Ferguson
-
Posts
51 -
Joined
-
Last visited
Content Type
Profiles
Forums
Articles
Gallery
Downloads
Events
Everything posted by Ferguson
-
New Style Kinyon Project / Drawing
Ferguson replied to ajclay's topic in Power Hammers, Treadle Hammers, Olivers
I have a few general questions. If you use a 2 inch cylinder, how large are the ports? Where can you buy cylinders with large ports? How much? I noticed that most 2 inch standard air cylinders have smallish ports, maybe 1/4 NPT. Sounds like cushions are a good idea for the cylinder, maybe even adjustable cushions. If you go with two limit switches, do you then buy a three position valve? I think that you can buy two position valves with two pilots and no spring, or three position valves with two pilots and a spring center return. The three position valves might have all ports blocked in the center position, is that an advantage? Why? Would that conserve air? If you only had a two position valve, what is the advantage of the two pilots with two switches vs. a single switch and a spring return? I can see that two limit switches provides a bit more flexibility. Having the limit switch position tied to the treadle in some way adds complexity, but some advantages as well. No matter what arrangement you use, you might still need to manually adjust the limit switch position if you wanted to use taller tooling, at least if you wanted full power with taller tooling. The advantage of the new Kinyon design is mostly lower height and fewer alignment problems with the cylinder, right? I know that the spring adds some "whip", but only if it is tuned correctly. If you want to understand how to "tune" the spring of the hammer, take a look at this article, addresses mechanically driven helve hammers but applies to this design as well, due to the spring. Hammer tuning Richard -
Hammer heads, Cracking, Cracking, and more Cracking
Ferguson replied to Ferguson's topic in Problem Solving
I made another hammer, number 8, using 3/4 inch square 1045 alloy, from the same bar that was cracking on me previously. I kept it away from the water, and let it air cool. I did not get any cracks, even after I quenched it in oil. My conclusion was that repeatedly cooling the bar in water caused the cracking on hammers 1 through 6. That does not say that there were no hidden defects in these bars, but it does indicate that by eliminating water cooling from the process I minimize cracking. I am not too worried about making these hammers as hard as possible, since I plan to use them on sheet metal. I still need to temper them; I plan to put them in an oven at 300F for an hour or two. Thanks to all for your comments and encouragement. Richard -
I have a question about quenching, or rather avoiding quenching. If I leave a piece out in the air, intending that it be annealed, what is the temperature below which I can put the work in water without affecting the metallurgy of the steel? I have been taking the work out of the forge, letting it air cool, waiting until the work is down to 300F, as measured by a non-contact thermometer. Once the work is warm, not hot, I drop the work in water to cool it so that I can sand it or drill it or perform other processes. My guess is that the real cutoff is maybe 400 or 500F. My goal is that the work be annealed, without me waiting for the work to get down to room temperature. I said annealing, but maybe I mean normalized. For purposes of this discussion, assume 1020, 1045, or 4130 steel. I do understand that 1020 steel is not going to harden like 1045. I wish I had paid more attention in Metallurgy class. ;-) Thanks. Richard
-
Hammer heads, Cracking, Cracking, and more Cracking
Ferguson replied to Ferguson's topic in Problem Solving
OK, I decided to test the "bad bar" hypothesis, so I started with a 3/4 inch square 4130 bar. I was very careful not to quench it in water, I just let it air cool down to 300F. No cracks were found, hallelujah! That does not prove that the 1045 bars were defective, as I was careful never to water quench it, and 4130 is a very different alloy than 1045. But it is certainly possible that I was working with bad 1045 bars. I don't have access to a dye penetrant system. So how should I heat treat it? I don't have an oil bath, don't even know what oil I should use if I wanted to set one up. Since my work is pretty small, hammer heads, punches, etc., I should be able to use a quart paint can or something like that. Should I use a gallon can in an attempt to reduce splatter? Would it be OK to quench it in water? Which cools the metal faster, oil or water? Obviously the hammer is pretty rough, but I am interested in function not appearance. If I can get a working process I can then work to improve the appearance on the next hammer. As an aside, I made a very crude set of tongs to grab the hammers, using 1/4 by 3/4 bar, and they seem to work. No way that the hammer will be able to slip out of those tongs, as I welded pins onto the jaws to engage the hammer hole. Richard -
Hammer heads, Cracking, Cracking, and more Cracking
Ferguson replied to Ferguson's topic in Problem Solving
I have cracks coming from two different bars of steel, 1/2 inch square and 3/4 inch square, so I don't think that it could be the steel. Richard -
Hammer heads, Cracking, Cracking, and more Cracking
Ferguson replied to Ferguson's topic in Problem Solving
The steel that I am trying to make hammers out of is 1045. I don't seem to be able to get my work beyond medium to high orange in color. I put it back in after three or four hammer hits, generally. I have some scrap steel that I leave in the forge to keep whatever I am working on off the bottom, and it gets to medium yellow, eventually. How long should I expect it to take for 3/4 inch square steel to come to temperature? I leave it in the forge for a minute or two, no more. In the middle of this process I upgraded my heating torch, from a Victor #2 oxy-acetylene cutting tip, to a Victor size 8 oxy-propane rosebud. The rosebud does not seem that much hotter than the cutting tip. I usually do close the back end of the forge, not sure that makes any difference. I have yet to try to heat treat any hammer, as I find cracks in every hammer before I get to that point. What else do you need to know? Maybe I should make a video showing my process...... I watched a video of Mark Aspery making a hammer, and was amazed at how long he left the piece out of the fire, at least triple the amount of time that I would leave it out. Richard -
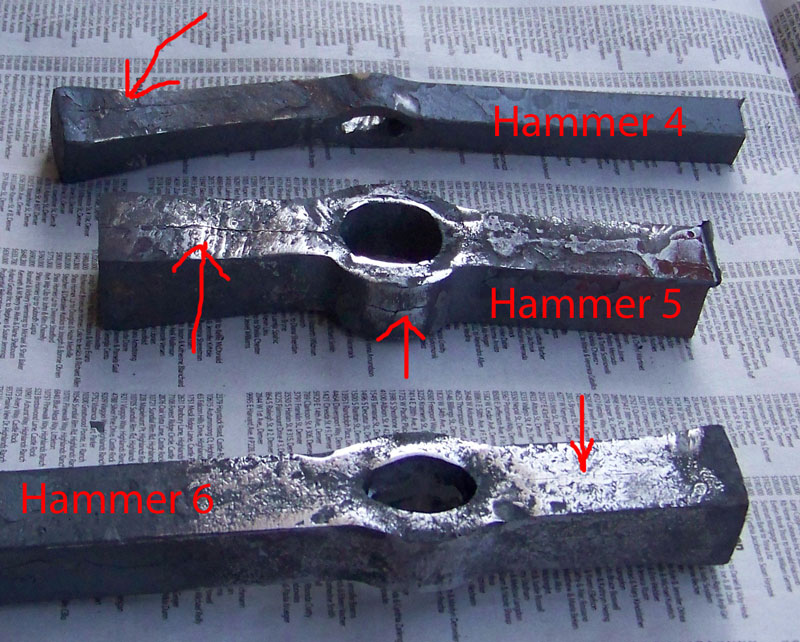
I am now 0 for 6 on hammers. Every hammer that I have made has cracked, some in more than one place. What causes cracking? Working material too cold? What color should the hammer be before I start to hammer on it? =============================== Home Made Hammers General note: The hammers are shown in reverse chronological order, so the newest hammers are at the top. I did not keep track of the number of heats. Suffice to say that it was many, partly because my forge will not get hot enough. My propane forge will not get hotter than orange, even after adding a second burner, and tuning the burners on the bench. So I am working with the forge that I have. Hammers 4, 5 and 6 Process for Hammer 4: I started with 8 inches of 1045 steel, 1/2 inch square. I used a oxy-acetylene torch to heat the end of the bar, and then beat it on a steel plate on the floor to upset it. I drilled two 1/8 inch holes, 3/4 inch apart, to facilitate slitting for the hammer hole. Then I used a hot chisel to make the slit between the two holes. Then I used a series of drifts to drift the hole bigger. I tried to be patient, leaving the hammer in the fire longer than last time, to get it as hot as possible, and only hitting the drift a couple of times before putting it back in the fire. I drifted it to 3/4 inch by 1/2 inch oval for the hammer handle. Then I cut the hammer from the bar. Results for Hammer 4: Inspection revealed a long crack, marked with an arrow, so I put it aside. Process for Hammer 5: I started with 6 inches of 1045 steel, 3/4 inch square. I used a oxy-acetylene torch to heat the end of the bar, and then beat it on a steel plate on the floor to upset it. I drilled two 1/8 inch holes, 3/4 inch apart, to facilitate slitting for the hammer hole. Then I used a hot chisel to make the slit between the two holes. Then I used a series of drifts to drift the hole bigger. I tried to be patient, leaving the hammer in the fire longer, to get it as hot as possible, and only hitting the drift a couple of times before putting it back in the fire. I drifted it to 7/8 inch by 5/8 inch oval for the hammer handle. Then I cut the hammer from the bar. Results for Hammer 5: Inspection revealed a long crack, marked with an arrow, as well as another crack around the hammer hole, so I put it aside. Process for Hammer 6: I started with 6 inches of 1045 steel, 3/4 inch square. I used a oxy-acetylene torch to heat the end of the bar, and then beat it on a steel plate on the floor to upset it. I drilled two 1/8 inch holes, 3/4 inch apart, to facilitate slitting for the hammer hole. Then I used a hot chisel to make the slit between the two holes. Then I used a drift to drift the hole bigger. I tried to be patient, leaving the hammer in the fire longer, to get it as hot as possible, and only hitting the drift a couple of times before putting it back in the fire. I stopped after the first drift to inspect the results. Then I cut the hammer from the bar. Results for Hammer 6: Inspection revealed a small crack, marked with an arrow, so I put it aside. Hammer #3 Process: I started with 6 inches of 1045 steel, 3/4 inch square, 0.9 pounds. I used a oxy-acetylene torch to heat the end of the bar, and then beat it on a steel plate on the floor to upset it. I drilled two 3/16 inch holes, 3/4 inch apart, to facilitate slitting for the hammer hole. Then I used a hot chisel to make the slit between the two holes. Then I used a series of drifts to drift the hole bigger. I tried to be patient, leaving the hammer in the fire longer than last time, to get it as hot as possible, and only hitting the drift a couple of times before putting it back in the fire. I drifted it to 7/8 inch by 3/4 inch oval for the hammer handle. Then I cut the hammer from the bar. I put the hammer in a vise, heated the end I had just cut with an oxy-acetylene torch, and hammered it to upset it. I rounded one end, as I intended to have one square end and one round end. Results: No cracks around the drifted hole, but cracks on both ends, apparently from the upsetting process. Note that the upsetting did not seem to cause cracks in hammer #2. Patience seems to have paid off in the drifting process on hammer #3, so I need to be similarly patient with the upsetting process, taking the time to get the ends very hot. I will try again. I purchased some 1/2 inch square 1045 steel, I may try that for my next hammer, make a lighter hammer. Smaller stock will heat up and cool down faster. I may also make some additional oval drifts in smaller sizes, perhaps 3/4 by 1/2 inch. Hammer #2 Process: I started with 8 inches of 1045 steel, 3/4 inch square, 1.2 pounds. I used a oxy-acetylene torch to heat the end of the bar, and then beat it on a steel plate on the floor to upset it. I drilled two 3/16 inch holes, 1 inch apart, to facilitate slitting for the hammer hole. Then I used a hot chisel to make the slit between the two holes. Then I used a series of drifts to drift the hole bigger. I drifted it to 7/8 inch by 3/4 inch oval for the hammer handle. However, the hole was larger than the drift, so I drifted it to 1 inch by 7/8 inch oval. Then I cut the hammer from the bar. I put the hammer in a vise, heated the end I had just cut with an oxy-acetylene torch, and hammered it to upset it. I rounded one end, as I intended to have one square end and one round end. Results: The upsetting went well, increasing the end from 3/4 inch to 15/16 inch, in three heats. The two 3/16 inch holes were apparently too far apart, so the hammer hole ended up bigger than I had intended. Unfortunately, there were cracks on both sides of the drifted area, perhaps resulting from letting the metal get cold during the drifting process. Overall, I think that I am getting closer to a process I can live with Next: Try again with 6 inches of 3/4 square, aim for a lighter hammer. Drill holes 3/4 inch apart. When drifting, limit the drift to three hits and then drive it out. Hammer #1 Process: I started with 8 inches of 1045 steel, 3/4 inch square, 1.2 pounds. I drilled two 3/16 inch holes, 3/4 inch apart, to facilitate slitting for the hammer hole. Then I worked on necking down the two ends, making the hammer longer. Then I used a hot chisel to make the slit between the two holes. Then I used a series of drifts to drift the hole bigger. I ultimately drifted it to 7/8 inch by 3/4 inch oval for the hammer handle. Results: Not good. Tapering the ends, using my toy power hammer, took a long time, and the result looked very rough. After I had finished, I heated part of the hammer, near the head, in order to straighten it. The long crack you see on the left was the result of a couple of light blows to straighten the head. Next: Try again, but do not taper the ends, just upset the ends to make the hammer head larger. I don't see a way to go forward at this point, kind of like I have run out of ideas. I may try to go visit a local expert blacksmith, and see how he makes a hammer. My home made forge may be part of the problem. I have spent a fair amount of money and effort trying to improve the forge, lining it with ITC-100, adding a second burner, trying different MIG tips, tuning the burners, without the forge getting any hotter. I don't have the cash at the moment to buy a commercial forge. Details from the link My home made hammers -------------------------------------------------------- Forge burners Burner Experiments When I added a second burner to my forge, I copied the dimensions of the first burner, but did not have the results that I wanted. The second burner did not work nearly as well as the first burner, either in the forge, or on the bench. These are both Reil type 3/4 inch pipe burners, using .023 inch tapered MIG tips. Note that I live at 5000 feet, so I need to use a smaller tip due to lower air density, to get the right fuel-air mixture. Previous experiments with the first burner persuaded me that the 0.023 inch tip was correct, the others ran too rich. After considerable head scratching, I decided to put both burners on the bench, and swap parts until I understood what was happening. After swapping parts, and more head scratching, I realized that both the burner flare and the jet tube mattered. Then I put the first burner back together, and checked how it was running, which was well. The second burner was still not doing well. I tried different stickout of the flare, and found that fairly critical. If I slid the flare back to where it was flush with the end of the pipe, which really meant no flare, I could not light it. If I moved the flare to where it was sticking 1.8 inches past the end of the pipe, that did not work well either. The correct number turned out to be around 1 inch. Note that the flare on the first burner, purchased a few years before, worked OK at 1.8 inches. Looking at the flares, I could see that the newer flare was a little different, a bit longer. How far the tip went into the bell adaptor also seemed to matter. If I stuck the tip too far into the bell adaptor, the flame would blow out at higher pressures. Finally I realized that if I pulled the tip out further, it would run correctly. The big surprise to me is how differently the two burners tuned up. Dimensions that worked on one burner did not work on the other burner. But I finally got both burners to work correctly. The photos below are of the second burner that was originally working poorly, after I finally got it tuned right. Burner at 2 psi Burner at 15 psi The first burner seemed to work better with a flare stickout of 1.4 inches than 1.8 inches, so that is where I left it. Note that in the beginning, the first burner tip stuck almost one inch deeper into the bell adaptor than the second burner. I later pulled out the tip, similar to the second burner. So don't just blindly copy dimensions, realize that you need to experiment to get the adjustments right. So the burners worked pretty well inside the forge, they both have a nice cone of flame, similar to what you see above in the photos. However, the forge does not seem to get much hotter than it was with one burner. I was hoping to get to white heat, but at orange-yellow. ----------------------------------- All Very frustrating, of course. Richard


-
I have been searching the forums, and picking up bits and pieces of information, but I have not been able to gather all the information that I would like. I believe that I could use a kitchen oven for tempering. Not sure about temperature or time. I have a couple of ways to check the oven temperature. However, a kitchen oven is not a precision instrument, and the fact that it is a gas oven means that the temperature control is less accurate, as I understand it. What I have read suggests that temperatures in the 300-500F range would work, but how long? My assumption is that for chisels and drifts, I should quench the tip, but not the rest of the tool. Does that rule apply for raising hammers as well? I have been using water for quenching, not oil, so I assume that I will not have nasty odors in the kitchen. Still may be something that I should do when my wife is out. I learned to temper by color, but I am wondering if oven tempering would not be more accurate. I am asking about 4130 and 1045 alloys. On a related question, what should I do with my H13 or 4130 drifts and hot chisels? They certainly get pretty hot, so I assume that I have long since lost whatever heat treating might have been done. The H13 holds up pretty well hot, the 4130 drifts not so well. Are they even worth heat treating? If so, how? Thanks, Richard
-
I visited the best hardware store that I know of, about 15 minutes from my house. They have a large fastener selection. We were unable to find a compatible nut. The pitch is 24 threads per inch; that is what I measured, and they confirmed it. We tried metric sizes, as well as #12-24. Nothing fit. I measured the OD of the threads with a digital caliper, and came up with 0.230 inches, a little less than 1/4 inch. The manager of the fastener department said that it had to be a special thread, and I am inclined to agree with him. He said that anything 1/4-24 was probably pre world war II, but that the railroads still used it because they have some lights that were made that way. I may order a special tap, size 1/4-24, knowing that it will be a little large. It may not work too well, but maybe better than the 1/4-20 that I tapped the hole for the first time. (For quarter inch, the standard threads are UNF 1/4-28, and UNC 1/4-20.) Richard
-
What is interesting to me is the physics would tend to equalize flow out of the bottles. That is, as you draw out of one bottle, it cools down, and the pressure in the bottle goes down. If the other bottle had little flow, its temperature and pressure would remain the same, so it would have higher pressure, so most of the flow would then come from that bottle. To put it another way, the tendency would be for the temperature (pressure) of the two bottles to equalize. If one bottle started out more full than the other, it would remain that way. There may be something wrong with the one bottle or the manifold, preventing that bottle from delivering the high flows needed for a forge. The bottle might still work in a lower flow application. One thing to remember is that there are safety features in bottles and regulators to shut off flow when it senses very high flows. Perhaps that safety feature got tripped in the bottle which did not empty. One way to reduce the risk of tripping that feature is to open the tank valve slowly, and then later turn on the flow to the forge. I have been caught by this more than once, generally when I am in a hurry and open the tank valve quickly. The safety will reset if you close the valve for a time, and then reopen it slowly. When this feature is tripped, the flow is almost cut off, but enough flow remains to allow pressure to equalize and for the safety to reset. A simple experiment would be to shut off the tank that is almost empty, and see if the other tank will deliver enough propane for your forge to operate correctly. I found this little item on the web, which might also apply. Q: Roofers and other commercial customers are trying to use OPD equipped tanks on torch applications and they are not getting an adequate flow through the valve. What can we do about this? A: Some of the early OPD valves had an insufficient flow capacity for certain types of service such as high pressure torch applications. Market competition has resulted in OPD's becoming available that have significantly greater rates of flow. Richard
-
I went out and found my thread gauge, and it appeared to be 24 threads per inch, not the standard coarse thread, 1/4 - 20, or fine, 1/4 - 28. I will try to find a 1/4 - 24 tap. But when I looked in my Enco catalog, that was a 'special', $12 each, I doubt my local store has one. Maybe it is 12-24. If that does not work, it must be metric. Thanks. Richard
-
I went out and found my thread gauge, and it appeared to be 24 threads per inch, not the standard coarse thread, 1/4 - 20, or fine, 1/4 - 28. I will try to find a 1/4 - 24 tap. If that does not work, it must be metric. Thanks. Richard
-
Do you know what the threads are on those MIG tips? I should have known they were metric. I just screwed them in to snug, knowing that the threads were wrong. I just ordered ITC-100, that should help. I also spoke to Chile Forge, they mentioned that for customers at higher elevations, they recommend their two burner forge, not their one burner forge. This makes some sense to me. Richard
-
No, I am not offended. I never claimed to be very knowledgeable about blacksmithing. My work is in metal, but my expertise is more in sheet metal, especially copper. If you want to see my work, http://www.fergusonscupture.com Yes, I have taken a blacksmithing class, and attended a couple of blacksmithing conferences, but blacksmithing is not something I do every week or even every month. There are no shortage of those who say that building a forge is not that big a deal. I hear people talk about getting a white heat from a propane forge. I have never even gotten close to that with this forge. From my standpoint, I was just disappointed that after reading everything that I could find, then following all the recommendations, experimenting with the burner in free air and tuning it there, my forge did not seem to get much hotter. I have spent a day or two working on the forge in the last week or so, so it is not for lack of effort. It does run better at low propane pressure, so that is an improvement. My blacksmithing friends tell me that I am close, but from my standpoint, I am running low on ideas. I do plan to try smaller MIG tips, probably .030 and .025, maybe that will help. It is unclear to me if my 5800 ft elevation is part of the problem, my guess is that it plays a role. I am sure that a store bought forge would work better. I need a forge that I can pick up and put on the shelf when I am not using it. I am usually pretty good at figuring things out. I can wear my artist hat or my mechanical engineering hat, usually one or the other will give me what I need. I tend to prefer to build my own tools anyway. But I also know that commercial tools generally work better. I think that if the ITC-100 and the smaller MIG tips do not help, I will rebuild the forge to include two Reil burners, or perhaps one larger burner. So for those readers thinking about building their own forge, perhaps this thread will give you some idea of the downsides of doing that. You might be better off buying a propane forge for $500 or so, presumably getting good results out of the box. It is on my list to visit one of the local gurus and see how he would slit and drift a hammer, that might also help
-
Lots of good comments, let me try to address them. The floor is refractory, but buried in the refractory is lightweight fire brick, for better insulation. I really don't want to rip the refractory out, I don't have any to replace it. The firebricks at the end are the soft lightweight type, so not a big thermal mass. I ran the forge for a long time today at high pressure, so I think that the thermal mass had plenty of time to heat up. I have heard people talk about ITC-100, but I have never seen it, where can I get it? I understand that it is kind of a slurry that I would brush on. I have heard the claim that it increases efficiency 30%, that sounds like a lot. I think that I set the end of the burner flush with the kaowool. I have the stainless nozzle on it, so I suspect that I could stick it into the chamber a bit further and get away with it. I can try closing the forge up more with firebricks. I am thinking that the mixture may be too rich, which might explain the loose and poorly defined flame front. I would have to cut back to .030 or .025, but would have to special order the 14T tips, like I did the .035 tips. Thanks, Richard
-
Right, using the 14T 0.035 tip. I see what you mean, the large brass cap could be disrupting airflow, although the cap is back an inch or so from the end of the tip, and well into the wide part of the bell adaptor. Let me think about that one. I am not sure that this is the "smoking gun" that would explain my problems, however. I do use firebrick front and back, although I am not sure how much I should close them off. I have to have enough of an opening to let the air out without creating too much back pressure. I wonder if at my elevation, 5800 feet, 263 cubic inches is too much for a single Reil burner. Richard
-
I have been struggling with slitting and drifting, and the consensus is that I need to get the steel hotter. So I went back and very carefully tuned my Reil burner, using the recommended Tweco 14T tip. The most I can get out of it is orange color, not even yellow. I went ahead and set up a web page with more information and photos, so take a look. My forge Suggestions would be appreciated. Richard
-
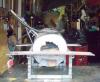
Building a air hammer....
Ferguson replied to monstermetal's topic in Power Hammers, Treadle Hammers, Olivers
The topic of using an air hammer as a single blow hammer is one that I have been thinking about quite a bit. I don’t have room for both a treadle hammer and an air hammer. I would like to propose a solution which would be 100% controllable. There are two key elements to my plan: An industrial timer and an electrically controlled air valve. Most Kinyon hammers use a single air microswitch, which drives the main air valve, moving the head up and down. They usually also have a ball valve, to restrict airflow and control how hard it hits. If you design a “standard” Kinyon hammer, you can add the industrial timer and an electrically controlled air valve. You might also need a valve to bypass the ball valve used to control air flow. The standard Kinyon controls would be installed in parallel with the electric controls, so one could use the hammer as a conventional Kinyon, or for precise single hits. You hook up an electric foot pedal to the industrial timer. When you push the pedal, the timer turns the valve on for an exact time. That time will limit how hard it will hit. You could also control the hit by using a large (high flow) pressure regulator on the input. It might be best to plan for both the timer/valve and the pressure regulator; between the two one should be able to program any hit force desired, and have it more or less completely repeatable, since a digital industrial timer is very accurate. A good pressure regulator is also repeatable, given a decent gauge. The pressure regulator could be useful for ordinary power hammer use, when you need light hits. The timer/valve combo is what makes it a repeatable single-hit hammer. I have seen someone use a treadle hammer for repousse work, using a foot pedal connected to an air cylinder. He installed a stop to prevent crushing his hand. Such a stop could be added to a hammer of this type, such that one could use the air hammer for that purpose as well, again using the timer/valve combo. With the timer/valve combo, the stop might not be necessary, as the head might reverse before bottoming out and crushing your hand; of course a mechanical stop would be an additional safety factor You were asking about running this on a small compressor. That should be no problem for single hits, as the compressor tank will store enough air for a single hit, if not enough to run it continuously for 30 seconds. You might need large hoses to get adequate airflow. The concept is one hammer which can be used as a conventional air hammer, a treadle hammer, or a programmable single hit hammer. If anybody is interested in pursuing this approach I could help you pick out a suitable timer and electric valve; with an industrial timer, the wiring is pretty trivial, the brains are in the timer. Richard