

reefera4m
-
Posts
146 -
Joined
-
Last visited
Content Type
Profiles
Forums
Articles
Gallery
Downloads
Events
Posts posted by reefera4m
-
-
WOW! I'd be VERY Careful with some of these suggestions. A coal forge with a blower puts out a LOT of heat, especially when using the blower. While I only use my coal forge outside, I do have a wood stove in my shop. Wood stoves run cooler than coal stoves and yet the building code require at least a double-walled insulated chimney pipe (sometimes triple) where ever the pipe passes through ceilings, walls or roofs. Below the ceiling you can use single wall - it radiates the heat back into the room but there is a requirement for a 'thimble' a pass-through piece at the ceiling. Not following the code will invalidate your insurance, put you and your shop at risk and may cost a lot more in the long run.
Double wall chimmney pipe is Expensive! The best place to find it is Craigslist. You can save 50% or more if you're lucky or persistent. I saved more than 50%!
Also, I would recommend two things when building your chimney; 1) minimum 8" diameter pipe and 2) the chimney extend a minimum of 4' above the highest point of the roof (or what the code calls for, whichever is greater). The taller the chimney the better it will draw - 12' being the shortest recommended. My shop has a 9' ceiling, then a 7' loft. I used single wall to the ceiling and 12 feet of insulated doublewall chimney pipe through the ceiling, loft and roof. It draws great - no smoke at all in the shop - ever! And no worries about starting the ceiling or roof on fire. However, if you were to touch the single wall chimney pipe you'd get 3rd degree burns in a heartbeat!
Also, you need to keep the forge at least 36" away from any combustible wall (sheetrock is combustible, therefore 36" clearance minimum) -
OK. two questions that prove my ignorance. 1. how do you suggest heating the cement, and 2 what is ITC-100
thanks again for the info and advice. I'm probably going to go get the wool on Monday, but i was wondering, if i did use nothing but the cement, and just applied it in thin layers, would that work or would it just crack and fall apart. i am going to use the wool but now I'm just curious. I'm just not curious enough to go through all the labor of doing it just to see that it in fact doesn't work. i was also wondering about sandpaper. i can't find anything over 220 grit around here and i actually wanted to take it up to 3000 grit like one bladesmith i use to know. is there a good, inexpensive website where i could order it?
To 'dry' the cement I used a heat gun on low (the Wagner brand made for stripping paint). Others use hair dryers. Just go 'low and slow'. ITC-100 is a refractory clay (comes in 1/2 pints) that needs to be quite thin to apply (thinned with plain water). The manufacturer recommends applying with a sprayer but I don't know anyone that does - most, me included, use a small paint brush. ITC-100 reflects heat back into the interior of the forge, helping to increase heat/reduce the time to get to temperature. Using an ITC-100 coating will increase the lifespan of the ceramic wool considerably. This also helps keep the heat from migrating to the forge body - something you'll find important.
I believe John N is correct, cement alone won't provide the insulation you'll need to get and keep the forge hot enough. The 3000 degree temperature rating for the cement is the temp that the cement will withstand without burning up - not the 'insulation' value. It would work to a certain degree but I think you'd need at least a 2"-3" thick coating.
If you want sandpaper of finer grit try your local auto supply store (O'Reillys/Schucks) carries up to 1000 grit. Specialty autobody stores carry the finer grits. After 1000 grit you're better off using a polishing compound. However, after doing one at 1000 grit, I think you find that a 400 grit finish works better :P -
inuroku842
There is a .pdf file availabe on the internet - Basic Blacksmithing - An Introduction to Tool Making with Locally Available Materials - by David Harries and Bernhard Heer that is an outstanding primer for just what your looking for. In fact, starting on page 91, it explains, in detail, how to forge a knife from leaf spring steel, including the point. I would attach it here but it is almost 4MB.
Just Google 'Basic Blacksmithing', it will be the first or second hit!
I can't recommend it highly enough. -
i was going to normalize the blade several times. but the heat treating process i was going to use was going to be a bit different. i was intending to clay "temper" it. this is why the spine is curved. because according to all the studying that i have done the clay "tempering" process will make the spine curve up and if you want a straight spine you need to give it a downward curve before you heat and quench it. Thanks for your help. I do know that the wool would insulate it better, and other than the welder i am buying next week and the wool i have all the parts for my forge. i was just wondering if it was possible to use just the cement. What i have is Hercules regular body high heat furnace cement. on the back it says it's acid resistant so i hope that it at least takes a while for my flux to eat through it. I was thinking about giving it a three inch lining and using this extremely small forge, (small coffee can design) until i can get the parts to build a permanent propane forge in whatever shop i can find to use in my area. again thanks for the help and please keep the advice and the opinions on the knife so far coming. i really appreciate all the input.
Newbladesmith,
Funny you should be using the Hercules brand of furnace cement - that's exactly what I used to cover my ceramic wool. My experience, and others I've read about elsewhere, is that doesn't hold up well when applied in thick layers. This is especially true if you don't dry it slowly using very low heat. What you'll find will happen is that the first time high heat is used any residual moisture left inside the cement will turn to steam and crack it all to pieces. That happed to me the first time I tried it. I ended up thinning the cement with a little water and applying several thin layers, drying each layer thoroughly before applying the next one. The more layers I applied the fewer cracks occured and what cracks did occur I filled in with more cement. Eventually I was able to get a crack free surface. Applying a couple layers of ITC-100 on top of the cement seems to help it stay that way. -
What newbladesmith said merits some serious consideration. Looking back at your initial statement, you said you were not a beginner in metal work so this should help with forging. While it is somewhat of an 'art' it is one that you can master with a little work. Remember, even after forging, almost all knife makers have to do some grinding and filing on the blades. Your hammer work doesn't have to be perfect, just be sure to leave enough steel in place to grind
 . If you follow good heat treating methods - annealing, normalizing, hardening/quenching and tempering, you can compensate for less than perfect hammer work.
Still hammering steel on an anvil, like welding, takes some practice. It is certainly easier to learn on a lower carbon steel (like a railroad spike). Then again, leaf spring steel (or coil spring) is very common, ususally easy to find and relatively inexpensive - and it makes a darn good knife blade. -
here are a couple of my frist knifes
Looks like a fine start to me.
Tell us more about your knives, type of steel, how you made the blades (forged like the first one? or stock removal), how you heat treated them, etc. -
I use Loctite Professional Heavy Duty epoxy as well - just not on knife handles.
It's just a question of performance vs cost. Loctite PHD epoxy has a strength of 1500-2500 psi bond strenght vs 3000 - 6000 psi for the Hysol 'E' series epoxies. If you look further, the Hysol 'E' series are formulated to bond metal to wood, plastics, etc., while the brands available through your local hardware are not. -
Mainly, Bob, prankow,
Great tips. I've been using a small telescoping magnet but the ceramic magnet hanging from a thin wire sounds more convenient! The Tempil sticks is another great tip and the idea of using three to help understand the range of temps additionally useful.
I think I'll try the Tempil sticks on several pieces of scrap to help with visually estimating the temps base on steel color for general forge work. I also think I'll use Tempil sticks on the more critical hardening temps. -
Well the blade flexed about 30 to 40 degrees or so, I didn't temper the back portion of the blade to a blue color which would have made it flex more, because this was mostly for me to test the cutting edge. I did temper the blade to a light straw just to test the cutting edge and it seemed to do pretty well. Also the camera might make the color appear just a little different then it actually was because of the lighting, but I was curious, how you can tell if the grain is too hard?
Loctite makes some outstanding epoxies for attaching knife handles of wood, bone, antler and man-made materials. Not the epoxy you find at Home Depot, Lowes or your local hardware store but their 'aerospace epoxy' - the 'E' series - about $16 for the 50ml dual syringe. I like E20HP, the 'E' standing for the type of epoxy, '20' setup time, and the last to letter are either the color ('C' = clear, 'W' = white, etc., or 'HP' High Performance'). They range from E05 to E120. E20HP is rated at 3000 lbs - 5000 lbs adhesive strenght, 300 degrees temp, chemical and solvent resistant. It is considered 'off-white' but virtually disappeared when I used it to attach antler slabs to my handle. My personal test was to try and remove a piece of elk antler I epoxied to a piece of steen. I used a 22 oz ball peen hammer and only succeded in breaking of bits and pieces of the antler - I could not seperate it from the steel. My personal test shows that it is also 'dishwasher' safe
Note, a very useful tip I came across was to sandblast the tang which gives the epoxy a much better surface to adhere to than just grinding or sanding. I used a simple and inexpensive ($13 - $16) siphon sandblaster and got excellent results.
The best place to find it was at Fastenal, they seem to have outlets everywhere and if they don't stock it can get it in a day or two. They also have the best descriptions of the various epoxies. -
Hello everybody, my name is Alexander Hurtoi from Romania.
For about a year I keep thinking that I want to forge a knife. I have worked with metal before (welding, stamping, filing, etc..), i can say that i am not a beginner in metalworking but not as skilled blacksmith (it is an art too fine for me).
If you can help me with some advice: what materials to use (leaf spring?), hardening techniques, etc.
I understand that I can do a knife made of leaf spring, please give me some links from which I could learn how to make a knife of this material.
Thank you in advance.
WELCOME Hurtoi!
Like you, I thought about making a knife for a long time before I decided try my hand at it. I think I've been fairly successful for a beginner. The couple of knives I've made have turned out well - particularly given the tools I had to work with.
I documented both the buildng of a propane forge and making a knife using leaf spring steel. I've had both documents reviewed by several bladesmiths and they've verified that the my processes are good.
I've posted some of the information here but I'm also attaching the documents for you to use.
Good Luck! -
Welcome newbladesmith!
Nice design and a good start. A couple of thoughts. By tempering i hope you mean the whole heat treating cycle, i.e. 'normalizing', 'hardening/quenching' and finally 'tempering'. Tempering is meant to 'relax' and take away some of the brittleness that might have been created during the hardening/quenching cycle. Tempering alone will just leave you with a soft blade.
I wouldn't use refractory cement alone. A 1" layer of ceramic wool will provide a LOT more insulation that a 1" layer of refractory cement. However, coating the ceramic wool with several thin layers of refractory cement has a number of benefits; 1) prevents the ceramic wool fibers from getting into the air (and your lungs), 2) protects the ceramic wool from damage, 3) provides a base for later layers of ITC-100 (a lining clay that reflects heat back into the forge increasing the maximum temperature possible and reducing the time to reach temp.
I've attached a MS Word document that provides a list of materials/tools, photos, illustrations and instructions on how to build a small propane forge for between $20 - $40. I've also attached a document on basic heat treating.
Keep asking questions, there is lot's of great information here.
My link -
--------------------------------------------------------------------------------
I'm interested to know how fine a finish would be best on blades prior to heat treating, i.e. hardening/quenching and tempering. My approach to date has been to polish the blade to 220/320 grit. My rational is that 1) it is easier to work the softer steel and 2) removing any deeper scratches/grind marks reduces the possibily of cracks or fractures along them.
I haven't seen any negative consequences from this finish but wonder if there could be. -
I got tired of trying to swage big stock with spring swages and the one guillotine tool I had was to small so I b uilt this one from all 1/2" stock..The only dies I have in it right now are mild but hardened in super quench..I have some 1045 for my next swage dies laying around..The striking button on top is 1045..Its setting on a 200# fisher. Sorry about the pic quaility, Ive never had pics turn out fuzzy like that before
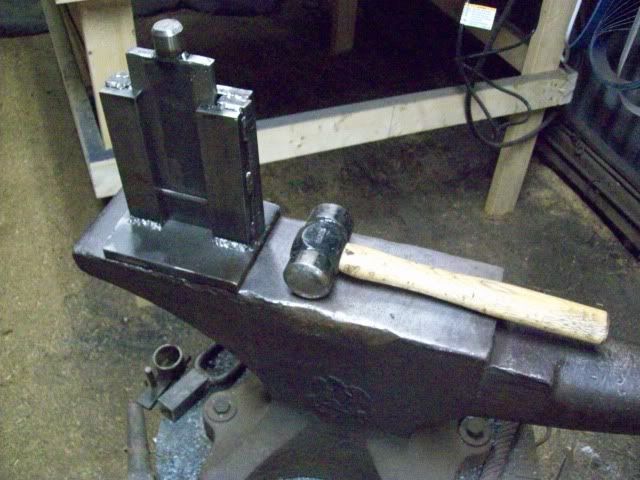

Very nice! Hope you don't mind if I 'borrow' your design.
By the way, that is an interesting hammer in your photo. I found one just like it along a local highway a few months ago. The one I found is made by Estwing and has their steel handle with blue cushion grip). I looked for quite a while to find a name for this style and eventually found it on the Estwing website under 'Specialty Hammers', it's called a 'Linemans's hammer'. I wonder what it's intended purpose is. I use mine for finish forging. The head is very hard and has a very smooth, almost flat surface, only the edges are eased. Too light for the heavier work bus does a nice job flattening and finishing. -
I'd like to make a spring fuller and guilotine fuller to aid in my knife making. Does anyone have any pics, plans, material list or just advice they care to share? How long, wide, thick, etc.
I have some 5160 spring steel but I wonder if it would be too hard to repeatedly hammer on top of my anvil .
For the the guilotine, specifically what steel is recommended for the anvil/blade? -
I appreciate good quality tools; especially hand tools. For wrenches, its Craftsman, Snap-on, Matco(insert favorite top-end brand) Hands down. That being said, besides my 4" Makita, I own 3 HF angle grinders. I have two 4" and one 9". I don't use the 9" as much as any of the 4"ers so Its still in great shape. I do how ever, use the 4" ones extensively. The Makita, I have had for maybe 10 years and the plastic switch bar has been worn out for about 5 years. It works but I have the internal toggle switch black taped to the outside so I can turn it on and off. The two HFs I used the most;one I keep a cut-off wheel mounted and the other usually a flap disc. One has had the cord near cut in two and repaired and the other drop a good distance and broke the plastic housing from the metal frame. Duct tape holds that one together and both still work fine after 3 or 4 years abuse. When one quits working, if I have the extra cash, I may pop for a dewalt/makita/milwakee or such but if HF has one on sale for $14 again at that time, I'll probably pick up another. Besides, you just cant have too many tools...can you?
Dodge, I noticed this old thread and thought I'd pass this along. I too own a 4" Makita that after 15-20 years the plastice switch bar wore out. I went to my absolutelyy favorite parts place ereplacementparts and they had a new part in my hands in just a couple of days. I had a little difficulty getting the Makita angle grinder apart so I called Makita, they walked me through the procedure in about two minutes. That was a couple of years ago and it is still working. -
this is my first attempt at badesmithing. the stock is a recycled old file and the handle is aged cherry with brass rivets. any tips about what i might do to improve my knives would be great. thanks for looking. cheers
jason
Looks good to me! However, if you provide some more information about the process and/or materials (glues, etc.), we might be able to help.
For example, most hardware store epoxies from Home Depot, Lowes, etc, won't hold the wood/steel bond very well.
Also, how did you heat treat the file after forging, grinding, etc.
There are lots of folks here that can help and will be more that happy to. -
I am just starting out as a bladesmith and i would like to know how to make a Ka-Bar knife, I'm open to any suggestions/methods
The Ka-Bar's I'm familiar with from my Marine days were fairly heavy knives with a fairly thick spine, about a 10" blade, full tang with pressed leather disks for handle material. The blade was not made of very high carbon steel, probably to make it easy to sharpen in the field (or maybe to save $$). Probably just a little more carbon content that mild steet. The butt of the handle served a dual purpose as a hammer (hammering tent stakes). The finish was non-reflective black. You can Google/images to find thousands of examples -
Unless you have a pyrometer or other type temperature guage capable of accurately registering temperatures up to 2800 degrees F, I would recommend a MAGNET! Most forging on blades is done around a temp known as 'critical', where the steel will not attract a magnet. Some people forge hotter, some cooler, but ususally not by much. Also heat treating - normalizing and hardening are done - at 'critical/non-magnetic' temperature (soak times vary). Trying to distinguish colors without a fair amount of experience can be a challenge and what is 'bright red' to one person may look 'orange' to another. The lighting, or lack of lighting, around the forge can also affect color perception, but magnet never lie!
-
I have a diamondback two burner model forge. I have a couple of cracks in the top piece of insboard. I was wanting to patch them and am wondering what would be best to use? Im also thinking of coating the whole inside (insboard and inswool) while Im at it. What do you recommend? Satanite? ITC-100? Thanks
I expect the manufacturer will have the best answer but here is an option. Use furnace cement (several brands out there - I use Hercules). It costs about $12/half gallon and withstands heat to 3000 Degrees F. Don't use Satanite or ITC100 to patch a hole or crack. They work better on top of refractory cement or furnace cement. I coated my ceramic wool with several layers of furnace cement for strenght and then a couple of layers of ITC100 for reflectivity. It's easy to fill in cracks with furnace cement and as long as you have ceramic wool or insboard (relatively soft) you'll occasionally get cracks or chips. Treat is as continuing maintenance. -
Thanks for the kind words.
Got14U,
I only slightly peened the brass pins but even that probably wasn't necessary. When I assembled the handle I epoxied the antler slabs and then coated the pins with epoxy as well and put the in place and clamped the antler to the handle. After the epoxy cured (24 hours to be safe), I cut the pins almost flush with a diamond wheel on my Dremel tool. I took a very small peening punch and, with a small flat punch on the backside, just gave the brass pins a couple of taps.
The epoxy I used, Loctite E20HP, is MORE that sufficient without peening the pins. On a test piece of 5160 steel that I'd prepared just like the tang (sandblasted and wiped down with denatured alcohol), I epoxied on a piece of the same antler. After 24 hours I tried to beat it off with a 22 oz ball peen hammer and was only able to break the antler off in pieces. None of the antler came off of the tang where it was epoxied. -
Pros and cons aside, a well made RR Spike knife is a great way to learn, can look quite good, and will , if well made and well sharpened, cut your arm of in a NEW YORK second! :)
-
Pros and cons aside, a well made RR Spike knife is a great way to learn, can look quite good, and will , if well made and well sharpened, cut your arm of in a NEW YORK second! :)
-
Chris,
A great idea for every bladesmith forum and something I struggled with for some time. And then I found the ULTIMATE dictionary for Bladesmiths/Knifemakers. Over 115 blade/knife terms defined,with PICTURES, by far the best I've ever seen. If it ain't here you, don't need it!
Go here:
Jay Fisher's Knife Anatomy -
Oh Yeah! Heck of a JOB!


Which blower to buy
in Bellows, Blowers
Posted
IMHO Grainger is a PITA to work with - period! And you only need a blower that will provide 100 - 200 CFM.
Try these guys Burden Surplus Sales Center. I know of several blacksmith/bladesmiths that have purchased blowers there are were glad they did.