Brasilikilt
Members
-
Joined
-
Last visited
-
Hey there! I did actually line the forge with a single layer of insulation from the pottery supply shop, and covered it with a thick coating of high heat furnace cement from Lowes. In retrospect, it probably was not the best choice (even though it's rated up to 3,000F) because after running the forge for a while, I noticed the cement starting to melt where the flame hits the bottom! http://www.lowes.com/pd_15879-138-35515_0__?productId=3572462 I measured the inside of my forge, and the chamber is 3X7", which calculates out to 49.49" cubic inches. I got the instructions from this site: http://www.zoellerforge.com/sidearm.html It says that the mini side-arm burner works great with smaller forges of around 60" cu/in....Mine is not far off. I think you guys are guessing correctly, and that the lining of my forge is to blame. I just noticed on the same website, they mention using 2" of insulating wool in their coffee can forge, when I used only one. They're also using a *micro* side arm burner, for which I did not see the plans, or parts list on the site.... I'm guessing they scaled it down from 1/2" to a 3/8" tube and reducing tee? Thanks for chiming in fellas!
-
Hello everyone A few months ago I built a little coffee can forge and mini side-arm burner. After having used it several times, I am wondering what it is I could have done better, and learn anything I can in regards to optimizing it's performance. Here is a short video showing it running around 15-20 p.s.i (I think) http://s21.photobucket.com/user/Brasilikilt/media/11739874_10204234029952802_437786060_n_zps2ecbwy7p.mp4.html With all the orange flames shooting out, my first thought is that the burner is too large for the forge, and/or my gas pressure is up too high. I still get the dragons breath when lowering the gas pressures below 10 p.s.i, (which was the expected operating range of this forge) but it seems to take *forever* to get anything up to forging temperatures.....I never expected this forge to get to yellow welding temperatures, but it doesn't seem to be getting as hot as it should. It seems to make it only into the lower orange temps, even when the opposite opening is blocked off. I know that my limited experience using gas forges, and the fact that I hadn't forged anything for a long time are certainly factors to be considered. Here are a couple more pictures which may be helpful. As always, any thoughts or comments are greatly appreciated Thanks, and take care BK
-
Hey Daniel, thanks so much for chiming in with your suggestions! To answer your questions.: I was testing the burner outside the forge and didn't have the tip assembly fixed in any set position---to allow me to slide it in and out while observing what the placement did to the flame.....So far the results sound similar to what you describe-a rather weak, puny jet flame at 30+ psi. Usually when the tip is near-ish to the middle of the air intake hole. I also stuck a magnet over the intake and tried choking off the air supply to varying degrees, which didn't help matters much. I applied a coat of this stuff over a 1" layer of insulation: http://www.lowes.com/pd_15879-138-35515_0__?productId=3572462 just a few hours ago, and am building up the wall thickness in layers, so it'll be a little while until it's dry enough to test and tune the burner. I haven't seen or heard of anyone using this stuff to line forges. According to the label, this stuff is rated up to 3,000 and 'suitable for use in burn chambers', so it should work fine, but we'll see.... In the meantime I'll check the solder joint holding the welding tip onto the 1/8" pipe... Perhaps it's leaking. I'll also drill and tap holes for the set screws instead of the makeshift copper collet I was using before. The black pipe union (connector?) you're using, did you grind or forge it into a flare or use it as is? 1/2" to a larger pipe, (bell reducer?) or same diameter? I happened to have some mild steel tubing with a 15/16" ID which I hammered into a flare, that at least looked pretty close to those I've seen others build. I'll see what I can do to refine it into a true 1in12" taper. Failing that, I'll get a pipe union or try the dozen donut technique and stop by a local machine shop with a piece of stainless pipe in hand and see what happens...... Thanks again Daniel...I'll keep you in the loop.
-
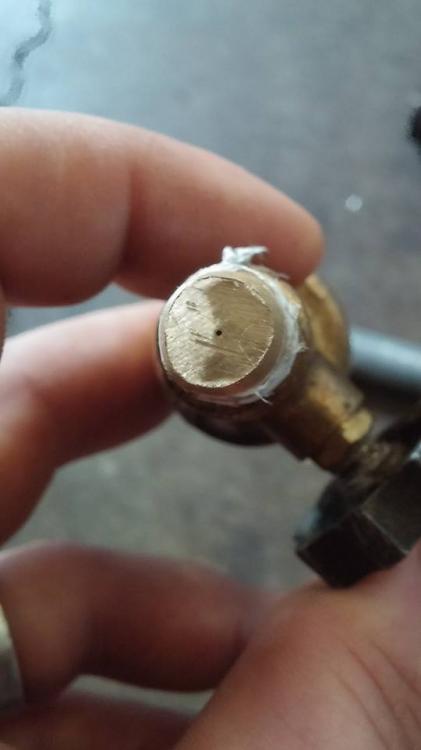
Hey all! With the recent acquisition of a propane regulator, I have been able to broaden my options in terms of what burners I am able to build. I liked the simplicity and size of the Zoeller mini side arm burner, and picked up the parts to build it yesterday. http://www.zoellerforge.com/miniburner.pdf The only problem is that after assembly, my initial tests produce mediocre results....Just a very weak flame and nothing like the mini jet engines I see others using First off, the plumbing supply house only had the 1"X3/4"x1" reducing tee. I had seen other smiths building this same burner use a bushing to reduce the 3/4" down to 1/2". At the time, I saw no problem in doing the same.....I'm kinda wondering now. The .023 mig tips I got were Tweco, not Miller, and slightly smaller than the ID of the 1/8" pipe nipple. I simply soldered the mig tip into the pipe. After it cooled, it was slightly cocked over to one side, so I chucked it up in my drill and spun it against my vise to true it up. There was a casting void in the 1" pipe plug which threw the hole off center by a smidge, but should center up properly with set screws. The flare was done rather quickly out of regular carbon steel, not stainless.... Could the angle of the flare be to blame? I will be the first to admit that I have only been experimenting with burners for a couple weeks, and am slowly learning the process as I put them together. I'm pretty sure I have followed the instructions detailed on the website rather closely, but due to my inexperience I have a feeling that I am missing something pretty obvious.
-
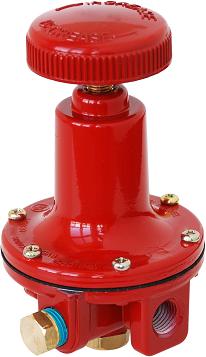
I put the word out, and was able to get one of these 0-60 psi regulators. It seems to work OK, and is able to cut the gas off completely, or flow with enough pressure to blow the flame out. I'm guessing that's what it's supposed to do....Right? After hooking it up to my burner, the flame isn't as good as it was when connected through the torch valve.... Any idea why that might be? Also, I need to complete the body of the forge itself by coating the insulating wool with the appropriate clay or cement. Testing the forge out right now blows a lot of particles in the air (which according to the mfr. are broken down harmlessly by bodily fluids) I still don't want to risk inhaling it! After calling a fair amount of suppliers in my area and only finding 55lb sacks of refractory for sale, I ordered a tub of this stuff http://www.lowes.com/ProductDisplay?langId=-1&storeId=10151&catalogId=10051&productId=3572462&cId=detail It's rated up to 3,000 deg. and should be enough to do the trick...for a while at least. For $13.00 with free shipping it was an attractive option, as I'm sure it will do a lot better than plaster of Paris cut with sand!

-
Hello everyone.....Your explanations are most appreciated, thank you for taking the time to type them out for me! TimGunn Are you anywhere near Baccup/Haslingden by any chance? What started out as a very small forge heated by a plumber's torch has evolved into something a bit bigger. All I set out to do with this project was to come up with something to work temporarily, while learning and familiarizing myself with the basics of gas forges while hopefully improving my equipment as knowledge and money allows. I always knew the need to acquire a regulator. The guys at my neighborhood used tool and pawn shops have an interest in my blacksmithing projects and have offered to keep an eye open for me. Also, the beginning of garage sale season upon us, and I seriously doubt it will be long before I acquire one. My 20# propane tank was purchased off of Craigslist with the adapter hose for $30.... Not a smoking good deal, but not terrible considering that the tank and hose are near new. Are the burner pics coming through okay? Thanks again for your comments everyone!


-
#1 After researching different burner types, the main thing preventing me from building those is that they all require an f-ing regulator! That's all fine and dandy if you already have all that at hand, but I don't, and am mostly forced to work with what I have available to me....Which is time, a #20 propane tank and a box of brass pipe/torch fittings. A little constructive criticism would have been helpful, but I still am able to tinker and experiment on my own.
-
Hello everyone! I tried the regular plumber's torch and found the results to be much less than what I think I'll need to get blades up to temperature. I was cruising the net and found what information I needed. https://www.youtube.com/watch?v=5uuTqCsoOLE This tutorial was especially appealing since I have a box of random copper tubes, discarded torch parts and brass pipe fittings that I have accumulated over the years, and would not need to run out to purchase a lot of stuff to make something usable. Since a lot of these parts were the type needed for the burner build, but the wrong size, it made more sense to get an inexpensive tap and die set ,than to go out and spend more for the correct sizes of pipe fittings. The tap and die set didn't have 1/8" NPT in it, so I had to make another stop at a favorite little used tool shop down the street from my house to get them. Along with those I also found an old Halide torch, extra pipe fittings as well as a burner tip with a small diameter hole, all for around $4 I quickly threw this together after doing some cutting, drilling some holes and re-threading some fittings. This hodge-podge of parts doesn't light without covering the air ports with tape. After poking holes in the tape, it does produce a weak, jet-like flame. I was hoping that those of you familiar with the mechanics of forge burners might clue me in to what might be going on here
-
Hello! Life's circumstances and challenges (both large and small), have prevented me from doing any blacksmithing for a very long time. One of the main reasons for that is the only coal available is either very expensive, or too far away. Recently I started entertaining the possibilities of building a propane forge, and have been thinking that one of those mini forges made from a coffee can or a couple fire bricks would be a simple and relatively inexpensive place to start. My short-term goal is to (at the very least) build something sufficient for heat treating the several small blades I have already forged. I've done some research and noticed that a lot of people use those bernzomatic swirl torch heads, but those I have seen are far too expensive for something that seems pretty limited. I was curious to know if it is possible to utilize my existing plumbers torch by modifying the existing nozzle, or putting together a new nozzle and tapping it to screw on. I would much prefer to piece something together from stuff I already have, that would potentially work much better. Cost is a factor, and for now want to avoid buying anything else if I can help it. I know that I will eventually need to buy a regulator, but.....Doesn't the knob on the plumbers torch already do essentially the same thing, and be sufficient for short term use? I already purchased a 20lb tank of propane with a hose fitted to match the small 1lb propane bottles. I and also picked up a couple feet of kao-wool type liner and 2 soft fire bricks from the local pottery supply shop, so I should have enough to get something put together pretty soon. Thanks for any advice you guys may have.
-
Hey all, thanks for the responses! The reason that was given for using softer steel/Annealed HC is that softer steel could be sharpened more easily in the field, and that the billhook would be only used for chopping green wood. Tougher, more expensive HC steel didn't need to be used. I suppose this *used* to make more sense back in pre-industrial revolution days when good steel was harder to come by. I hear that getting the distal tapering correct is tricky, and important....This is where having a well made used antique billhook available to reverse engineer would come in handy. John B. If you are inclined to show off some of your finished hooks, that would be great...Should I consider the ergonomics of a billhook to be similar to a meat cleaver? The thickness of the blade thinner near the handle and thicker on the chopping end, with the spine being very thick? What size/shape stock do you start off with? Please understand that I have probably read waaay too much about them recently, and am likely over-complicating them in my mind's eye :-) That being said, I do want to do it right the first time, and the information provided is much appreciated!
-
Hello everyone! I've always liked these tools. To me they seem extremely useful for camping, help with yardwork and feed the fireplace at home. I want one, but have never handled one in real life. Unfortunately buying a used, high quality example from the UK or Italy would be prohibitively expensive. There is not a lot of information about how to forge them online, and even then, some of the information is contradictory....Some say that annealed high carbon or mild steel is suitable to make a hook, but others say properly tempered high carbon is the only way to go. Since most of my blades have been forged from 5160, I think using a thick spring from a large truck would work, but am open to suggestions to any other recycled/scrap items which would lend themselves well to being made into a billhook without expending the huge amount of fuel and labor it would take to hammer out a hook from a 3/4" thick leaf spring. If anyone has had any sucess forging a bill hook, please share your experiences.
-
Hey there Central Fuel in Centralia sells bulk coal. The last time I checked it was 12 cents a lb, or $13 for a big 60lb sack. Admittedly it's not the best stuff, but it's cheap and better than nothing :-) I know it is a long drive, so I would suggest buying as much as you can to make the trip worthwhile.
-
-
Hey all, thanks for getting back to me. The story behind the sword-like-object is that a very good family friend commissioned it some years ago from someone who could talk the talk, but certainly couldn't walk the walk. After I got into forging and making knives, he asked if there was anything I could do with it. I simply made another seax for him and kept the original. He recently showed me a type of Roman Gladius that he likes, and asked if I could hammer one out for him. I've made big knives, but never a double edged sword...I figure it'll be challenging, but a good way to impove upon existing skills. I figure this poorly constructed excuse for a weapon *might* yield usable material, but most likely not. I figure that I could stick it in the forge, check for any obvious flaws, and more or less treat it as a "practice run" before I commit to buying a new peice of 5160 or 1095. I'm not counting on it, but the leaf spring could be okay....If that's the case I'd like to fill the bolt hole. I like the forge welder idea, and have given it serious thought, but since I am somewhat shaky with those skills, I'm exploring other options beforehand and consulting those with more experience who might have done this sort of thing in the past. I was also thinking of using softer mild steel for this, but figured that the contrast between the 2 types of steel might make the plug stand out too much, and I do have lots of cut up coil springs laying around....It never hurts to ask questions. Anyways, I will try to post a shot of this example of bad workmanship so that we may point and laugh. :-)
-
I have a *really* poorly made clunky sword like object made from a leaf spring. The hack who made it used a section of leaf spring with the bolt hole in the middle!?!?!?! I don't have my welder set up yet, but I still want to utilize this material. My thoughts are to flare out/counter sink the hole on either side with a die grinder, heat the section of leaf spring up, and then drive a length of cold coil spring into the hole and hammer the coil spring as I would with a rivet My understanding is that if I let the spring cool off it will shrink around the bit of coil spring and hold it firmly....Correct? Will it still be stationary if I continue to forge and reshape the leaf spring, or should I just have it welded? Thanks :-)