TaylorM
Members
-
Joined
-
Last visited
-
It's not so much the weight of the door itself, more the weight of the door pin hitting the latch, as that will force the latch closed, pulling the chain towards the outside. This particular latch has a bit of a belly on the hook when it is fully open, so when the pin hits the belly it forces the hook downward, locking the pin in place. Where would you suggest I add the weight? You've touched on one of my main concerns, maintaining tension in the chain. Nobody likes a floppy chain... I originally thought of working a spring in to maintain tension, but as Frosty pointed out, more complexity means more areas of potential failure. A weight would probably be a far more simple solution. Thanks, Taylor
-
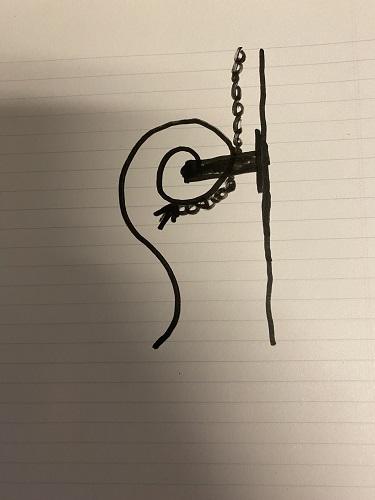
Thanks for the replies. My thinking was to forge something like what I have in this picture (viewed from the side). It would have a pivot point spiraled around a base plate which is attached to the door frame. Then the chain would be attached where the little arrow is, allowing the chain to be pulled along the radius of the spiral. The weight of the door closing would force the latch closed and pull the chain back in the other direction. At least that's how I think it would work in theory... Frosty, I like your point about putting something in the hole to prevent friction. I hadn't thought of that, and I have some spare conduit that would be perfect for this job. It might also be worth it to swap the chain for a clothes line cable so there's even less friction. Taylor
-
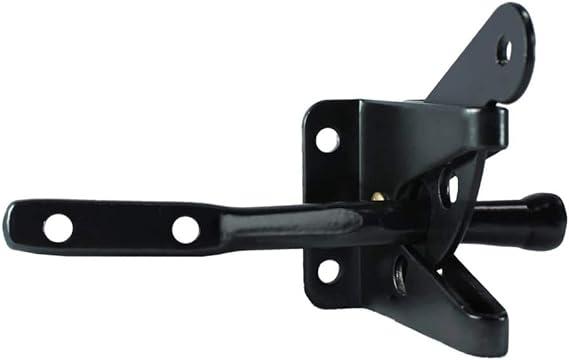
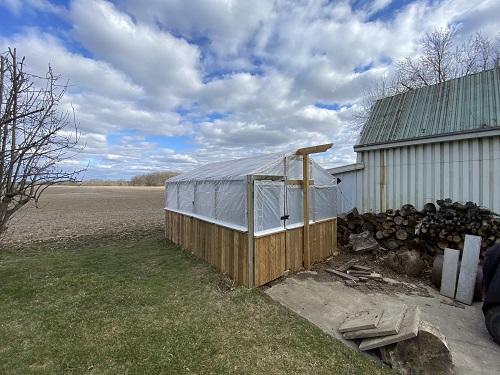
Hey guys and gals, I tried googling this along with iforgeiron, but I couldn't find any relevant discussions. I'm also not sure if this is the right place for this topic, but it didn't seem to fit anywhere else. I've attached a picture of the style of latch that I'm working with while building my wife a greenhouse (picture also attached). Just for clarity, I'm building this on the frame of an old dog kennel, so I'm reusing whatever I can, hence this style of latch. After getting the walls and windows in place and admiring the inside, I realized that I couldn't get out... there was nothing on the inside to pull up on the latch mechanism! Luckily I hadn't fully sealed the plastic around the edges yet, so I was able to stick my hand through and unhook the latch. I remedied this by drilling a hole through the doorframe and running a length of garage door chain through to the inside. Fool me once you cheeky bas.... Anyway, I'm trying to come up with something to use as a latch on the inside which will allow me to pull down on the chain and open the outer latch. I have some ideas on how I can do this, but I wanted to touch base with the resident experts to see if you had any cool ideas. Thank you for any insights you can give! Taylor
-
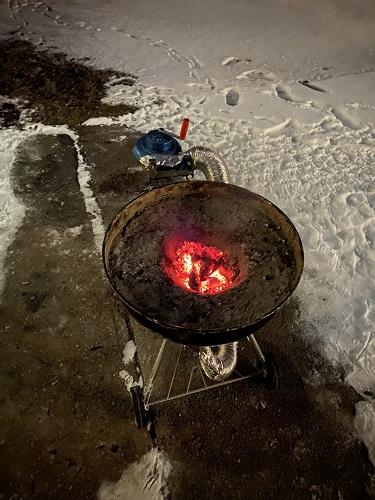
Hey guys, Thanks for the feedback! George, I'll keep that in mind about the grate. The wonderful part about building a bowl of dirt is that I'm not worried about playing around with stuff like this. If it doesn't work, no big deal, strip it down and try something else! One of the reasons I went with the cast iron grate was the thickness, as all the steel ones I could find were very thin. It seems like I'm probably better off fabricating my own. I'll try to keep an eye out for a metal plate to drill holes in. Do you have any recommendations for the thickness? Frosty, good point about the amount of fuel. I was thinking about that while I was firing it. I built the bowl a little oversized because I wanted to make sure all of the oxygen was burned up, then while firing it I thought "wow, that really holds a lot!" I'll probably keep it as is for now, but I want to build a permanent one outside in the future. I'll make that one a side blast with a trench Neil, I've seen the name Newman Forge around. I'll have to reach out to John! As for the blower, I've seen them mounted both upright and sideways. There doesn't seem to be anything leaking out... for now... but I'll keep an eye on that. I actually mounted it on it's side for ergonomic reasons, figuring it's easier to stir a pot than it is to crank in a vertical plane. I can just rest my hand and turn it with my fingers rather than lifting and lowering my arm with each crank. I don't have to turn it very fast. In fact, as per Frosty's point about the amount of fuel I'll burn through, I found that I have to turn it very slowly so I'm not ripping through the fuel in record time. I don't know what they were using on FIF, but the one I bought came in different sizes, from 80 watts to 200 watts (whatever that is supposed to mean I don't know why they can't just use CFM). I got the 200 watt one. Maybe they had the 80 watt which is why they had to crank it so fast. Either way, I didn't expect much from this Chinesium wonder, but so far I've been pleasantly surprised. I'm still keeping my eye out for a good one, but those would cost an arm, a leg and your firstborn child in the Hamilton area. I'll check out some antique stores up north (down south for you Frosty) once the weather warms up.
-
TaylorM changed their profile photo
-
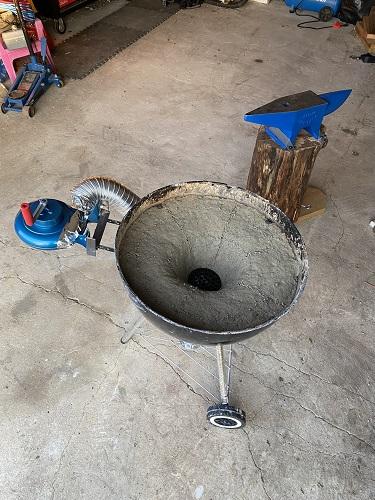
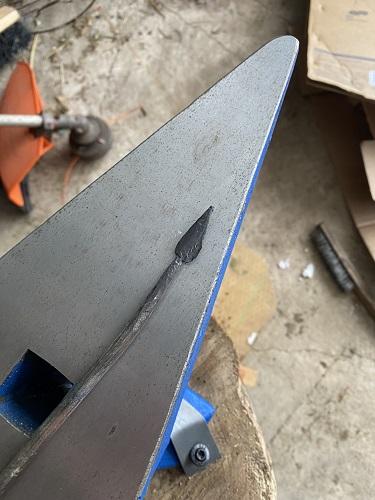
Hi everyone! I'm just getting into blacksmithing and I've been a silent peruser of the site for some time now, just figuring out how I should go about this fun new hobby. Don't expect fantastic start-to-finish photos. My wife will attest to the fact that I'm usually too giddy to start a project and I never take photos before and during, only after. I was going to go the gas forge route, but then while trying to figure out the refractory cement and all the debates around which one to use, and where to get it, and how to apply it, I thought "Hey, I have an old BBQ. I'll just make a solid fuel forge". I live in an area where charcoal is available everywhere but coke and coal are nowhere to be found, so that limited my fuel options. Considering I would be using charcoal, I then had to decide whether to go bottom blast or side blast. While I know side blast is generally recommended for charcoal forges, a couple factors made me go for the bottom blast. First off was dealing with ash. Considering I was starting out with a kettle-style BBQ, I figured it would be easier to build in an ash dump underneath rather than trying to trench it out to the side. Secondly, a side blast would have required a water-cooled tuyere (at least if I'm going to do this properly). My workshop doesn't currently have power and I didn't want to run a long extension cord to power a water pump every time I wanted to forge. Therefore, bottom blast it was! I went with one of those fat and fancy truck exhaust tips from Crappy Tire (the Canadian... I don't know... everything store) coming up through the base, with another 1.5 inch exhaust pipe welded into it on an upward angle. I was able to find a 4.5 inch cast iron grate, which I built into the firepot. For the blower, I went with a cheapy hand crank blower. Although this thing is nothing to brag about, it seems to be doing the job remarkably well. I barely have to turn it, maybe 1 revolution every 2-3 seconds, to get to forging temps. 1 crank per second and the thing is spitting up lovely blue flames. The lining is just a kitty litter/sand mixture rammed, dried and fired a la Frosty's recommendations (spider web and all). I'll probably end up cutting out a section of the side wall to allow for longer pieces to lay flat, but I'll see how everything works before I start breaking out the Sawzall. While doing one of my fires, I decided to test it out with a piece of 1/4 round bar. I was able to make an ugly little leaf-shaped object, but I'm still proud of the wee guy. I was only able to get into this hobby because I'm building my wife a greenhouse and I told her that if I got into blacksmithing I could decorate her greenhouse... so I better get good at making leaves or she'll be onto me and my shenanigans. Anyway, I just wanted to share my journey with you so far. I'm looking forward to being part of this community and continuing to learn from everyone!