

Fire plus Bird
-
Posts
32 -
Joined
-
Last visited
Content Type
Profiles
Forums
Articles
Gallery
Downloads
Events
Posts posted by Fire plus Bird
-
-
Nice, David. I really should make some similar hooks how that I'm redoing my grinding area. Belts take up a crazy amount of space. Is that PVC tubing cut in half? If so, what size. I'd guess 4-inch.
-
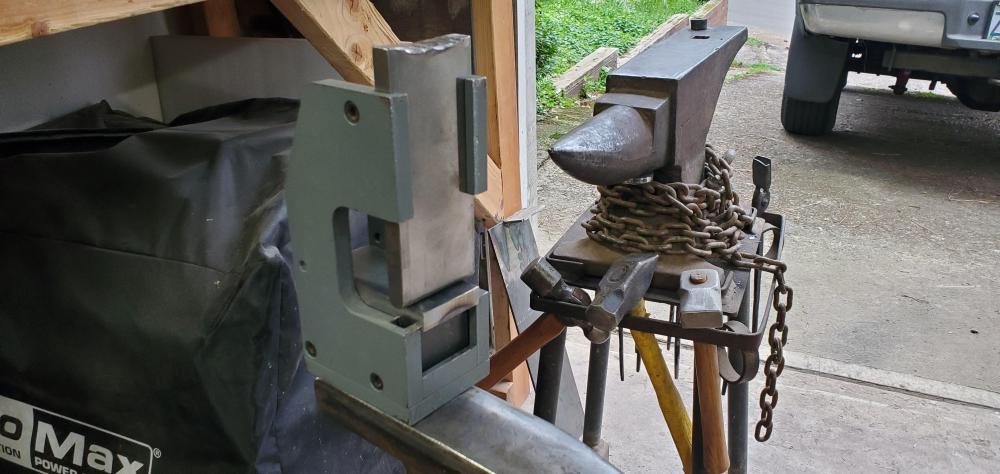
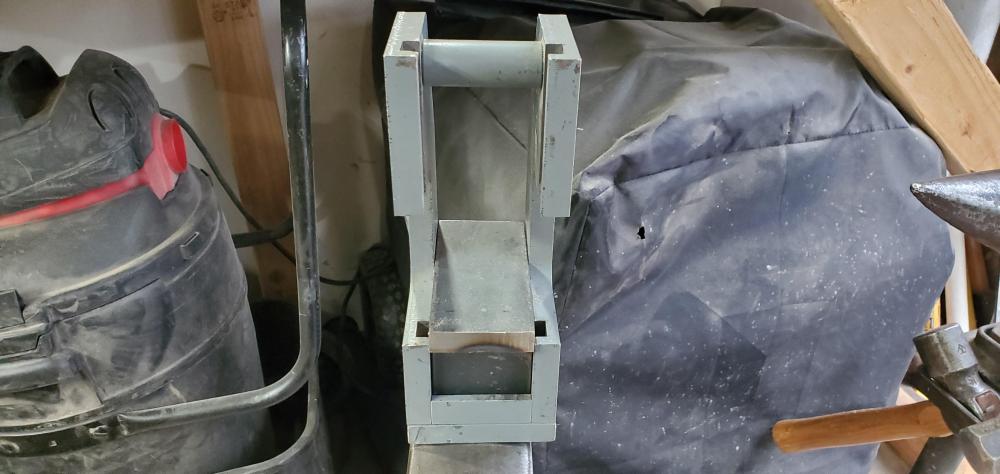
Great point. There is a postive stop in the vertical postion already. It's just barely visible in the picture on the right side between the two pivoting mount brackets. I plan on building a horizontal stop on the new table that will support the middle of the frame.
-
Yeah, at least $300 worth satisfaction. That's definitely the point of why I picked up blacksmithing, something interesting and creative to do.
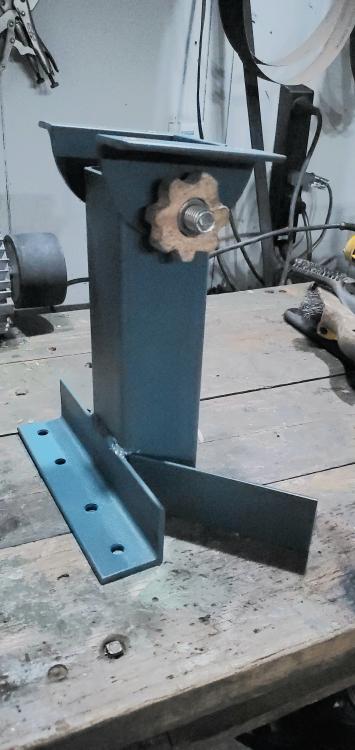
The part in question is a nut, set in a wooden, not brass star. I had it laying around from another project I started and nevr finished. The purpose is indeade so I can hand tighten the pivot. I think it needs to be a bit bigger, so I may redesign it or weld an arm onto the bolt head on the other side to make it a lever.
-
As part of my shop reorganition, I need to move the old workbench in my woodshop that my grinders currently sit on out to the smithy. Before I build a new workbench for the 2x72, which is staying inside, I figured it was time to build a tilting stand so I can run it either vertical or horizontal.
I could have bought one from the manufacturer for about $300, but I had some angle iron and square tubing hanging around and thought this was a great opportunity to work on my fabricating skills. My welding sure isn't anything to brag about and I really do need to spend more time designing things before I start building, instead of seeing something in my head and just charging ahead.
All that said, it came out decent looking when painted and should be nice and functional. Now I need to get some mounting bolts and top material for the table.
-
5 hours ago, Frosty said:
Fire Bird: A good way to even heating is to use a muffle.
Yeah, I have a piece of rectangle tubing that just fits into my little farrier's forge to use as a muffle, and pieces of firebrick to close it up. Eventually, When I get around to building a new forge, I think I'm going to try forced air, rather than multiple venturi burners. That should give an even more uniform heat, and a thermocouple can be wired into the blower to regulate the temperature like Alec Steele has shown in his videos. Probably not as good as a heat treat oven, but getting closer. I'd still use Dr. Thomas's method as there looks to be sound science behind it.
If I where trying to make knives and axes for sale, sending out for heat treatment would make sense. That's not where I'm at though. I'm interested in this as a hobby to see what I can do myself as a creative process, so finding a process like Dr. Thomas is great, because it does take out the guess work using simple equipment and instrumentation, a tempilstik and a magnet.
Eventually, I could see getting a heat treat oven if I progress as a blademaker, again because I'm motivated to see what I can do. The Jen-Ken Vertical Air Baths and Paragon models start at what I paid for a 2x72 variable speed grinder, so not unreasonable.
-
I don't know how much a 1/2 yard of 1/4" minus weighs, but my yard and smithy seem to soak it up like water due to all the terracing and leveling out I've done. The wheelbarrow and shovel method of getting back there is no fun, but Glen is right about small bites and light loads.
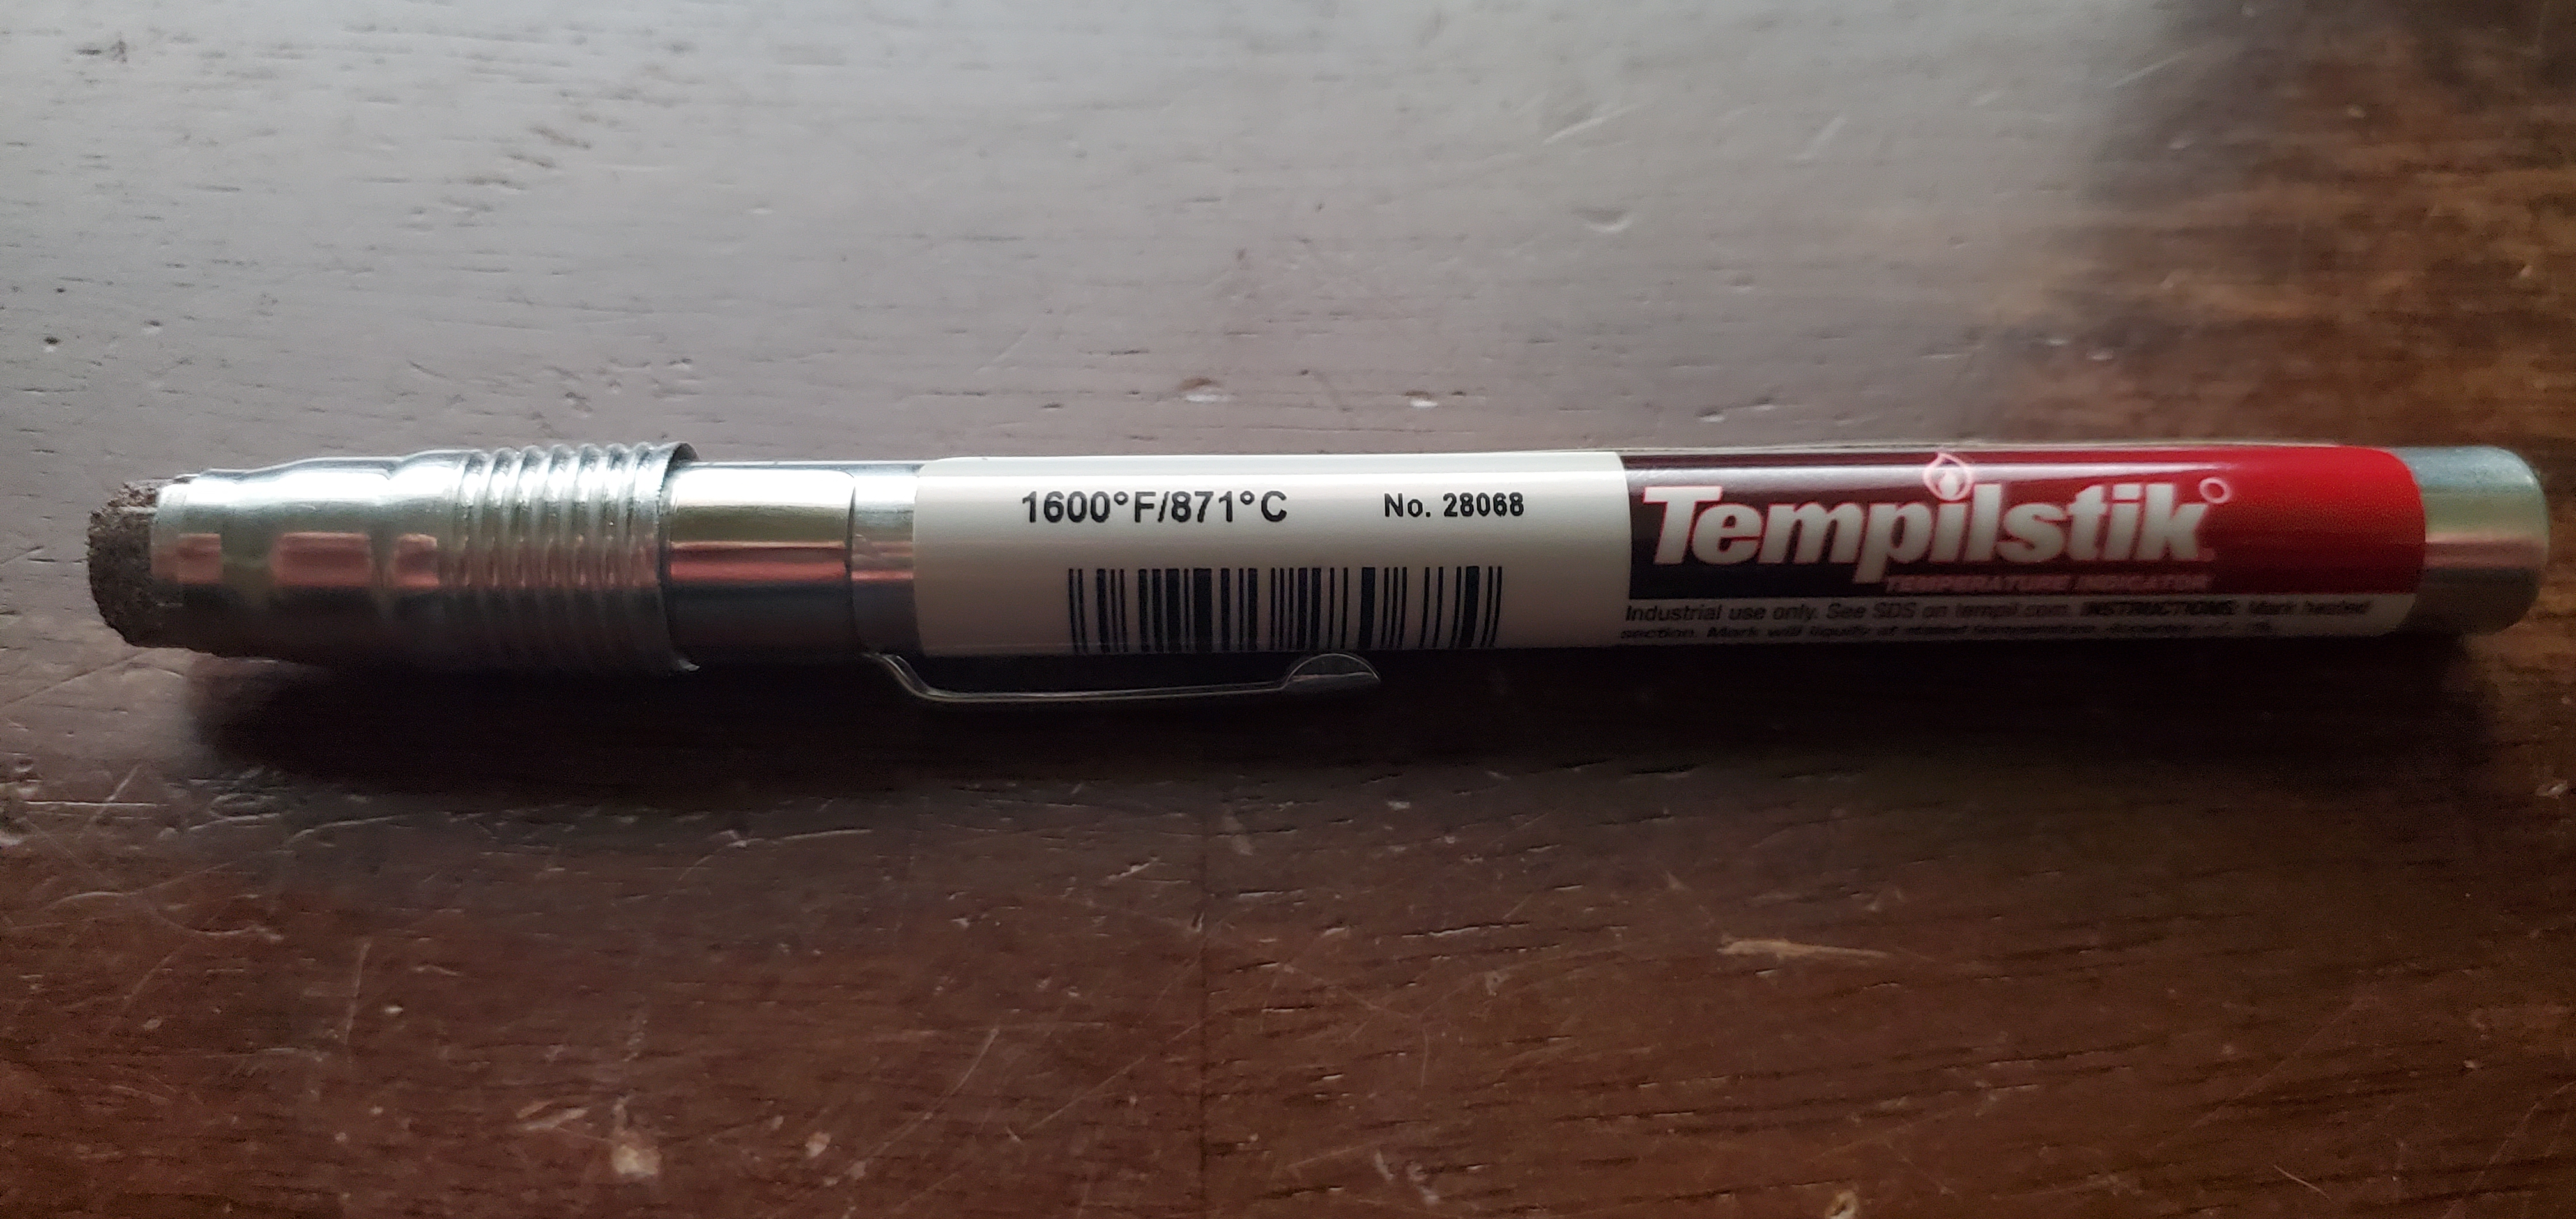
Those hardness files are great. I've had them for a while now and am planning to put them to a lot more use coupled with this item I just got delivered yesterday.

Eyeballing everthing in the heat treatment cycle may be great for experienced smiths, but I've been worried about inconistency due to my inexperience. I'd really, really love to have a heat treatment oven, but that's not in the budget yet. In researching how to heat treat effectively with a forge, I ran across metallugist Dr. Larrin Thomas of Knife Steel Nerds. He's done a really deep dive into how to do it. https://knifesteelnerds.com/2021/09/23/how-to-heat-treat-knife-steel-in-a-forge/
Forges heat up much faster than temp-controlled ovens, can have hot and cold spots due to inconsistent insulation and typically can't be held at a specific tempature for a set time. So it's really hard to soak your steel a set temp for a specified time and its very easy to overheat your steel, especially when trying to determine steel temp by looking at the color. Dr. Thomas shows that the way around this is to normalize your steel and for the austenitizing or hardening step, quench as soon as your steel hits non-magnetic, rather than soaking at that point or heating just a bit more. He says that the normalizing step creates a pearlitic microstrucuture that austenitizes pretty much immediately whereas annealed steel take more time and a higher temp.
The tempilstik is to check that the steel has hit the target normalizing temp. I've looking forward to seeing if I can get consistent results with this method.
-
8 hours ago, JHCC said:
Nothing wrong with a dirt floor, if the drainage is okay.
Yeah, no problem with the drainage. It's the high spot on my lot, I'm draining water off the roof into a rain barrel and then a planter, and I've got a few inches of packed gravel. I want a paver or brick floor eventually mainly so it's a big neater. I'm not the tidiest guy out there, but I am trying.
-
6 hours ago, BillyBones said:
Fire bird, that is not that weird. It is a penny around here though. As a matter a fact i was just watching a TV show the other night and some did that as well.
A penny, a nickle, a dime... whatever the market will bear. Or whatever you've got in your pocker, anyway
 4 hours ago, Shainarue said:
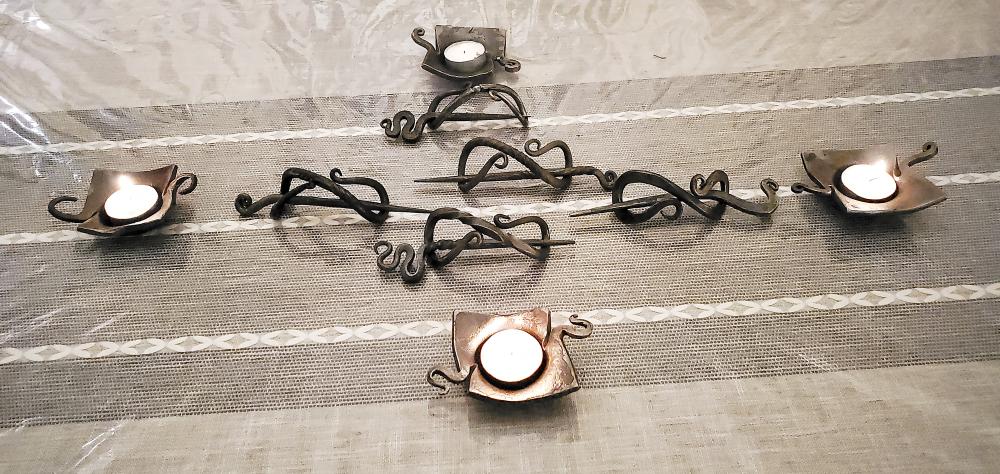
Fire Plus Bird - I really like those hair pins. It's another thing on my project list "just because". I only know a handful of people with enough hair to even warrant a hairpin, lol, so it's totally just something I want to do because it looks pretty.
Thanks. They are kinda fun/addictive to do when you start thinking of all the little design changes you can make. Luckily, I know a lot of ladies with a lot of hair. Another thing you can do is make them a bit smaller and without so much bend and give them away/use them as shawl pins for knitted shawls. That's what I did for my mom, who is a big time knitter and has thin, whispy hair now that she's in her 70s.
-
5 hours ago, Frosty said:
I sharpened everybody's knives, did minor repairs and NEVER struck an anvil after maybe 8pm nor earlier than 9am.
No problem whatsoever forging before 9 am. Stoping after 8 is probably a good idea too.
5 hours ago, George N. M. said:I will mention one possible draw back that I see. Depending on your local zoning and fire codes you may have an issue with set back distance from the property line if the neighbor or anyone else wants to raise the issue. Some places have anywhere from 5-15' side line setback requirements. Some of the justification is esthetic and some is to prevent fire jumping from one structure to another. If it is not visible from the street and your neigbor doesn't have a problem it very probably will not be an issue even assuming that it is a violation in your town or county. (Oregon is famous for pretty tight zoning requiements). Just a heads up for you from an old County Attorney.
Yeah, my wife mentioned the setback thing... after I finished building it. The house is set back about 30 feet from the sidewalk and there are some tall bushess screening that side of the yard a bit, so you'd have to really be looking for it to notice. It's all screwed costruction, so if I eventually sell the place and it gets flagged during an inspection I can pretty easily deconstruct it enough to scale it back.
My neighbors are great, no probelms at all since we bought the place about 13 years ago and they let get into their side yard to work on the gutter. I'm definitely going to smith them some candle hoders or something.
-
Thanks, Rank. I certainly wouldn't have been able to takeover any garden space in the yard. Lucky for me it's easier to argue with the dogs than the wife.
-
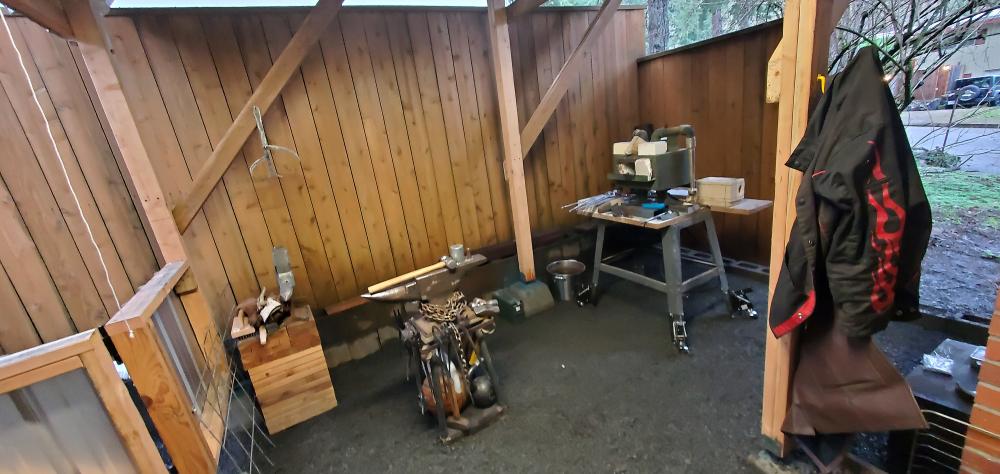
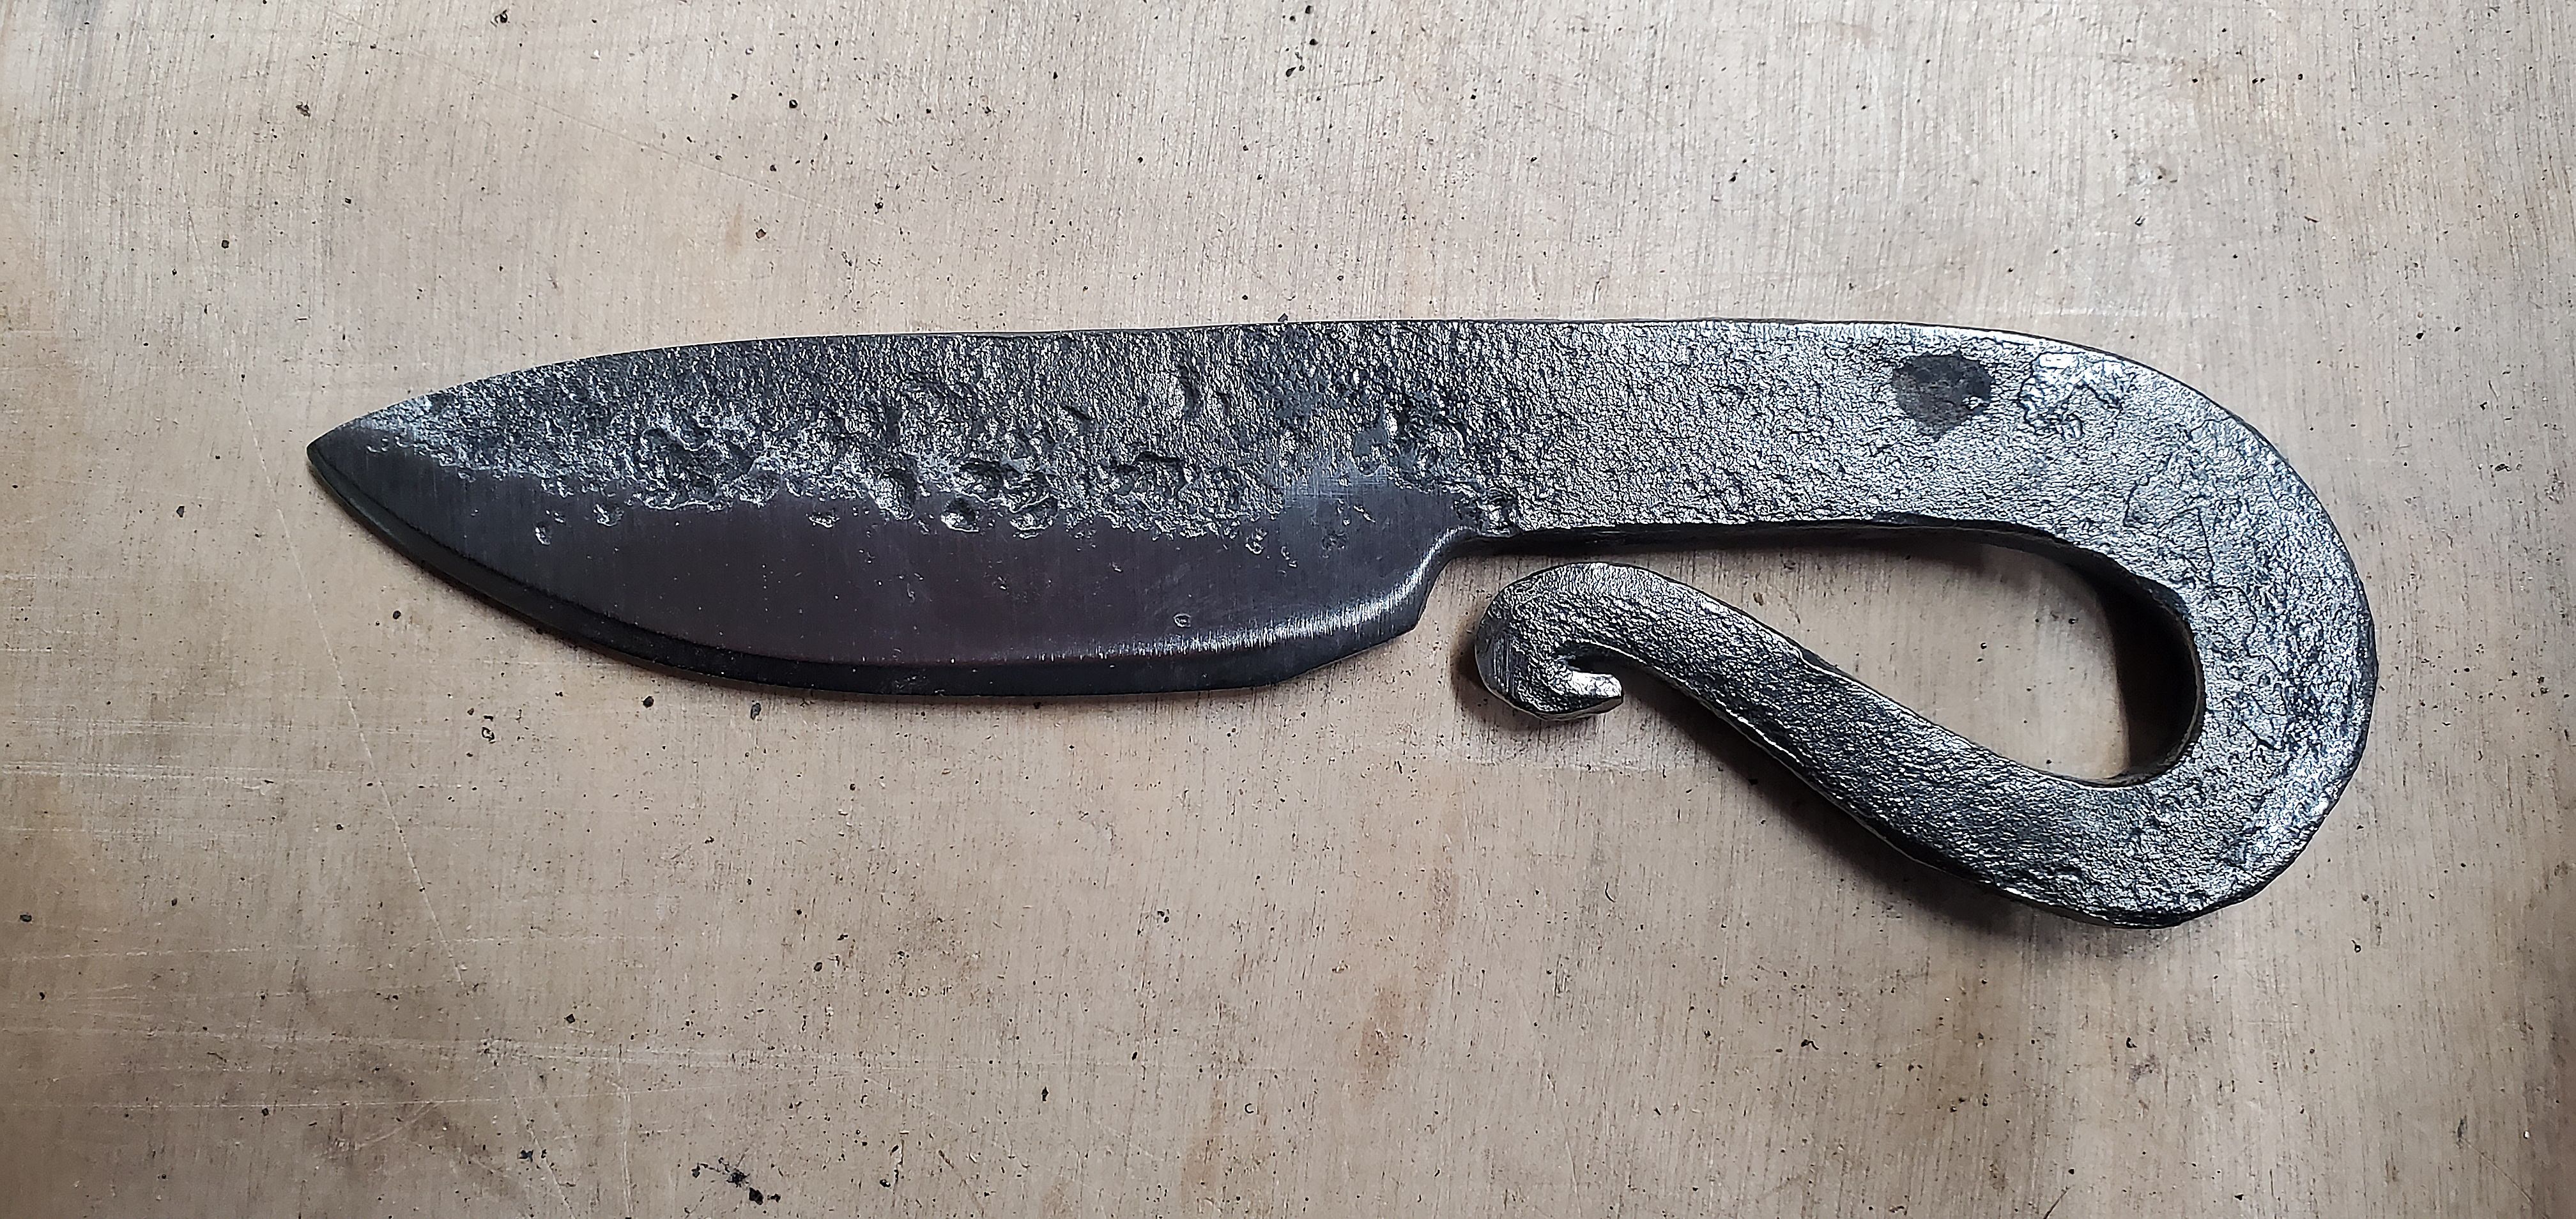
I've mostly been spending my free time building my new little side-yard smithy that I just posted about in the shop forum. I did take time the week before Christmas to hammer out some hair pins and tea light holders for gifts.
I also finaly forged and finishing a blade, a little blacksmith's knife from new 5160 that I sold to my daughter's new father-in-law for a dime that I gave him. Sounds a bit weird, but my native friends taught me the tradition that if you give someone a blade, versus selling or trading it to them, you sever the relationship you have with them. I like that tradition so I follow it.

-
I've been smithing in my single car garage, which would be great and all if it wasn't primarily my woodshop. My wife wasn't too keen on me building a forging area in the back yard but I was finally able to convice her that running a 2,300 degree forge in a room filled with sawdust and random bits of wood wasn't the best idea and I claimed half a of a side-yard we've been using as a dog run.
I had to level and restack the cinder blocks we've been using as a retaining wall and under-fence barrier first, and then rebuild the existing shed roof, raising it high enough to so swing a hammer and lengthening it to the fence. Then it was on to leveling the ground with 3/4 minus gravel and building a half wall and gate on the dog yard side so the boys don't come in and mark everything up.
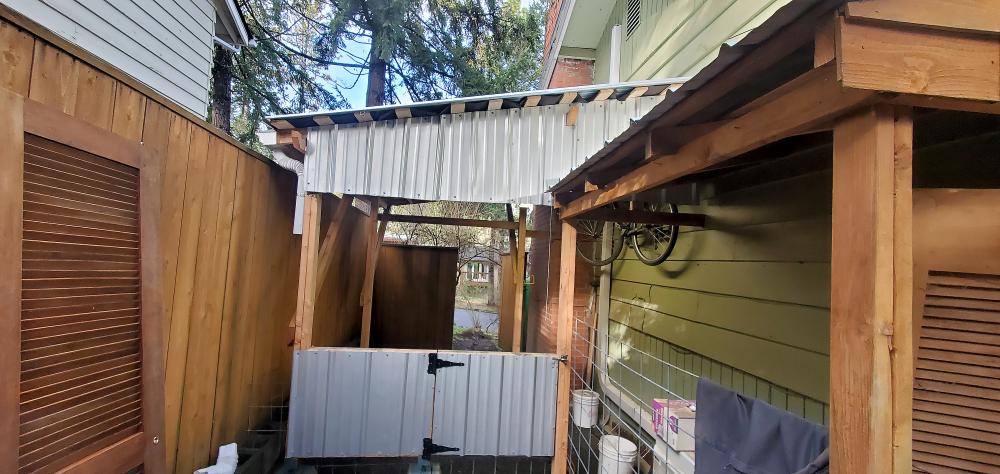
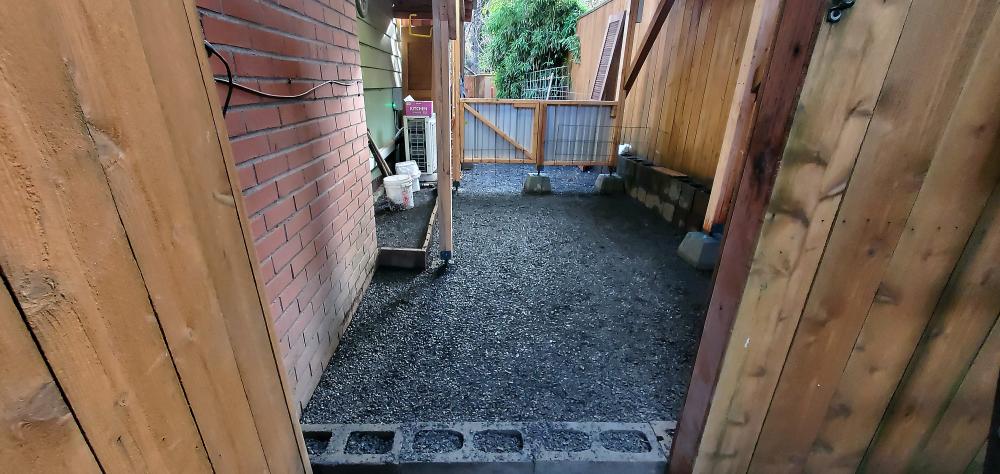
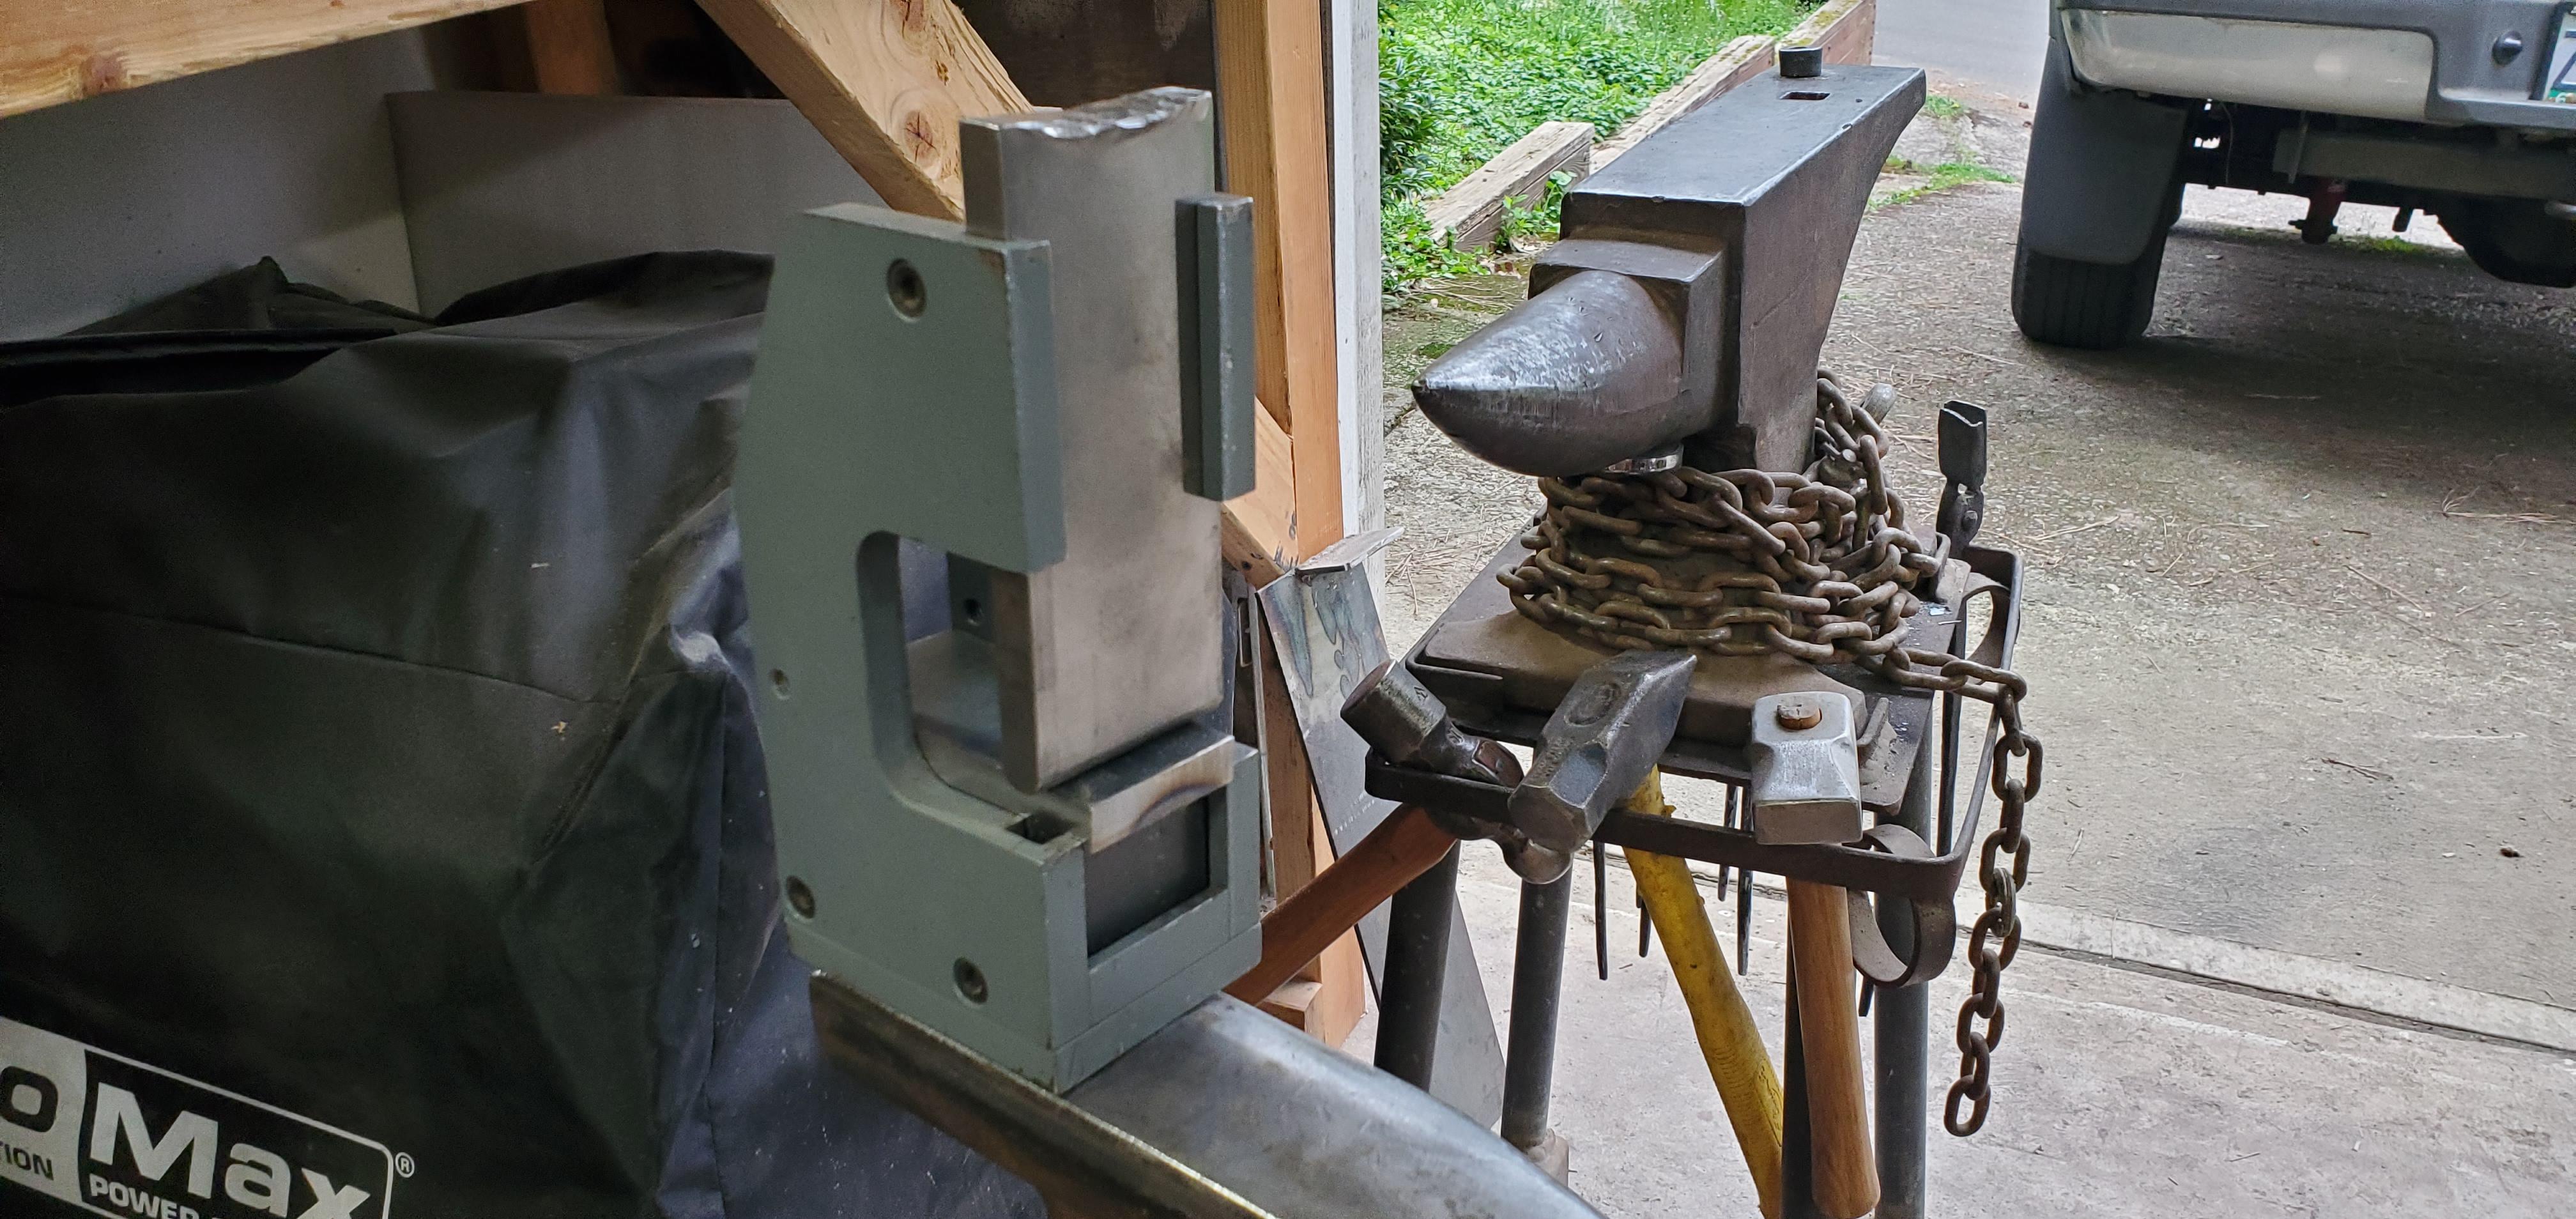
In a month or so I'll lay pavers for the floor but for now I can move my tools in and play around with the layout. It's a cozy 10' by 14' space and just enough for my forge, main and mini-anvils, post-vice and a workbench I still need to move from the woodshop that my old bench grinder lives on. For temp power I'm running an extension cord from my deck, though I'll get it wired up for 110v eventually. My 2x72" grinder is going remain in the woodshop. Now I just need to get my propane tanks filled and get forging.
-
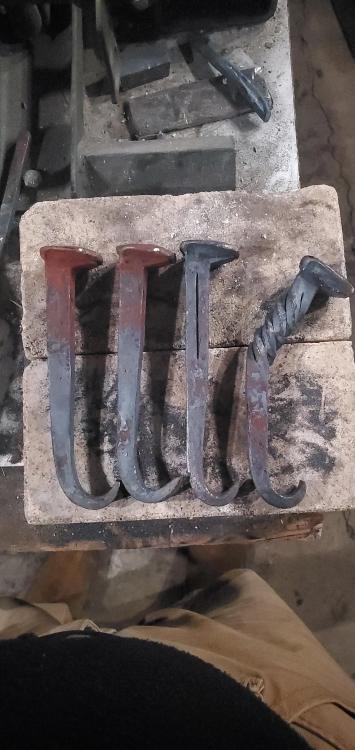
I need hooks to hang up my jackets and aprons in the hall outside my woodshop. After I finish these off I'll need to find some nice wood and build a little shelf to mount them onto.
-
Dang, ya'll are making some really nice things. Very cool.
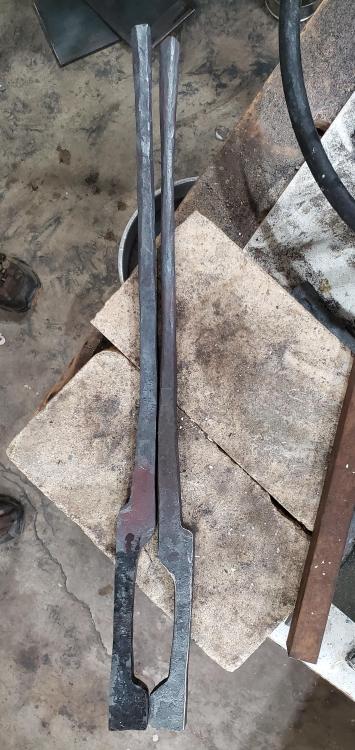
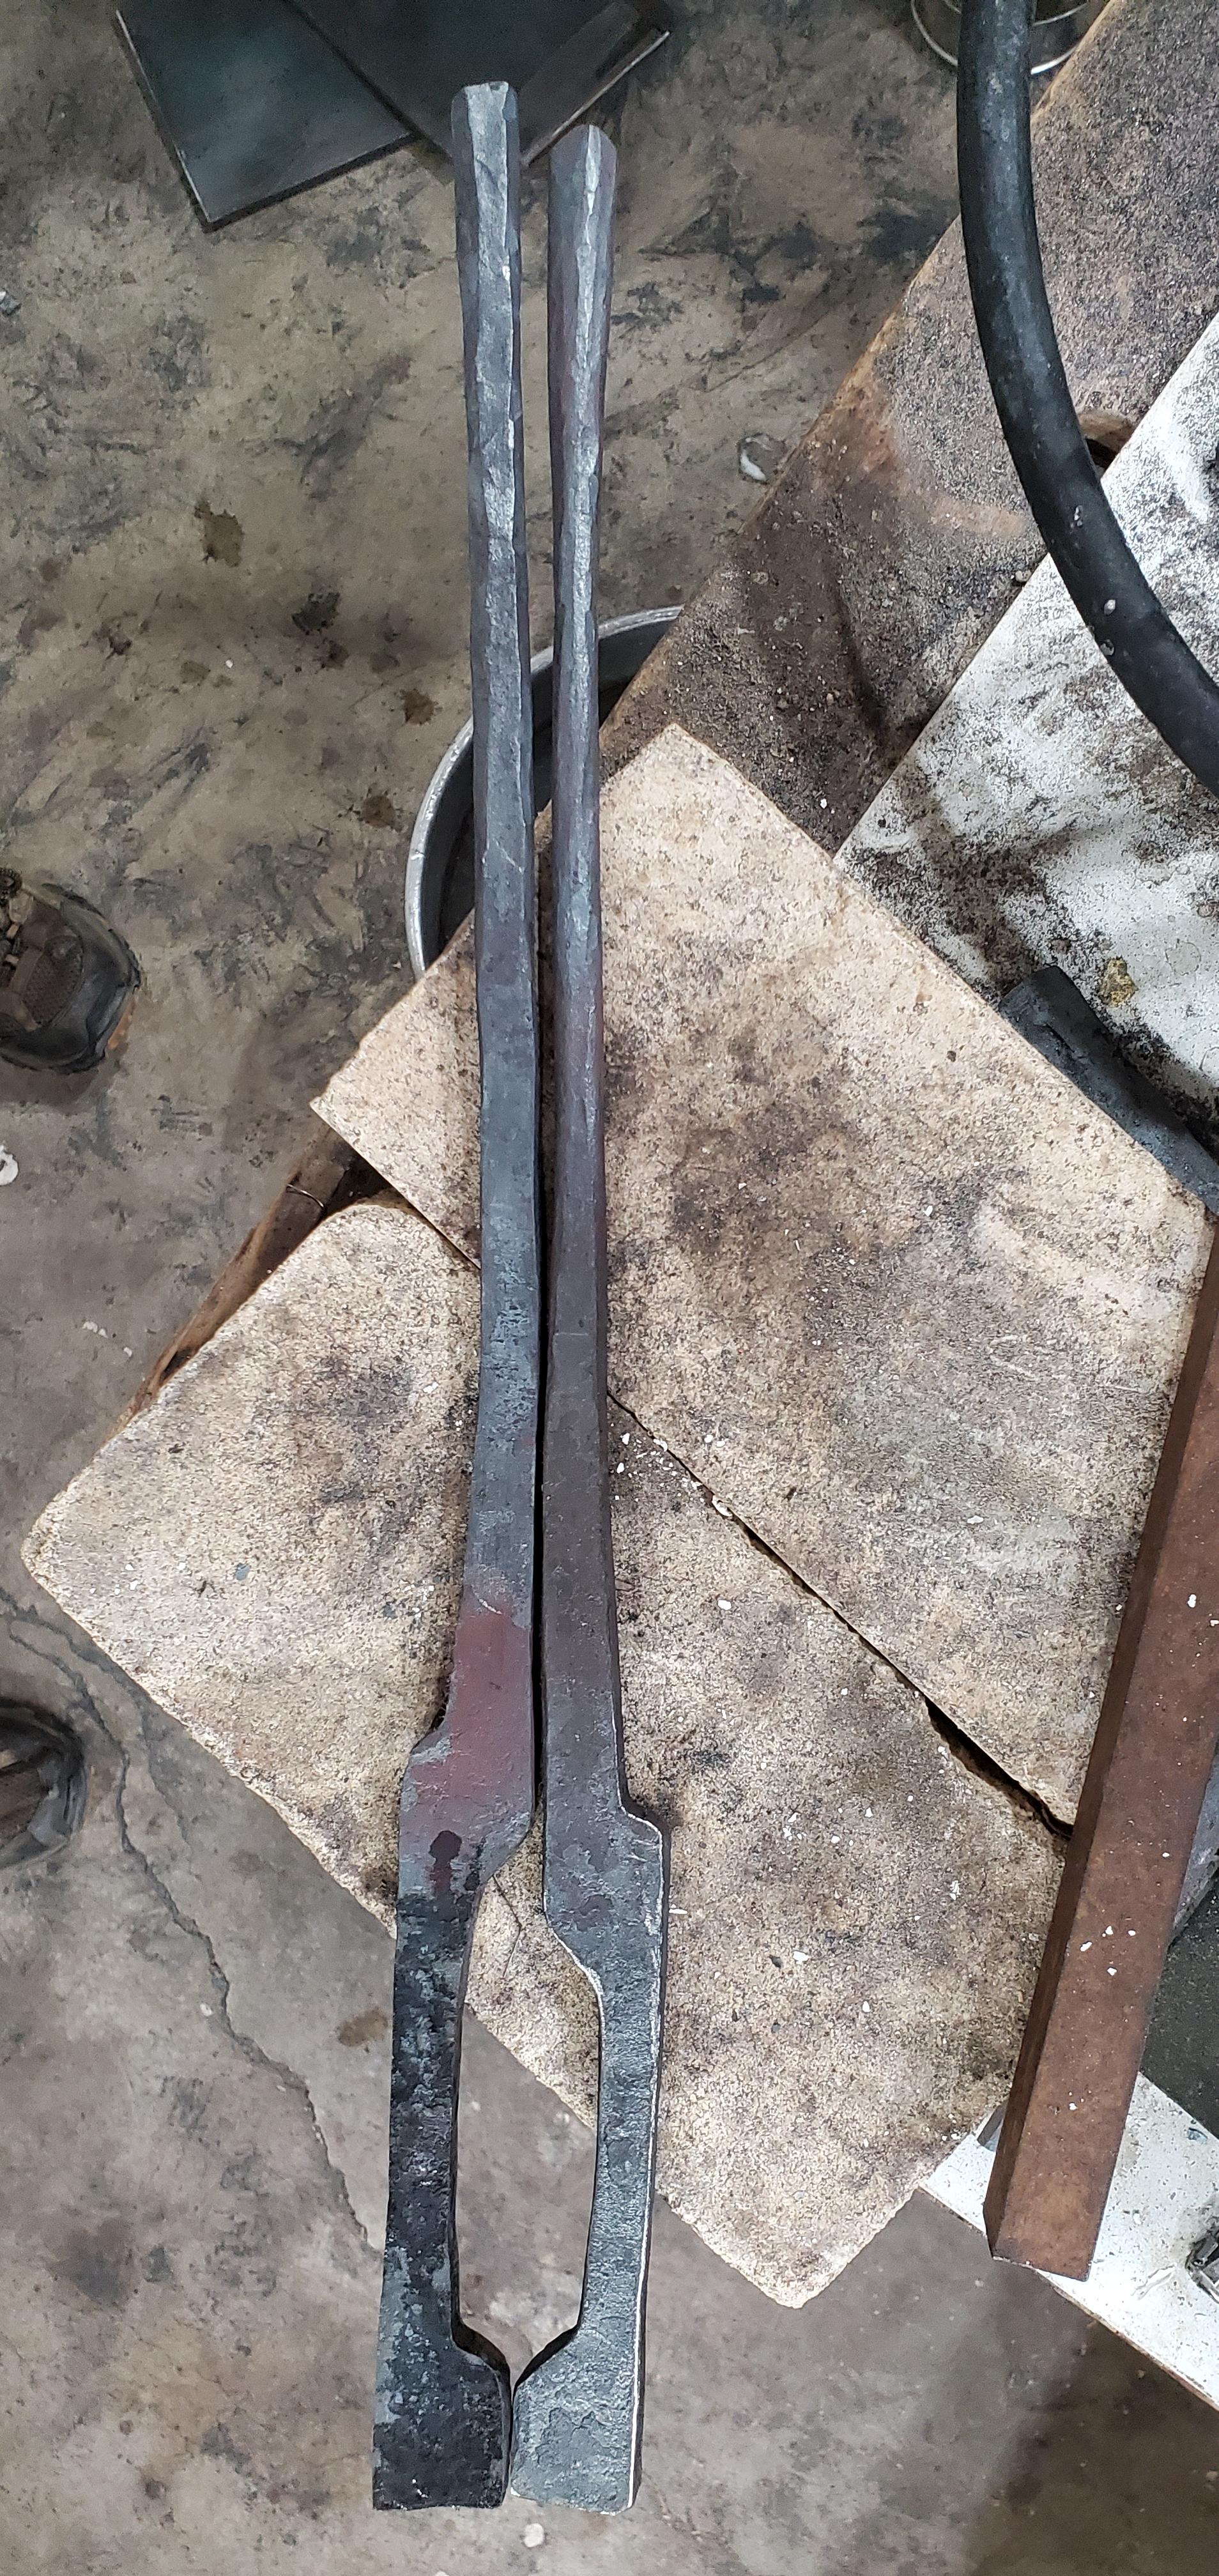
Here's the next set of tongs I'm working on. Little problem, unfortunately, as you can see. I marked these out exactly the same, but the jaw portion on the left is about 3/4 of an inch longer. When I was drawing it out and setting up the boss with half-faced blows, I screwed up and struck a blow that indented the material a bit past where I had started to establish the boss, maybe a 1/16th.
I couldn't see how to fix that without causign a cold shut, so I decided to just use the new indentation as the start of the boss, knowing that the jaw would be a bit longer. The stock I'm using is pretty meaty, 1 by 1/5, so it drew out a fair bit longer than I expected. I'm not sure at this point if I should just continue wiht this set and have the bend in the jaw be asymetric or if I should make two new sides, one to match each of the existing ones. I hadn't planned on making another set of bolt tongs right away after making this one, but I guess it wouldn't hurt to have on set for 3/8 as well as for 3/4, which is what I intended for this one.
-
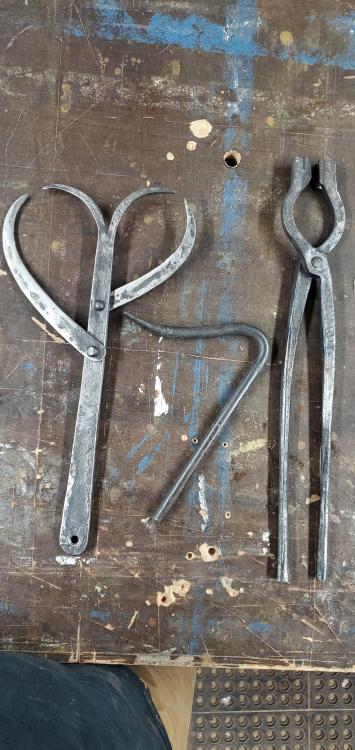
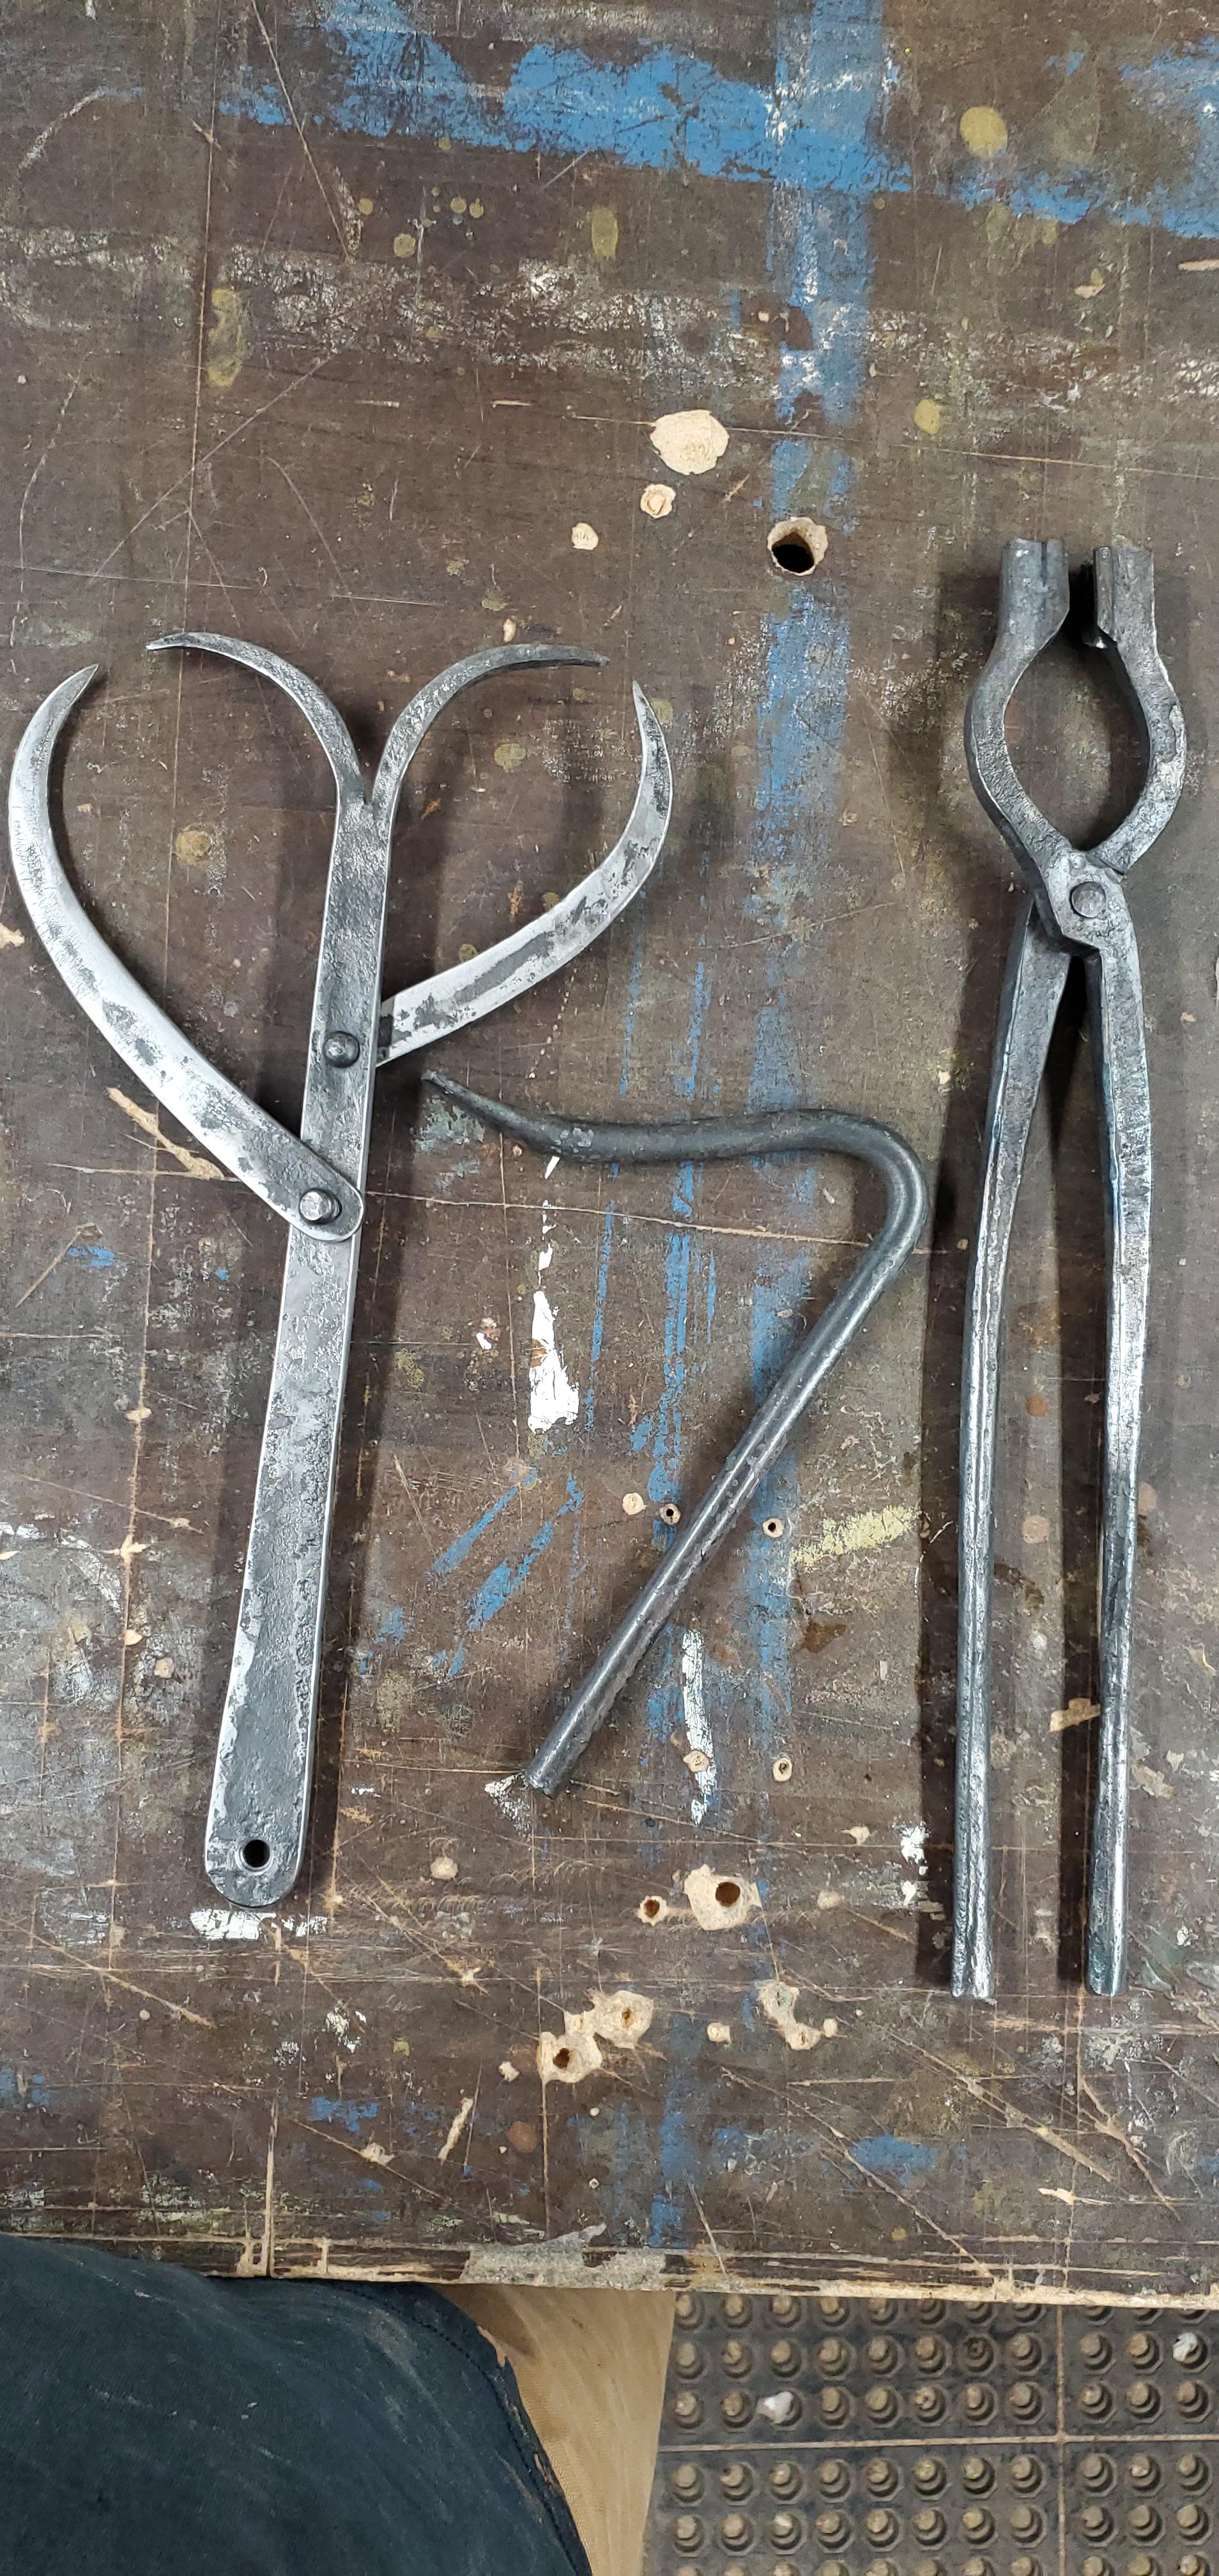
Here's some stuff I've been working on recently to help outfit my little smithy. I wanted 1/2" bolt jaw tongs, and found while making them it would be real handy to have calipers to check dimentions between two pieces. So I set to work on a blacksmith's caliper.
When it came time to slit the tip of the center piece, I realized it would be real handy to use both hands, so I needed a hold fast.
In the end, I made a tool so I could make a tool to make a tool. I love that about smithing.
-
Yeah, that's what I thought. I think he likes really big tongs. I figured I might as well get the kind of stock he likes to make tongs from and learn his style from him and make tongs from rr spikes in my own shop. Can't have too many pairs of tongs, can ya? Or learn too many ways of making them. My local steel yard has a pretty good rack of cut-offs and end pieces sold by the pound pretty cheaply, so it's not a problem to find a few short lengths of whatever size mild bar to play with.
-
I got some time Friday evening and Saturday to dink around in the shop. Finally got a chance to weld up a simple little tool shelf/strike table for the bottom of my guillotine tool. I think it will make a handy little tool all that more handy for those times you want to fuller or cut into only one side of your stock.
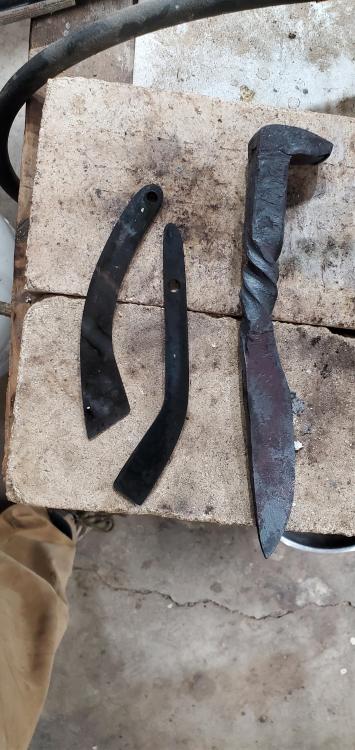
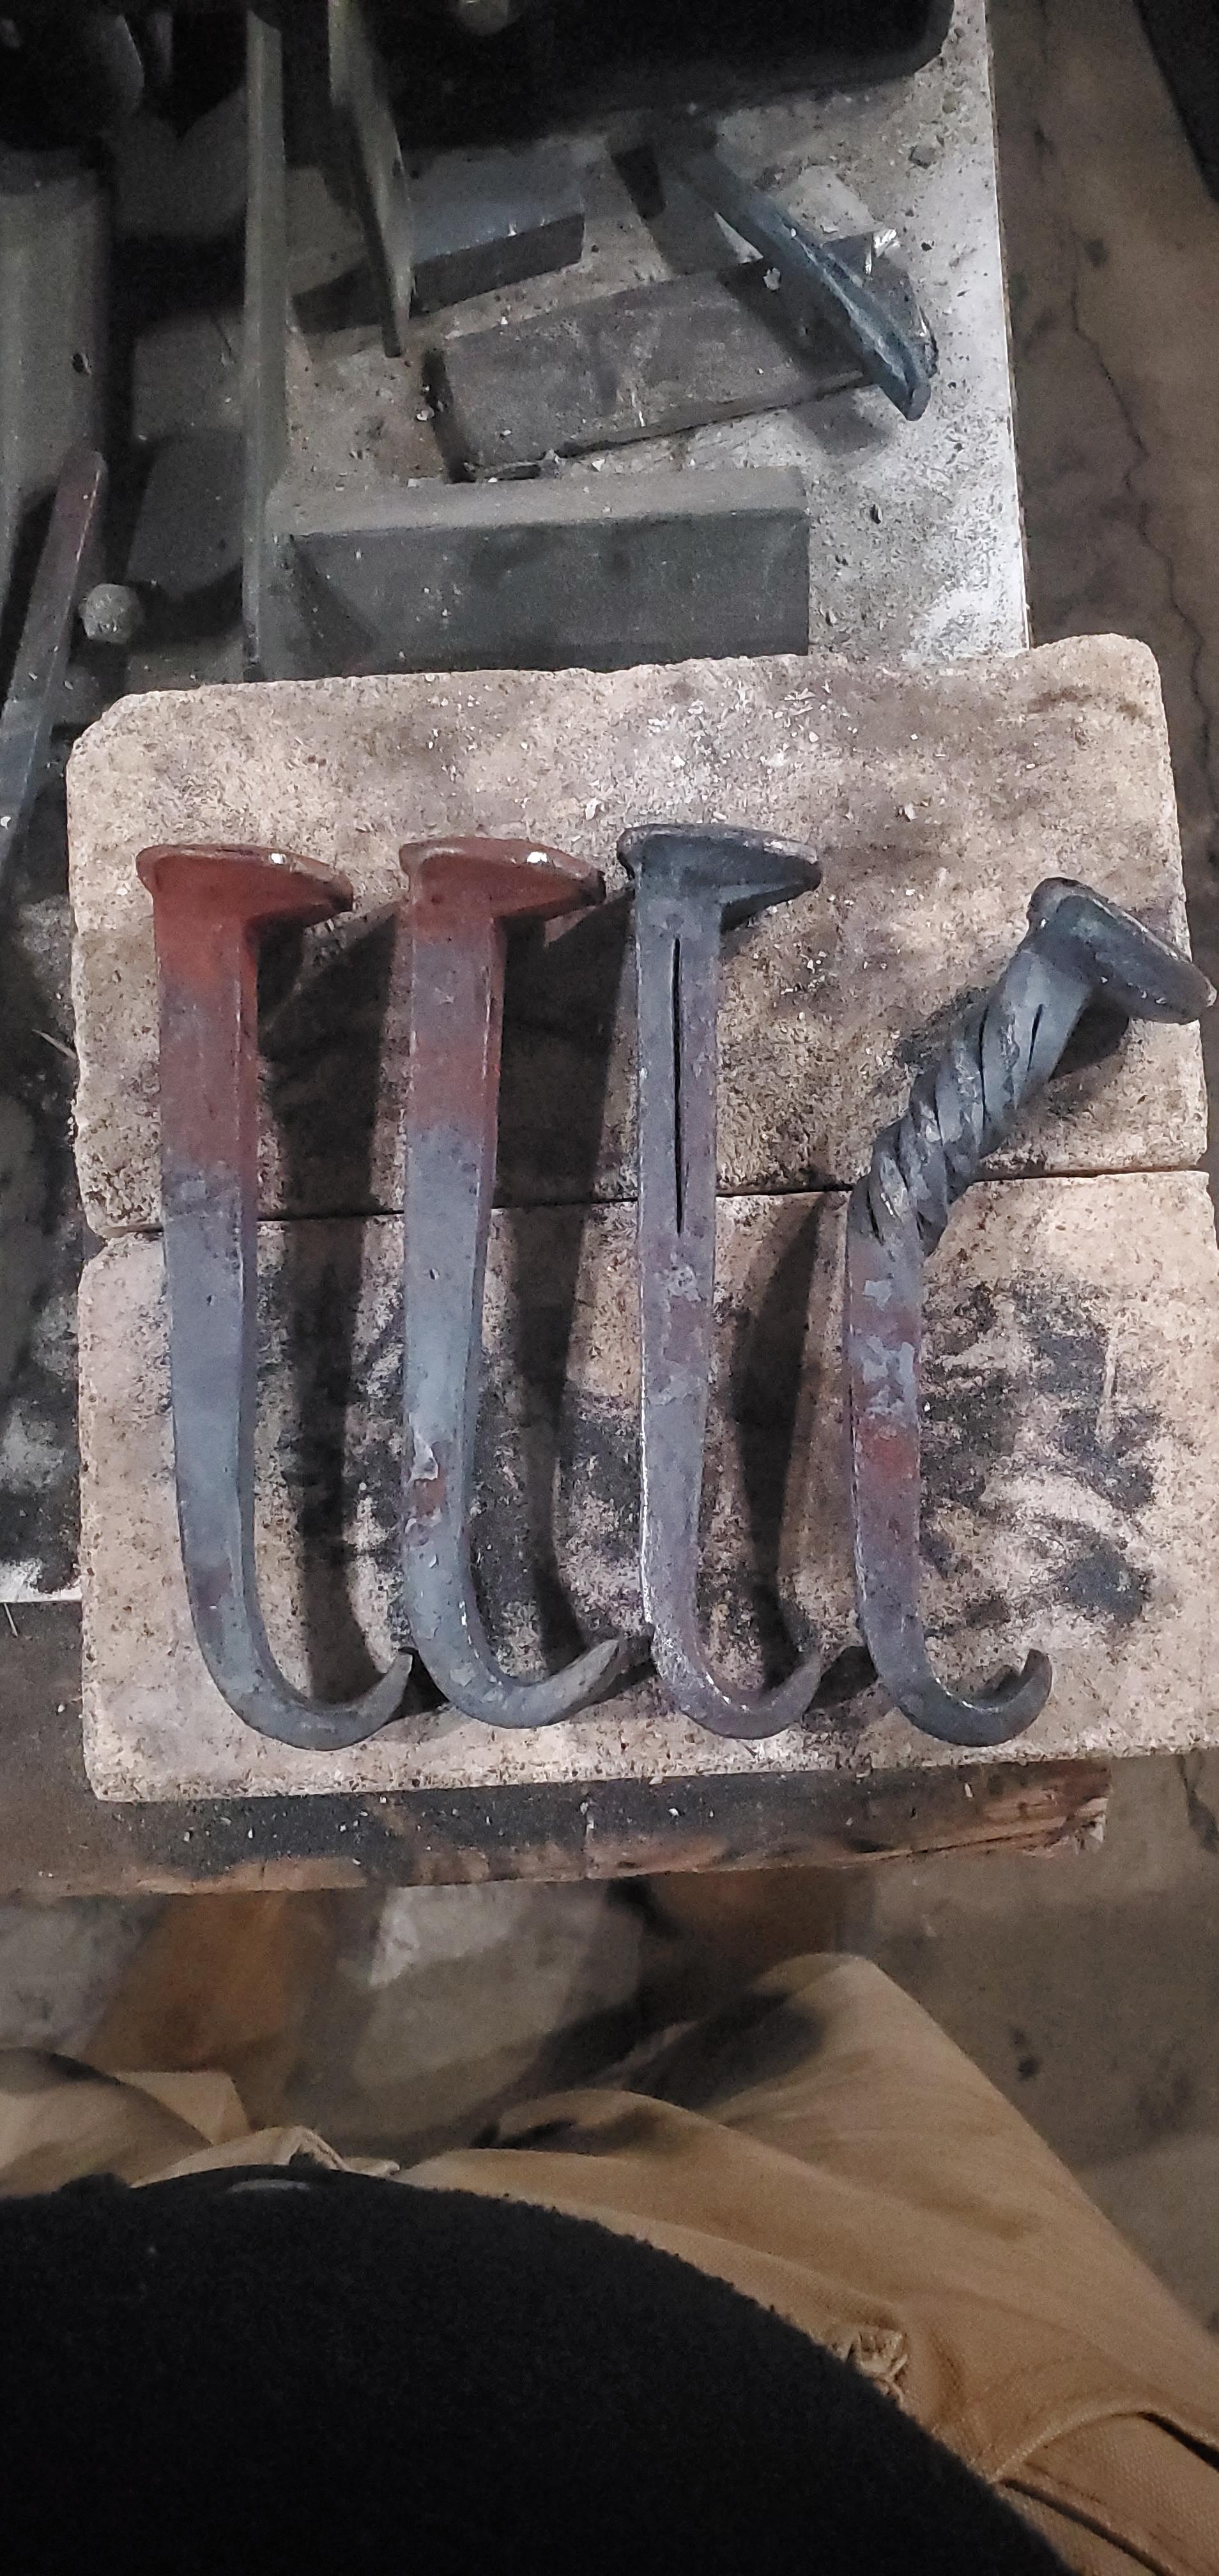
I also played around with, ugh, a RR spike knife that I started recently the first time I went to a local weekly hammer in. I'd planned to use some RR spikes to make RR spike tongs, but the pro blacksmith who helps out with advice at the hammer in was pretty sure there isn't enough material in a spike to do what I wanted, so in order to have at least something to work on that evening I make into a blade. Now I need to decide whether or not to make up a batch of Superquench to attempt hardening it or to just chalk it up to forging practice and move on.
I also tried to harden the two kiradashi blades in the pic below. Unfortunately, neither hardened at all in my gass forge, quenched in Parks AAA. The steel for these is a thin bar my pops gave me when I was visiting to steal an anvil and post vice. He thought it was some 5160 someone had given him, but he could have mis-remembered. His shop is utter chaos and the steel could have been switched around by him or my younger brother. It does spark like decent steel.
I'm going to cut a piece from a bar of 5160 I bought from my local steel yard, spark test it against a chunk from my dad's bar and then test harden the known steel. If I can harden the known steel appropriately, I'll repeat with the mystery piece and go from there.
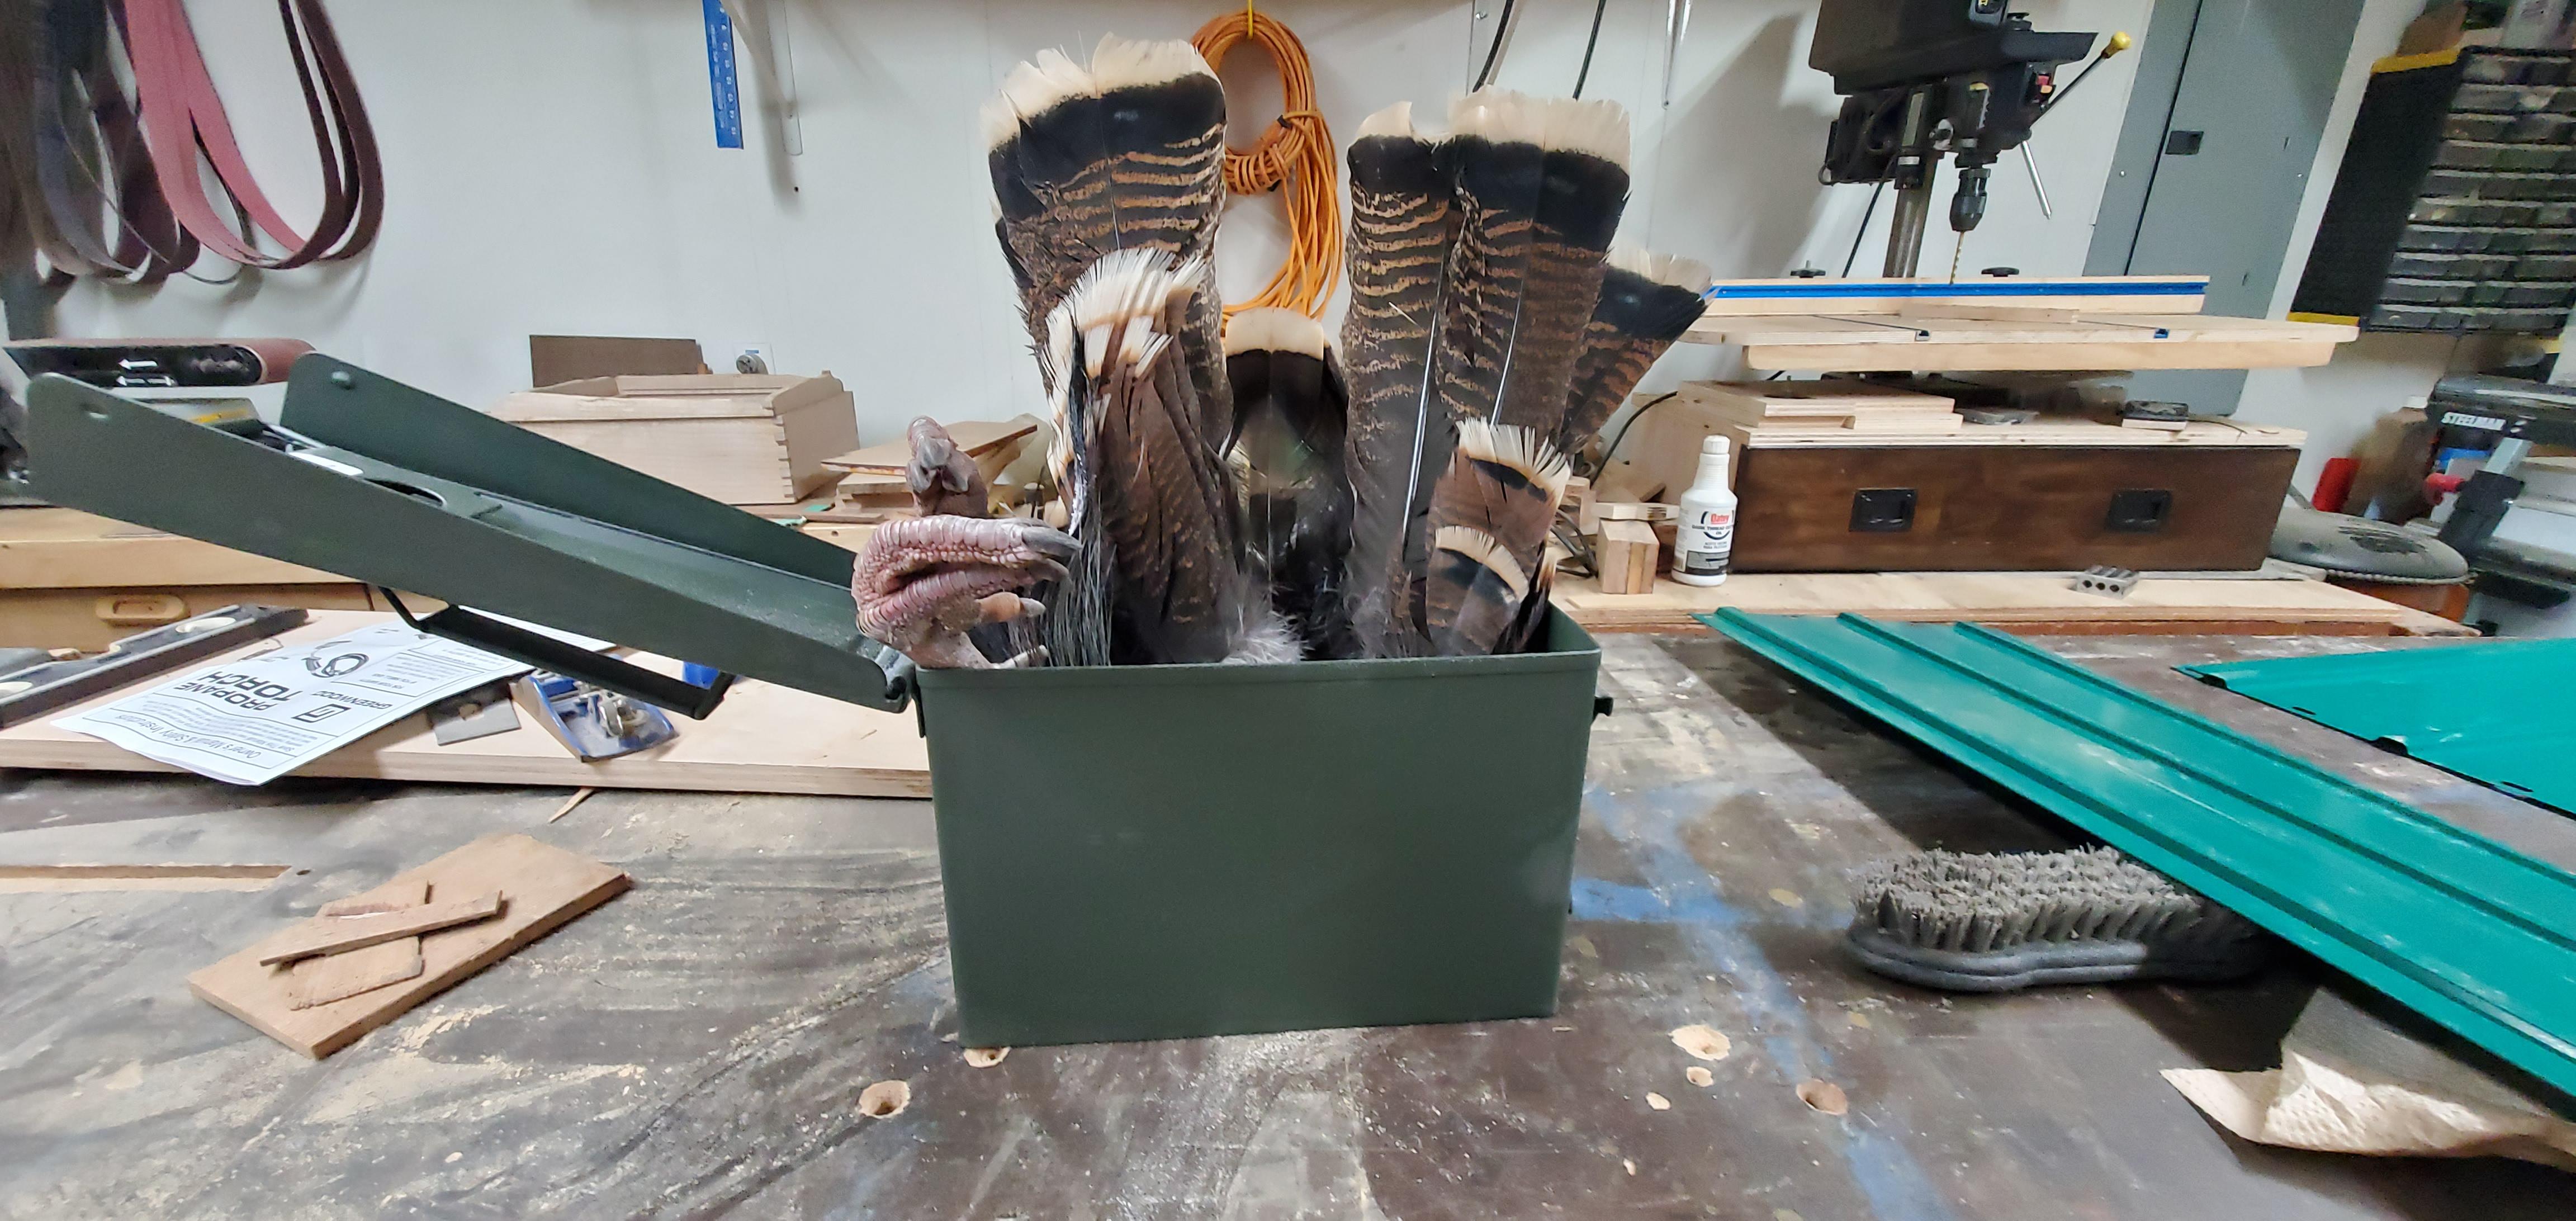
I'd have done more forging, but I also got my Spring tom by surprise... er roadkill. I'd just told the wife last week I wouldn't be doing any Spring turkey hunting because of all the landscaping/remodeling we need to do around the place. Not that it's easy to even find a place to hunt toms (on public land at least) in Western Oregon. So I'm sleeping in Saturday when she leaves to visit friends out of town. She calls right away to let me know there's a freshly hit bird about three block from the house, so I bolted right up and got there in time to find a neighbor bagging the bird to landfill it. He was happy to hand it over, so I spent a good chunk of time plucking and butchering it. Had time to make a little diorama too... er, chuck the meaty ends the tail fan, feet and beard in my ammo can of borax for the moment while I find a container to dry them out in. The wife titled it 'Murica: An Art Installation.

-
Ouch, ya'll are making my hands numb!
I grew up around woodworking, so I have a very healthy respect for my various power saws, especially the table saw. It doesn't play nice.
However, you can royal mess up your digits just doing ordinary everyday things. Last winter, not the current one finishing up here, I was walking my dogs at dusk and one of them got startled by someone with a mask on passing us from behind, so he leapt out to bark at her (he's part Aussie and all mouth). I yarded him back to me pretty hard and my right hand ring finger, which was seperating two leashes, got yanked up and out of the socket and fractured in a nice little spiral pattern along the first finger bone.
It looked like a hockey stick going at right angles to my other fingers. After surgery to pin it back together and months of PT it mostly works right but won't flatten all the way. As a bonus, the middle finger next to it developed a trigger finger response when I grip tight, due to swelling during the healing process. Now I generally get a good grip on things but not infreqently that finger locks up and I have to force it back open, sometimes with my other hand.
Which is all to say hand injuries SUCK. Be careful with your digits.
-
I'm framing sheet metal raised beds for my wife with cedar. Lumber sure ain't cheap these days. Just finished replanking my back deck last month. I ended up buying rough sawn 2"x6"x12 boards (well, one face was planed) from a guy I know who owns a forest in order to save big... Milling all that wood to dimension took some time, especially since I had to go to a friend's house to joint it. Maybe it was worth it?
-
On 3/3/2022 at 11:23 PM, ThomasPowers said:
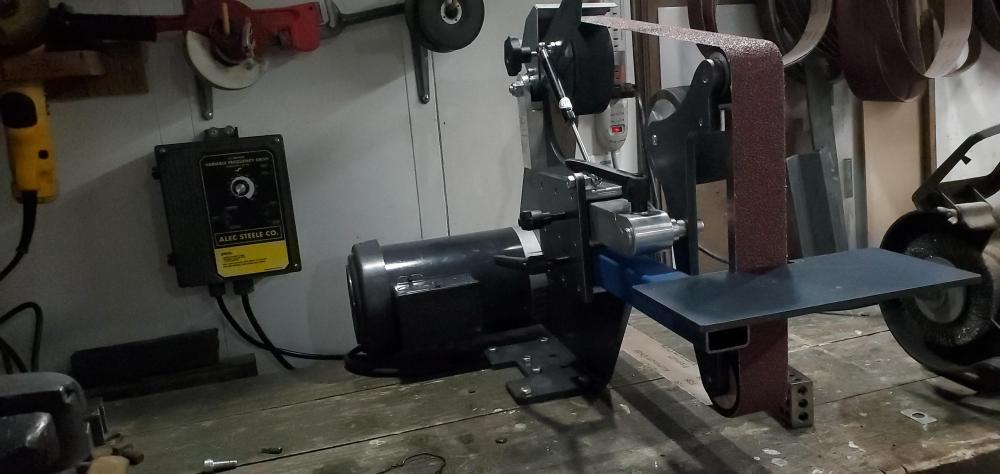
Funny I picked up 4 breakers at the ReStore today, I'm going to run a 220 VAC, 10 AWG line to run my Bader grinder.
I actually used to work for a nonprofit that ran, amoung other programs, one of the largest and oldest materials reuse stores on the Wes Coast. Think your typical ReStore times 4 or 5. I used to bring home stuff like palettes and pallets of cinder blocks, roofing tiles, bulk nuts and bolts, floor tiles for the house, random old tools like hammer heads, a little old bench grinder, and old neck-sizing only reloading press, a hand crank grinding wheel... So much cool stuff/junk.
Never got any electric supplies, though I'm sure we carried them. I'm in no way qualified to run wiring or install breakers. I'm just barely qualifies to do things like wire on new plugs on cords or change jumpers in a VFD box with very clear instructions. I did get the 27D wired up to 110v at 1.5 HP and found that my unit has the jumpers for GFCI and sensitive GFCI, so I can run it now before getting the 220 circuit wired up. That makes me happy.
-
Thanks, Pat. I do know what you mean. I had some cash stashed, extra profits from my small business last year, that I was going to put towards a carribou hunting trip in AK with my cousin. Things aren't moving on that front, so I though, what the heck, buy the grinder now and make more money for Alaska (not through knife making or blacksmithing mind you, through my business).
It's all set up and ready to go, with one little problem. It came with a 2HP motor and a KBAC 27D wired for 220. I don't have a 220 line in my shop yet and the electricians I use are backed up until April. I'm contemplating whether it will be worth it to wire it for 110/115 for a month and change when I have tons of house upgrade projects on the list. I'm leaning towards doing it, trying to figure out if a 14/3 appliance cord I have laying around will be sufficient.
-
Well, it didn't exactly follow me home, but it showd up at home today. After my thread about 2x48 vs 2x72 ginders, I decided to go for the big machine. What the heck. Unfortunately, my electricians are booked up until April and I need a new 220 circuit installed in the shop to get working. I'm wondering if it would be worth it to wire it up to 115 for a month, but I've got a ton of stuff to do around the house... decisions decisions.
![20220301_131038[1].jpg](https://www.iforgeiron.com/uploads/monthly_2022_03/1355201633_20220301_1310381.thumb.jpg.761d3165bcc7bdcf12501e35114f427d.jpg)
-
Hah, Thomas. I almost wrote that it seems kinda subjective. But should it be? I mean, you'd think that someone would have done studies to discovery how much IR light is harmful... to the average eye... and so what level of IR protection is appropriate. I'd expect there to be something like an ANSI standard for forging/kiln work or other similar sort of industrial exposure. But, maybe not.
I get that not everyone has the same eyes. Believe me. Heck, my eyes have gone from fairly farsighted and cross-eyed as a child to relatively normal as a late teen/young adult, to farsighted in one eye/nearsighted on the other as a late twenties-something, to still farsighted in one eye/just barely nearsighted in the other as I tiptoe up to 50. Not to mention the need to go from regular corrective lenses to progressives, to progressives with serious magnification up close.
So heck, maybe I'd prefer your eyes to mine, Thomas
. Seriously thouhg, I just had my annual eye exam yesterday (no cateracts or anythingt natsty like so far, yay!) and ordered $600 and something worth of corrective eyewear -- so eye care is on my mind. I'd like to keep my glasses protected in the shop and my eyes protected at the forge. My great granddad's cataracts did him in... but the old devil lived into his 80s, so mayvbe it's not such a big deal after all ") .
.
Maybe I'll start with IR 3 lenses. Honeywell makes some OTG safety goggles that look like they might be decent. Can anyone speak to how IR 3 green lenses affect your ability to see heat colors on steel?
-
After reading this thread, I searched older threads about safety glasses to try and find out more about what levle of IR protection is appropriate for safety glasses used at the forge.
The choises I've seen so far include didymium, green welders glasses/#2 Welding lenses, IR3 lenses, IR 5 lenses... There also seemto be differing opinions on whether green or grey lenses are better in terms of letting you see forging colors on your steel.
Any clarity to clear things up would be great.


![20220301_131038[1].jpg](https://www.iforgeiron.com/uploads/monthly_2022_03/76378925_20220301_1310381.jpg.1b6880b5f75ba7a83d36f0524bcc2d47.jpg)
New Smithy for a New Year
in Building, Designing a Shop
Posted
Thanks, Bud. It's just enough space for what I'd doing as a beginning smith.