TylerKXJ
-
Posts
8 -
Joined
-
Last visited
-
So my initial findings were definitely a bit off on this one. I was going by the small guage I have attached to each of my tanks (nothing super accurate, just a little dial with red,yellow and green to show how full the tank is, for bbqs). I realized that one of my tanks had a blockage which was almost completely preventing the flow of fuel, so 95% of the fuel was being drawn from one tank, which of course caused it to begin freezing, and made my guage drop to yellow in that amount of time. After warming up again, it went back up to green. Just going by weight, I'd say there's still more than 3/4 tank left, so better than I thought!
-
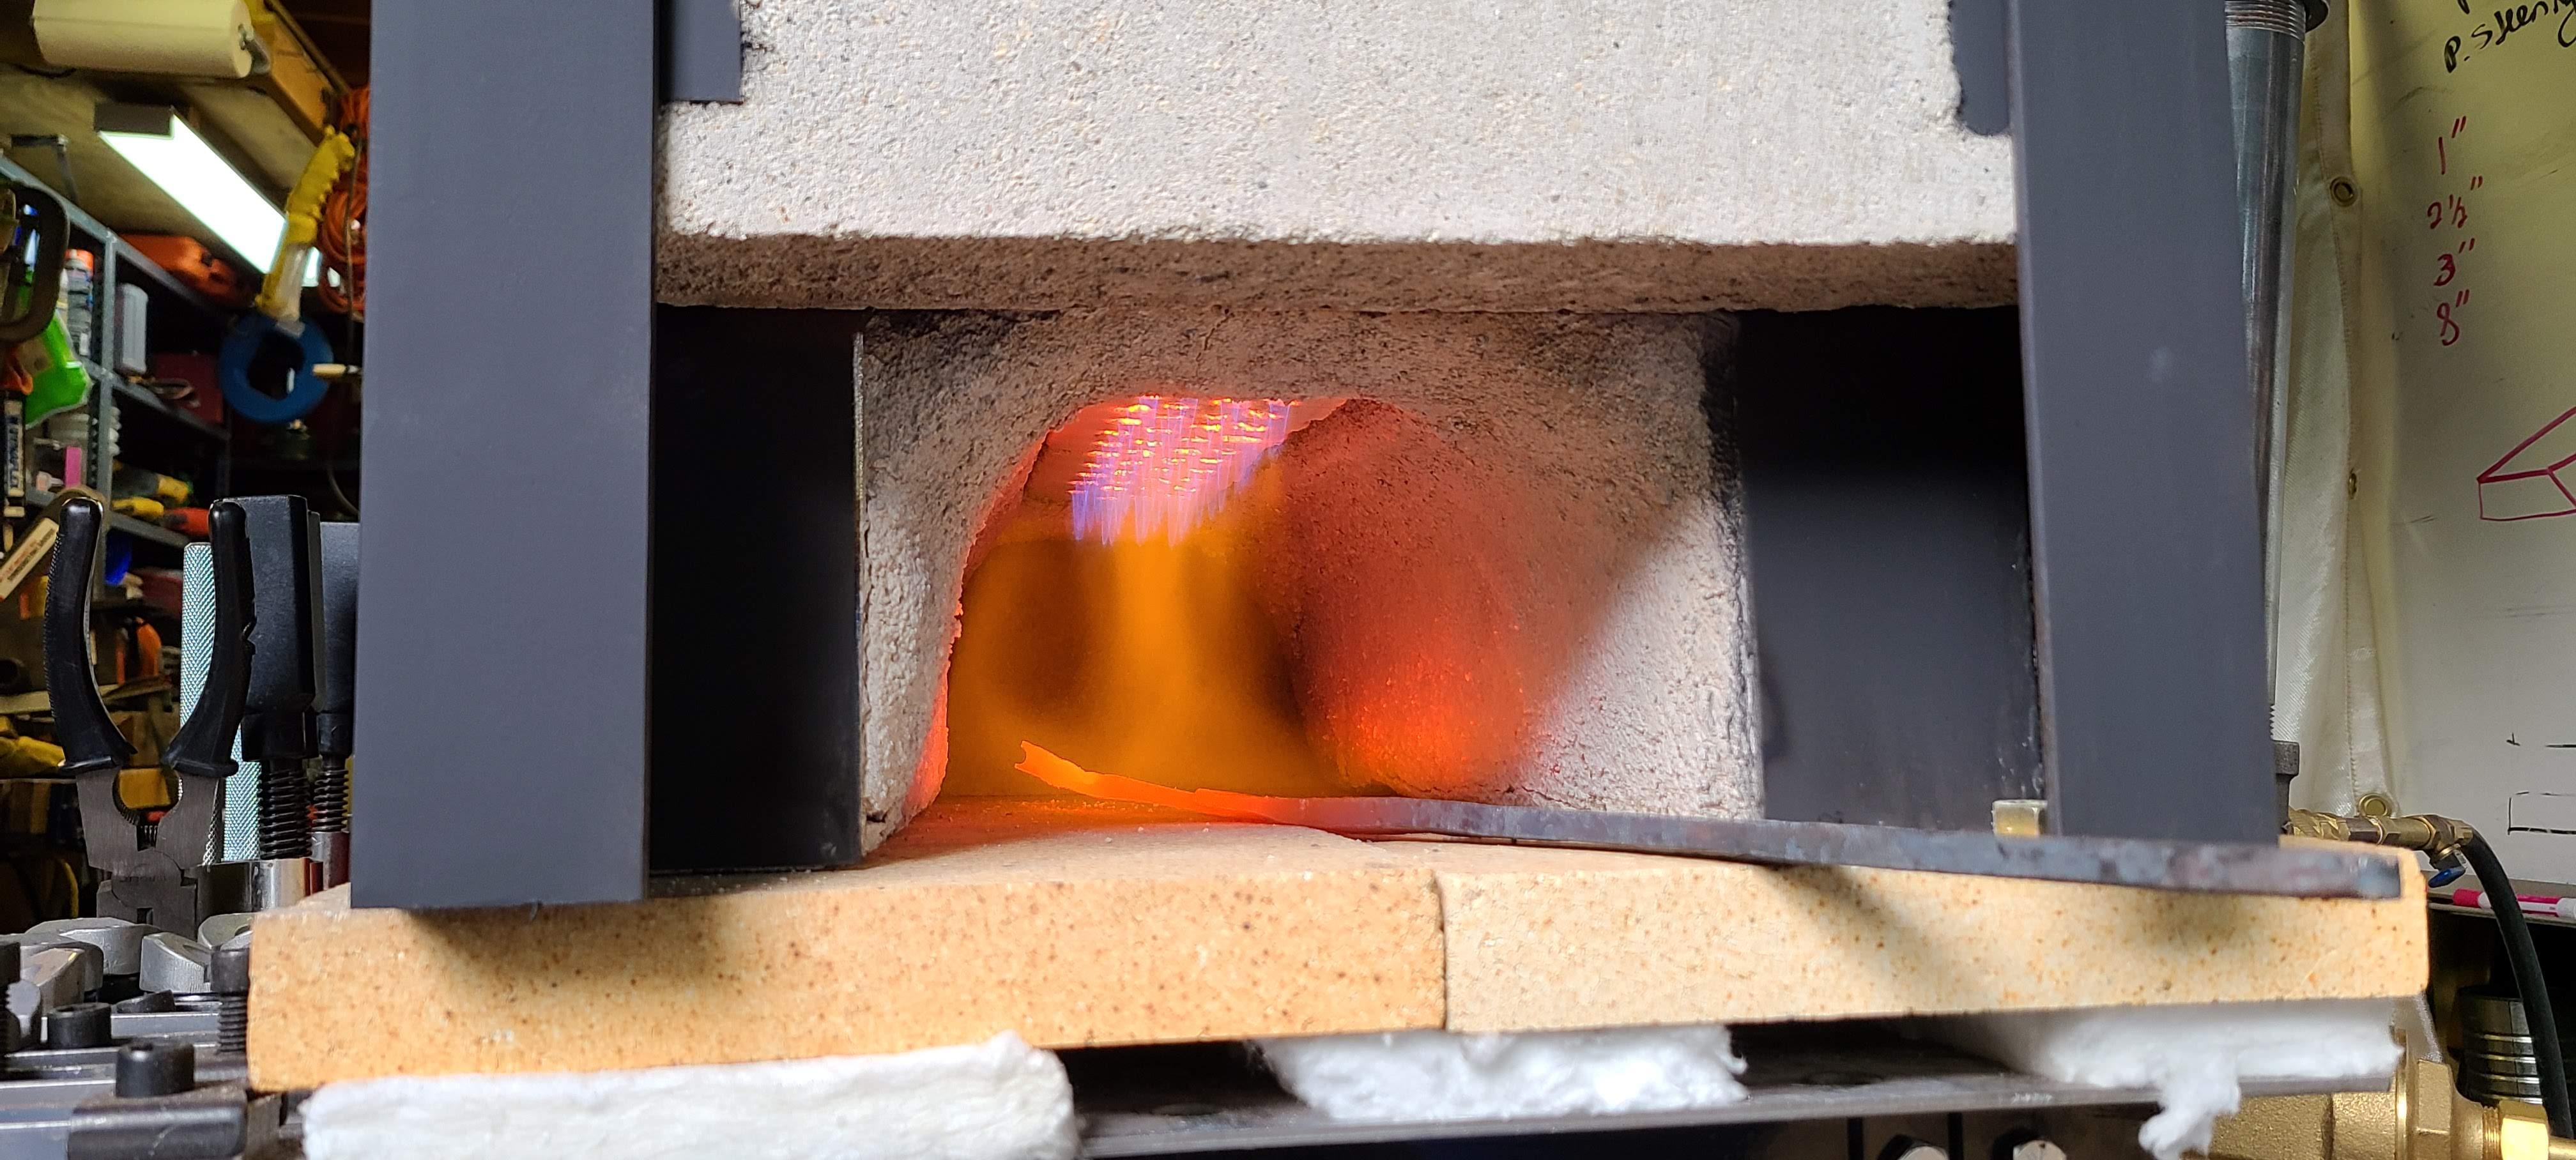
Hello everyone, I want to give a quick update because my issue is SOLVED. What I ultimately did was widened the gas orifice which was one of the easier options, short of changing the forge bricks, coating etc. While I was at it, I manifolded two 20lbs tanks together for the gas input. Im unsure whether I want to run one at a time and switch over when they freeze, or run both at the same time, but i have the option. So once I put everything back together, I let the forge heat up before seeing how high I could push it. Right away I busted my 10psi guage by adjusting the (now extremely sensetive) needle valve too quickly so Im flying in the dark as far as before and after comparison, but since the orifice diameter changed theres nothing to compare anyway. So anyway, the difference was immediate. The gas flow was MUCH higher. So I adjusted the air and the gas to the point where the air gate valve was 100% open, and I had tons more gas pressure to spare after that. But since the gate valve was 100%, that was my max setting, and I adjusted the flame accordingly. And let me tell you, that thing was CRANKING! Holy cow I couldn't believe it. In no time I was pulling sparklers out of the forge for the first time ever! I had a piece of 1" round sitting in the forge, and about 10 minutes later I had a pool of molten steel starting in the floor of my forge! I had no idea that would even happen. Oh yes. In about a half hour of running full blast, she nearly drank an entire 20lb tank. I guess this is the price to pay for welding heat, but I am beyond pleased that I was able to get there with a couple simple changes. Thank you all for your input on this! Some of this advice will likely come into play on the next iteration or as I need to make changes, but for now I'm glad we got this far and I'm calling it a day!
-
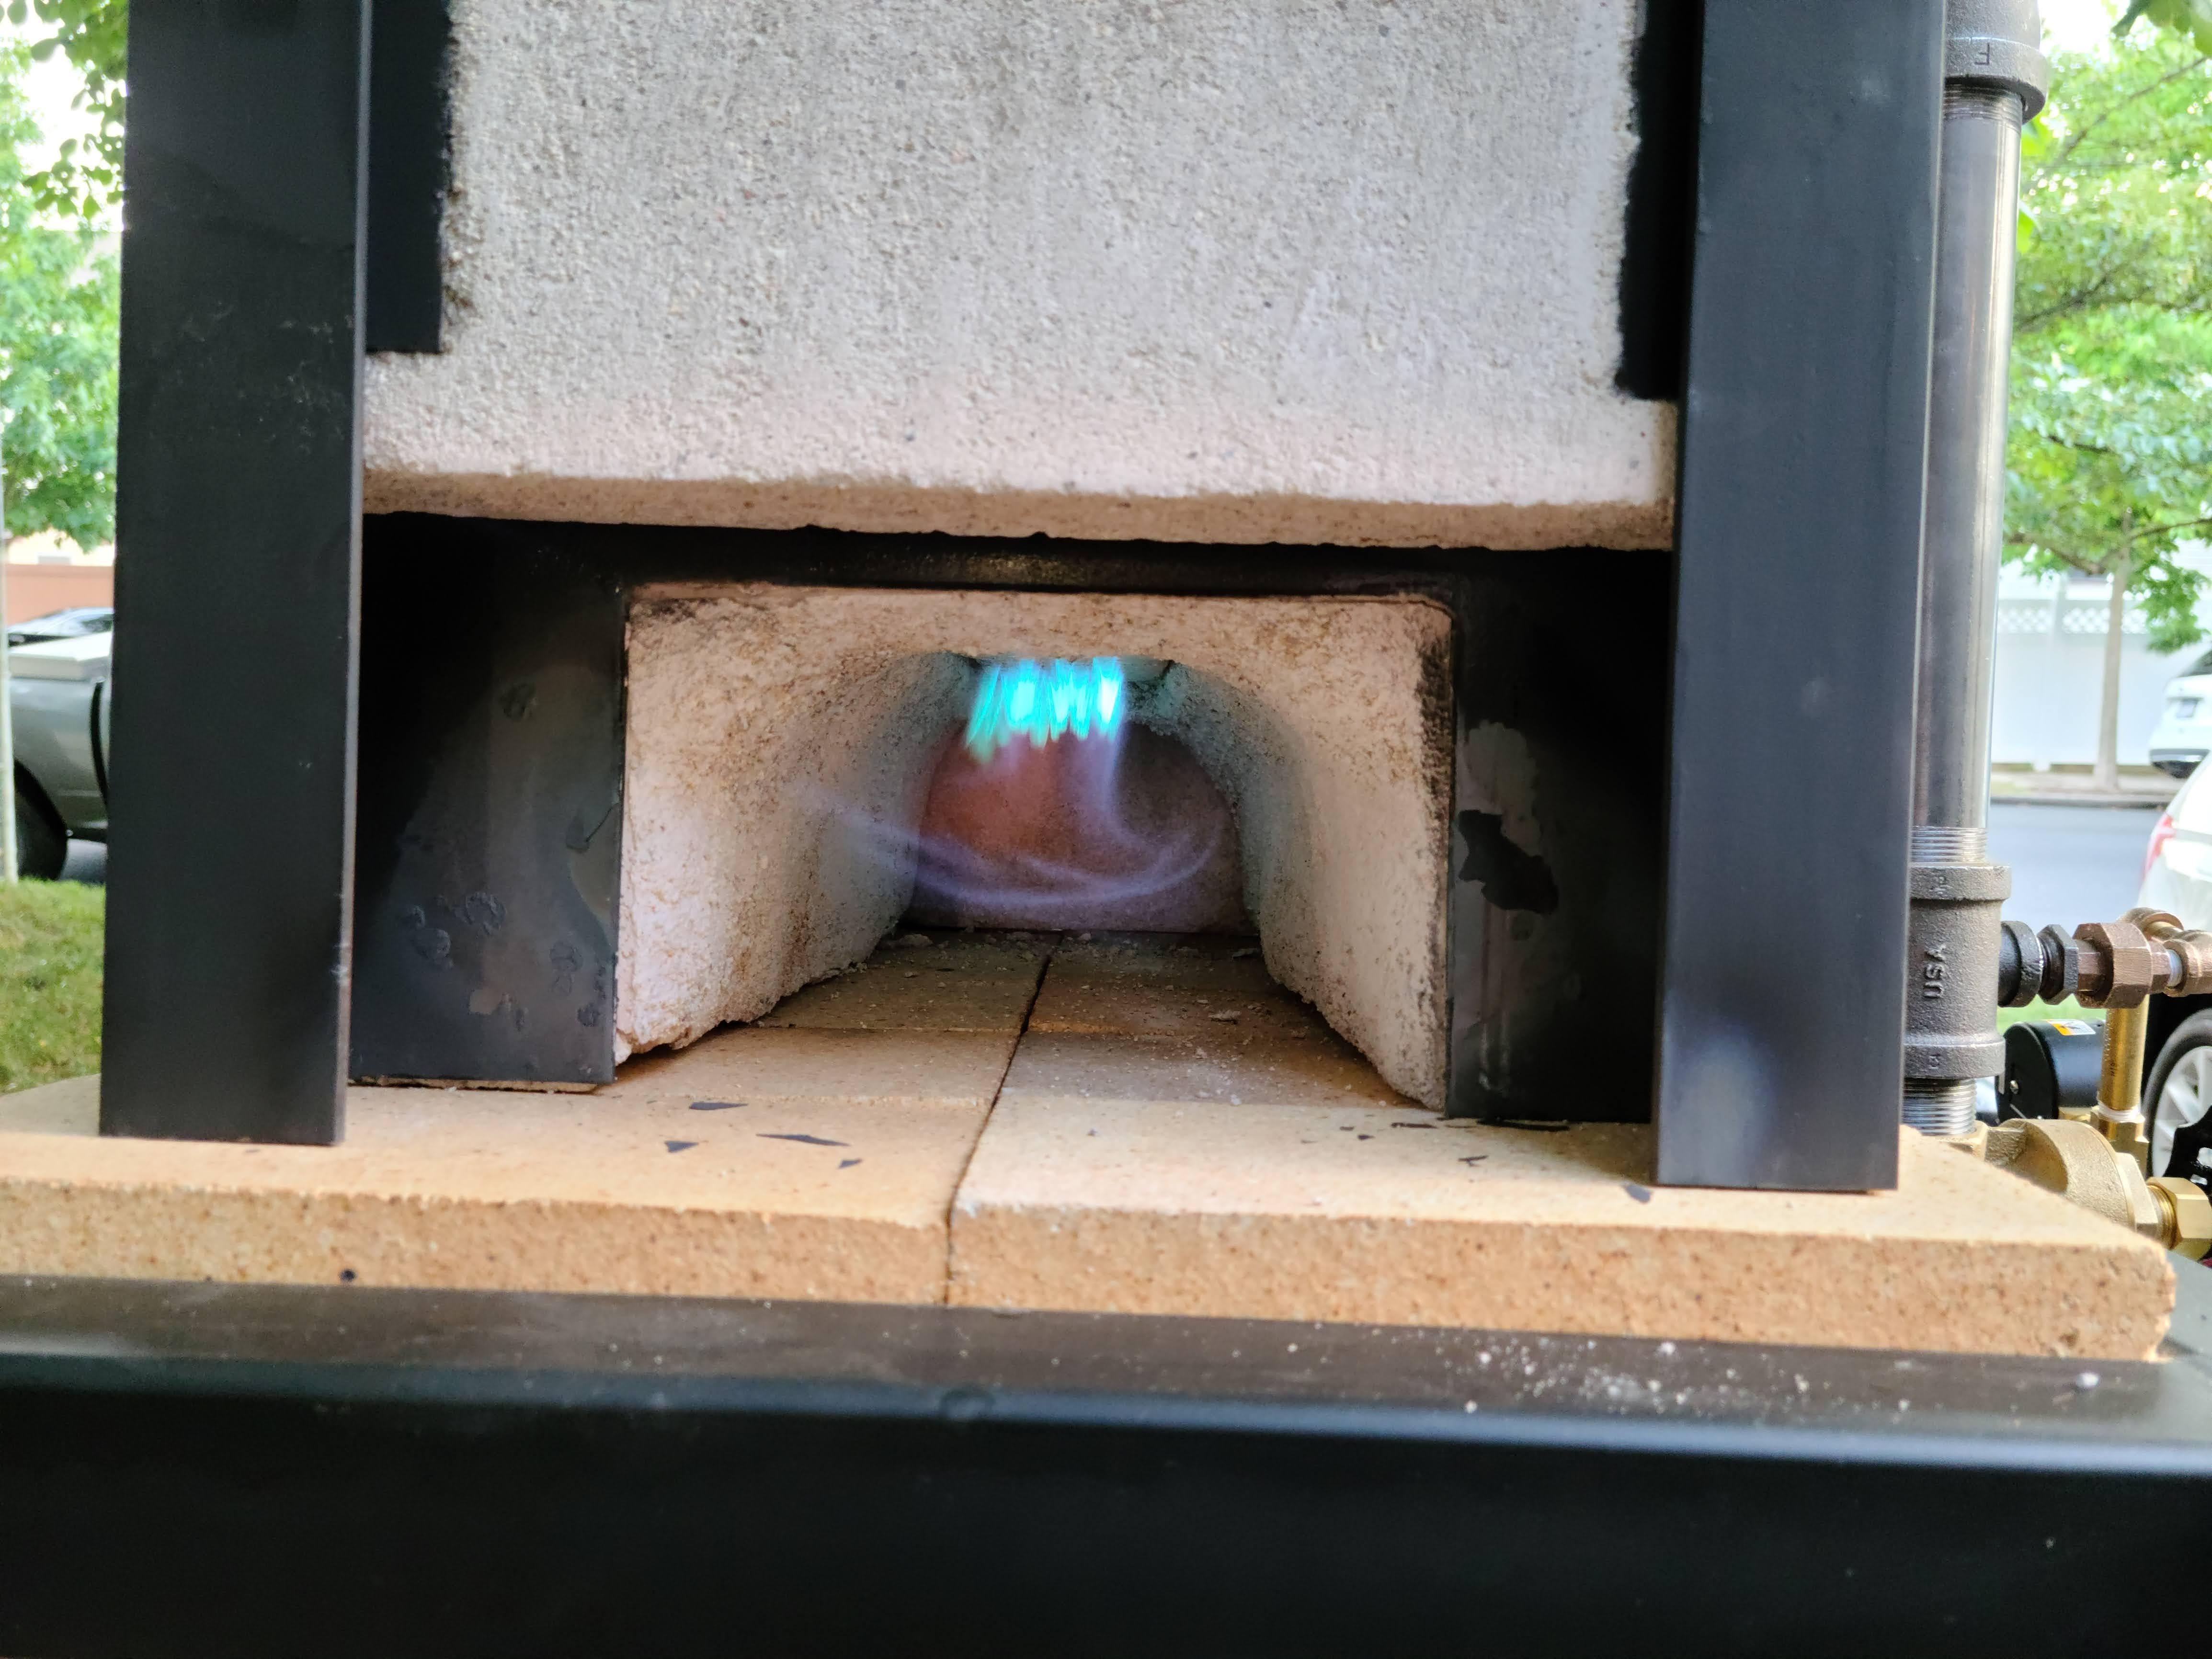
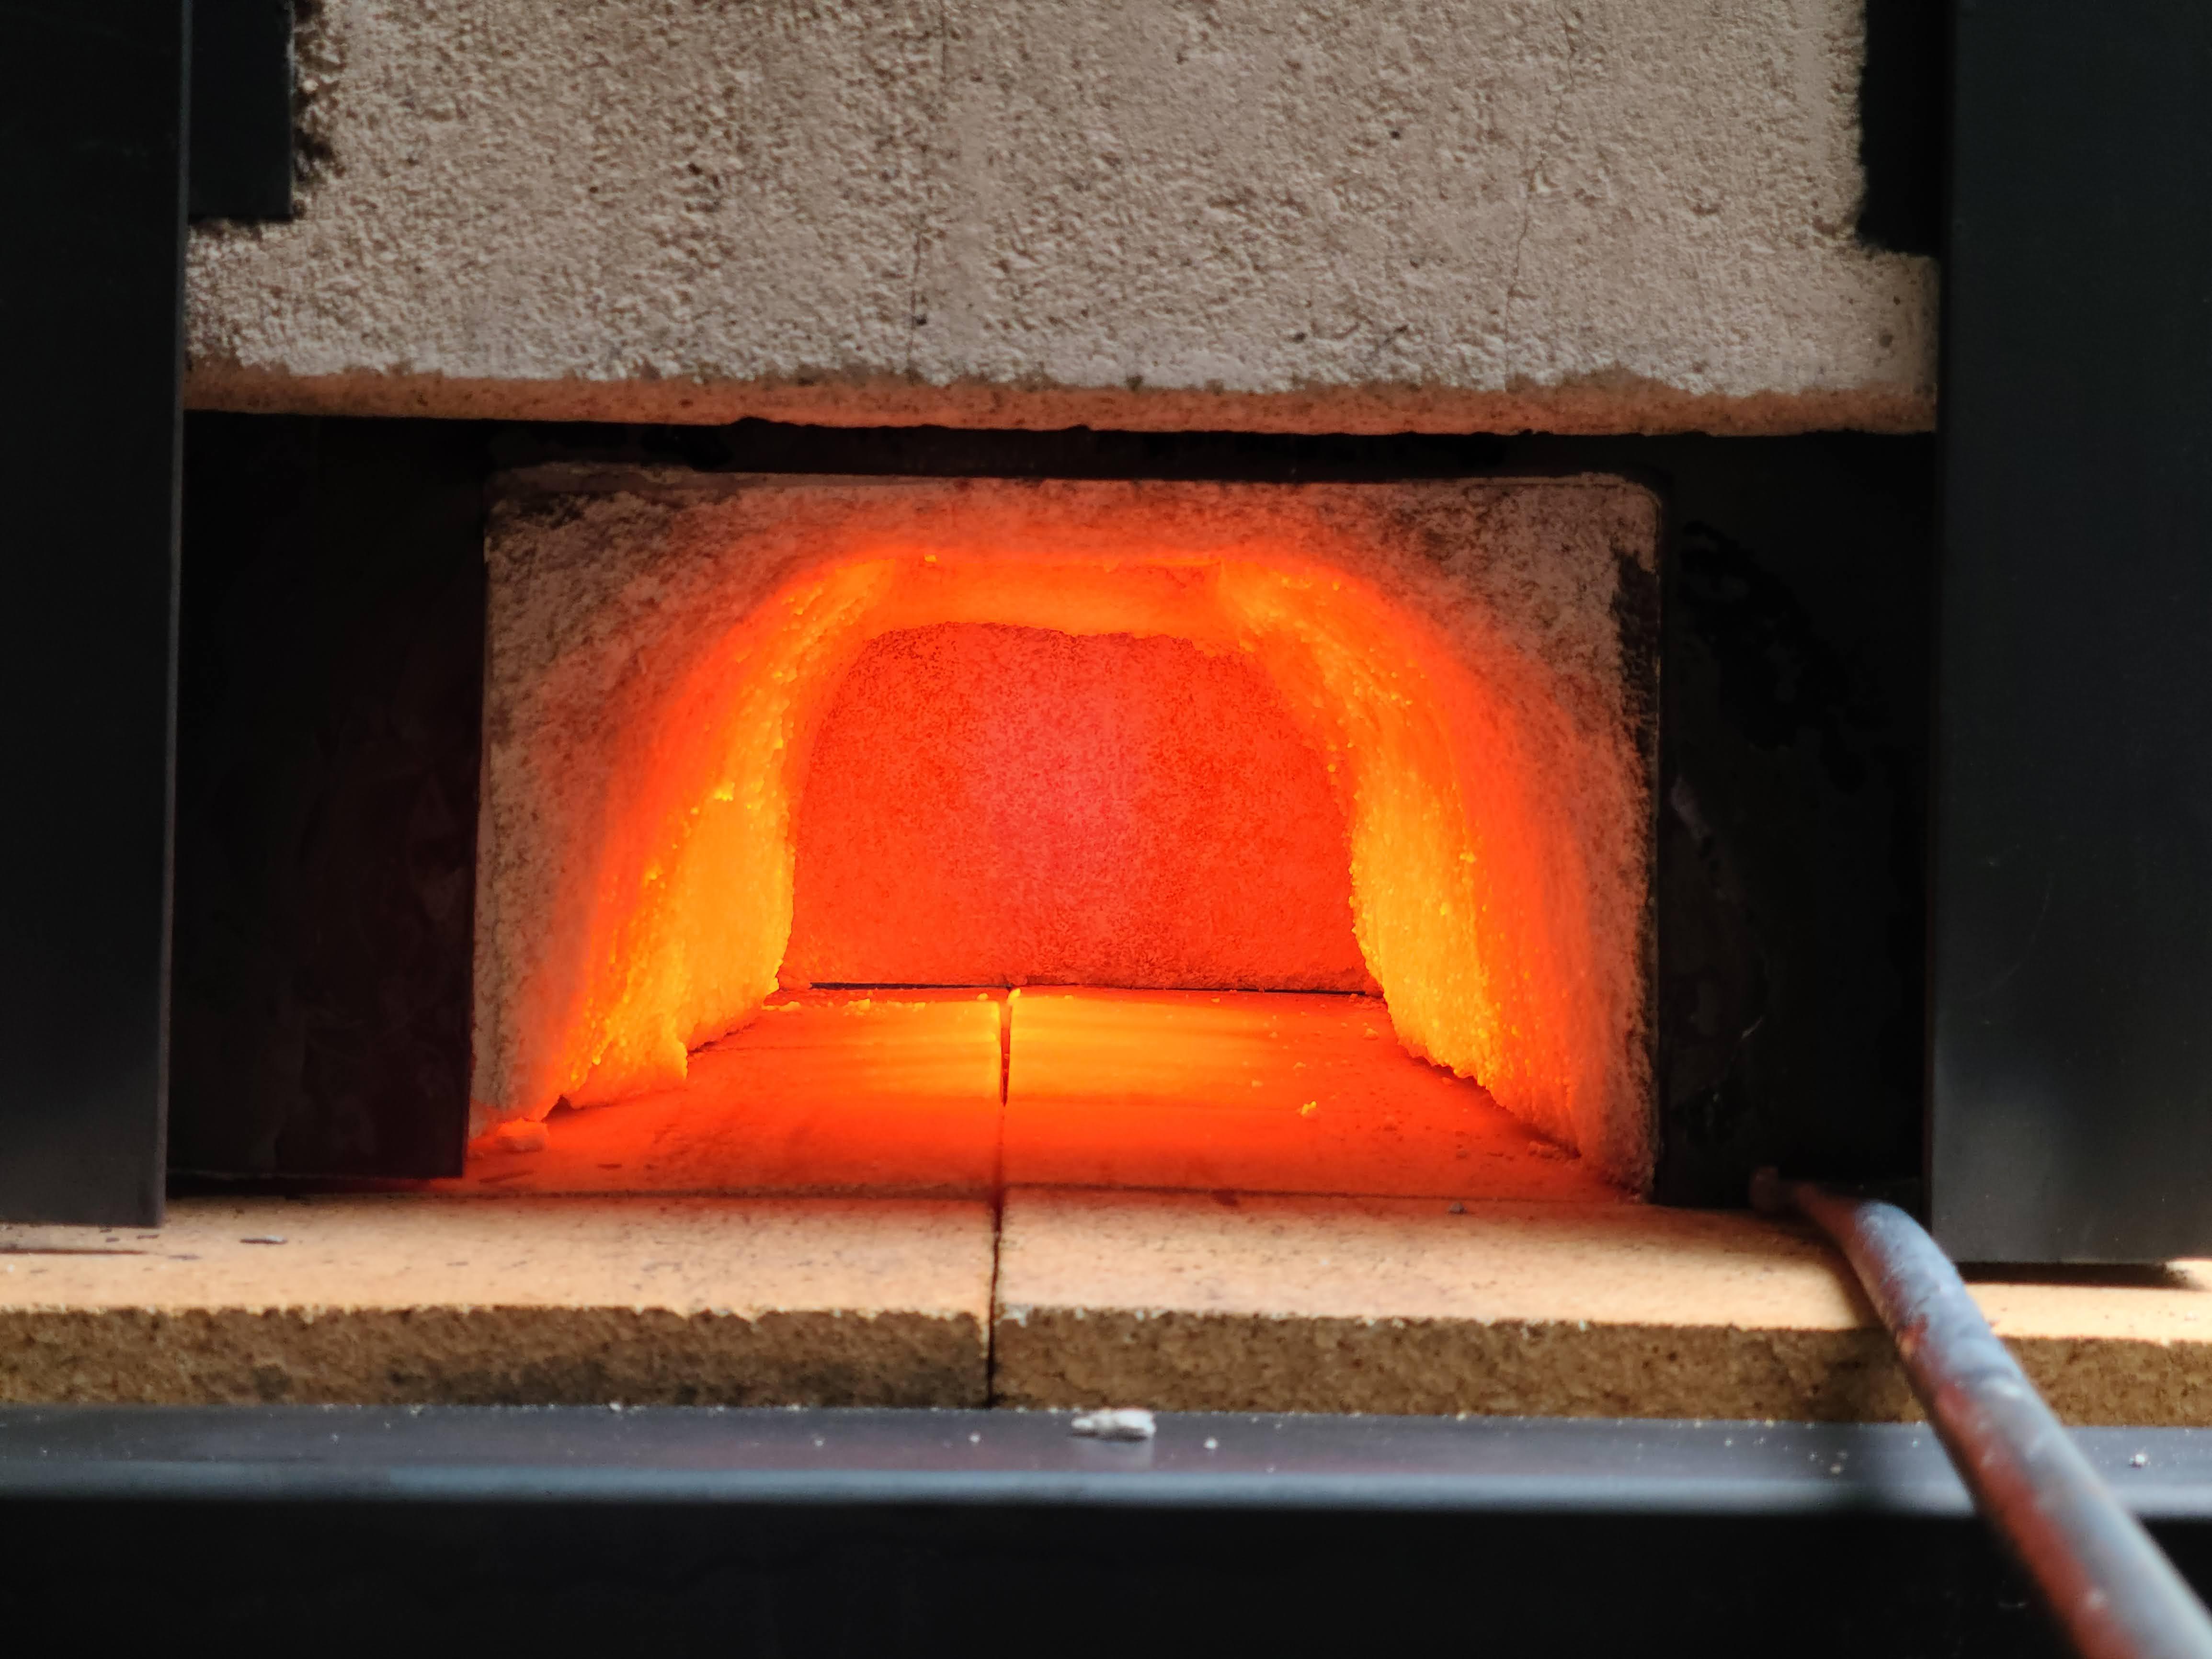
Alright everyone, an update after a day of forging. Frosty, I took your advice seeing where I could get just by adding more air. I just want to throw it out there that I do understand the difference between flow rate and pressure, but since I have no way of accurately measuring the flow rate I am going to continue throwing PSI out there, as nothing more than a benchmark for testing. I let the forge come up to temperature, which looked something like this: The forge was not at its hottest, but you can just barely see the blue flame in the center of the image. I think based on what others have said, this may have been too much air as the flame is off the surface of the burner. Dont take this image as how the burner was performing the entire time, as I tried a bunch of things, but this is where I started. With the doors mostly shut, and the gas around 5 psi (again I know, I'm just throwing it out there for reference) I let the forge get as hot as it was going to get at that adjustment. The air was adjusted to the point that the forge was making the loudest audible "roar" and from what I could see the combustion was looking good inside the forge, although barely visible at this point. Then, I slowly began to add air. Adding air past my initial setting would always lessen the sound of the burner, as well as move the flame off the burner and more into the center of the forge. Both these things as I understand it are signs of too much air. But I would leave it like this for a little, and the forge seemed to want to catch up with the heat slightly rising until I could add more air again. So for the most part I would say this method worked okay, but it didnt get me to where I wanted to go. It seemed to me, at the end of the day the blower was always able to put out more air than the flame could keep up with, ultimately cooling off the forge, and I would end up backing off the air until the sound and look of the flame felt right. Eventually I got here: This was somewhere around 5psi after some adjusting as mentioned above, with the forge having run for a couple hours. I think the photo might appear to make the forge look hotter than it was, but even here you can see we are not at forge welding temperature. After this, I messed around with adding more gas and air, but it didnt seem to do much. Doubling the air/gas mixture for example certainly didnt amount to doubling the heat output (not saying it should, but my point is there seemed to be minimal returns). At the 5psi mark, my tank was freezing up almost every hour, (Laticino you were spot on with this one) so I ended up cycling between a couple tanks. Because of this I dont know exactly how much gas I used, but I would estimate I burned through almost a full tank today, with the forge running for maybe 4 or 5 hours. Kicking myself a little bit for making such a large forge because its way overkill for messing around with small round bar, but as I said above I want to grow and be able to tackle bigger and better projects. But for now the forge is overkill size wize. I will say, with just two pieces of work in the fire, I can forge non stop. By the time I'm done smacking one, the other is already hot and ready to go, so thats cool. So anyway, the main point of this update is to just say that I havent actually changed anything yet, but this was my findings after messing around with my mixture today, and seeing what adding air would do as Frosty suggested. Which again, seemed to put out the flame more than make it grow. In regards to this, The bricks definitely bleed heat. The bricks aren't crazy hot, but certainly too hot to touch. I'm not sure how much It's actually effecting everything, but it might be worth it to switch over to the better bricks. I was also thinking about it and I'm not sure that widening the gas orifice (suggested earlier) would make a difference, as again we are talking about flow rate ultimately, and based on my gas consumption today, I would say I am probably on the high side already in comparison to others. My thinking now is that I don't want to add more gas if I can help it. My 5psi benchmark from today is probably as high as I'd ideally like to go, consumption wise. I would hate this forge to cost me $30 a day to run (propane in the city is annoyingly expensive). I have a 50 gal tank but nowhere to fill it here. Frosty, if you think I should chase this dragon of seeing just how high I can push the air without raising the gas, I'm more than happy to give it another try. But like I said, I kept outrunning the burner with the air and it would take a while for the forge to catch up, and ultimately it seemed to me to not be burning as hot. Turning down the air brought back the roar. Thoughts?


-
Ok, understood. Forgive me because I'm sure this has been answered 100 times, but what is the easiest tell to know when I have a proper neutral flame? Is it a balance between sound, making sure the flame is blue and not orange and is sitting right at the surface of the burner? As I understand, lifting off the face of the burner=too much air, which in turn means too much oxygen, which = oxidizing atmosphere?
-
Thank you for these suggestions. I think I will tackle widening the orifice first as that's by far the easiest modification. One question, you mention removing the swirl inducer, and if I understand correctly that is in an effort to allow more air and gas to flow? Its made of very thin sheet metal (a cut up paint can actually, lol) so I dont think its restricting any air flow, but I will remove it and see what happens, that's another simple change. A buddy is coming over to do some forging in a couple hours so I will mess with it with him and post some better photos.
-
OK now I understand. I think it's not a big deal to try this out. It seems I can get them in the same dimensions too. So maybe this will be my first move. My question now though, is do you think this will make up the difference I am looking for, or is there another factor to consider? Again thinking about people forge welding on .5psi and I cant get there with 10. My gut is telling me there must be another issue on top of the bricks soaking up my heat.
-
 TylerKXJ changed their profile photo
 -
Thanks for a quick response! So I will say those images don't reflect actual operating air and gas mix, that was the first time i ever fired up the forge and was just snapping a few photos for friends. Maybe tomorrow ill try to get some more accurate images. Under normal operation, it does appear just as you suggested, at a certain point you can no longer see the flame. At that point I'm really just going off of sound, I adjust the air to where the forge "roars" the most, but honestly I'm not sure if thats the best mixture, or if its a reducing atmosphere which as I understand it is what you want. As far as the bricks, you are 100% correct. I went with the bricks because I wanted to do damascus and as such was looking for something that I can easily replace after the Flux eats away at it. That being said, if that's what's keeping the forge from getting to temp I can certainly use kastolite for the base if you think that would be better. Both options still have the 2" of kaowool underneath. Done! Thanks for that, I was excited to post and forgot to do my due diligence. Your name also reminded me that I should have used Barque Forge (the name I came up with for my little YouTube and insta channel) instead of my usual alias but too late now!
-
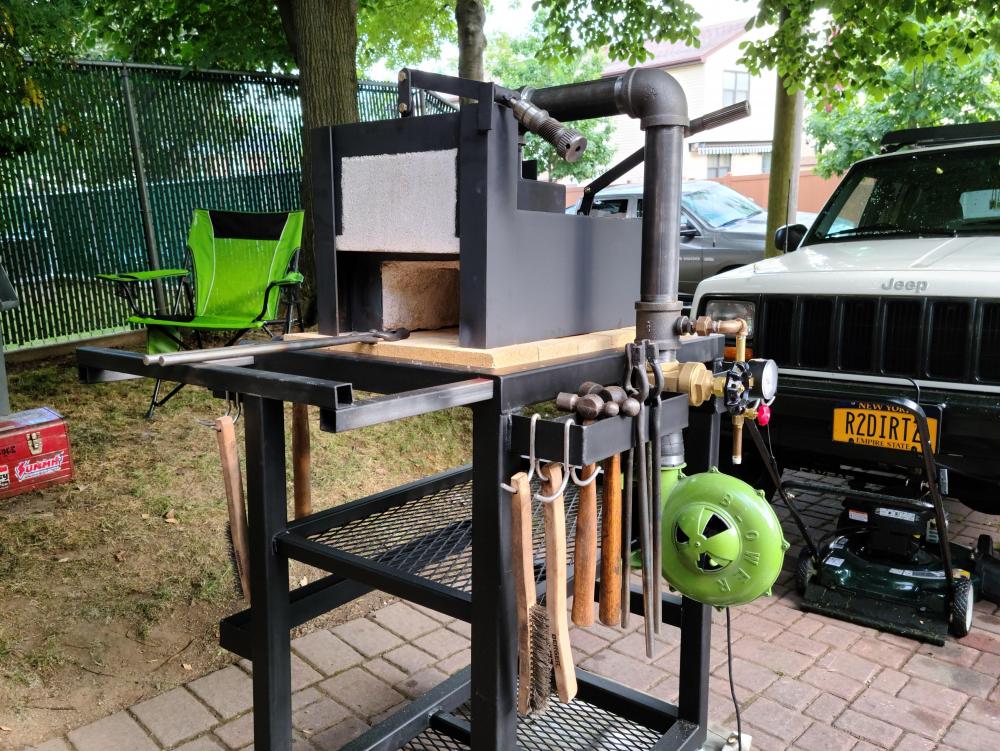
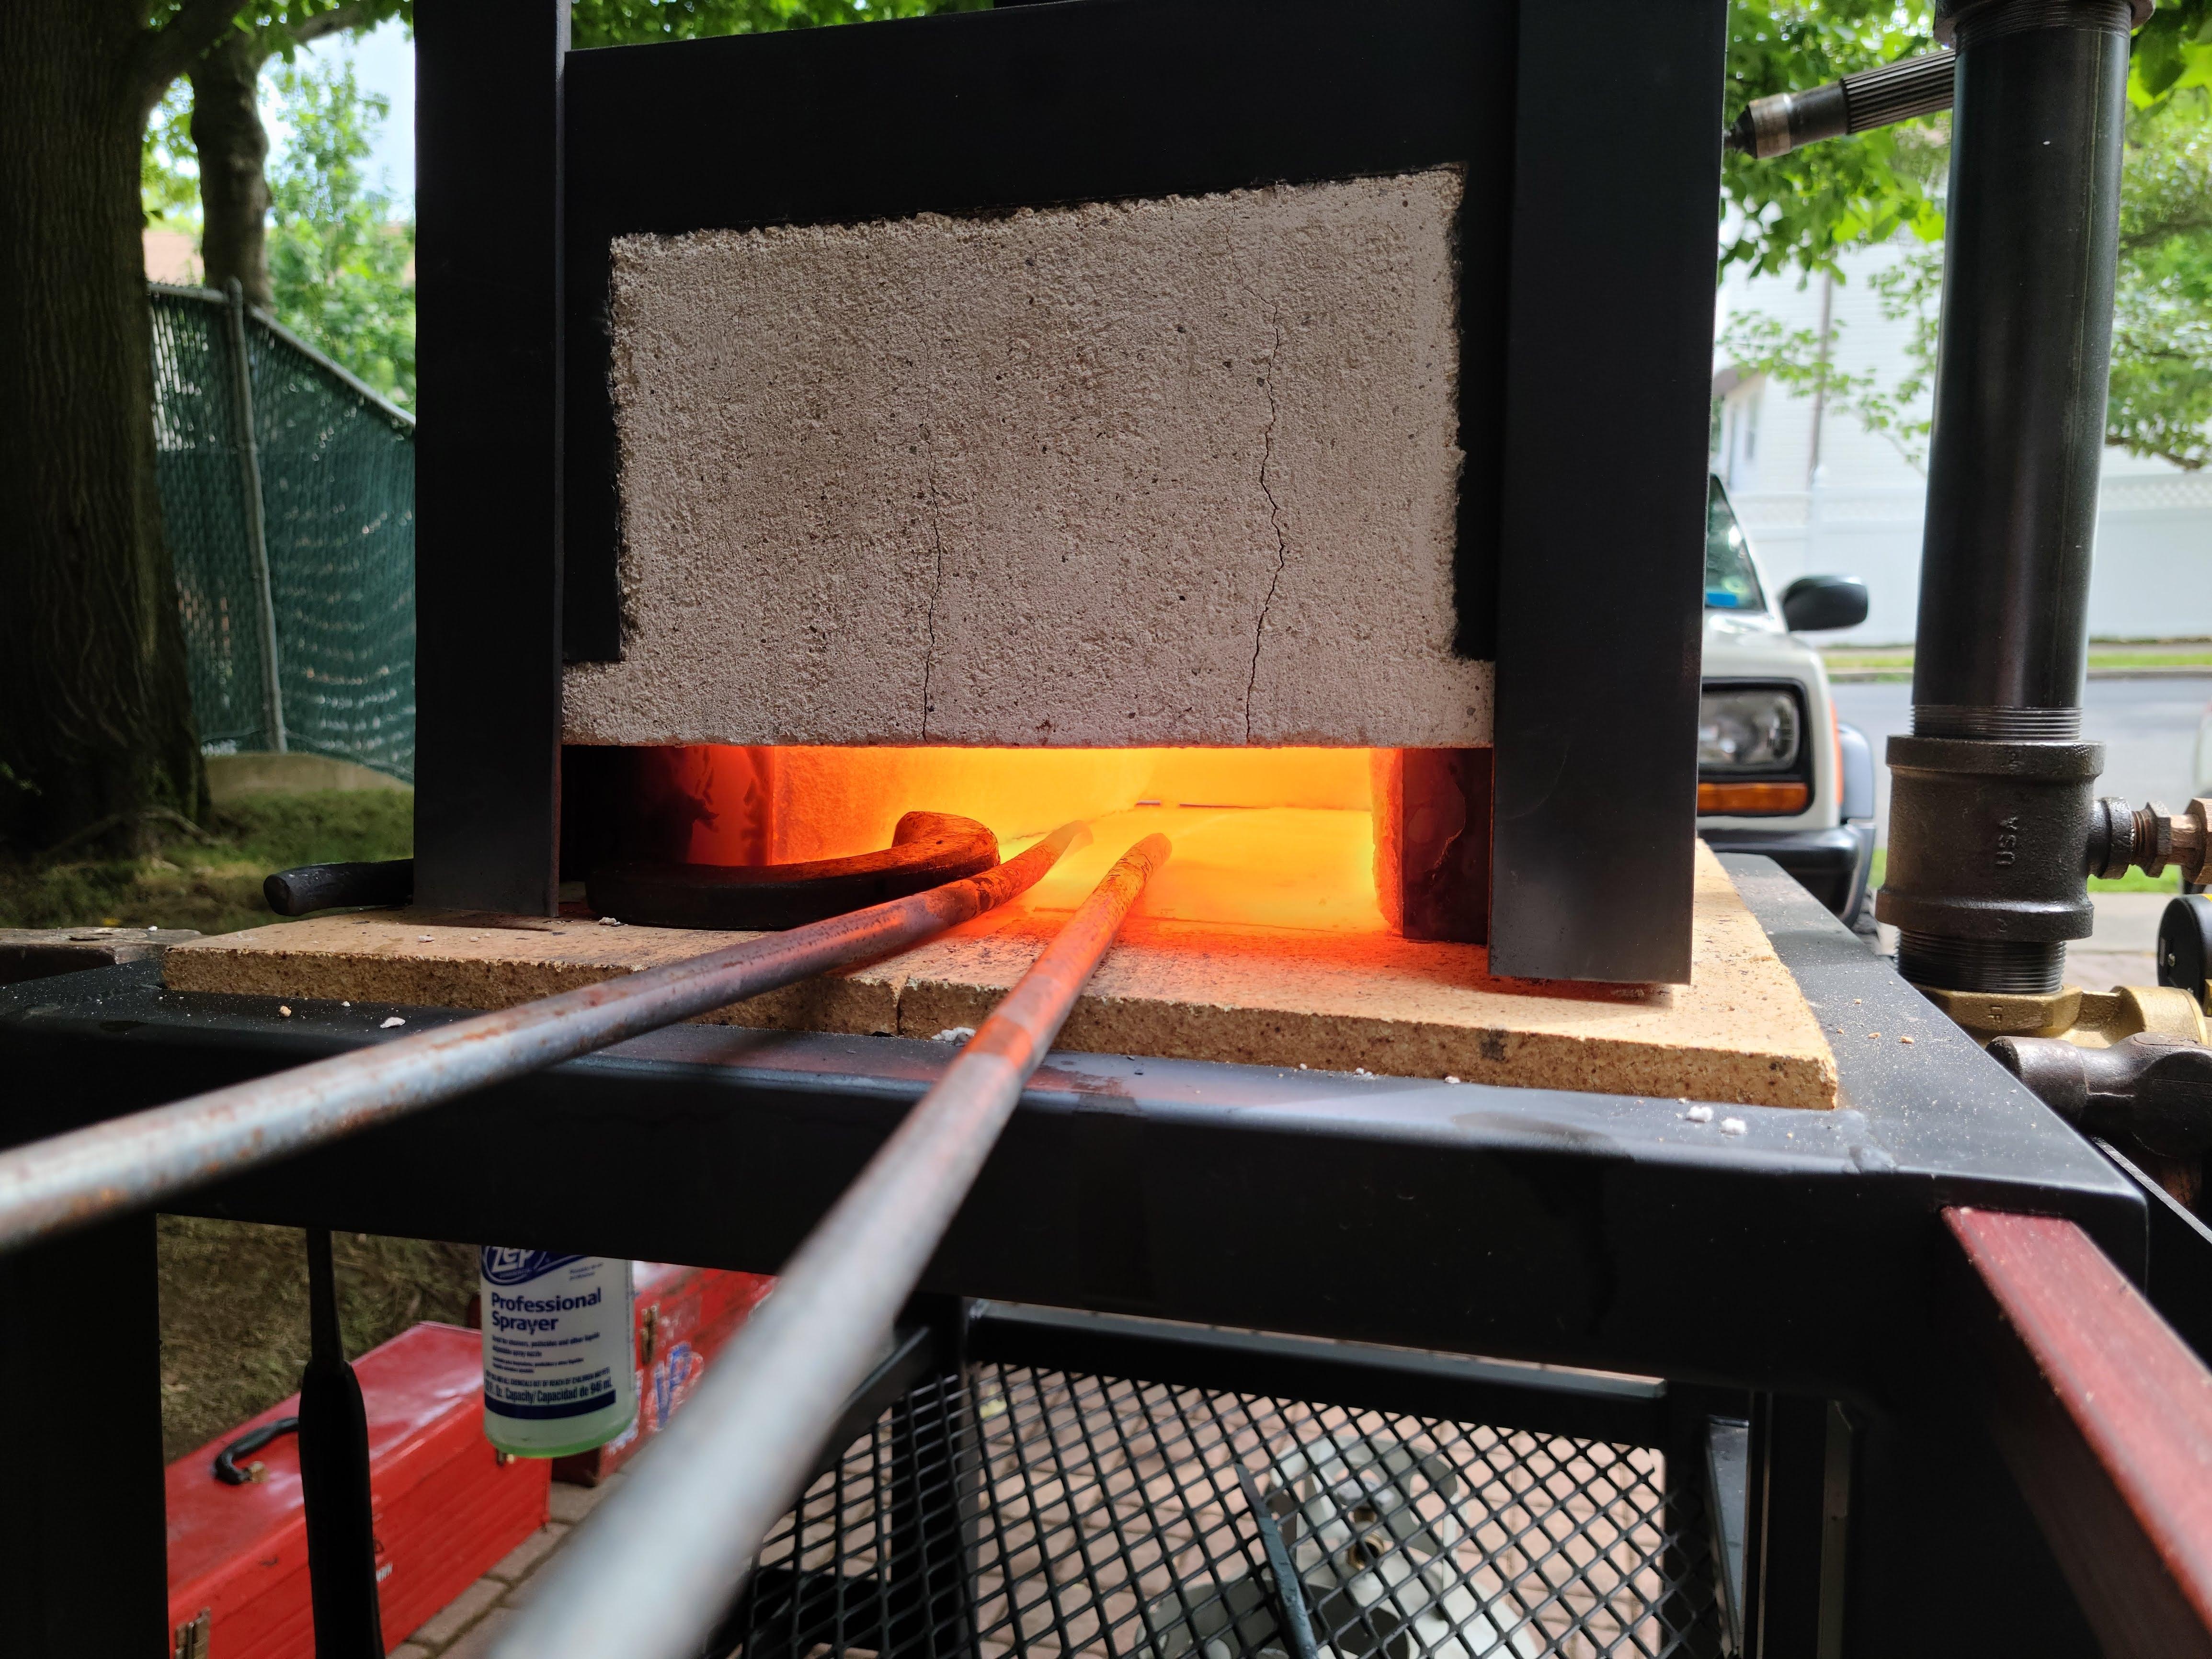
Hello all, I am new to the forum and am hoping someone can help me out with my new forge. So after many weeks of designing and building, I have finally brought to life a forge/forge cart design that I have wanted to do for a long time. I will attach images of the finished design. I have a small shop so the idea was an efficient forge that I can move around to where I need it. Anyway, the main issue is that, while my forge gets plenty hot, it cant get hot enough to forge weld. Here are the details: The main forge opening is roughly 7.5in wide, 4.5in tall and 18in long with operable doors at both ends. Surrounding this opening is 3" of ceramic fiber wool, coated in roughly 1/4"-1/2" of kastolite 30. The forge itself is not attached to the base, it simply sits on top of the base which sits inside the top of the cart. The base is 2" of ceramic fiber wool with a layer of rutland fire bricks on top. The doors are 2" thick solid kastolite. My ribbon burner is the standard 3" square tube design and is 12" long. Not sure how many holes exactly but based on the pictures maybe about 40? Before I detail the gas side of things, I want to talk about the forges performance. First of all, I started out with a 20gal propane tank forge with a venturi burner and no door, so even in its current state this forge is leagues better than my old forge. The main 2 reasons I went ahead with this project is that I wanted a forge that was more efficient, as my old forge burned through a 20gal propane tank in 6-8 hours, and I wanted to be able to forge weld. As of now, goal A is definitely achieved. With about 3psi of gas, I have plenty of heat for every day blacksmithing. As far as how long it lasts I dont quite know yet, but I'm sure that 3psi is far less than what my old forge was running at. The issue is, however, I cant reach welding heat. So onto the gas setup: Feeding my ribbon burner is 2" black pipe, the horizontal portion of which has a static air mixer inside just to help mix the gas and air. Its just some sheet metal bent into a swirl. Overall the mixture seems to be ok, the back of my burner looks like it gets slightly more air pressure than the front, but its not a big deal. This 2" pipe leads to a 2"x2"x1/2" tee. Into the 1/2" port is inserted my custom made gas jet, which essentially is a 1/2" black pipe which extends into the center of the 2" pipe and has a small gas orifice, I'm unsure exactly how large but it is at the very most 1/16", but more likely about 1/32". So essentially the gas is inserted directly into the center of the air stream through this small orifice. The gas lines are all 1/4", with a needle valve and a gauge displaying the pressure regulated by the needle valve. Past the 2" tee is a 2" gate valve to control the air, and past that is the blower. Its this blower specifically, rated at 125 CFM Remove commercial link per TOS So I know overall my forge and burner is on the larger side. However I feel like with doors on both ends and 125 cfm of air pressure, heat shouldnt be a problem. At normal forging temps, I can run about 3psi of gas with the air regulated pretty far down. At this psi, my blower can easily out-blow the gas. In my initial test, I turned up the gas to 6psi and the air accordingly. Then 10psi. Then who knows what psi because my gauge maxes out at 10, but I opened the needle valve as far as it would go, along with opening the air up as far as it would go. My tanks regulator goes up to 20psi, so lets just call it 20psi. Which is insane for a ribbon burner. And still, no forge welding. I let the forge sit for almost an hour at this pressure and It wouldnt come up to temp. I dont have an IR thermometer, but based on color I would say it was sitting around 1500 degrees. Bright orange but no sparks jumping off the steel, and my quick couple attempts at bending a bar over on itself failed. I was really dissapointed after all this hard work to not get up to temp, and figured maybe I had to play around with it more. But then I saw a post where someone was forge welding with .5psi of gas and I knew something was wrong. So at this point I'm not sure where I went wrong. Maybe the forge is too big? Burner too big? Any help would be appreciated. 20200630_200856.mp4 Oh and just some fun details: The cart is made of mostly 2" tube. There are hammer/tong holders on each side which work great for keeping everything organized. And those hooks are off an old pot rack and they work great for hanging stuff. The tools dont get hot as all the heat is balsted out the front, not sideways. Also the forge is really well insulated. It started raining today while I was forging and water was sitting on top of the forge and barely evaporating off. The cart has locking casters which are really awesome. The work rest is made of smaller square tube and pulls in and out of the cart fairly freely. To make that I used a 1.25" square tube welded inside of a 2" square tube, and the work rest itself is a 1" square tube which fits perfectly inside the 1.25" tube, with some grease. You cant see this because I welded a cap onto the end and ground everything smooth, but thats all it is. The doors lock in place by twisting the handles. You really have to crank on them since the doors are heavy, but this lets you open the door just enough for whatever you are working on and hold the rest of the heat in. The handles are sections of the transfer case output shaft off my jeep =) So yeah overall I really like what I came up with aside from the above issue, and if anyone wants to try something similar I would be more than happy to share a parts list, my CAD models etc.
.thumb.jpg.5fe54ac3d1d5eeec5749c2bc54cc5d0b.jpg)


.jpg.28bea54a2325ac9ce1792a51916bed0e.jpg)