MayerMR
Members
-
Joined
-
Last visited
Everything posted by MayerMR
-
Hey Ty, where are you located? As mentioned in the post below yours, knowing your location would help a lot. Thank you and good looking out. For whatever reason, I received an email notification about your post, but not about Ty's post. S/F, -Matt
-
Ah, I understand. Maybe that could have to do with its placement at the foot rather than on the sides though? I just did some (re: very little) digging into the history of the British Broad Arrow and from all the images that I could find, the letter code was always placed to the side or under (what would be the shaft) of the arrow. Really makes me wonder if we are just inferring a Broad Arrow on what may be a centering point? Though why they would be a centering point on an anvil is beyond me. Regardless, still pretty xxxx interesting and I appreciate everyone's input.
-
Thanks Irondragon, I certainly will turn him onto that thread. I'd love to see this little guy get a new lease on life. Not to mention that I live in the Dallas suburbs, so it'd be nice to have a quieter anvil for when I do some late-night thumping
-
That's really interesting! I wonder if it was taken up and used during WW2 over there before making its way over here? Yes, I think I may have just gotten lucky on the deal. The real items of value were the 5" bullet, the 2 yr only Craftsman "Mohawk" drill press, and the HF welder setup w/mask/cart/gloves, tools. The Craftsman jointer and table saw need a complete nut/bolt restoration, so while complete, were "throw-in's" on my part - I have versions of both that are already up and running and I just thought he'd like them. Thomas, I'm wondering if you mean the dressed up, ie "shinier" area around the stamp after it came out of the e-tank, but before the BLO. If so, that was actually my doing. I cleaned up all the stampings with a dremel tool and wire brush so I could get all the gunk out of the crevices. If that's not what you mean, then I don't know. Everything about the anvil looks original to me, down to the "British Broad Arrow" - so *shrug* beats me. Based on Richard Postman's book, this would put it between 1816-1830. I'm tickled to death with how old it is and all that it has "seen" since it's forging. That stuff just gets me excited. Already did and the arrived last night! I must admit that I immediately skipped to the Mouse Hole section to see about placing an age to the anvil, but I'm excited to read through the rest of it! Thanks all for your kind comments and thoughts. I'm pretty excited about this find and look forward to building a nice stand for it soon!
-
Thank you. And that would be neat if that was what the mark was for. Being as old as it is, it makes me wonder what (if any) war this this made items for. Also, I don't seem to see where I can edit my initial post...which is weird because I remember doing it yesterday.
-
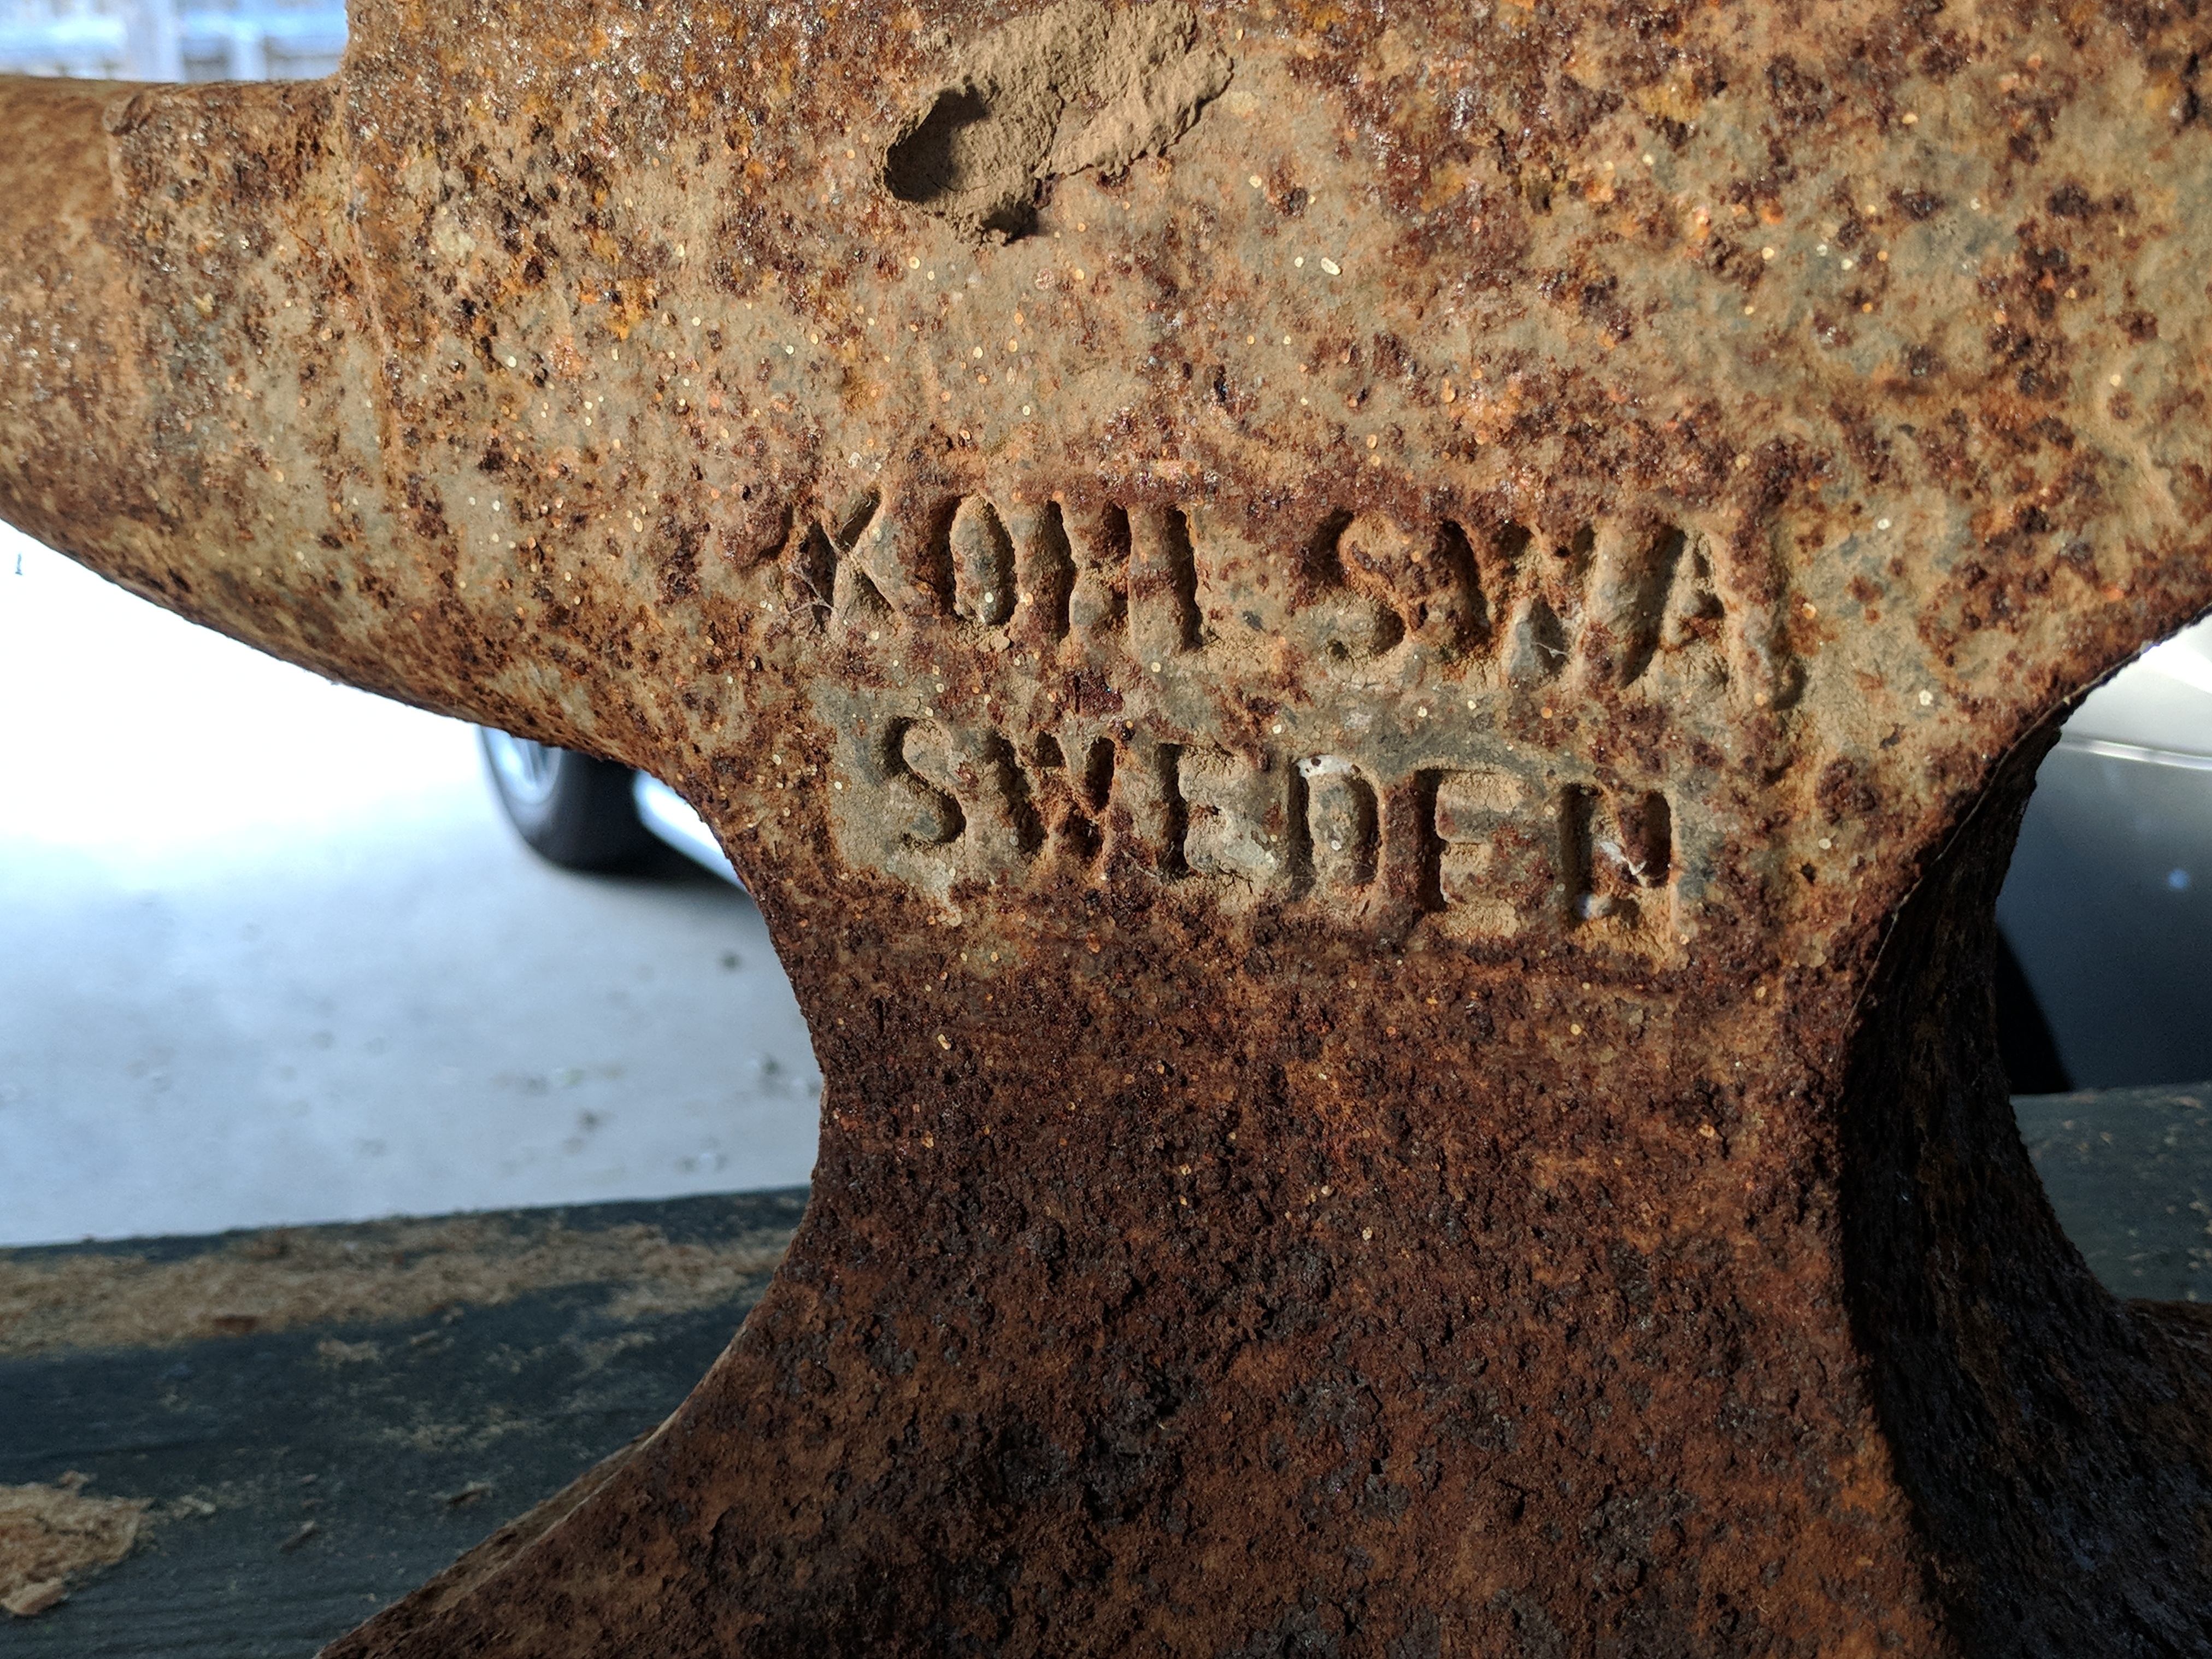
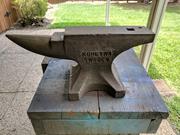
So I traded some nice vintage/antique power tools (Craftsman Mohawk drill press, table saw, jointer, and 5" Wilton bullet, and a HF welder setup) for this nice old lady. Turns out it may be quite old, but it looks like it was well-taken care of most of its life. I hope that I can continue the trend of good caretakers. After some basic prep (knocking off the loose dirt and debris and using acetone to remove that black tar-like substance, it took an overnight bath in the electrolysis tank: Out of the tank and after some basic brushing with a SS wire brush. Then sat in the sun to dry out for several hours: After dried, a more detailed brushing was undertaken to get the remaining rust and detritus out of all the nicks and crevices. Followed by a pretty gentle overall wire brushing to even out the bright spots from the detailed brushing. Lastly, a light coating of BLO (boiled linseed oil) over the whole surface. Pretty happy with how it turned out. Now I just need to make a stand for it and get to work. Lastly, does anyone know what this marking under the horn means? Is it a centering mark?
-
Yeah I'm not too sure exactly what I want to do with it. Mainly it was to get it away from the dirt/mud and stop any *further* degradation. I've recently met a machinist who is breaking out and starting his own shop, full CNC mills, etc. Big stuff. He also overhauls, restores, and sells cutting/brazing torches and teaches classes on brazing, etc. The guy's got hundreds of them. I jokingly sent him a photo of the anvil last night saying, "here's your next challenge" or something to that affect. But he replied with, "I want to fix that at my cost." "I want to fix it" "I saw that thing and I want to fix it" I replied that he's welcome to take a crack at it. What's he going to do, destroy it? Of course, I'm going to give the guy more than just his cost, I'm not going to make him work for nothing. Anyone see any reason why I *shouldn't* let him take a crack at it? I mean, worst case scenario he mills off the top and brazes on a hardened steel plate...and I can't imagine it'd be any worse off than it is now. Laughably, as usual, I'm getting drawn into throwing money at another pit (forge?). Don't tell my wife...
-
Hey fellas, I figured you all might like to see the sad little guy that followed me home today. I did the same thing I always do and ended up personifying and then feeling bad for the little thing. I'm well aware that there likely isn't anything that can be done for it, but still wanted to get it out of the crappy place it was at, even if just having it as a conversation piece. btw, it's a Southern Crescent No. 7. Without weighing it, I'd guess that (at one time) it was a 50lb anvil. We have the technology...we can fix it... *edit* oops, I meant to post this in the regular anvil thread, not the review-by-brand...
-
Hey I think it looks good. What did you coat it with? Just oil?
-
It absolutely will remove paint. So in your case, it'd be a great option for you. If you were hoping to preserve paint though, then you'd want to go a different route. How'd your Fisher turn out? What method did you use?
-
Wow Dave! That's quite the operation you have going on there. How do you keep the exposed sections of the parts from rusting when you've flipped it and it's working the other side? What do you like to use as your sacrificial electrodes? Huge difference...had I known the difference years ago I would have replaced the cast iron one a long time ago! Well I finished up the electrolysis today around noon. It really did a great job removing the rust. I then took a brass brush to it to knock off some of the black residue left by the process And then after blowing off the dust with my compressor, I gave it a light coating of boiled linseed oil and have it baking in the Texas sun. I'll leave in to cure out for a few more days and may even do another light coating. All in all, I'm really pleased with how she turned out. And lastly, just a quick Before/After for good measure
-
Evening fellas! I thought I'd give everyone a quick update on where I'm at with my Kohlswa! I decided to try something new with de-rusting this fella. Electrolysis. Firstly, I'll say that it's incredibly simple to do. That said, my anvil is still sitting in the tank, so I don't know how it'll end up in the end. Here's was my quick and dirty set-up. My wife walked out in the garage to ask me if I knew where the purple rubbermaid that she had just emptied and left in the living room was and caught me drilling holes in the side red handed. I, of course, denied any knowledge of the whereabouts of it. I don't think it worked, but she turned around and walked away, so I carried on. Wired ten 12'' pieces of rebar together around the edges and put a bolt through the pritchel hole. Mixed up the washing soda (sodium bicarbonate) and added the anvil to the mix after taking a wire brush to it to knock off most of the loose scale. Powered on at near near 6pm sharp. Bubbles started right away...that's a good sign: 30 mins later: Just checked it a few mins ago (now 10pm). It's been in four hours now. Can already tell a big difference: Stay tuned for more updates!
-
Thanks Frosty! I really do feel pretty lucky to have received such a quality anvil. As I've mentioned, I've been looking for a better anvil for awhile but in my area these things are My neighbor refused any payment other than helping him move some decorative boulders around with him - but I do think I'm going to try to think of something nice to do for him aside from that, as well. So it's really funny that you mention how loud it will ring. I had read in the past about how good anvils "ring" when you hit them, but I hadn't really had any first-hand knowledge of it until I got this one. On the way out the door to work this morning, I paused and thought, "I'm going to hit that anvil with a hammer real fast" So I proceeded to do so, and sure enough, "RIIINGGGGGGGGG!!!" I was taken aback. So then I thought, well I've been whacking on that Chinese anvil for awhile now and I don't recall anything like that ever happening before...so I walked over to it and thwacked it. It just goes, "thwump" and the hammer didn't even bounce at all. *That* was eye opening to me... Thank you for the kind words. I will definitely looking to the little forge options out there. I have see the coffee can forges before but always wondered if their size would basically limit someone to bladesmithing? Again, I'm completely ignorant, so I need to do some more research. I've not heard of a brake drum forge though; and I think I have a couple of those laying around - I'll need to look into that as well.
-
Man, I bet that sucker was quite the heap-o-rust when you got it. So, forgive my ignorance, but if I built a campfire in my fire pit and got the coals good and hot, could I put a few pieces of iron/steel in there and get them hot enough to do some forging that will make a difference? Or do I really need a forge to get the metal hot enough? I was considering paint; that's kind of option 2 for me though as I'd really rather keep the anvil bare - mainly from a aesthetic perspective though. I'm honestly not as concerned about keeping it from rusting again once I get it cleaned up. My hobby is the restoration of old tooling from the 20s through the 70s (which I then use, btw...they are meant to be used...) so I'm pretty good about watching the humidity and temperature fluctuations in my shop and keeping the bare cast iron coated with paste wax or other protectants. I'm thinking I may try my hand at an electrolysis bath on this anvil and see how that works in cleaning it up.
-
Yes sir, inside 99% of the time. It's light enough that I can move it about if I want to though. I really just wanted something that would allow me to keep the sides from rusting up again. The face is a bit pitted as well, will it hurt it if I take an orbital sander to help smooth it out some? I'll be honest, I don't think I even have a method (other than a propane or oxy torch) to heat up anything anyway.
-
Thomas, Thanks for the reply, my apologies about my naked profile. I'm located in Dallas, Texas (well, technically, just outside of Dallas, in Richardson, close enough). Thank you for the advice. I'm assuming you mean silicone caulk on the underside where it meets the stand? And that's what I'm finding...people are throwing big $$ numbers out when talking about these things. I'm not really overly surprised that a quality anvil would go for that much though, to be honest, since I've been looking for a new anvil for awhile. Most anvils in this area tend to go for $500-1000, granted they are larger than this one. People are really proud of anything they can call "vintage" or "antique" in this region... So since I'm in Dallas - does my boiled linseed oil treatment a la the cheap Chinese anvil work out? Ah darn it, one post and I've already made a faux pas. My apologies, I let my excitement for my new anvil get the best of me. I've already added some info to my profile and I'll be sure to read through that post before I make any more mistakes!
-
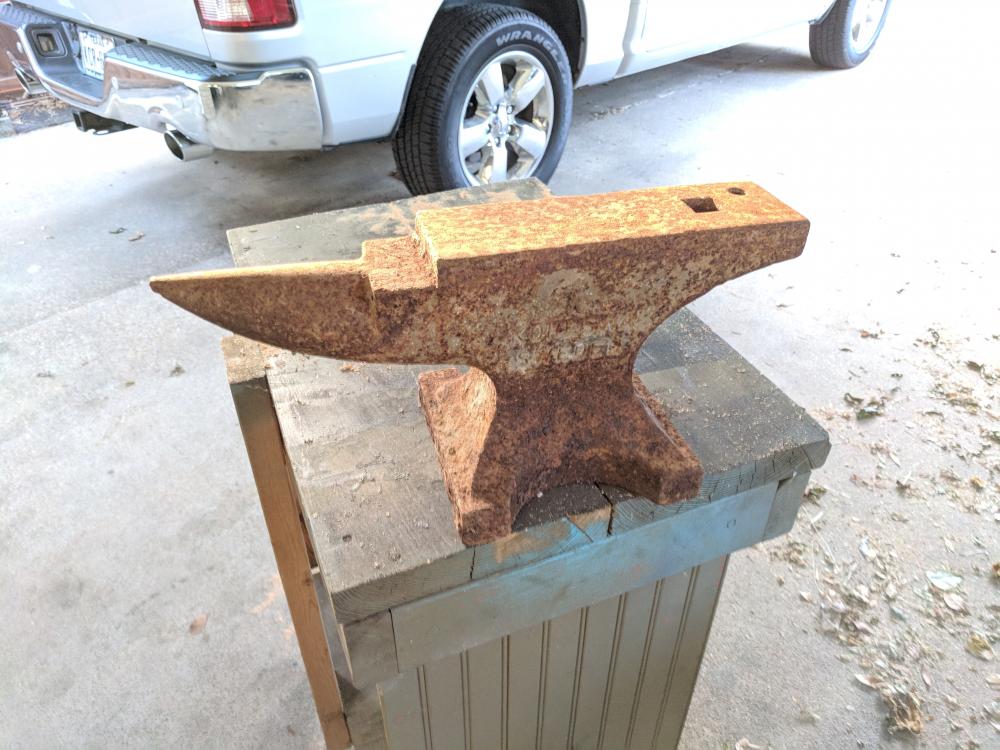
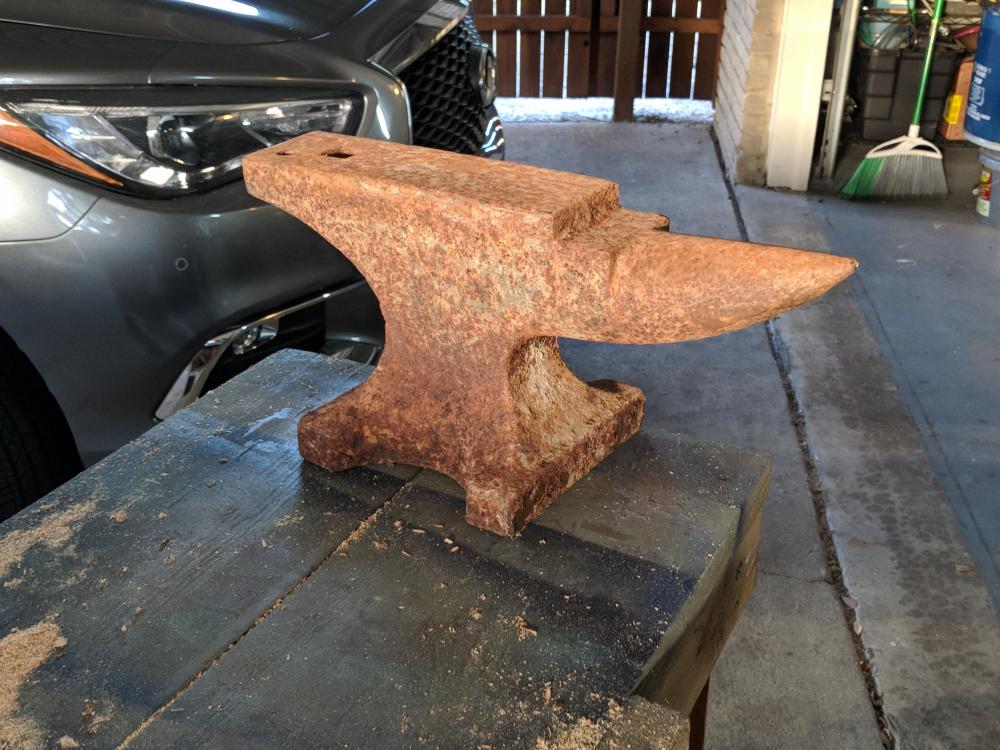
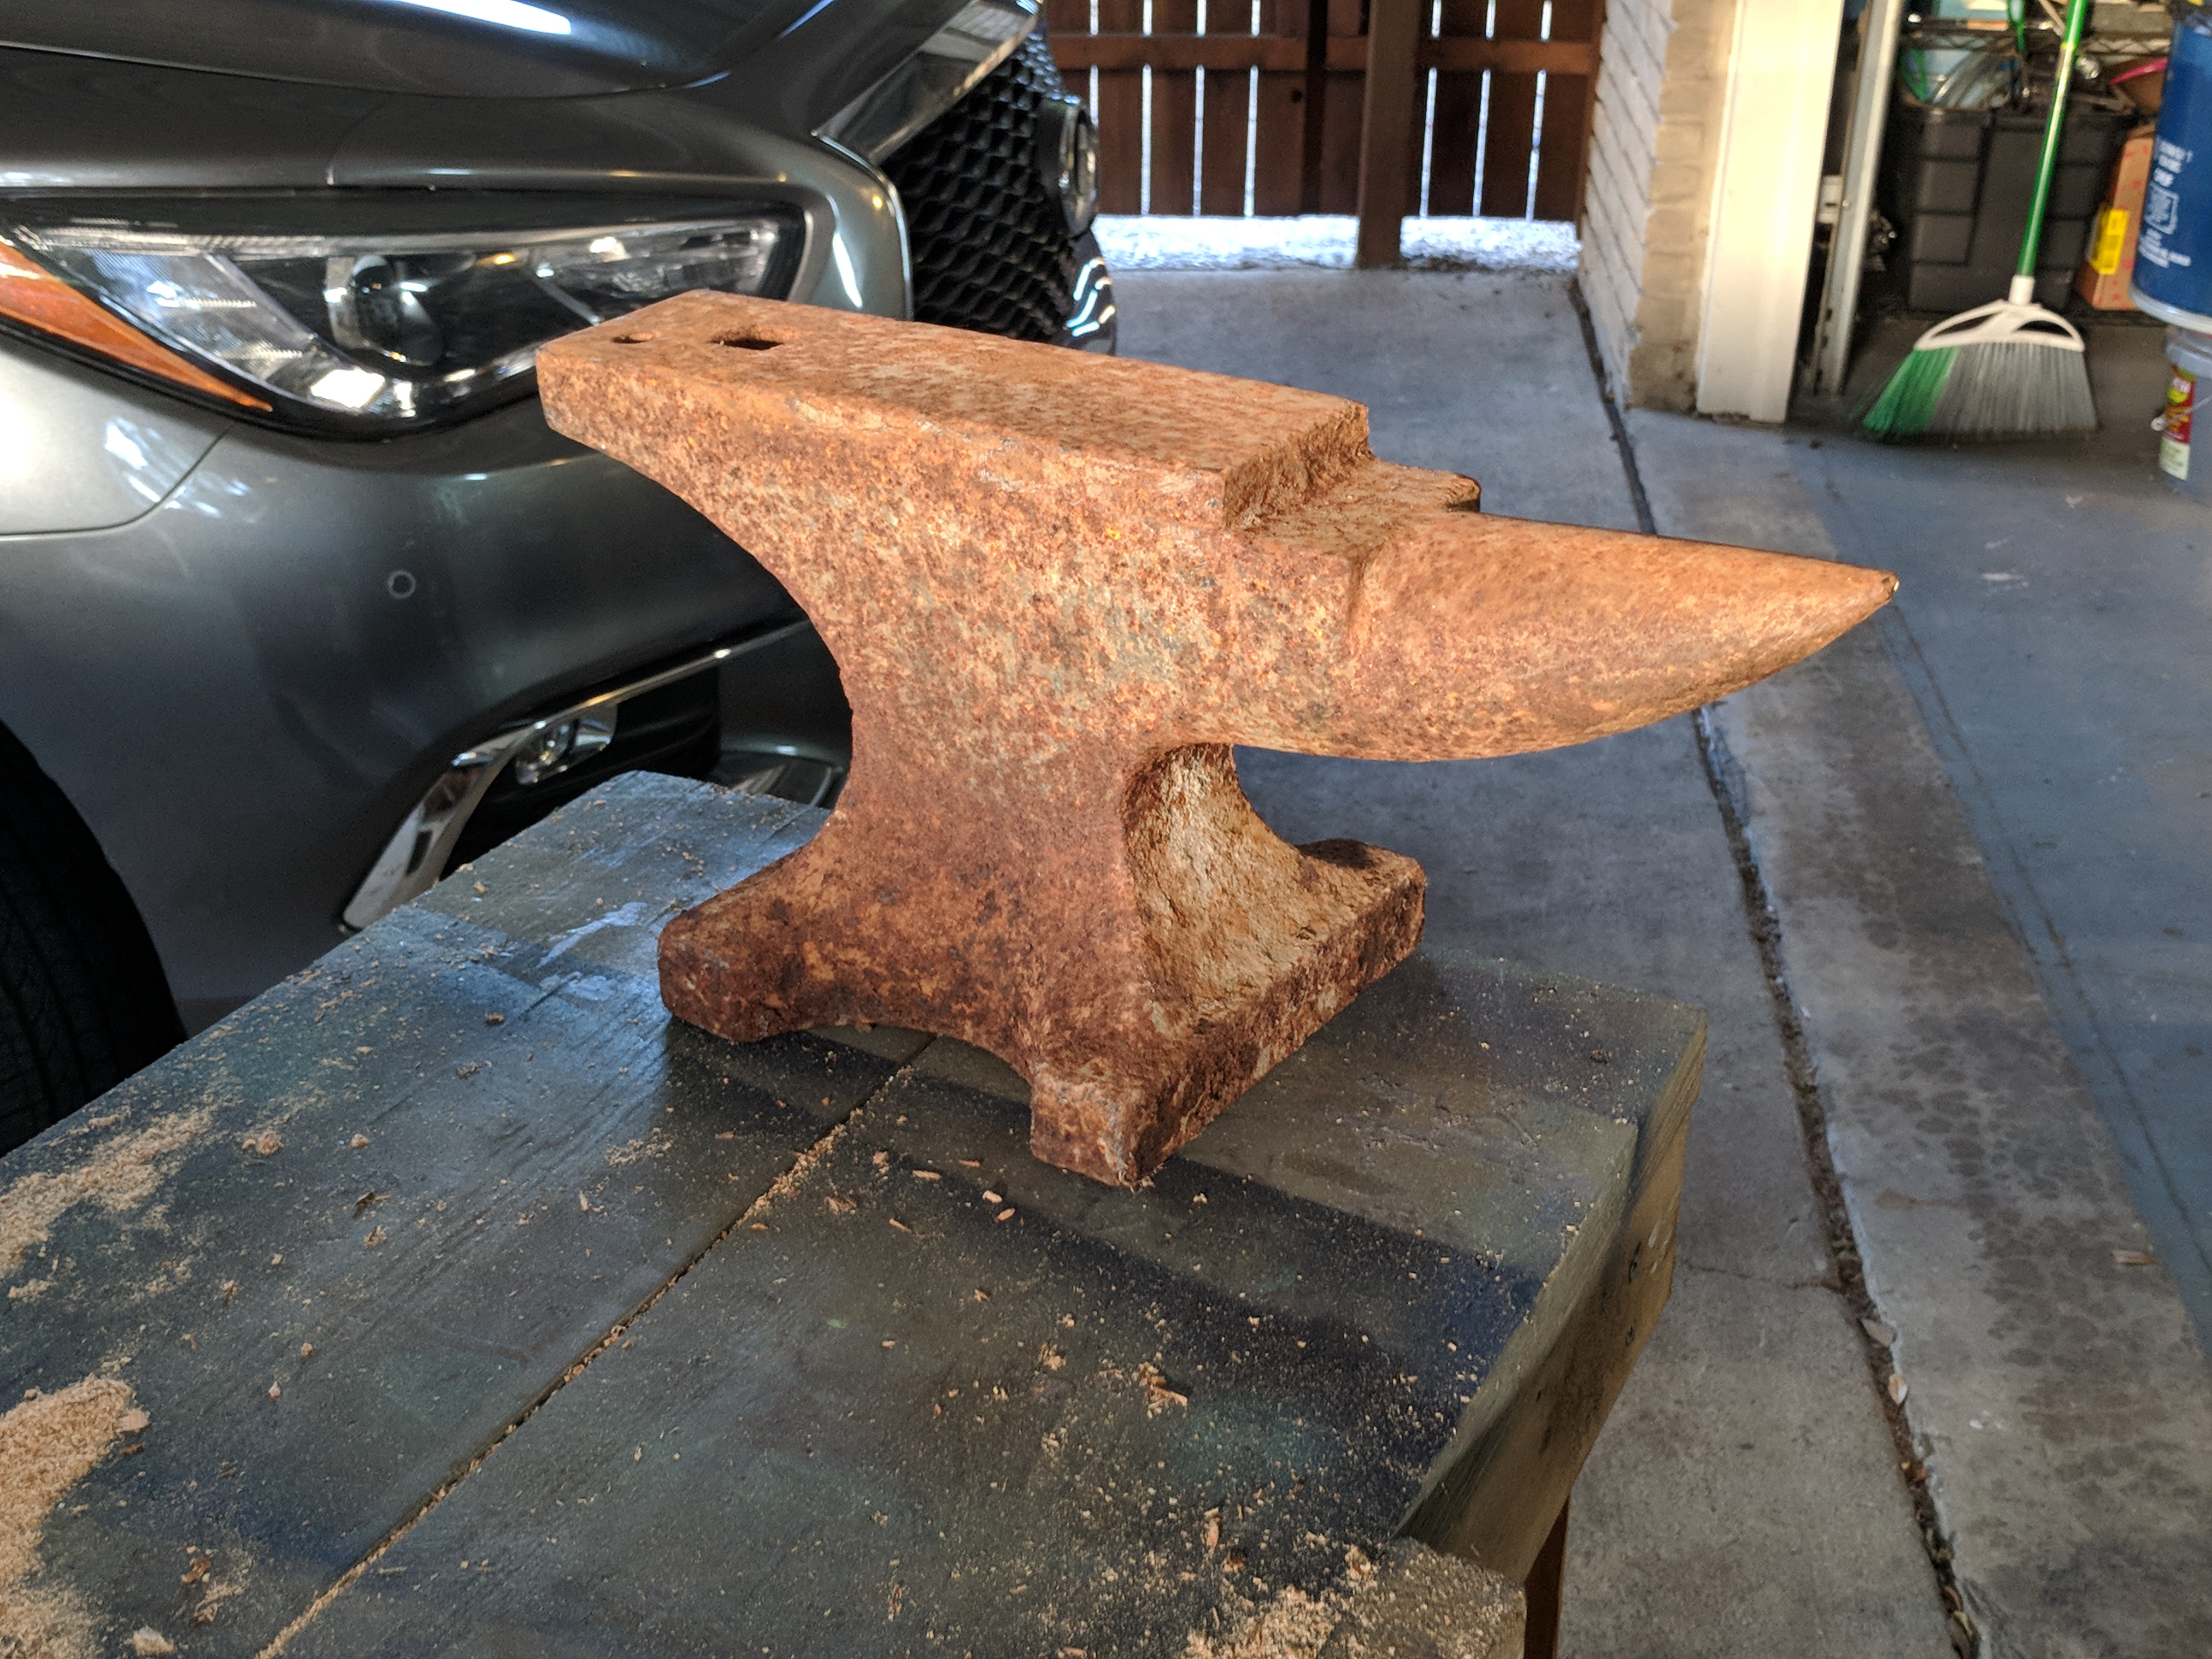
Hey fellas, I'm new to the forum and I should just come out and say it...I'm not a blacksmith...just yet anyway. Right now I'm pretty constrained by my location - I live in a city suburb right now and just don't have the space. That said, I do have a nicely outfitted garage and while I don't smith, I do find having something around that I can hammer my projects on extremely useful. That said, I've been using this cruddy, 55lb (actually, 52lb) Chinese anvil for quite awhile that until recently, always left transfer marks on my work pieces because of the poor quality grind on the face of the anvil. Last weekend, I was doing some work on a project and in my haste I forgot to put down my metal flashing that I used as a shield to keep the pieces from getting transfer marks. My project was ruined and I was fed up. So I did what I know I'm not supposed to do and took my angle grinder to face and smoothed it out. While I was at it I stripped the paint and smoothed out the casting marks on the horn. After which I coated it with boiled linseed oil and let it cure in the sun for a week. Turned out nice...but I was basically putting lipstick on a pig. Well, all that said, my neighbor and I were talking and I mentioned that I was looking for a better anvil because of the aforementioned issues. He said that he's got one out on his farm that he'll get for me next time he runs out there. It was apparently his dad's and it was old and rusting away and he was just happy to give it to someone that would take care of it. He called me today and told me he had to run out there this week and brought me the anvil. He knew nothing of the brand or the size, but free was free, and knowing it was old, I could only assume it was better than what I am currently using. So it turns out it's a Kohlswa 70lb anvil. I don't know much about anvils, but from what I've briefly read, it seems that this is quite a quality anvil. As you all can see though, it's pretty rusty, but otherwise in pretty darn good shape. How would you fellas go about rehabbing anvil? I'm thinking of taking a wire brush to it to knock off the loose rust, then putting it a tub of Evaporust to remove the rust, and then giving it the same boiled linseed oil treatment. Would this be a suitable thing to do with an anvil of this quality? Additionally, would using the same anvil stand that I've been using for my crappy anvil suffice? Or should I look for a large stump? What is the best method of affixing this anvil to the stand or stump? I friction fit the Chinese anvil into the stand to secure it. It was in there and didn't move, but I don't know if that is proper? Thanks fellas, I appreciate your assistance! S/F, -Matt