
.jpg.02cdc5b3ade6d35c797a0e2d05542f39.jpg)
Howling dog forge
-
Posts
106 -
Joined
-
Last visited
Content Type
Profiles
Forums
Articles
Gallery
Downloads
Events
Posts posted by Howling dog forge
-
-
"That's an idea well worth experiments. Goooood idea. . . for a Texican.
 "
"
We do have our moments.
I suppose I could dig out the old rock tumbler , if I can find it and a hand full of ball bearings to polish. On the other hand is the aggregate serving a purpose once it is pulverized? I have always considered the aggregate of such mixtures to be a structural component which would just become an inert filler If powdered. Would you voice an opinion on a small percentage of powdered Bentonite in the mix to increase the liquid suspension and increase the mixtures fluidity.
It does not seem that course until you put water in it and then the it starts to separate almost immediately. Can you think of something to mix that would make a more homogenous and fluid mixture??
OK so time for the dog to say some crazy stuff, I am pondering the possibility of using dura board refractory for the "core" of the ribbon burner with a Kasto lite 30 shell and/or face surface. Drill the dura board, put in the plugs, put a level face on it with the plugs in place and when all is cast pull the plugs soak the holes with rigidizer and reinsert the plugs to keep the surfaces of the holes as smooth as possible. This makes the burner much lighter, and hopefully not as inclined to transfer heat to the plenum. And of course making a 1/2" layer of Kastolite/Mizoo fill around the plugs will be a lot easier than forcing it into a rather large heavy brick.
Please understand I am standing out on the bleeding edge of what I think I may sort of understand but in fact have no clue what I am talking about. All I do know for sure is that casting multi port burners is frustrating, at best and not something you really want to do a lot of trial and error experimentation with. But in the search for a small, efficient, quiet, (that's a big point) burner that travels well . this is the most obvious direction to head at this time.
As always gentlemen I appreciate your input.
-
Any thoughts on pulverizing the castable to make it flow into the form easier?? Any thoughts on using something else??
-
What size do you consider your NARB with, I am guessing . a 3/4" tube and 1 1/2" area of nozzles?? I hope you can see my point. If this is a 1 1/2" burner it is running very well at extremely low delivery pressure. That is a truly awesome flame , by the way . So uniform, well done.
Was there a ratio involved in your nozzle size and number??
-
On 6/24/2019 at 12:42 AM, D.Rotblatt said:
Using 1/8" holes instead of crayon sized holes has solved this problem. Look back starting on Page 22 of this post I talk about my NARB mod using 122 holes @ .125" After a 2 hours session of forge welding I am able to turn it down to almost no pressure bringing the forge down to 1450 degreed F for heat treating. No back fire. I'm forging at about 4lbs using a reil burner as the injector.
Dan R
That is a bunch of little holes. I am guessing you maintained the free area of the burner??
-
Does the light brick improve the overheat at low pressure thing, I can't call this a problem really. You are using a 3/4" T burner if I recall?
-
your still using the cast block??
-
I have not been paying attention for quite a while, I have done quite a bit of reading to catch up. I have not seen the epiphany that solved the long use, over heating, back fire problem. Is this because it has not happened yet?? And of course the previous entry is a dead give away. My grasp of the obvious remains impeccable.
-
I thank you for your response gentlemen. Just what I needed to know.
-
Does anyone have an opinion on recuperative burners ? I have an old ABANA forge I built 30 years ago setting on a shelf. It's a clever little box with a pretty cool door, the refractory was nothing to brag on when it was built and the burners were a disappointment by modern standards. I can't decide if I should leave it on a shelf, give it away or upgrade it with new refractory and better 1/2" burners.
I guess the deciding factor is, does the recuperative burner concept make enough difference to make it worth the effort?? -
thank you Mr. Frosty.
-
When casting the ribbon burner is there an advantage to using Mizzou over , perhaps, Kastolite 30?? It would seem most use the Mizzou but having never used it I have no point of reference for comparison. The Kastolite does seem a bit grainy, course and dry for casting, wondering if the other refractory would be a better choice.
-
On 2/21/2018 at 10:37 AM, Jasent said:
I have only used kastolite but no leaks or cracks. I fired mine in the forge after curing for 2days if I remember right.
did you fire it long enough for it to go entirely ceramic? If so, I am surprised and impressed it did not shrink enough to loose the seal at the plenum, this is good to know.
-
12 hours ago, AnotherCurtis said:
I cast the outlet nozzle in the kastolite hot face so I don't have a metal nozzle at all.
This sounds like a great idea, what did the plug look like?? and the finished cast hole?
-
On 9/15/2018 at 7:57 PM, HojPoj said:
quotes removed
And tell me, how do you think that hole got in the MIG tip?? and if you say majac I will
be rolling on the floor for the next 5 minutes laughing. Another point would be how the MIG tip was shortened that could be pretty ragged.
-
you are right 1.2-3% Pb, I did not know that. I am wondering what alloy is used for bullet shells as they are routinely annealed by reloaders 3 or 4 times before being scrapped. But what the heck MIG tips are made of a beryllium alloy which is easily as toxic as lead. I would have to say that with all the other things that are actively trying to kill me these two are pretty far down the list.
-
On 9/14/2018 at 1:59 AM, Frosty said:
Be aware though that drilling long holes in copper alloys is a real bugger, be ready to break bits. You'll have better luck if you blunt the cutting faces SLIGHTLY on drill bits and lathe cutters you're going to use on copper alloys. It has to do with the way copper alloys work harden and a subject for another thread. Just a touch on a fine stone is plenty, it has to do with the angle of the cutting face.
I have .25 " of laminar surface By the time the mig tip is cut down for the 3/4"X1/2" T I don't think it can be much longer but I think I could get away with drilling as much as 3/8" without too much problem. I think the free machining brass is half hard so it had no hard spots I could feel, the greatest failure (one bit) was the start into the center drill hole, I guess it grabbed at the different angle. but after I got past that it went pretty smooth. But lets not get sidetracked by methods , The thing that I like most about this burner in that it is so easy to build with a minimum amount of tooling. That is what attracted me to this burner in the first place .
The thing will stay lit as is and when I have a box to put it in we can go full contact on tune up
Another Curtis good looking work I have nothing but admiration for someone that can run a pipe tap straight in the side of a coupling, well done. I am wondering if the taper on your tip is as important as the length of the tube , as in would a 5" nipple work better than the 4 1/2"?and just use a straight coupling on the end? Have you used this one in a forge?? The tip you have does not look like it would last too long. I would like to stick with the SS coupling as it will make it much easier to cast a hole in the refractory. Here are some pictures of my burner and jet and the only reason they do not look like yours, exactly, is that it is easier for me to do it this way .
-
If you like the "lifting flame " thing feel free to use it . HVAC term for a flame that floats and is unstable, generally caused by lack of combustion air.
I thought we could discuss the burner tip and the effect it had on the burner I don't see why that would be a great difference between one burner and another, am I wrong? And the removing the threads does not seem to fit your model and more surprisingly the taper did not improve things but , in fact made it decidedly worse. I must admit, the whole thing is a bit confusing.
I have a couple more questions on this subject and your comments but I will carry them over to Frostys thread -
On 9/13/2018 at 12:54 AM, AnotherCurtis said:
quote trimmed Is the jet's position adjustable within the Tee?
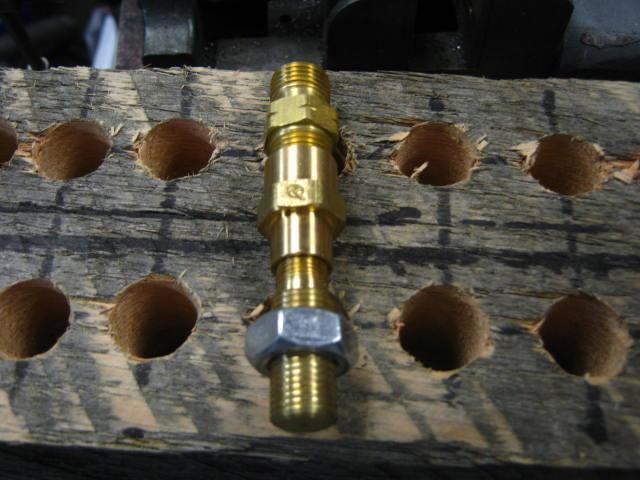
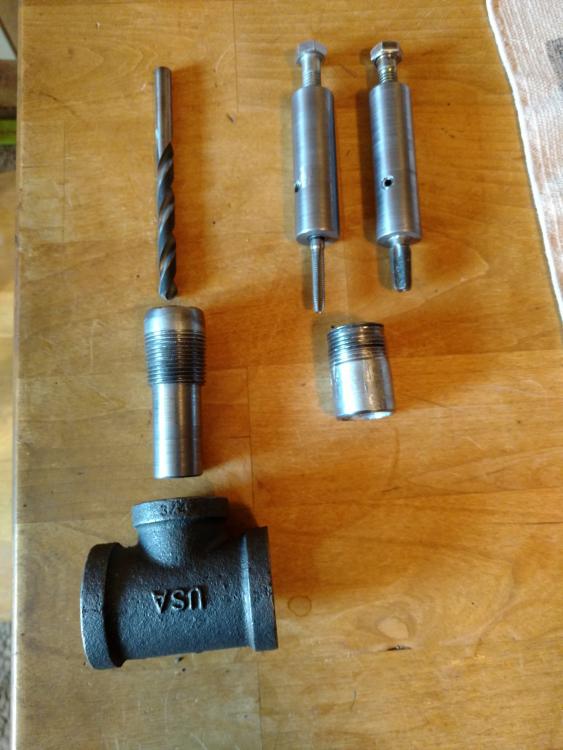
yes it is , the jet is a 1/2" brass shaft threaded 20 tpi, the end is taped for a 1/8" npt fitting counter board 1/4" to .25 from the end and drilled .025. the t is drilled and tapped 1/2"X20 tpi. I will post pictures next time I swing by the house.
It seems to work a bit better when it is screwed out past center, I believe this in leaning the fuel to air, is that correct?
-
changing subject just slightly, I made a 1/2" T burner , details on request, that had a severe lifting flame . I had a 1/2" coupling on the end. after removing the threads from the inside It decided to light. I cut a 10° taper on the inside of the coupling and once again it would not stay lit. Obviously I do not understand everything I know about this but I had thought a drop in pressure at the end would improve my lifting flame problem. Any comments?
-
Can't take credit for the drill fixture , it belongs to square nail. I an misfortunate enough have a lathe so creativity like this is not something I got to experience. I do think it is brilliant though.
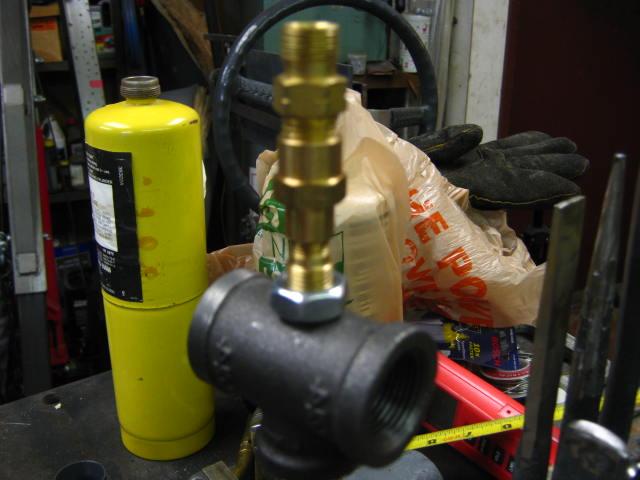
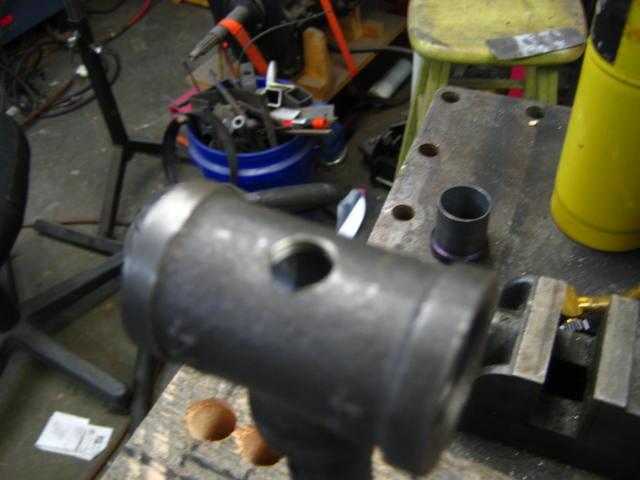
Right now I am working on a 1/2" T burner and I have to say it has, so far , been much more challenging than the 3/4" was. I used a 3/4" X 1/2" T with a 4 1/2" nipple and a cast steel nippli on the end. The 1st jet was drilled to .03. I could not get the flame to settle on the end and actually light until I was down to about 1 psig and then it was completely unstable. I made two new jets drilled to .025 and .02 and basically got the same results. I cleaned out the threads in the tip coupling and managed to get it lit with the .025 jet. Strangely enough I cut a 10° angle on the inside of the coupling and it would no longer stay lit. I cut the threads out of a cast 304 SS 1/2" coupling and it will hold a flame but not at pressure above 10 psig.
I understand that what happens mounted in a vice and what happens in a forge are quite different and I am prepared to work with the burner more after I have a box to put in in but it seemed like a good idea to have a burner that would at very least light and stay lit until it was in a hot enough environment to effect its operation.
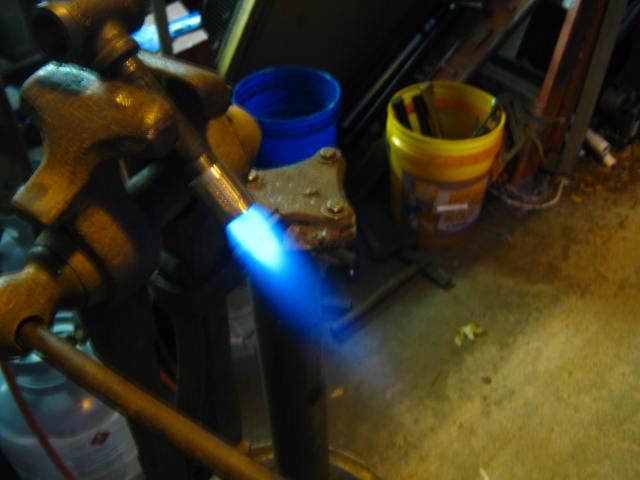
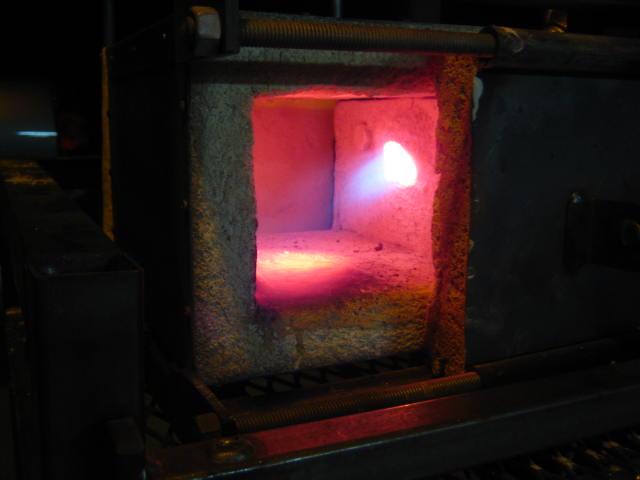
Here are a couple of pictures of the flame for what they are worth. I think I have enough of a burner that I can feel confident of some success with a forge to fit it. Look for a new thread on the construction of the "Small Dog Box", or maybe I will just put it on the end of the Dog box build. There are a couple new ideas I want to try on the design and construction.

-
I am guessing a .023 mig tip would have a .025 hole. or pretty close.
-
I just put together a 1/2" T burner with a .030 jet I am getting a lifting blue flame which , of course , will not stay lit. I have a 1/2" coupling on the end with the threads intact , no taper, 3/4" X 1/2" T and a 4 1/2" nipple/ mix chamber. the end/depth of the jet is quite close to centered in the 3/4" dimension of the T I suspect I need to reduce the jet to .025. Any comments?
-
On 7/19/2018 at 6:44 PM, ThomasPowers said:
Lou; don't you date back to the age of carburetors? A "slight" difference can mean the difference between driving and walking!
Or driving about as fast as you could walk.
-
first I would like to say, this is brilliant.
I mad my T burner pretty much exactly as the design calls out and it performs quite well reasonably easy to light and quite stable as far as I have seen. I would ask those that are getting unstable after a few minutes if they have a gage to see what tank and delivery pressure are. this thing will frost up a 20 pretty quick but setting the bottle in a tub of water keeps the pressure much more stable. So far I am very impressed with the T burner for ease of construction, efficiency and performance.
I am using a 3/4" SS coupling with the threads removed by a 5° taper. It is deteriorating faster than I should like and would wonder if there is anyone working with a refractory tip of some sort to actually be at the point of ignition.

building the Dog box.
in Gas Forges
Posted
Five years later and it still works. The pedestal is a bit clumsy and I managed to drop the forge from about tailgate height but it came through needing just minor repairs. In fact the repairs were to re repair the first patch and re do a bit of the other end. it did crack at the burner bur not seriously. So I suppose I can safely say the dog box travels well even at a high rate of speed in a vertical direction.