

jsurgeson
-
Posts
146 -
Joined
-
Last visited
Content Type
Profiles
Forums
Articles
Gallery
Downloads
Events
Posts posted by jsurgeson
-
-
DennisG:
Thanks for that
Just a question when you say "it cracks and flakes off" are you referring
to the board or the coating flaking? If the board is this only after a while
or after how much work hours?
I intended to not use any coating to reduce cost and maintenance, and make
the design as modular as possible to effect repairs in a few minutes. I know
the benefits of the "ITC100" from my blanket designs however it is very costly
in my part of the world and a pain to apply and maintain.
Jeff -
Hi All
Thought I would post drawings of my latest forge design, the main differences from previous designs
is the change from blanket to board. The main reason for this is durability, and ease of build.
It comes in a single and dual burner version, the dual is double the capacity, 4500 / 10000 cubic cm
250 / 650 cubic inch.
The will both be fitted with 3/4 atmospheric hybrid style burners.


Hope you like, any comments or criticisms welcome.
Regards
Jeff -
Use an old PC power supply, they are cheap, provide 5VDC and 12VDC at high current,
more than enough for your needs, all in a nice neat package. -
Have tried the ear bud and other methods of applying the electrode however have found the ability to press firmly down over whole design
better than doing bit by bit, I may be wrong. What ever works well for you I suppose, good luck. -
Hi Ian
Well in that case
Give me a shout on 073 422 8490 and we can make arrangements to collect or drop off or whatever.
Jeff -
Yes the 3/4 defiantly does the trick
 I can not believe just how well they work.
Yes the burners are homemade, essentially I modeled them on the t-rex style burner, as I have always
thought them to be the best of a great bunch. And going by the comments on this forum that style of venturi
appears to work very well. Being in Africa its unfortunately not cost effective to ship one out.
Not too sure if I understand the question, by the cage I am assuming you mean the burner chamber?
Till my milling machine arrives, by hand with lots of sweat and tears.
If you need specifics on design give me a shout, but there is nothing new or revolutionary in them. -
I misunderstood, sorry I speak New York English, we talk first and sometimes we listen.
Dont feel lonely I too suffer the same ailment
Thanks for taking the time to get involved -
southshoresmith:
Sorry dont follow, was just replying to maddog that "if" you were using the "stock removal" method then
there would probably be no need to use the clay method to establish volume of steel needed, at least in my
experience it has never been necessary.
My original questions asks how to "calculate start size of stock" when forging a blade from an irregular
piece of stock, for which the clay method was suggested. :) -
maddag:
Cheers, thanks for the volume tip. Coming from a stock removal background I dont think it would be
necessary to use the clay method, you would start with flat bar stock the correct overall thickness
and width, bandsaw or grind out profile and then finish grind.
arftist:
makes sense, thanks for that. -
I like it, the clay trick makes sense, I am sure after a few times playing with clay it will
become obvious how much steel is required for a given blade, thanks guys. -
This is probably a very blond question, but I am a stock removal maker who has just started out in the forging world.
Example:
I want to forge a blade whose overall final dimensions will be 5 x 50 x 300 (blade + tang)
My stock material is 8mm thick plate.
Question:
What starting size blank would I start with?
I suppose I could just start with those same overall dimensions, but that would waste. Is there a simple way to
fairly accurately calculate the minimum size blank required to end up with a particular end size? or is this just a thumb suck?
I hope this questions makes some sort of sense, if not sorry
Jeff -
Ok after lots of bug squashing and messing about here is my final freon tank based forge with 3/4" burner.
The original version of this forge had open front and back with a 1" burner, the 1" proved to be a bit too
much for this forge capacity, going to a 3/4" burner of same design shows zero loss of ability to reach welding
temperature in well under 10 mins at about 50kpa (7psi)
Now thats done thought I would try and weld a motorcycle chain, hmmmm....
Man I have got to get a press, this is hard work, and this is after 2 heats
Thanks for all the advice on getting my forge right. -
Ian
Thanks will bear that in mind. I dont think the stainless will be suitable
as blade material but thanks for the offer. -
Hi Ian
Hey great to find another local knifemaker/blacksmith here in Durb's, I am in in Morningside, I thought they only existed "up there" in Gauteng.
is you cutter laser? in my experience the normal vinyl cutters dont do too well with small fine stuff, but then I know XXXXXX about
vinyl cutters.
Jeff -
Thanks for sharing that. I look forward to giving it a try.
One thing though... is that really 220VAC coming in or did you mean 120?
Don
Yeah! here in deepest darkest Africa we can only afford 220VAC, 120VAC is too expensive, the cost
of an extension cord from USA is prohibitive. sorry could not resist
But you right I should have said something about local supply, but for all you 110 volters the same rules apply.
The truth is as long as you end up with 12 - 24 volts at 1 - 2 amps it will work. The closer to 2 amps the better,
but as I said if lower you will just need to apply probe that much longer. -
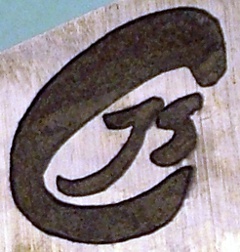
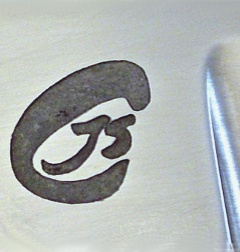
Thought I would share my experience with developing a cheap simple way to electro etch my makers mark.
Now my process is not new and is well documented elsewhere on this and other sites, however I found that
all variations of this method required the use of either purchased machines and or expensive stencil materials.
Even a battery charger is not that cheap today, so my goal was to build a etcher using cheap, easily available items.
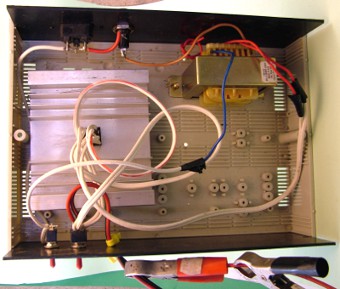
ETCHER UNIT
Although I have used a huge heat-sink on the bridge rectifier, I doubt that such a large one is necessary.
All you need to do is allow the rectifier to dissipate any heat, so any chunk of aluminum will do, couple pieces of
angle bolted together.
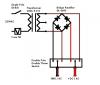
The transformer is center tapped with two secondary windings 9-0-9 ignoring the center tap you have
18VAC / 20VA. I used this as it is fairly common and very cheap.
Technical Spec
Primary Input: 220VAC
Secondary Output: 18VAC (9-0-9) 20VA (1.1A)
Output Switch Position 1: 18VAC 20VA (1.1A)
Output Switch Position 2: 25VDC 20VA (0.8A)
ETCHER SCHEMATIC
The circuit is very simple, take 220vac from public supply, step it down somewhere between 12VAC - 24VAC
1A - 2A is sufficient to do what you need to, the lower the current the longer you need to apply the probe.
Take secondary output of transformer to bridge rectifier input and also to one side of double pole switch.
Take the DC output of the bridge rectifier to the other side of double pole switch.
You now have a etch unit that can etch with either AC or DC
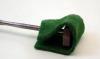
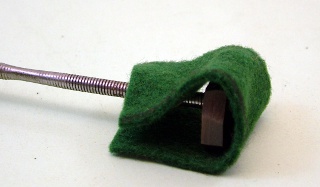
PROBE
5mm threaded bar, 5mm SS plate (sized to just bigger than touchmark)
Small square of felt

SOLUTION
Salt / Water (saturated) just keep adding salt until water stops dissolving it.
STENCIL
I have tried photo resist spray, fancy silk screen material and every other way suggested on the web.
All are expensive and have varying degree of success, solution VINYL, again not a new idea. Every town
has a sign writer / label maker etc. The technology is cheap as are the materials. All you need to do is
be able to produce a negative 1:1 size, high resolution image of your touchmark. I used a free open source
graphics software called Gimp and also Inkscape to create a vector image as a .svg file.
My local vinyl cutting company, uses a laser vinyl cutter, this is the best way to get clean small detail.
They make a lot of vinyl stencils for people who do acid etching on glass, and yes you could probably use this
and etch with acid, have not bothered as electro etching is cleaner and safer.I had them cut a sheet of stencils,
cost R1.77 per stencil, your money ($0.24) had to buy a minimum of R150.00 worth ($21.00) This gave me almost 100
stencils, and even though they are one shot, it is still cheaper than any other method (besides stamping)
USAGE
To use:
(if DC) attach red +DC clamp to work, black -DC clamp to probe.
(if AC) does not matter
Wrap new felt square around probe plate, fix with rubber band.
Shake solution, use eye dropper to wet felt
Set AC/DC, apply probe to design, do 2 - 5 seconds max at a time, check then reapply until finish/depth achieved
AC OUTPUT:
Does not etch as deep, blackens etch.
DC OUTPUT:
Etches much deeper, not as dark, looks like acid etch
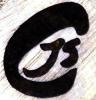
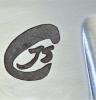
BLADE EXAMPLE
What it looks like on finished blade
Thats it, cheap etcher, cheap stencils, excellent result!
Sorry for the crude schematic, if the circuit is not clear give me a shout.
Jeff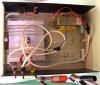

-
Cheers maddog
Yes I am fortunate enough to know a bit about electronics, and play with PIC micros as a bit of a hobby
so put it together as a project. It is based on the Analog Device AD595 type K thermocouple amplifier
and a PIC 16F690 microprocessor. The main reason was for heat treating my blades, due to inexperience other
than non magnetic, was incapable of telling the difference between 900 and 1050 deg C, and with N690 I
believe would make a difference in the result, could be wrong, either way as you say it is a quicker more
accurate way of training your eyes. If technology makes it easier why not?
As for shipping to SA, hmmm most people wont ship to SA due to high loss rate, if they do the cost makes it
prohibitive, even then the chances of it getting lost are high.
What industries would use them a lot? I have tried the refrigeration/aircon/gas appliance but none use them.
I am going to build a similar 3/4" burner and see how that operates in this forge, I am also going to build
another body with removable front and back.
Will post some images when done
Thanks to all for help and advice. Have a great weekend, I think you guys are celebrating a special day, if
so enjoy :P -
Did a few of the suggestions and did another trial run:
1. Removed internal flame stabilizer and fashioned flare like shape into wool
2. Closed up front and back 80% with temp wool
3. Sealed up around burner holder with wool
Result:
Just short of 1200 degC in under 10 mins, small section of shed40 1" distorted in under 5 mins
Burner will not run outside of forge anymore, dont think this is a big deal. And is a bit spluttery
below 2psi but still runs.
A few questions:
1. My choke stays 100% open, 30% - 100% make very little difference to the burn, less than 30%
flame is softer and richer (green)
2. Outside of body is hot, too hot to touch, you can see around burner holder getting red hot, is this normal? -
maddog:
Thanks I will fashion a "front door" to reduce heat loss. The 1" runs from
1 - 30 psi without burning back or popping off. However it is still not
tuned right.
Phil:
Taking strain, I can always repaint
Nakedanvil:
Not too sure how I can come in at any more of a tangent, but it still does not
seem to swirl much, any suggestions on how I would change the burner position
to achieve this?
Still have to work out how to tune it perfectly, I dont have a needle valve on
the gas, so only have pressure and not volume to adjust on gas, and air choke.
Here in SA I have been unable to find a reasonably priced one, R1000.00 ($145)
too rich for me. Cant find an industry here that uses them other than high spec
laboratories.
After some comments by a "clock maker" friend, I think I am going to have to remove
my internal flame stabilizer and go with a flare, just need to find a way to produce
one that works well looks half decent. -
Cheers maddog
Good observation, correct were the flame hits the opposite wall there is a circular
cold spot. The thermocouple when pushed in so it is in about 3/4 way across only reads
about 80 degC higher, so I think i am still short.
I am going to also do a 3/4" burner version as I think the 1" as you say is
overdriving it a bit, will play with pressures a bit as you suggest.
Left front open as I thought that was the standard design of the freon tank forge,
are you suggesting a temporary block while heating to temp, or to rather not cut the
front port as big in the first place?
Yes it is only the 3rd 15 min burn.
We don' get ITC100 here in SA but have an equivalent product that I have used.
Thanks for the observations and comments :D -
Thought I would post a short video of my latest freon tank based
forge and 1" burner.
I am really looking for comments from the experts on the quality of
the burn with regards the ability to weld, you will notice my temp
indicator shows 950 odd deg C, that is after 10 - 15 mins at 10psi -
Thanks Rob
Without a doubt, the freon tank design makes short work of a practical
forge that is capable of forging and welding.
Jeff -
I am a knife-maker that recently ventured into forging and homemade gas forges and burners.
Although I have successfully heat treated my blades for the last 2 years in nothing more than
a "pile of firebricks" and a old style reil venturi burner, I wanted to learn to forge and
forge weld, so I could make pattern welded steel.
And so my bumpy journey began, with failure after failure, from numerous forced air, and venturi
burner designs, castable forge bodies that were too heavy to pick up and that drank more gas than
a 747.
Most of these attempts would not have been possible without the numourous amounts of advice and
encouragement from the fundi's on this site. So I thought I would share my end result and hope
that anyone looking to build a gas forge for the first time might find helpful. This is just my
personal experience and definitely not a "this is the way its should be done" as there are many
ways to achieve a good result other than this.
1. Forge size: A mistake I made over and over with my forge bodies was to try and make them too
big, small is efficient, light weight and easy to move and transport. Of all the designs I played
with I found the "freon tank" body to be the most suitable for my needs. The design is well
documented on this and other sites.
The box below is my tempering oven.
2. Burner design: after playing with both forced and venturi burners, and having reasonable success
with both, but never quite managing to get them 100%, to light easily, run stable at all pressures etc
I settled on T-REX look alike design, I call it my "1INCHER"
The design is standard in terms of shape, diameter, length etc, the only unique I have done is
instead of using a flare for a flame stabilizer, I have gone with a internal one, the idea, if I could
get it to work was to remove the need to replace expensive SS flares, as well as the need to machine a
taper some way or other with some degree of accuracy.


At 30kpa (4.3psi)
Mig tip size: .6mm / .8 / 1 / 1.2 (runs with all 0.5 - 30psi)
(.023" / .032 / .040 / .047)
I was amazed that this worked with all tip sizes, even out of forge.
The 0.6mm and 0.8 ran stable outside from 0.1 psi to 30psi, the 1 and
1.2 became unstable over 15psi outside but run fine inside the forge.
The 0.8mm heated to 840 degC in 15min's at 10psi but seemed to hang there, did not
heat longer to see how long it took to get hotter.
The 1.2mm got to 970 degc at 10psi in same time and also seemed to hang there, need to
fill my tank to see what happens at higher psi.
Some questions I still have:
1. Is this 1" burner with a 1.0mm tip too much for the freon tank size?
2. At what psi would you expect to heat this forge to weld temp (1300 degC)
3. At what psi would you use to maintain weld temp once reached? -
My 19kg (42lb) bottle:
tare: 18.3kg
gas: 19kg
weighs full: 37.3kg
example weight:27.8kg
37.3 - 27.8 = 9.5kg of gas
Bottle is 50% full B)


Fiber Blanket to Board - my latest forge design
in Insulation and Refractories
Posted
Well its built, thought I would add video of how it goes together, breaks down and how the
burner fits, and then forge start up and what it looks like at 1200 C.
Thanks for looking.