

LB47
-
Posts
4 -
Joined
-
Last visited
Content Type
Profiles
Forums
Articles
Gallery
Downloads
Events
Posts posted by LB47
-
-
1 hour ago, Frosty said:
You found the header, good deal. It takes longer to type directions than it does to edit.
Square edges aren't that desirable, can be bad in fact as they cause stress risers when forging shoulders. Varying radius are much better but don't go grinding or welding
 on it at least till you have some of the old hands take a gander. You can NOT weld on a heat treated piece of high carbon steel without risking damage in the HAZ. (Heat Affect Zone) If you're going to use that fine old lady you want her in as good a shape as possible. Yes?
There are bottom tools that will provide any shape edge or face you want or need and not effect the anvil's face at all.
May we see some pics of the edges and face please? Oblique or diffuse light is best for showing dings, dents, etc. and not glare out the pic with reflected light.
From what I can see I'd build a better stand and put her right to work. Do a rebound test to see if there's hidden damage, delamination of the face plate from the wrought iron body or HAZ damage around the hardy hole. Damage to the heat treat around the hardy hole isn't too serious as you don't do much heavy work around it. A rebound test is easy, drop a ball bearing I carry a 1/2" ball in my pocket though lots of guys like 1" ball bearings for some reason, easier to find when they get away from you I guess. Anyway, drop the bearing on the clean face and estimate how far it bounces back, rebounds. Gussitimate the % of rebound. If you use a ruler, drop from the 10" mark and eyeball the rebound you'll have as good as necessarily precision.
A light smooth faced hammer I carry a 4oz. ball pein in the pickup for testing. It takes more experience to judge a relatively accurate rebound % but it's darned lot faster to look and listen for dead spots on the face. Tap a pattern over the entire face, expect rebound and tone to fall off gradually as you test towards the heal and horn, that's normal. What you're looking for is abrupt changes in rebound and sound. ting to thwap is a RED FLAG. Expect some thwaping around the hardy hole if it's been torched out. If it was drilled and filed it should just taper around it.
More pics please. Till then PLEASE NO GRINDING OR WELDING!
Frosty The Lucky.
 Just now, LB47 said:
-
1 hour ago, Frosty said:
Welcome aboard LB, glad to have you. If you'll put your general location in the header you might be surprised how many of the gang live within visiting distance.
Good rescue, rescued anvils never forget and your Karma has scored bonus points. How are it's edges? It's hard to see in the pics. Trentons are good anvils, good score.
Frosty The Lucky.
How do I get back to my header to update it?
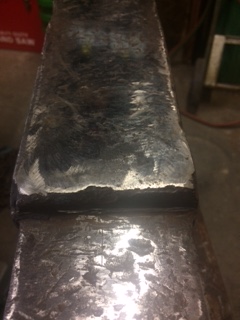
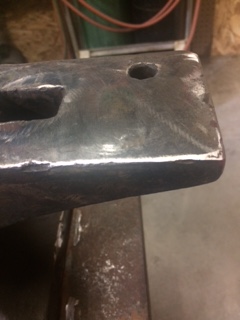
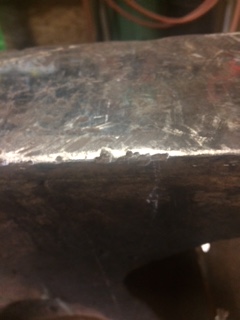
The top is in OK shape, the edges are rounded off with one broken corner.
50 minutes ago, ThomasPowers said:The hardy does look modified; you can modify it back or use an insert or just make your hardy tools to match---and not worry about them getting mixed up with someone else's tools at a multismith demo! Please do not allow anyone to grind or mill on the face!!!! The thickness of the hardened face is limited removing any of it is MAJOR ABUSE in almost every case. We have seen people take perfectly usable anvils and turn them into unusable decor items by removing the usable face.
Mr Powers I am in New Mexico (Just North of Santa Fe) I am not concerned with the hardy hole. I would like the edges to be square, which they are not. What should I do about the edges. One corner is chiped and both edges have gouges in them,
Some advice for me?
-
I have an old anvil that I aquired back in 1980-81. I have started looking on u-tub about blacksmithing. I would like to know more about my anvil. Any information I could get would be great.
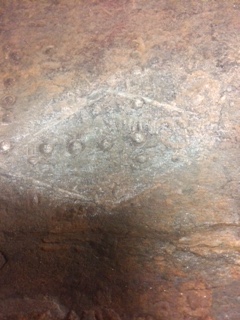
Has a Trenton LOGO (i think) on the side of it. See pictures.
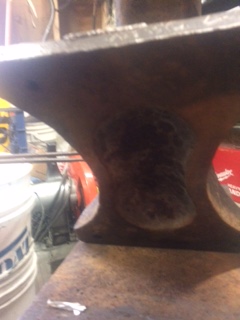
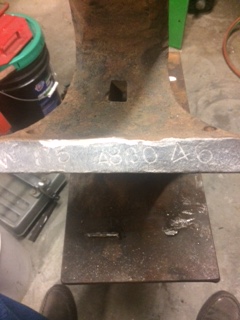
Also a series of numbers under the horn on the base. W 85 A830 48 (i think)
The hardie hole is 1' X 1-3/8" looks like someone drilled it out to inlarge it.
This anvil has been abused before I got it and I have used it when I needed it. Good anvil.
Thinks for your help on this.

Old Anvil
in Anvil Reviews by brand
Posted
Charles, The hardy hole is 1" X 1-3/8" and I will try to refrain from trying to clean it up.
Thanks for all the comments.
Does anyone have any info on the # W85 A 830 48. How old, whwer built? Etc
Thanks