

besserheimerphat
-
Posts
12 -
Joined
-
Last visited
Content Type
Profiles
Forums
Articles
Gallery
Downloads
Events
Posts posted by besserheimerphat
-
-
2 hours ago, ThomasPowers said:
Pile up some firebrick in front of it leaving a slot to put your steel in on the right hand, "hot" side and it will be much more efficient. Remember the old saying "Close the Door!".
"Were you born in a barn?" LOL
Yeah, the local stove shop has hard firebrick for $2.50 a piece. I'm going to pick up a few, paint one side with ITC-100 and stack them in front to help hold the heat in. And there are a couple local salvage places that usually have metal tool carts for sale, so I need to pick one of those up for cheap. One of the salvage places also has some stainless work tables that look like their from a restaurant kitchen - might need to see how much they want for those too...
-
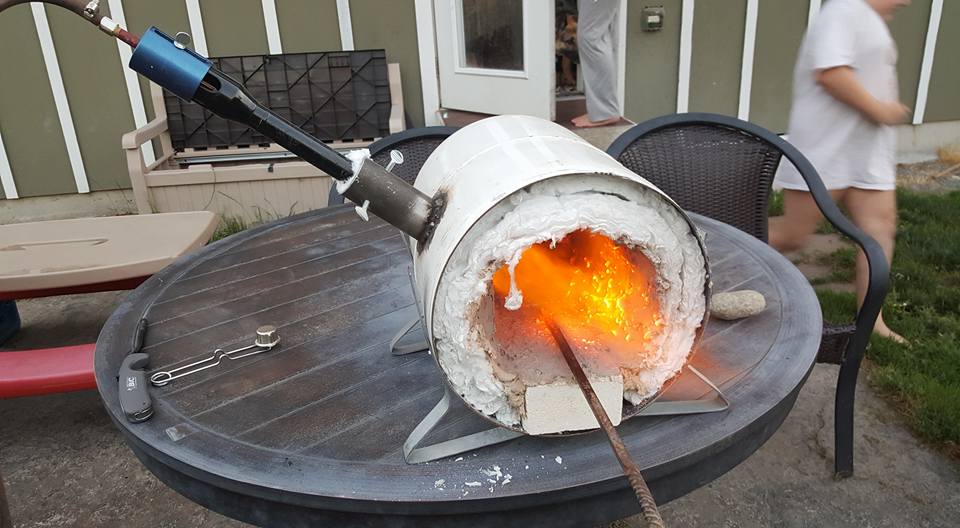
It works! I fired it up for the first time tonight. I only played with it for about 15 minutes because I don't have a great hot work area set up yet - I don't think my wife will want me using our metal patio table as a work bench...

I ran a couple minutes at 5 psi, a couple minutes at 10 psi and a couple more minutes at 15 psi before I couldn't wait any longer and had to stick a piece of steel inside. The steel is the tapered end of a 3/8" square bar that was the first thing I ever smithed in a class. It only took a few minutes before the big end of the taper would have been red enough to start hammering. I've got another 5 psi capacity in my regulator, and will eventually stack bricks in front to block it up a bit. I do have a 2" x 3" hole in the back to vent, along with a same-sized piece of soft firebrick to use for a plug as needed.
The forge is a 30lb propane tank with two layers of 1" Kaowool insulation. The floor is a full soft fire brick, with the intent of providing more structure for the floor. Everything is coated with a thin coat of 3000F refractory cement. I then coated the cement with ITC-100. Right now I'm really happy and excited. I am a little nervous about the longevity of the refractory cement - it was really difficult to spread directly on the rigidized Kaowool and I know the thickness is inconsistent which will cause stress as it heats unevenly. BUT, I now have the wherewithal to make a better decision when it comes time to reline it. The burner is a 3/4" T-Rex Hybrid Burner, running at 15 psi in the picture. The burner is in the same configuration as when I posted the photos/videos in another thread.
-
On 6/16/2016 at 0:48 PM, Frosty said:
Why do you need so large a forge? It's a common mistake folk make as beginners to think they need a LOT more forge than they'll ever use. Have you seen MY shop forge for example? If it doesn't get hot enough jus put another layer of ceramic blanket in it.
What are you going to wash it with before you use the ITC-1oo? The ITC won't harden or toughen the liner it's only efficiently resistant to heat and fluxes. Even if you rigidize the blanket with sodium silicate it's still vulnerable to poking, scraping, etc. especially at forging temps. Wayne Coe sells small quantities of good quality products to help armor your forge.
Surely you KNOW someone with a drill press don't you? If not look into building a "Side Arm" burner those ALMOST screw together from off the shelf parts.
If you're going to build one like a "Hybrid" download a set of Mike's burner plans, he taught Rex to make burners and Mike's are easier to build. You WILL need adequate shop skills though. Ever think of taking a college extension course? If for no other reason it'll give you access to a metal and or machine shop and expert advice.
Frosty The Lucky.
I don't need that large a forge. I found a guy that had a lot of scrap propane tanks that I could have for free in a town about 20 miles away. My wife was going there the next day anyway so I asked her to pick one up for me, telling her to get one the same size as what's under the bbq. She picked up a 30lb tank instead of a 20lb tank.
-
I haven't made much progress recently. It took me forever to source an inexpensive regulator but I finally found a guy that sells refurbished ones (got a Harris that runs up to 20 psi) and got the tubing, fittings, etc. I'm hoping to get the ITC coatings done this weekend. We'd decided to become foster parents and the training and house prep necessary to get licensed has taken up a lot of my free time lately.
-
I didn't have a question, it seemed to be working really well. I know I've seen questions about them around, so I figured I'd post a video just so people could see what they look like when running. Youtube has lots of videos of homemade burners, but I had only seen one other video of a Hybrid Burner and it only showed the flame - no views of the choke, no description of which burner it was, no info about the gas pressure, etc.
Frosty - I haven't had time to get the ITC coating in my forge yet. Hopefully this weekend I can get a couple coats done. After that I'm going to play with it for a while and see if I can get to welding temps (not that I'm ready to forge weld yet...). If you recall, my forge was built from a 30lb propane tank so my volume-to-burner ratio is nearly double the rule of thumb for forge welding. It's about 600 in3 and I just have the one 3/4" T-Rex burner. I'm confident I'll be able to get hot enough to move metal, but if I can't get it to weld temps I'll probably start down the path of building a second burner. Unfortunately I don't have access to machining equipment so I'll have to use a design that incorporates a weld tip - I don't want to try and drill small precision holes with my 14V cordless drill...
-
Here'so a video of me playing with my new burner. Running at 20psi.
-
It looks like the Zoeller version also contains a ball valve (handy for fast shutdown if something happened) and a 1/4 x 1/8 bushing. You could probably get those items locally too, but it's another difference in the price.
TimGunn, as I recall flow varies with the square root of pressure differential, not just pressure. Google says that at 60deg F, the vapor pressure of propane is about 130 psi. So if the regulator outlet pressure is 3 psi, the pressure differential is 127 psi; at 30 psi, the difference is 100 psi. 100 psi is 78% of 127 psi, which would mean that at 3 psi you are getting 88% of the flow you get at 30 psi. However, the compress-ability of gas makes the actual flow calculation a bit more complicated - the gas at 30 psi is much denser than at 3 psi so you are getting a lot more propane (BTU/cuft) at 30 psi.
-
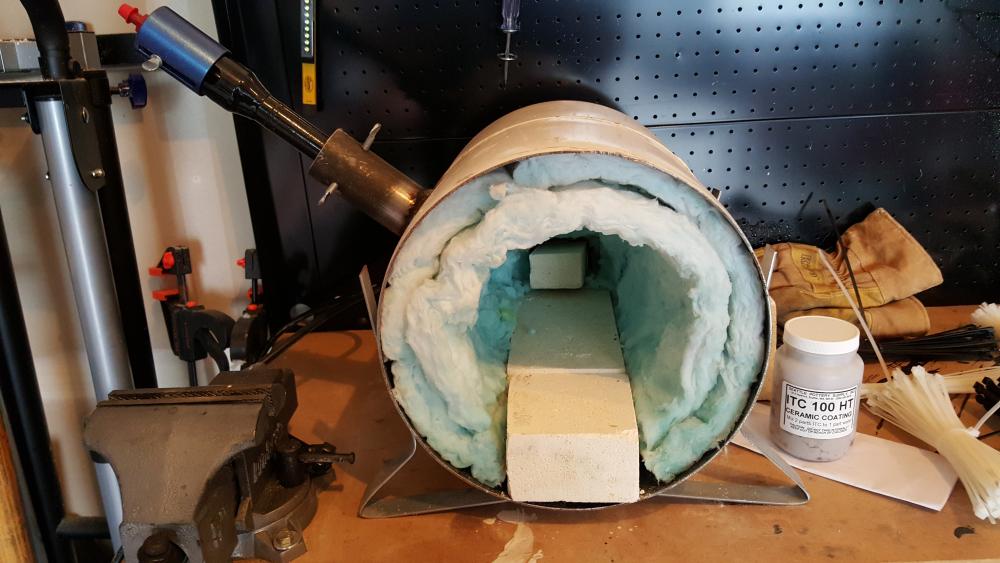
I'mean getting really close to having a functional forge! This afternoon I put in the kaowool and sprayed it all down with a good dose of rigidizer. In the next couple of days I'll put the ITC-100TH on it ($67 per pint from Seattle Pottery Supply). I put a 1.5 x 2.5 inch door in the back for venting or passing long stock, and used some scrap soft firebrick to make a plug when I want it closed up. The last thing I need is a regulator, shutoff valve and hose and I'll be ready to start banging metal!
-
As I continue building up my forge, I'm wondering how people set up the nozzle penetration on their gas forges. I've read where some people have the nozzle completely penetrate the insulation by a fraction of an inch, whereas others only stick halfway through the insulation and then form the remaining insulation as a continuation of the nozzle flare. How have you done it, and what was your experience?
The forge I'm building will use (2) 1" thick pieces of Kaowool for insulation, with rigidizer and IR coating. My burner will enter the cylindrical forge at about 45°, aimed at the soft firebrick floor (which I will also coat with IR goop). The body of the forge is a scrap propane tank, 12" diameter. If I stick the nozzle all the way through the insulation, it will hit the floor at 45° at a distance of about 7". I could pull the burner out of the forge an inch - so the nozzle only penetrates the outer layer of Kaowool, with the hole in the inner layer flared like the nozzle - but even with rigidizer I'm wondering if I'll end up eroding/blowing out a bunch of the insulation. What about the soft firebrick floor? I'm hoping that the jet impingement won't lead to significant erosion, but at least it will be easy to replace with something more robust if necessary.
-
3 hours ago, Frosty said:
Welcome aboard, glad to have you. If you've been lurking a few months you should know what I'm going to say next. Right? If you'll put your general location in the header you might be surprised how many IFI members live within visiting distance.
If you make your anvil stand with the 4x4s on end it'll be much more efficient than laying flat. Keep enough ceramic blanket, kiln shelf or whatever you're using for floor to make a movable partition in your forge. A 40lb. tank is pretty large for a single 3/4" burner you might need to adjust the volume.
Start by making your punches, chisels, etc. use longer lengths of stock and you can do it without tongs. Tongs are a little advanced for a beginning project and you'll need some basic tools anyway so save them for a bit later.
Frosty The Lucky.
Location added
") I also added a photo of my anvil stand below.
I also added a photo of my anvil stand below.
I was originally planning to use a 20 lb tank for my forge, but my wife was going to make it to the town with free salvage tanks before I could so I asked her to grab a tank for me. I said to get one the same size as what's under our grill, and the 40 pounder is what she came home with... I was a little worried about the volume as well given the burner I had bought, even with 2" of Kaowool and IR coating (about 650 cubic inches), but I put the burner close enough to the front of the forge that I can fill up the back with extra insulation to start and have plenty of space to eventually add a second burner. I have read great things about the 3/4" T-Rex burner (reviewed here by Ron Reil, where he says the output is closer to his 1-1/4" Mini-Mongo burner) so we'll see.
Thanks for the tip on the order of projects.
.thumb.jpg.5d7b97d9c4630fd9200c30af827c932f.jpg)
-
Well, I took a blacksmithing class and was hooked so now I'm working on putting together my own "shop." I've been lurking here for several months and now that I'm getting close I figured it was time to join the community. I've got a cute little anvil - an 84 pounder - and built an anvil stand out of rough-cut 4x4 fence posts that I had to replace when they got blown over in a wind storm. I've also got a forge nearly built out of a 40 lb propane tank and using a 3/4" T-Rex burner from HybridBurners.com. All that's left is to weld the burner holder onto the tank and get some ITC-100 or similar to coat my 2" of Kaowool and I'll be ready to start banging metal. I figure the first order of business is a set of tongs, followed by punches, cutters and more tongs.

.jpg.8445b586bd593ac0d6e563d4f84db2b0.jpg)
Forge progress
in Gas Forges
Posted
Thanks. The exposed end was liberally sprayed with rigidizer (as was the every other kaowool surface) and is very crusty to the touch - does it still need the refractory cement on it? I've already had significant exposure to kaowool during my 8 years as a test engineer, insulating industrial control valves for high temperature testing. Fortunately none of those involved high velocity gas moving directly against the kaowool so fibers probably weren't blown into the air, but I know I cut/pulled apart the stuff without a respirator for a long time. Don't get me wrong, I want to make sure my family and pets stay safe and healthy, but as for me, I could develop issues as a result of my previous job.