

Twilight Fenrir
-
Posts
50 -
Joined
-
Last visited
Content Type
Profiles
Forums
Articles
Gallery
Downloads
Events
Posts posted by Twilight Fenrir
-
-
23 hours ago, Smoggy said:
Goerge, from what I can see from the photo, I'd be tempted to grind the edges back to good and maybe settle for a rounded face, or if it's worse than I think it is.....is a straight pien an option?
Haha, that'd certainly be an interesting way to go... If it were anything but an Atha hammer, I'd probably do just that!
27 minutes ago, arftist said:Cross pein sledge hammers are not that rare; I bought a new 16 pound crosspein from Airco welding supply in 1982.
That is not a single hand hammer. It needs a long handle. What you have now is junk, keep slicing.
Cross pein sledge hammers may not be rare, but Atha hammers are, and I've never seen an Atha cross pein sledge before. If it had had any other stamp on it, I would never have bothered picking it up to begin with. It's not junk, but it's not really usable either... I guess it's more of a prestige piece at this point...
I finally found my stove black, I'll get a handle on it today, and share a picture or two of the finished product...
-
1 minute ago, ThomasPowers said:
you'd be more jealous if I had power to my shop to run them! After the house is fixed up for retirement then I can spend my bonuses on getting power to the shop...and then retire, hopefully in 6 years.
Well, if you ever wanna trade one of those power hammers for a 800+lb 30" Frink & Co Bandsaw circa 1890, you let me know
")
-
6 minutes ago, ThomasPowers said:
Champion very small BP (to go with my 2 champion 60# powerhammers of course)
Alright, I'm officially jealous.... Champion Blower and Forge is my favorite machine manufacturer
 I've got an 700lb blacksmith drill press of theirs, several forge blowers, and a few other misc things... i would LOVE a Champion power hammer. Plus, I like their offset design more than the Little Giants.
I'd be curious to see your dishing hammer made from that RR bolt.... I think I've got one of those bolts laying around..... I live next to a railyard and a few different sets of tracks, never a shortage of RR steel.... except rail itself >_>
-
9 minutes ago, JHCC said:
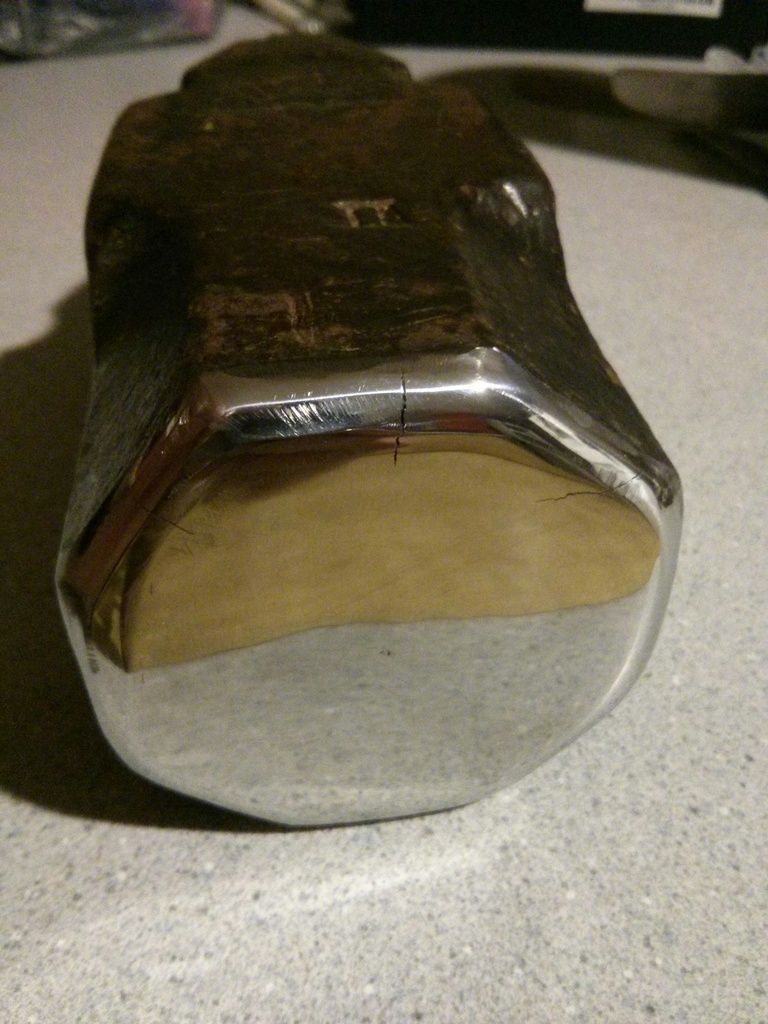
How far up do those cracks go? That doesn't look any worse -- even somewhat better -- than mine was before I started slicing.
That's post slicing.... I'm not sure how much further they go... it looks like they stop at the bottom of the bevel, tempting me to shave off another 1/4"... but because they are so deep, I really doubt that's the case... I'd have to polish the sides to try to follow the lines.
That left-most crack (about 10 o'clock on the face) I never even knew was there until I started dressing the face... completely invisible from the outside of the hammer.
-
Sadly, it would appear that my hammer is dead set on being a display piece without welding... I guess I should have left it alone after all, but it had to be tried.... the pein can still be used, though.
I'll blacken it as soon as I find my stove polish, stick a handle in it, and use it to educate people on what a REAL tool looks like
-
8 hours ago, JHCC said:
I cut mine off with an angle grinder, stopping frequently to cool it off in the slack tub. It worked surprisingly well, and -- if you think about it -- actually has a lower risk of damaging the temper. As I figure it, anyway, you're grinding away a bit more than 3/4 of a cubic inch of steel (2.5" x 2.5" x 1/8" kerf = 0.78125" cu.), which generates a lot less friction than the 3+ cubic inches removed by grinding 1/2" off the end.
Oh, no, your execution was MUCH better than the thought I had in my head. And you're right, a cutting wheel is definitely the way to go. I hadn't put a lot of thought into doing so, as I dismissed it out of hand originally. I can measure, and draw a line around it, making a cut along all 4 faces to cut down on heat build up, and help keep it a little straighter. Cool it in water frequently, and just take my time doing it... More and more I'm starting to think I'm going to take this approach.
7 hours ago, ThomasPowers said:A lot depends on the available tools, I have a massive angle grinder that I use for cutting RR rail, oxy welding tanks, etc. Using a good quality cutting disk cutting is easy. If I was trying to not mess with the temper I would have it set up and just every time I went out to the shop I'd work on it a bit till it started to get warm.
(ahh there is a difference between "mass production" and "supplanting" it was in the 1880's before production of ingot steel surpassed wrought iron in Sweden for example; but mass production of mild steel was in parallel in the meantime. It took a while for the "new" material to be accepted and people who were used to the strengths and foibles of a different material to convert to using it---"We've always done it this way" is strong in the workforce even today. WWI had an impact with the great depression of the 1930's being a major factor with the use of WI declining except for some speciality uses---It was still be spec'd for some bridges in the Southeastern USA in the 1950's for corrosion reasons, Florida for example. WWII was probably the 3rd strike for Wrought Iron; though the last plant to make it that I know of went out of heat in the UK in the 1970's and is now re-built at the Blists Hill Museum, IronBridge Gorge and is recycling old wrought iron for sale as a speciality material.)
I've got a big antique 7" angle grinder, the old aluminum housed kind, that thing is a beast. It's what I used to bring my anvil into shape after I repaired that with welding. Though for this project I'll probably stick to my little 4 1/2" bosch grinders, just to get a bit better control. I've got a cutting torch I inherited from my grandfather, an old Smith's that, with the right tip, is rated to cut 9" thick steel
Obviously, this isn't very temper-friendly. But that torch is one of my favorite tools.
Quite right, and that's some interesting bits of information there, thank you
 I've read up quite a bit on wrought iron... I more or less understand what it is, but I still haven't been able to find out WHY it is what it is. I've tried to read up on the methods of manufacturing, but I still don't understand why it winds up sort of like cable damascus, and why it can be torn...
46 minutes ago, Frosty said:
I've read up quite a bit on wrought iron... I more or less understand what it is, but I still haven't been able to find out WHY it is what it is. I've tried to read up on the methods of manufacturing, but I still don't understand why it winds up sort of like cable damascus, and why it can be torn...
46 minutes ago, Frosty said:A carbide bimetal blade in a band saw light on the feed and speed will cut that easily enough and leave a nearly perfect face needing only dressing. That hammer head would fit in my Jet band cut off saw with only minimal blocking to keep the clamp jaws square. If you go with this do NOT let anybody talk you into buying a fine TPI blade. 3 teeth on the stock at all times is THE ideal tooth count. No, a 1 1/2 TPI blade to cut 2" stock may be the IDEAL count but you have to have enough power and band strength to hog that much.
As coarse as you can find is still likely to be finer than best but variable TPI blades work well as the coarser pitch section clears the cuttings before they can either float the teeth or gall and jam the band.
Another really nice benefit of using a bandsaw as a cutoff is they don't heat the parent stock. Another being band saws are as safe a power tool as you'll find in a metal shop, the ONLY tool I'll turn on and walk away from. If something goes wrong it'll maybe break the band and cost you $10-$20.
Frosty The Lucky.
Carbide tipped bandsaw blades? o.o I never knew there was such a thing! I've got 4 bandsaws, but only my little porta-band is put together at the moment ^^; I've got all the parts to put my massive 30" bandsaw together and get it up and running... but I think I'm probably going to sell that one... it was so beautiful I couldn't resist saving it, but it's so preposterously massive that it borders on the absurd for my purposes... I need to fab a part for my horizontal bandsaw. And I need to build a stand and mount a motor for the antique craftsman I picked up.... I'm really bad about acquiring projects ^^; On the other hand, I'm really good at it too
My 30" bandsaw is the only one that cost me over $25
My drill press is a pretty safe tool as well. It's an antique self-feed blacksmith pole mount. I flipped a switch, and walked away while it drilled a 3/4" hole in 1" thick steel. Perfectly geared for drilling holes in steel.
16 minutes ago, Smoggy said:Personally, I would clean that off with a flap wheel and assess the damage with a view to dressing the original face or if needs be grind or slice off sufficient to reface to sound metal.
If it is beyond that level of repair then I'd want to stop and reconsider.
That's a pretty reasonable course of action... I think I've decided I am going to try to clean the hammer up, be it slicing or just dressing, so I'll start with dressing and see what it looks like. Then I'll slap some stove-black on it to pretty it up a little, and give her a handle!
-
13 hours ago, JHCC said:
I came into possession of a similarly damaged sledgehammer and ended up slicing a half-inch off both face and peen (which was much sharper than yours) and shortening the handle. Pictures here.
I thought about doing something like that, except I was going to grind it down, rather than cut it.... I wrote that off right away as too destructive.... I didn't want to shave a pound of steel off of it if at all possible.... But, yours really did turn out pretty nice.... I'm reconsidering my stance on that idea.... Would take a LOT of patience to cut through 2.5" of high carbon steel without damaging temper...
59 minutes ago, Charles R. Stevens said:Might I suggest a modification of the Gunther anvil repair methodology, or cutting off a 1/2" and forge welding on a new face? Either would go a long way tord "restoration"
personaly I would go with the "make a safe usable hammer" option, but hey, I have gotten crazy in the past...
An interesting idea.... But probably not what I'll do... Still, thabks for contributing n.n
42 minutes ago, ThomasPowers said:I think it might not have been made as a masonry hammer but may have been used as one. I see a lot of damaged sledges down here used for breaking up stone and concrete---many of them with a piece of pipe welded into the eye as a handle (I guess having no thought as to the damage they are doing to the tool they have no thought as to the damage they are doing to the users!)
Now the Bessemer/Kelly process dates to the 1850's and they are discussing how to work with Bessemer steel in Practical Blacksmithing written in the 1889, 1890 and 1891. Also the Siemens-Martin open hearth steel making process dates to the mid 1860's...So I would bet that it did not predate mild steel mass production.
You are right that it's probably a simple HC steel (1075 or 1080 ?) and should spark test well and work well with simple HC processes. *BUT* removal processes would still be less likely to cause issues than additive processes.
Oops, that's my bad, thank you for correcting me. For some reason I thought mild steel didn't supplant wrought iron until the early teens.
I guess it was somewhat wishful thinking that I could repair it without grinding it down... Maybe if I were a professional welder I'd be more confident tackling it. But everything I hear so far is that it's not practical.
-
42 minutes ago, Frosty said:
That looks like a stone mason's hammer and has undoubtedly earned all her scars. No, GMAW would cost you more buying a roll of the correct wire than taking a class and using a stick welder. CO2 is NOT an inert gas that is NOT a MIG. (Metal Inert Gas) GMAW stands for (Gas Metal Arc Welding) which is your wire feed.
Without specs you'll probably stand a better chance of doing more damage than repair to that hammer. You run into some interesting things happening with heavy section high carbon steels and welding. The Heat Affect Zone HAZ can get just plain weird.
My recommendation is make it a really nice forged wall bracket and hang her up. If on the other hand you really want to use it, grind out the defects and use it.
Frosty The Lucky.
I'm relatively certain it's a blacksmith hammer... the masons hammers I've seen are usually straight peins, not cross peins. Though, I do admit I'm more knowledgeable on blacksmith tools than masons, so maybe masons used the same tool and I'm just not aware of it...
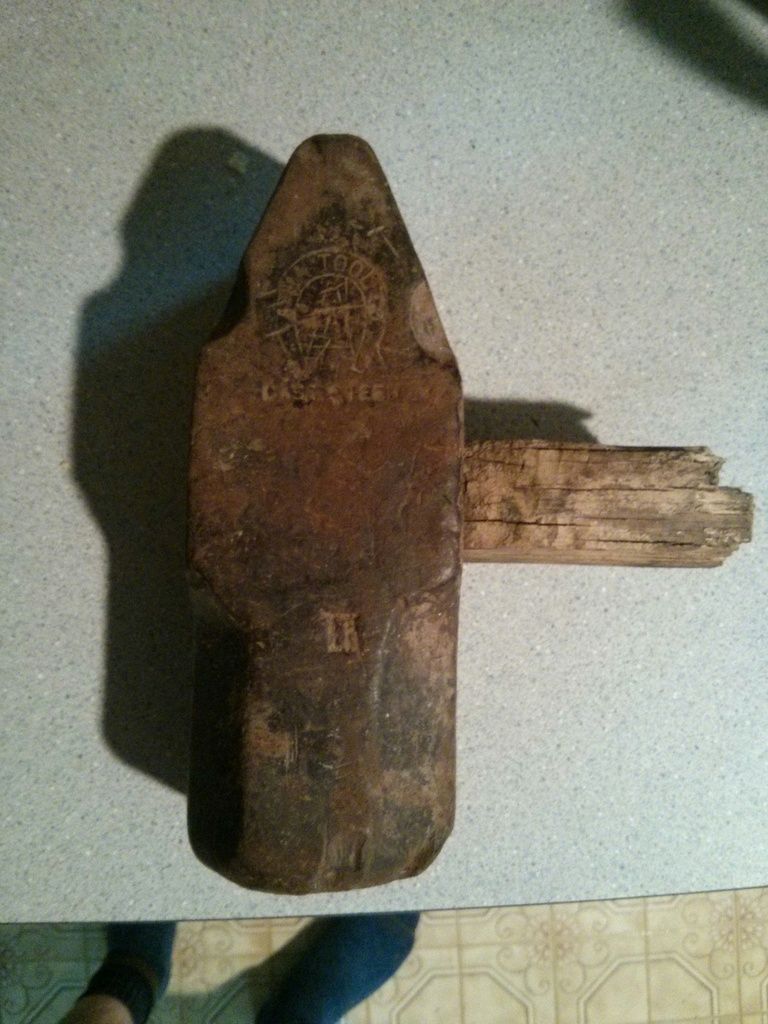
Atha made hammers from about 1875 to 1913 when they were bought out by Stanley. So I think that rules out 95% of the more exotic alloys of steel. This hammer predates even mild steel mas production. I'm not a metalurgist, I know a little bit of history given my trade, but when it comes to exact makeups, I know very little... I think it's reasonable to assume it is purely a high carbon tool steel, with no exotic additives like molybendium, tungsten, etc... I don't know if that helps.
-
17 minutes ago, ThomasPowers said:
Only own a dozen of so of them that I recall. When I moved from Ohio to New Mexico I counted and had 100 handled tools (hot cuts, swages, flatters, as well as hammers) on my tool rack. I've expanded a bit since then in the following dozen+ years...Got a cute little 4 oz Atha ballpeen up to sledges. I'm not a collector; they all get used!
you will need more than a flap wheel to get below those cracks; 36 grit belt on a 2x72" belt grinder is suggested. What kind of high carbon do you have access to for the MIG?
You've got me beat
I've maybe 20 handled tools, though that number jumps a bit if I get to count all the ballpein hammers I've got...
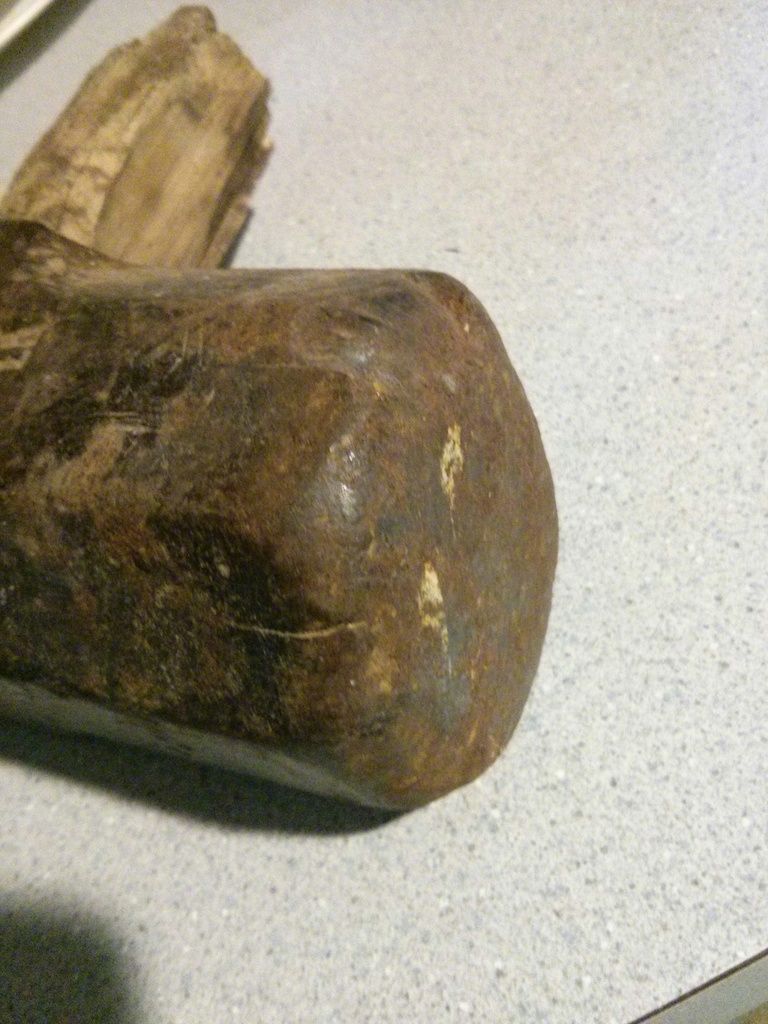
Well, I was planning to knock out the forming chip that that crack reveals. (it looks like it's about ready to come off with a few taps of a chisel) If it doesn't come off as I expect, I can use a belt, or a grinding/cutting wheel. I do have a 2" belt grinder.
I'll order whatever kind of wire is suggested as the best suited. I've just got mild steel wire at the moment, along with some ER70S-6.
-
1 hour ago, ThomasPowers said:
First get down to clean metal---I see more cracks than just the ones that have come off!
If it was mine I would take it substantially down to both get a clean base *and* have a hammer I could use a lot more one handedly...
Yes, there are more chips I'll have to get off, and will require a good deal of smoothing and cleaning the damage with a flap wheel on my grinder prior to welding. But, if repairing it isn't an option, I'll stick an equally old handle in it and use it as a show piece
Just keeping my options open for now.
Haha, I have many hammers. I AM a blacksmith
But this is my first Atha hammer, which is a pretty desirable brand if you're not familiar with them. And I don't believe I've ever seen a cross pein this big before, so it's a bit special all 'round.
-
This past weekend, I picked up a very special hammer, an 11lb Atha Cross-Pein blacksmithing hammer. It's been pretty sorely abused, and I'm interested in trying to make it usable again. It has a couple of chips out of the edge of the face of the hammer, which I could just grind a little bit and make it usable, but I'm more interested in the possibility of building up welds and restoring it basically to how it was originally, rather than shaving off metal.
I've been doing quite a bit of reading since I bought the hammer about the various kinds of fillers I should, and should not use... As well as proper techniques, such as pre, and post heating... But the problem with trying to research the best approach is, I don't know exactly what the alloy of the hammer is. So, I'd like to appeal to those who know better. I'll pose what I'd ideally LIKE to do, and I would appreciate if someone could tell me what I need to do, and whether what I wish to do is possible or not.
I have an arc welder, but I'm much better with my MIG welder, so I would prefer to use that if possible. The only shielding gas I have available to me is 100% CO2. What I would LIKE to do, is to weld the repair on with my MIG welder, grind the weld nice and pretty, dress it, then put the whole head into my forge, oil quench it so it turns nice and black, and then re-temper it in my oven. If I have to just weld it, and leave it alone, I can always give it a rub with some stove-black instead.
So, please, what would the best technique be to do this repair? And what should I use for filler? Honestly, the hammer isn't going to be extensively used, I can't swing an 11lb hammer very long one-handed
But I respect this tool, and want to make it usable again.
Thank you.
-
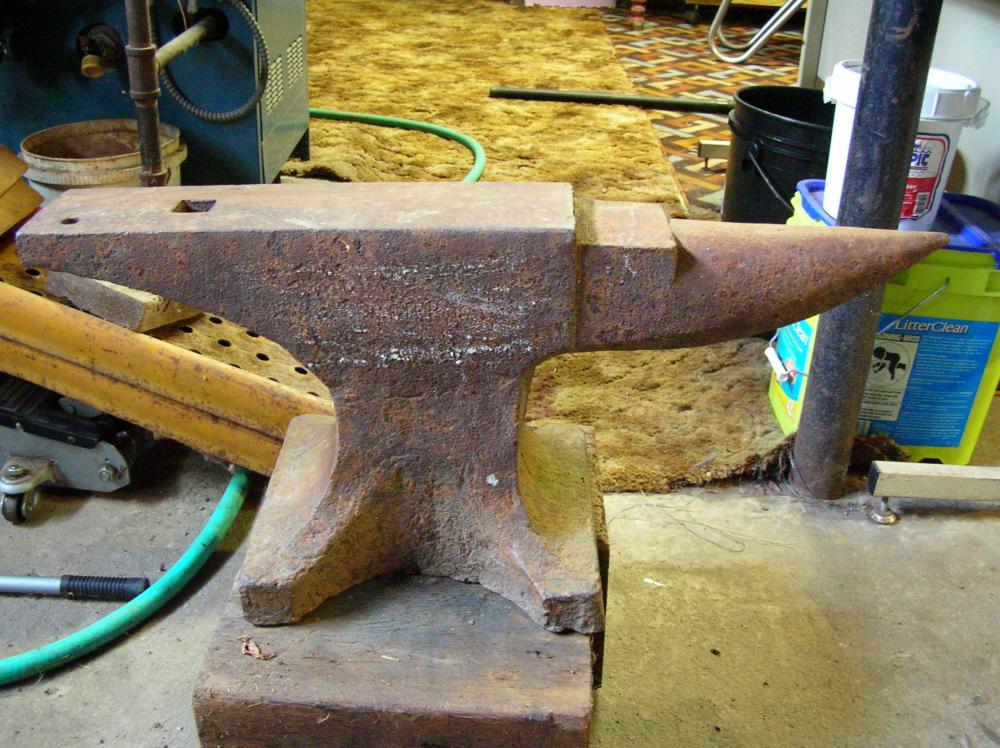
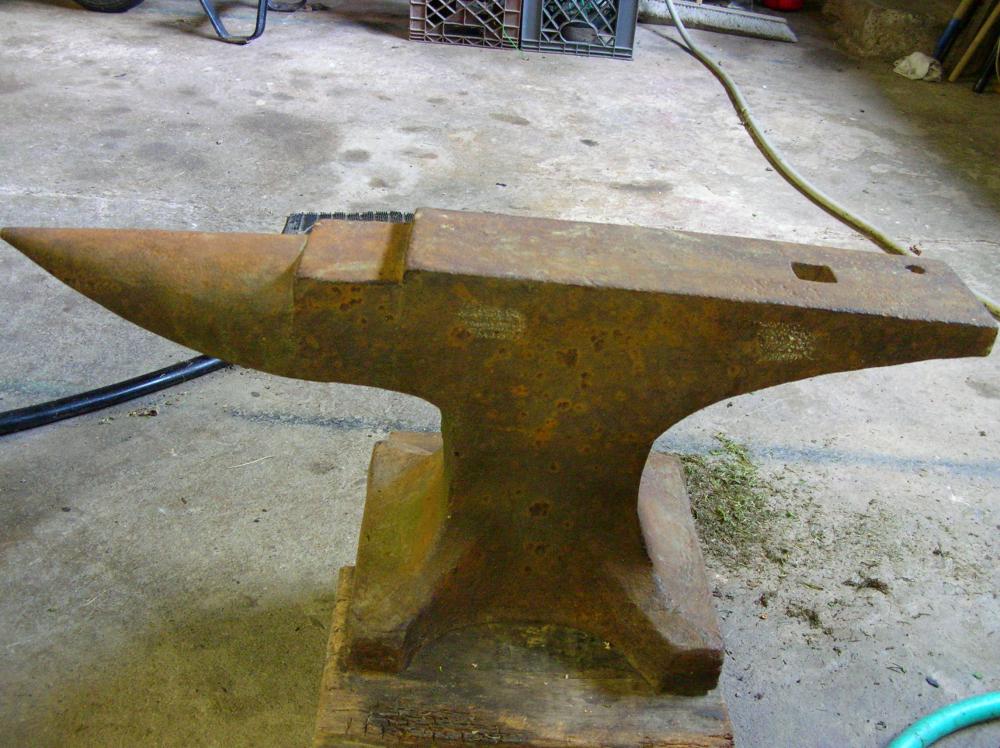
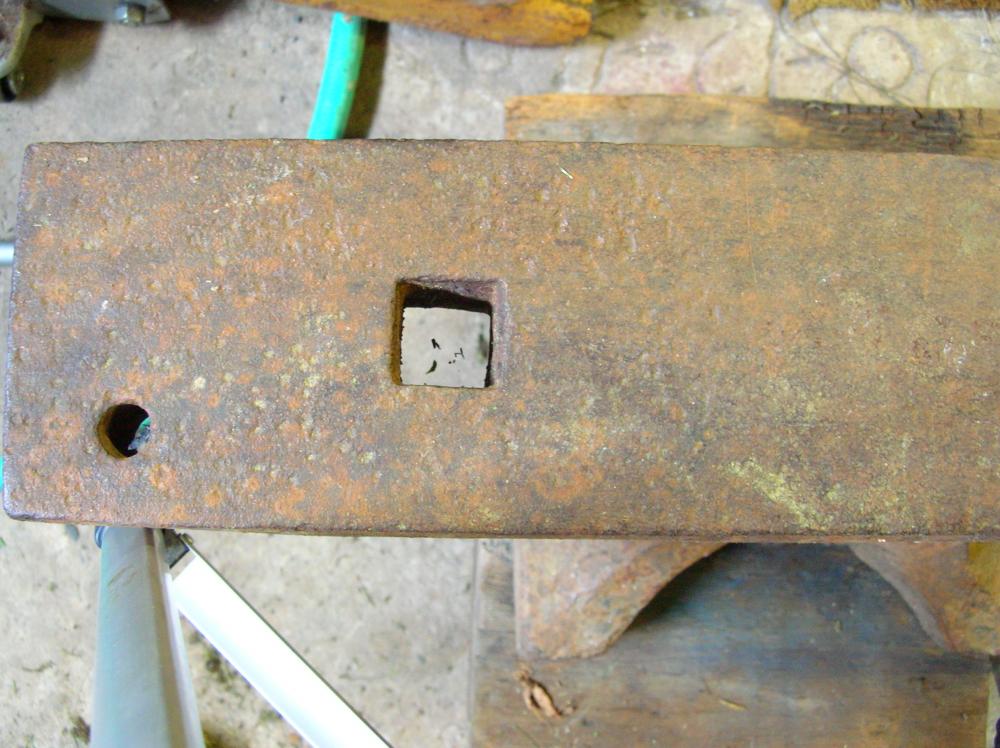
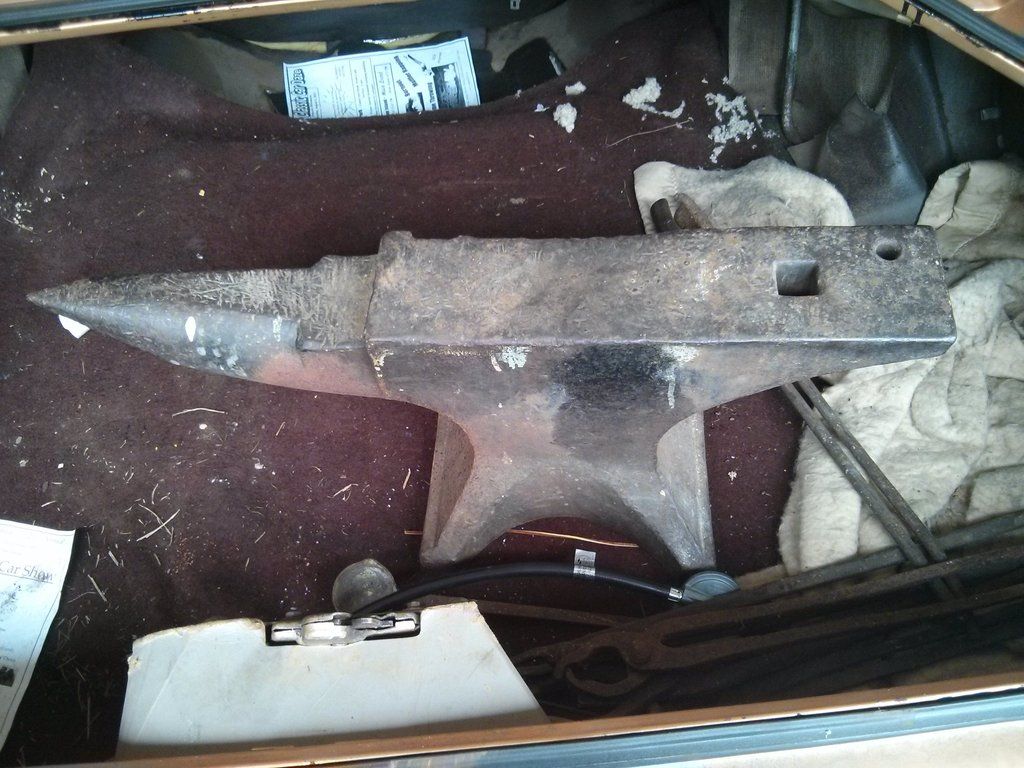
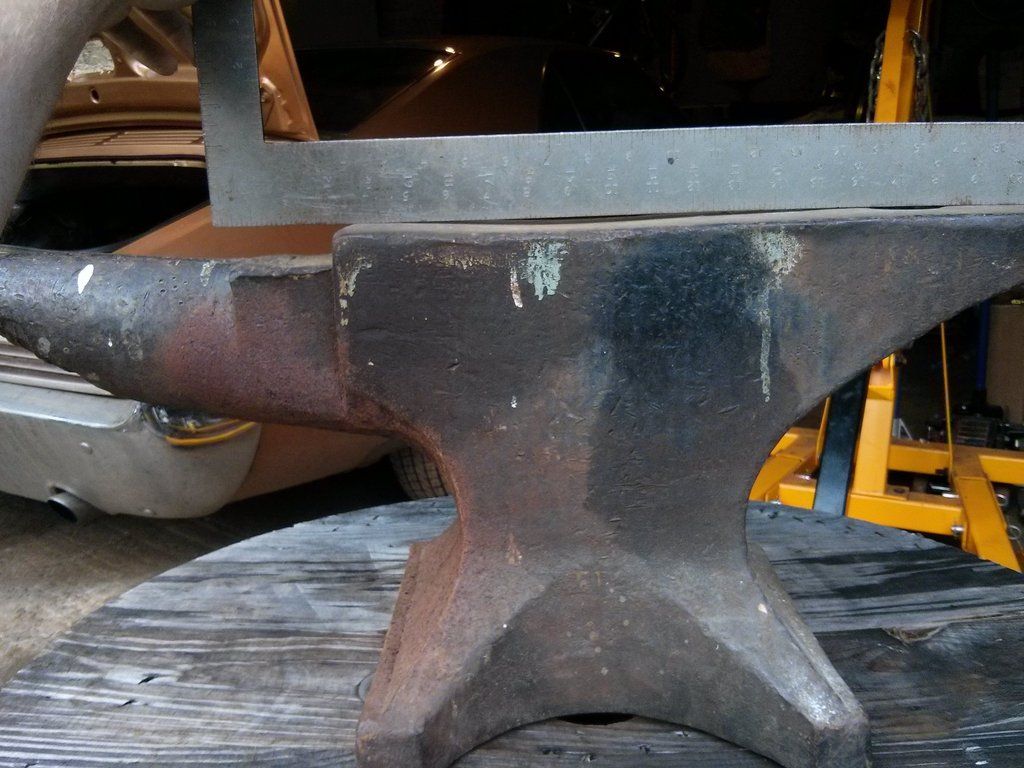
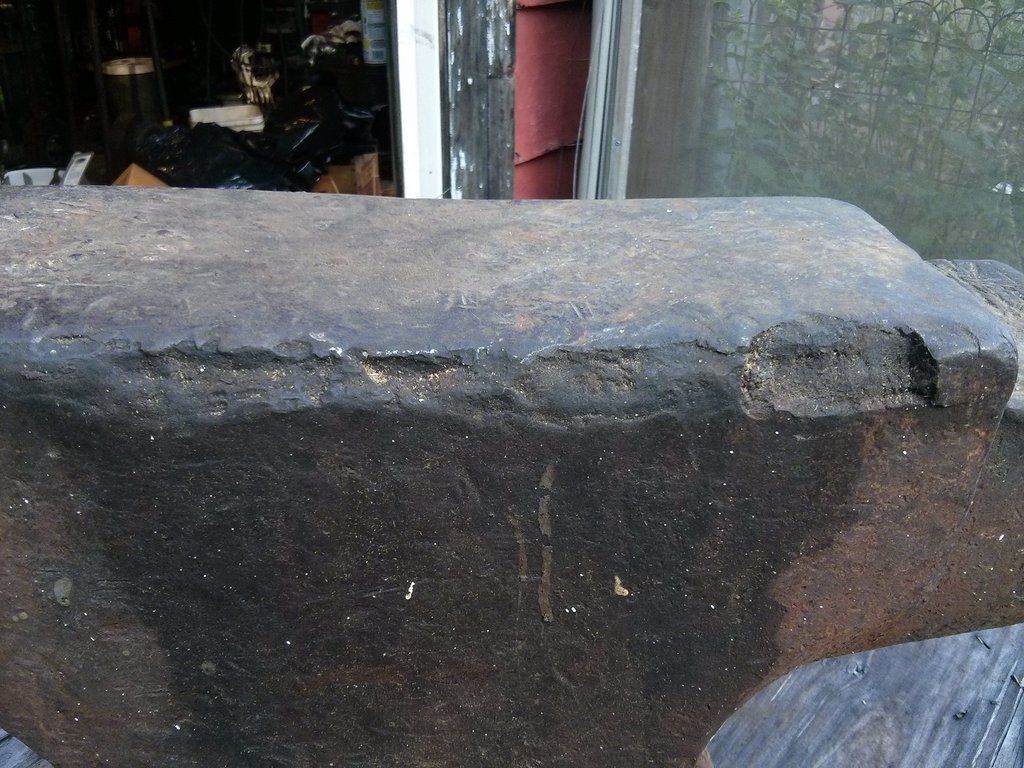
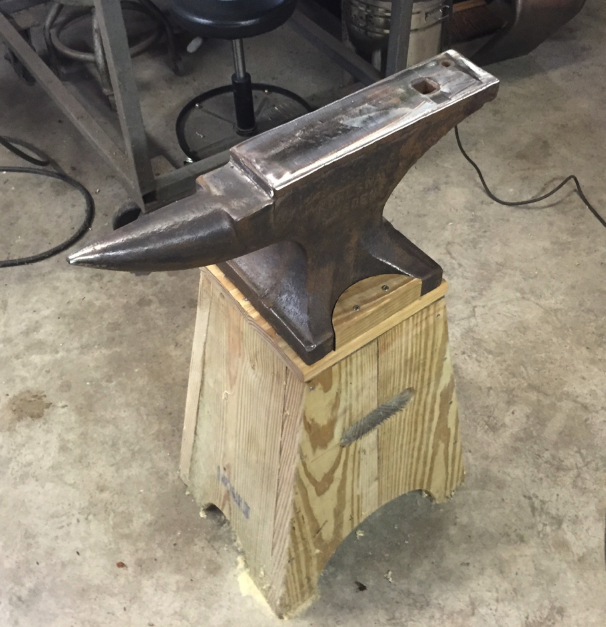
Discovered this anvil today in the welding shop for the tugboat company I work for. Just wanted to share the pic for the size of the anvil (look at the spray can on top). No visible markings due to the paint on it and I didn't have time to try to clean it and look further. Unfortunately it has a pretty serious torch cut in the face near the hardy - and even more unfortunately - it's not for sale -- yet......
") I hammer tested it for ring with a small sledge - some ring near the horn - dull thud near the hardy and cut. It's got to be one of the biggest in the field anvils I've seen.
I hammer tested it for ring with a small sledge - some ring near the horn - dull thud near the hardy and cut. It's got to be one of the biggest in the field anvils I've seen.Looks like a Haybudden, or a Trenton anvil to me. (Haybudden made some anvils for Trenton, IIRC) I'd guess 180 lbs ish? Has an awful narrow waste... The damage isn't TOO bad, it could be restored...
-
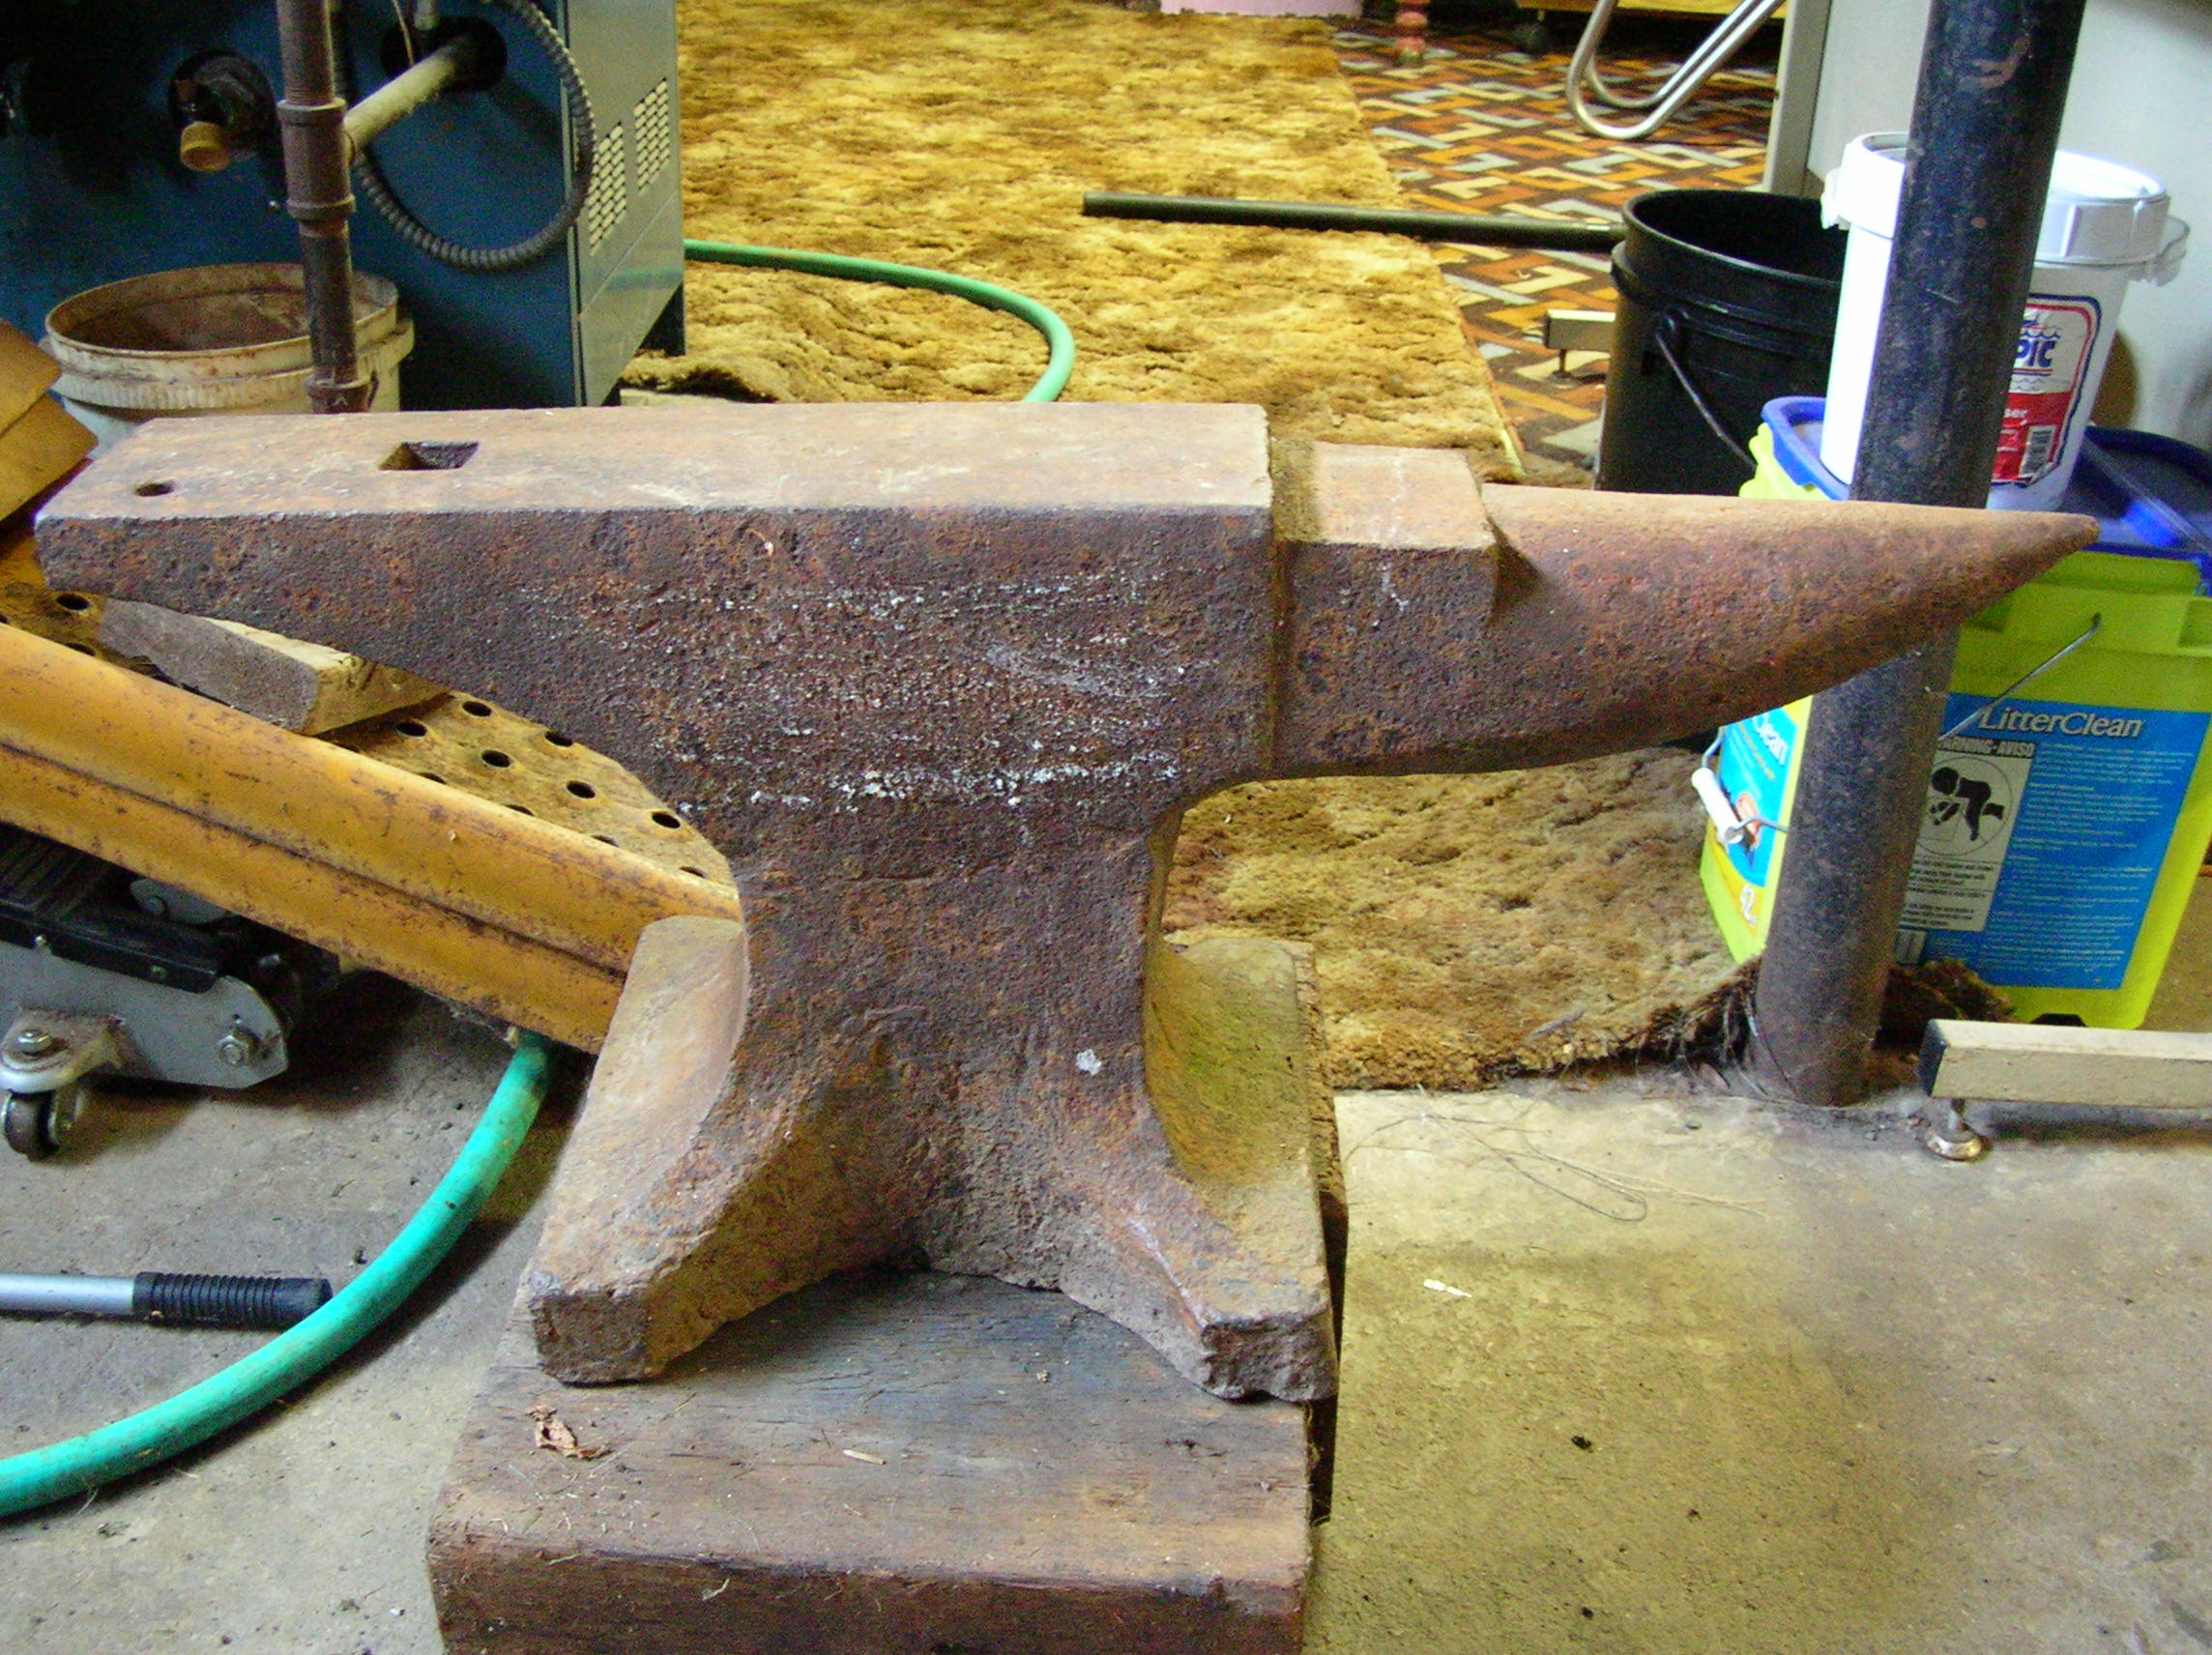
Hello new to forums and have an anvil to show and might be for sale 170 lbs 28 inches long 4 1/2 wide 12 inches tall Thanks for any info

Well, the silhouette looks like a Haybudden to me... Is... the anvil bent? O_o or, is it a perspective illusion?
Other than that, it if IS a Haybudden, looks in pretty good shape.... Where ya from roughly? If you're in Minnesota, I'd certainly be interested
-
How about just a row of coyote outlines on the anvil for confirmed kills...
Hahaha, that's hilarious, I might have to do that one... Thanks for the idea!
I've got to make a portable anvil stand for it... I was thinking of maybe forging some arms and legs too, that I could use to hang my hammers
Still not sure what I'm gonna do, but I'm sure I'm gonna do something!
-
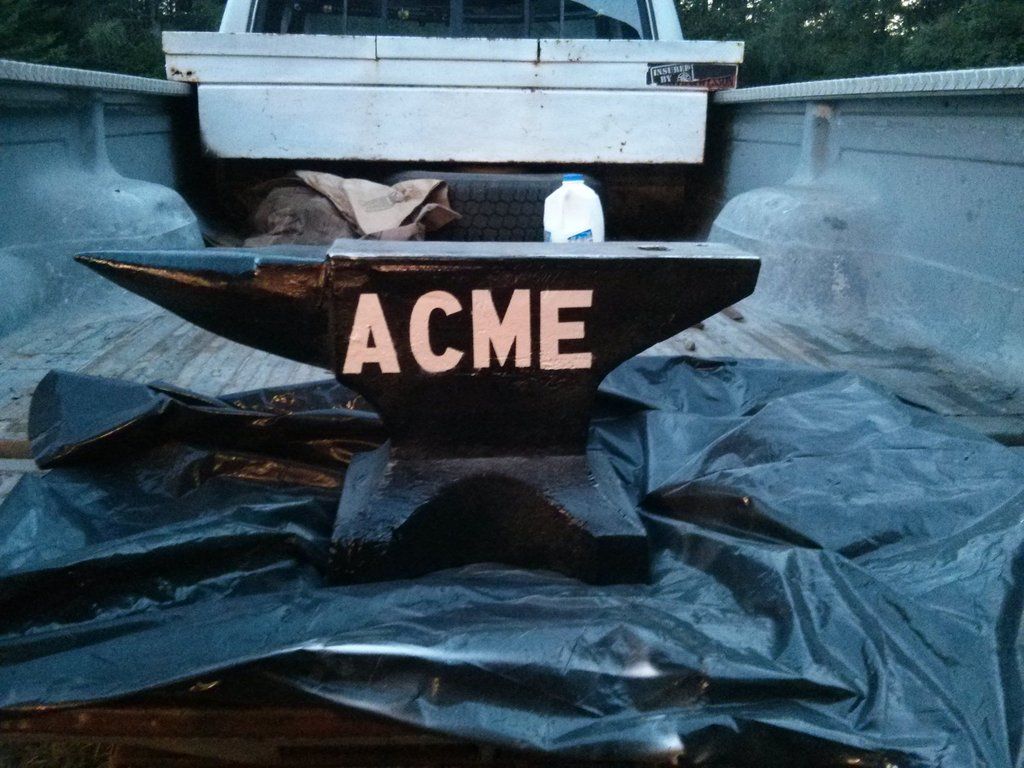
Well I guess you won't get into trouble for trademark infringement---ACME anvils used to be sold in the Sears and Roebuck Catalog about 100 years ago...
Haha, if Warner Brothers hasn't been sued in the 70 years they've been using it, I won't either
Besides, it's not like I' m selling it. I just need to figure out how to stick some coyote arms and legs out from under it in a non-flammable way...
-
Today I painted my anvil...
-
All of the sides are 2X12 pressure treated lumber. The front and back are edge glued with West Systems epoxy, VERY STRONG! No board behind the two with the handle hole.
I see, thanks for the answer! I'm definitely gonna have to make one of those for the Fur Trader rendezvous I go to.
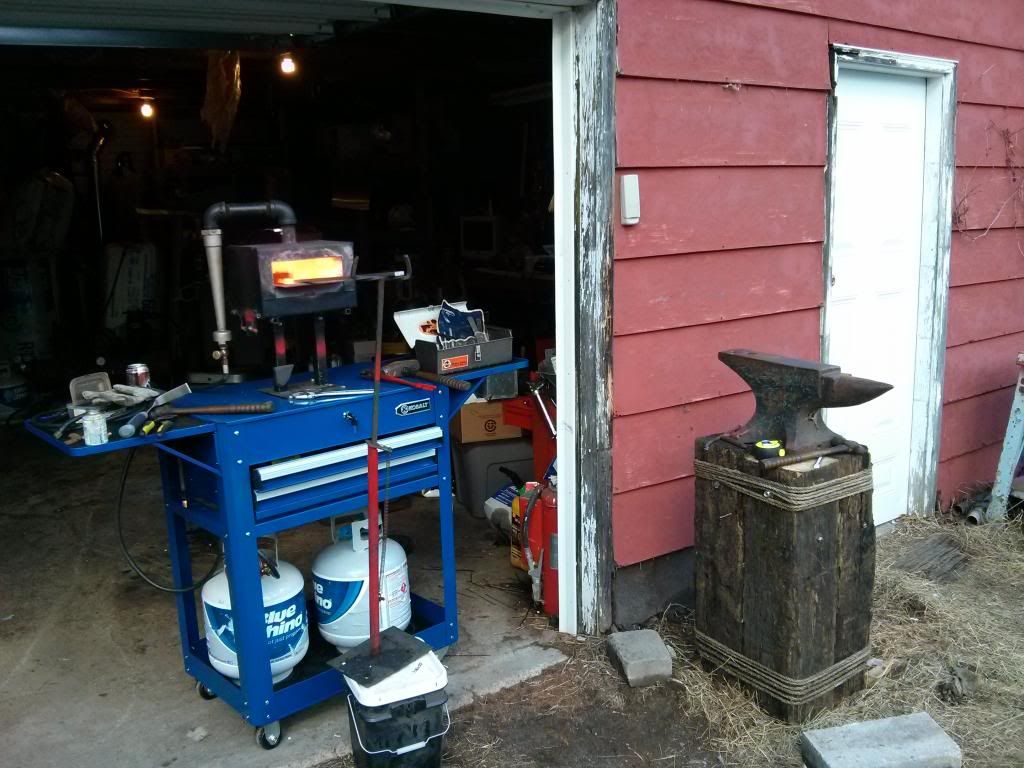
It's been refined, and upgraded pretty heavily by now, but this is what my anvil stand looked like when I first made it. It's been chopped down to suit my larger anvil, I added a bunch of hammer/hardie loops to tuck my tools into, and the rope has been replaced with hemp rope. Still, the thing weighs almost as much as the 200 lb anvil that sits on it. (The rope doesn't actually do anything but make it look interesting. It's held together with 8 pieces of threaded rod running through it.) That's a little 130 lb Peter Wright I had loaned to me when I was first getting started. Actually, the forge was a loaner too... haha, the only thing that is still the same in my shop is the cart my forge is on XD It's amazing how much my work space has evolved in one short year...
-
That cube with the barrel drifts on top looks like it might make a pretty good anvil.
That's destined to be a swage block or two. It is a jaw from those giant scrap-cutting crab claws that are attached to excavators. The thing is so hard it rings if you look at it funny
The other day, I called in sick to work to go check out a yardsale that said on CL it had a 'large anvil and blacksmith tools'. I went expecting to be disappointed with a small anvil, but I was pleasantly surprised. It was at least 250 lbs, possibly up to 300. They were asking $400 for it, a good price to be sure, but it would require a good deal of repair to be usable. I offered them $300 for it, to which they agreed, and threw in the 5 pairs of tongs they had with it.
While I was writing the check I found out I was actually related to them in a complicated way, and the anvil was owned by my distant relatives business since at least the 1920s! It saw heavy use in a marina repair shop. And it shows it. One of the edges is badly chipped. And the top is dished. Plus, someone took a cutting torch to the underside of the horn for some inexplicable reason. I'm going to team up with the master blacksmith from whom I apprentice and do all the welding needed to make it usable. Should be a great anvil with another 100 years in it.
Not sure of the make, the flats on the feet scream Peter Wright. But I don't see a seam between the face and body like I do on every other Wright anvil I've seen. Leading me to believe it is cast steel. Something Peter Wright never made to the best of my research. I don't see any markings, but I haven't wire wheeled the sides yet. Anyone have any insights?

I already cleaned up the horn..

-
Hello, new to the site, but been blacksmithing for about a year now...
I started with a 200lb Vulcan someone welded a plate of stainless steel on top of. (they actually did a good job.... Mostly.... It was either forge welded on, or silver soldered.... The latter being most likely on cast iron) They filled in some chips before putting the new top on, but not ALL the chips, and the plate collapsed in those areas of course. I've been very annoyed working around the dent in my anvil top, so been looking ever since for a better one. But, I got it for $200 and it has been workable.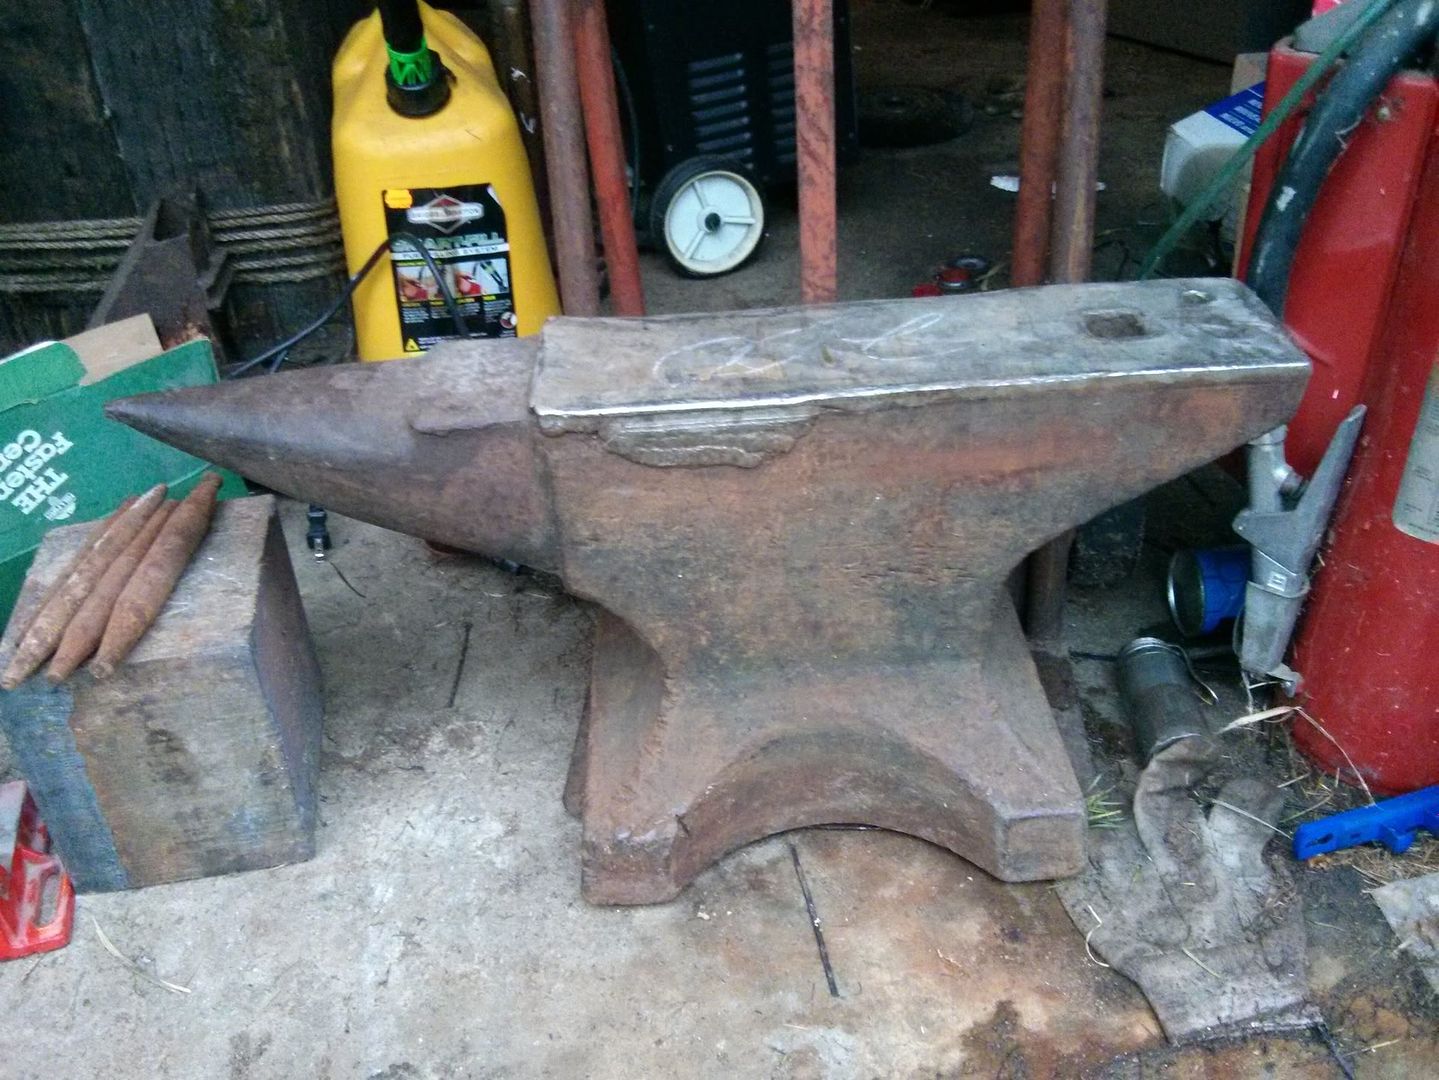
Trying to post my new anvi. Still getting errors. Will keep at it.
-
Here's a cute little 103# pre-WWII Kohlswa I picked up for a portable anvil.
I like that stand you made for that. I need to make something more portable than my 4 railroad ties bolted together to take to events
Is there a third board behind the two with the handle hole cut into it to keep it all together? Hmmm... I can't seem to post my anvils.... Keeps saying forbidden... Is there a post count you have to have before you can add pictures?


Restoring a hammer head
in Welding/Fab General Discussion
Posted
All done!