

Twilight Fenrir
-
Posts
50 -
Joined
-
Last visited
Content Type
Profiles
Forums
Articles
Gallery
Downloads
Events
Posts posted by Twilight Fenrir
-
-
3 hours ago, CMS3900 said:
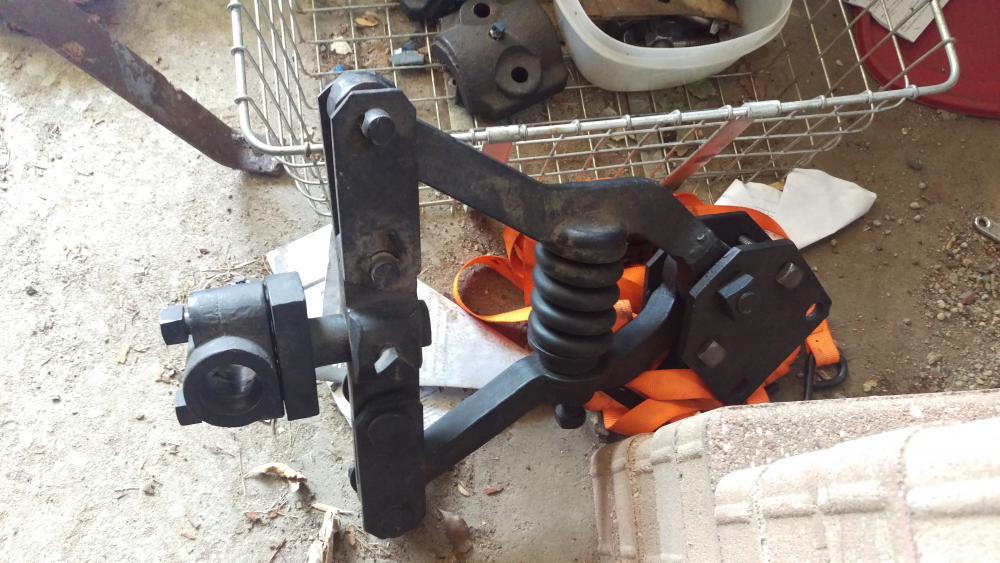
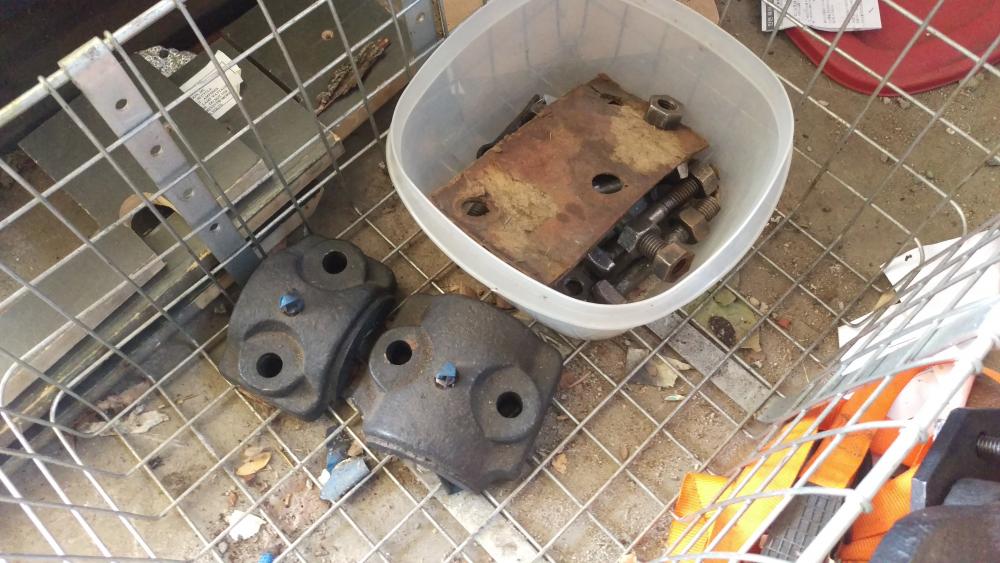
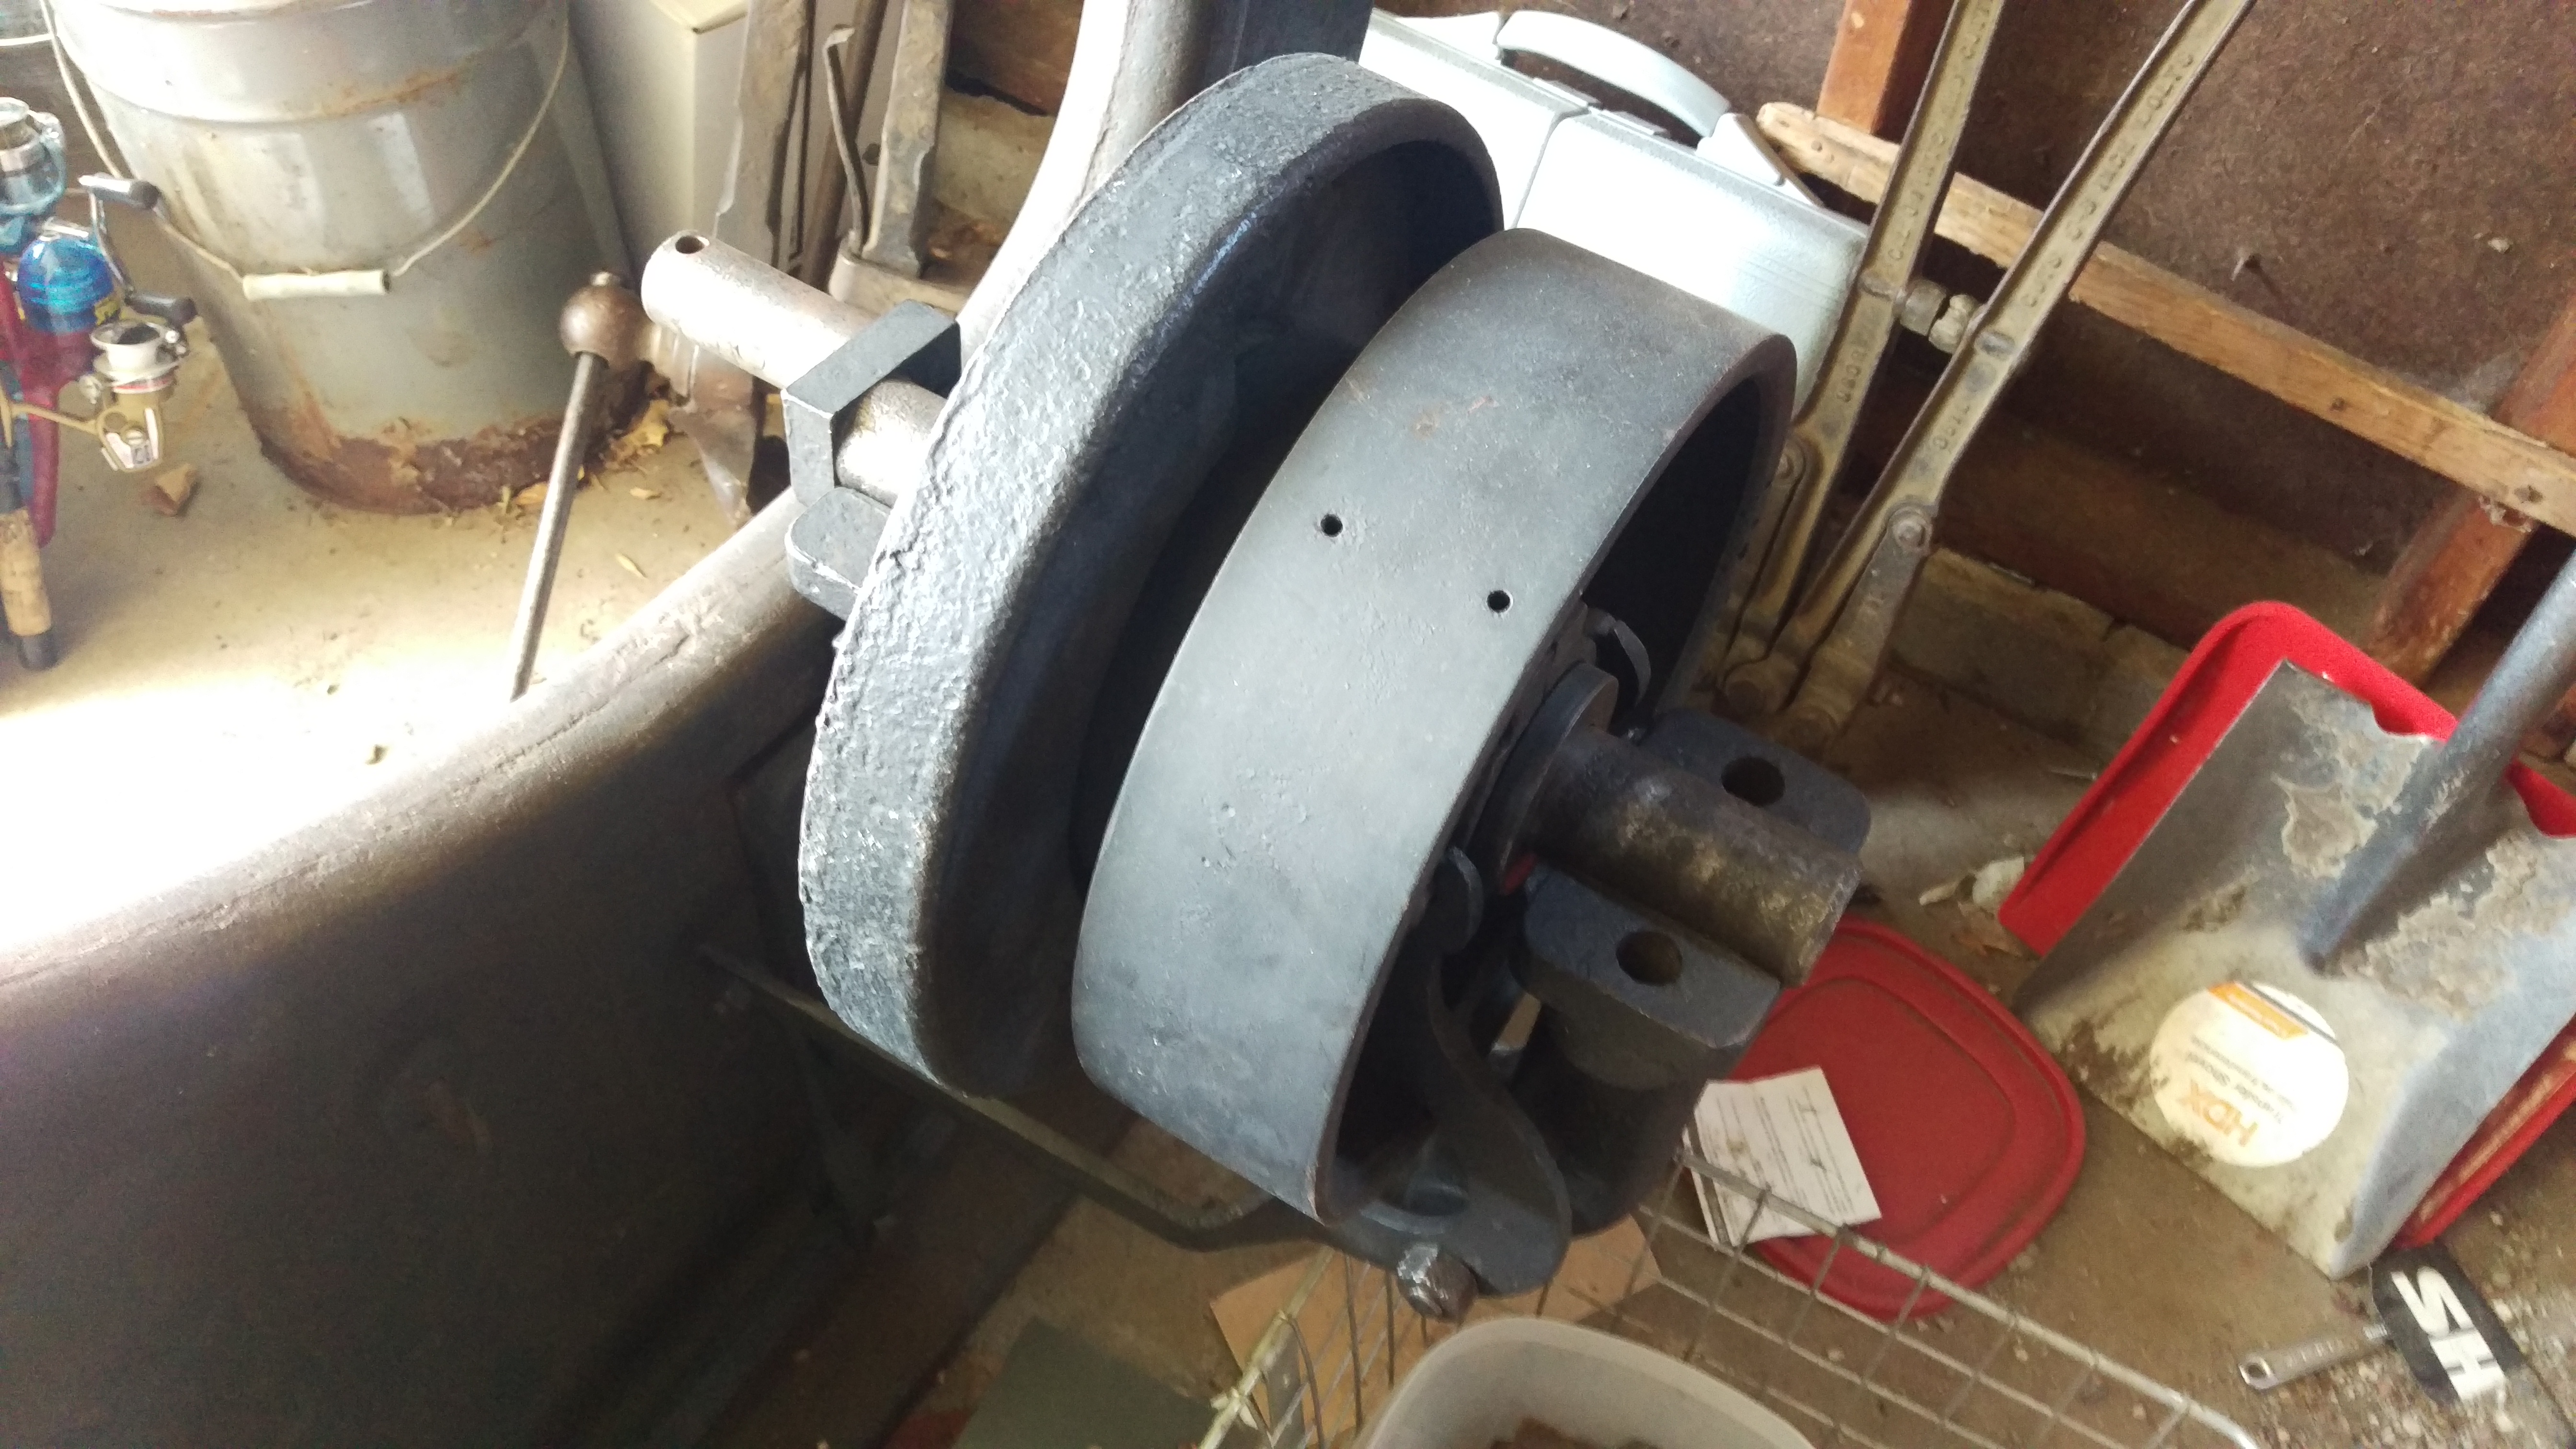
There is a small adjustment at the bottom of the spring assembly. If you look at the pictures and look where the assembly bolts to the eccentric/crank, it has a stub shaft that goes into a bracket that the toggle links bolt too, and is held tight in with one bolt. This is just like the adjustment on little giant/mayer brother hammers, except that your still contending with the arc.
As far as price/value go, with the bearing caps off, assume the whole machine needs new babbit poured. While much of this can be melted and re-poured new stuff will be needed to supplement, and in most cases it isn't cheap. Replacing the clutch is either wooden blocks or a leather belt, either way relatively inexpensive. Assume also that every pin hole and pin will need to be tuned by hand, either with a washer or totally re-bushed. Any slop will cause the helve to walk a little and strike a different spot. I also don't see a electric motor in the pictures, so there could be another added expense.
If the rest of the parts were there and the frame isn't cracked, I still don't know if there is value there or not at 1,700. After totally restoring my 100 lb. LG, re-babbiting, ect.., I would negotiate that price a little. A running 25 lb. LG goes for roughly 2500 in my area, so based off that I would value this at less than half of that.
Good to know thank you! I've never done work with babbit, but I have a friend who has a good deal of experience working on his Little Giants who would be more than happy to help if I need it.
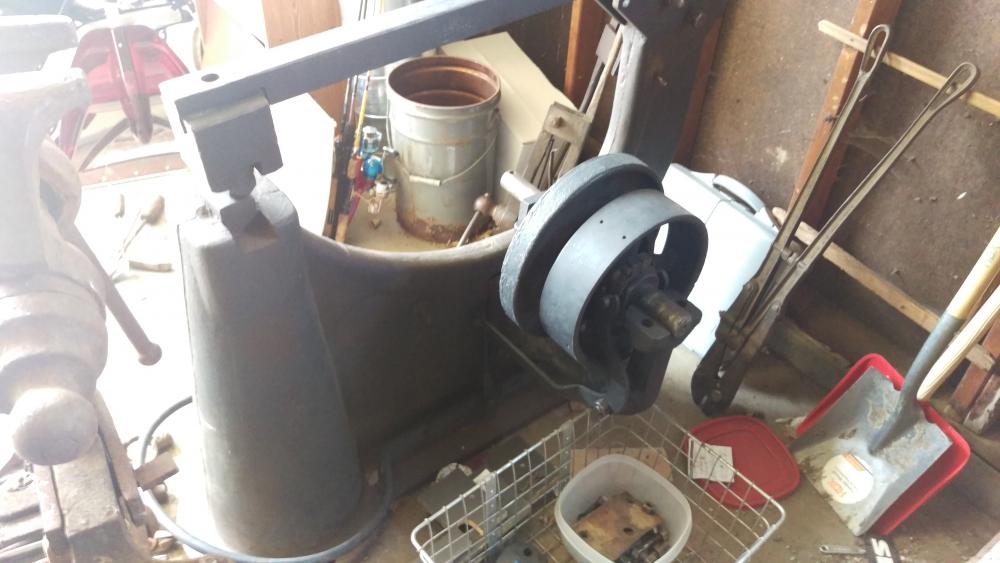
You are correct, there is no motor, it has never been hooked up to anythong but the original line shaft. I have a literal pile of electric motors though, so I'm not concerned about that....
I do have a motor related question though, does the HP of the motor really effect a power hammer much? My aforementioned friend uses a little half-horse motor on his 25lb, and I think a 1/2 horse on his 50lb little giant as well, and they seem to work fine? I have a 2 horse motor I had earmarked for my 1890s 30" bandsaw, but I think I'm going to sell that saw, so it could easily find its way onto the helve instead if it needs a bigger motor...
-
3 hours ago, Black Frog said:
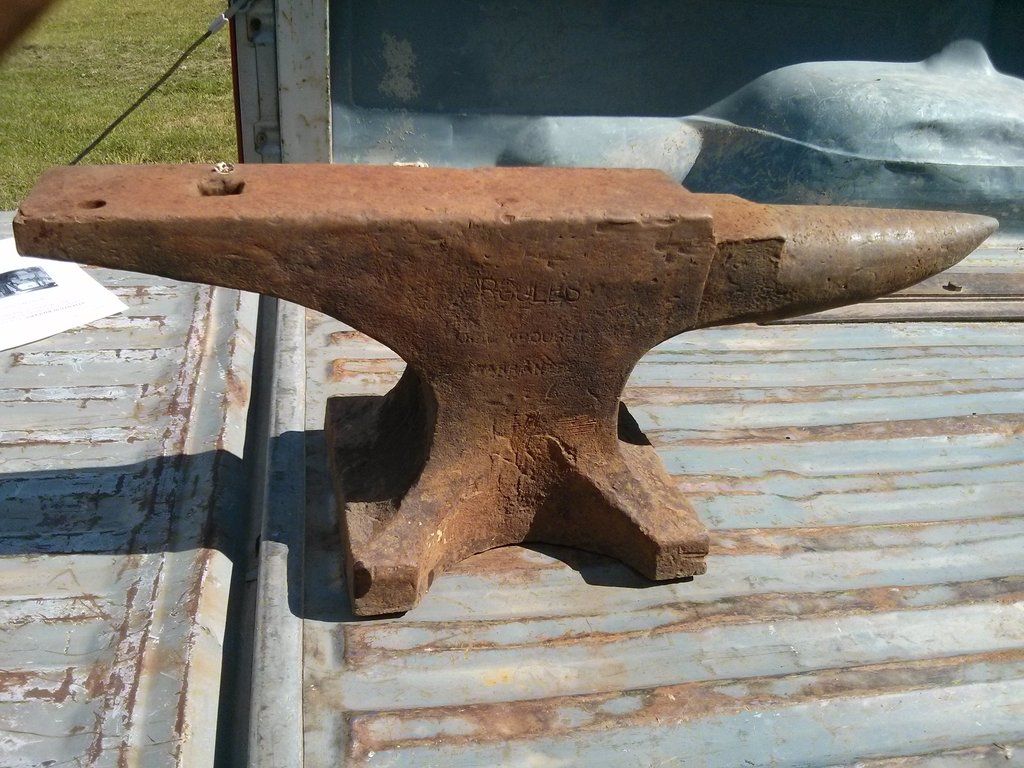
Looks to be a Hay-Budden marked for a hardware chain. Check the front foot under the horn for a serial number...
Yep, that was my assessment as well. I knew Hercules anvils were made by Haybudden when I saw it, and who could mistake that shape?!? It's got an unusual crease in the middle of the face that runs from one side to the other can't figure out what is going on there, but I think this anvil will replace my 250lb Peter Wright as my main shop anvil. There are one or two deep gouges, but they're smaller than 1/4" around, and the face, even covered in rust, has excellent rebound.
I'll have to take a wire wheel to it this wekend to get a better look at it.
-
2 hours ago, jeremy k said:
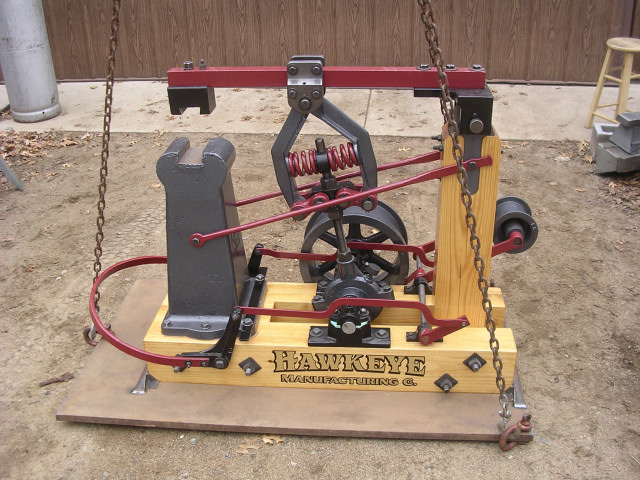
I'm a little partial to the Hawkeye brand, could be because I totally restored a 1903 version. I would like to restore an Easy Helve by Little Giant to though.
Wow, that's a pretty little hammer! Have you ever used it?
41 minutes ago, kubiack said:If you look at the plates where the helve pivots there is just a single pin and hole; I don't see any way to adjust the hammer for stock height.
Isn't it adjusted the same way as the Little Giants, by moving the spring arms up and down the little vertical shaft on the back of the eccentric? (the left-most component in the very first picture I posted, has a shaft that sticks up into the little butterfly, has one bolt that tightens it around the shaft) My memory is fuzzy, but I want to say that was called a Dupont mechanism?
-
2 hours ago, matto said:
One of the parts pictured is not for a helve, it is for a vertical power hammer.
Are you referring to the spring+arms? Because that actually IS what the Easy-Helve used...


Gosh, looking at these things... I really want one XD They're so cool looking! So unlike anything else out there, yet so obviously related to the Little Giant... It really is a very simple machine. And I would imagine that having that manner of spring would help it give a more uniform striking pattern than most other helves.
-
34 minutes ago, littleblacksmith said:
where in the world are you?? I know where I'm moving! nice save/score!
Littleblacksmith
In a wonderful bit of serendipity... I am from the city of Iron, MN
 Is it any wonder I find anvils? Hahaha
-
I'm having a very hard time finding any information on this thing... I guess the seller was telling the truth when he said only 400-500 of these things were made. The only Helve hammers I can find information on are home made affairs, or giant machines of industry...
This is a really interesting link though....
http://www.abana.org/ronreil/Forge1.shtml#An
I think I could be pretty happy with this hammer actually, it's just a matter of what it's really worth...
-
Driving by the scrap yard I live next to today, I felt something calling to me... so I swung on in and walked around, looking for a power hammer as I do every now and then.... and what should I find, but a 260 lb Hercules Anvil being used to hold down a pile of sheet metal
Asked the owner how much, and we agreed on $200 for it. I mentioned my smithing, and fished out my box of wares to give him a bottle opener in gratitude, and he really liked one of my RR Spike knives, so he took that, and $160 for the anvil n.n
The bird poop next to the hardy hole was free...
-
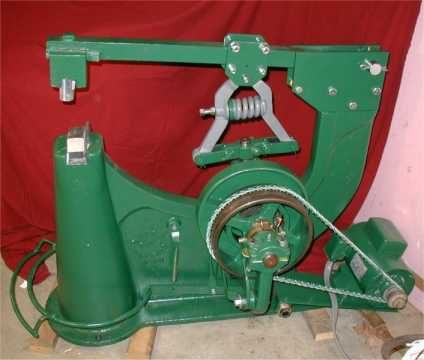
3 hours ago, kubiack said:
That hammer is an Easy Helve. I looked at one of those once and decided I was much better off with a vertically oriented hammer. The helve hammer swings the hammer head in an arch and is not adjustable for stock thickness. You will also not be able to use top tooling with this hammer only swages. The only advantage this hammer has over a vertical is when you are welding something like a tire rim where the vertical would be in the way. If you are only going to be drawing out stock and have extra floor space then maybe it would be worth having. I also think that hammer is way overpriced. These just don’t have the demand vertical hammers do and this one is sitting in pieces.
Not trying to refute either you or the seller, just looking for some clarification... the seller stated that the swing COULD be adjusted for stock thickness, but that it was a chore to do. Usually meaning people set it at one place for life, and deal with it... I mostly work with smaller stock at the moment, so that wouldn't be the end of the world I guess... but, that lack of flexibility IS important to know.
I'm guessing you can't use top tooling, because it doesn't come down perfectly straight, so it wouldn't work terribly well?
I'll try to look up other pricing examples of helve hammers to show him and see if the price will come down a bit, and do a bit more research to see if it's a good tool for me... but I really appreciate your information, you gave me some real points to think about!
-
Hello there,
I posted a wanted add for a power hammer on CL, and one of the replies I got back was for a Mayer Bro's Helve Hammer, which I understand is sort of the prototype for the Little Giant. I don't know much about Helve hammers, so I thought I would seek out input from the better informed...
I understand thr mechanical difference between a helve, and a trip hammer, but what I don't know is how the different design affects the work it does. I've used a 50lb Little Giant, and a 25lb as well, but never a Helve Hammer. The obvious thing to do would be to ask to go try it out and see how it works, but it is disassembled, so that's not really an option.
The seller seems to be very competent, and understands what he's talking about, so I think he is very credible. He's asking for $1,700 which is within my price range. He tells me it uses a lot of the same parts as the Little Giants, so despite being an odd duck, it's relatively easy to maintain... He did say that it probably needs a new clutch pads, but otherwise all the parts are there, and it should be bolt together, shim, and go. (not all parts are pictured, just a few shots)
The first question I'm sure will be, "what type of work do you want to do with it?" The answer to that is pretty general blacksmithing. I don't really have a niche, I make knives, and I make decorative items. So far everything I do is relatively light stock, but that's partly why I'm looking for a power hammer so the heavier work is more managable. I'd love to be able to make some hammers...
Does anyone else have some more insight to share on this?
Thanks!

-
On 7/22/2016 at 10:59 AM, ThomasPowers said:
One other thing: over the years I have noticed that *having* an anvil seems to lure in others. So start making stuff to pay off that one and have a stash of cash ready for when the *next* one sidles near....
Very true! The extra mass of an anvil increases your gravitational effect on other anvils dramatically... In my experience, people either have no anvils, or 3+ anvils
Over the last month, I've suddenly started practically tripping over the things! The more I buy, the easier it is to find them!
-
$255 seems pretty reasonable if your guess on the weight is accurate. I've only seen #80, #100, and #200 Vulcans, so I'm not familiar enough with the in-between sizes to speculate based solely on appearance.
I did my first two years of blacksmithing on a Vulcan anvil in MUCH worse shape than that. And even after I switched over to my new Peter Wright, I still sold my 200# Vulcan for $400, again, in MUCH worse shape, very easily. Almost anything remotely anvil shaped is worth at least $2/lb. Anvils are a good investment, and hobby-smithing is becoming more and more popular... Prices on anvils are going up fast, you'll almost always be able to get back what you pay for one if you don't go bonkers.
There's absolutely nothing wrong with a Vulcan anvil. Yes, they are made out of cast iron, but they do have a steel face, and that's what counts. Actually, cast iron anvils have a few benefits that their wrought iron kin lack. Firstly, they are quiet. Having gone from that 200lb cast iron Vulcan to my 250lb forged wrought iron Peter Wright, I do miss the gentle "thwack" vs the loud ring whenever I work on the horn... the ring has it's own charm... but, I digress....
Furthermore, wrought anvils have a tendency to develop a swayback over their 100+years of service life. This is something that does not happen with cast iron, as it is does not deform nearly as easily as wrought iron.
-
On 7/18/2016 at 11:29 AM, natenaaron said:
Wow. Great response.
Right?!?
On 7/18/2016 at 0:23 PM, BIGGUNDOCTOR said:Use a good needle scaler. The one I have will literally flatten a weld out. I have used it for several cast iron repairs and none ever had an issue with cracking / pulling away at the edges from shrinkage. I keep it hanging over my shoulder, run a bead, drop the stinger over my knees then get at it with the scaler while it is still a dull red. The inline design lends itself really well to this application. You can cover a lot more area much faster than you can with a hand hammer/punch/modified chipping hammer....
Twilight, as I mentioned above, you want the center tight against itself. If you have access to a milling machine they could even be milled flat before welding.The cooling welds will also help pull it together some. You won't even come close to flexing the top half with a hand hammer, so loss of energy is kind of a moot point. Some brands (Trenton?) were electric welded from the factory, and they did not do 100% welds, just a bead around the center.
Well, I have a needle scaler I inherited from my Grandfather, from his days at the mines.... it's a pretty serious looking tool... I've never used it, or even hooked it up though... That's where I got my cutting torch too, which is rated for cutting 9" of steel with the right tip... I could almost cut that anvil in half height-wise in one pass with that baby
(Not that I EVER would!) That torch is probably still my favorite tool... very handy in blacksmithing.
You're probably right... but I'm kind of stubborn in a lot of ways. I've got a good solid idea of what I want to do, and I don't mind throwing the time and 20lbs of rod at it... Besides, it's good practice, and I need more excuses to put hours onto my stick welding.
-
On 7/16/2016 at 11:10 PM, arftist said:
7024 will work but it likes to be in the flat position best. Also need a good sized welding machine.
7018 is an all position rod and like 7024 part of the high speed group (fast fill).
I would use 7018 if you want to keep the anvil upside down.
Alternatively the MIG would be faster and also work fine.
I would love to use my MIG welder... but I'd have to grind it out further to accept the big nozzle on my MIG gun... With the stick welder I just have to be able to get the stick in there
12 hours ago, Shade said:Grind out a good vee, generally a 70° vee is normal for welding to get good access to the root of the weld, if you grind from the opposite sides of the anvil this will give you the best access with minimal grinding and welding. Vee-ing out 4 sides is both not needed and just extra work. I don't know if I would trust much of the previous welding done to it. Also and this is important, you need to alternate welding one side then the other side on every pass this will keep any stresses equal and keep the weldment straight as you weld.
I would suggest some preheat, 200-250°F.
If you are stick (SMAW) welding start with E-6010 in your root passes. This will aid you in getting good penetration and cleaning out impurities. Peen the weld well after the first pass to reduce stresses. Every pass from here on should be peened well. In deep vees I use a tapered punch ground slightly round to do the peening. The remaining passes can be run with E-6013, E-7018 or E-7024. 6013 would be the easiest to run and the cheapest route. 7018 rod is a low hydrogen rod and must be kept dry or you could get hydrogen embrittlement. A proper rod oven will keep the rod at 250-300°F. (an old fridge with a light bulb is useless, xx18 high titania flux is hygroscopic) I tend to steer people away from 7018 for that reason. As mentioned 7024 is a fast fill, slow freeze rod and must be welded in the flat position and requires a 250 amp class or better machine so you can have the duty cycle you need also it is not a rod for the beginner as you can easily get inclusions in your weld.
If you MIG (SMAW) get a good 70S-6 wire, like Lincoln's L-56, and run with 75/25 argon carbon dioxide mix gas. Again peen all your welds and alternate sides welding. Welding in the flat position will help, if your machine is capable you can run spray transfer or pulsed spray modes, which require different gas mixes, and can be machine dependent.
Goodness, that was certainly a very detailed response, thank you! I highly appreciate your input. I understand what you mean about grinding the opposite sides... but for some reason I just can't fathom doing it that way XD I trust the original welds about as far as I can throw the anvil... literally.... I'm pretty sure if I throw the anvil the weld will break
I'm hoping it does, anyway. Otherwise I'll cut through the weld to the crack so I can start from scratch.
Would love to use my MIG welder, but I'd have to have a steeper angle to get the nozzle down in there. Plus, I only have 100%CO2 available at the moment.
10 hours ago, BIGGUNDOCTOR said:Best way to peen a weld is with a needle scaler. I have an inline I use for cast iron repairs.
The innershield welders we had at the college could do that in a pass per side running .0625 wire. They were making anvils out there at one time back in the 80's. My Dad's friend was laying down beads as big as my thumb while welding the sections together. He could only get a couple in before having to let the anvil cool some.
If that anvil was in my shop, it would get a 1/2" weld prep around the waist after making sure the center sits flat against each other, then a few passes of 7018 and be done with it. There is not a lot of stress in that area,and you are not going to flex the top half hammering on it.
Keep it simple,and don't over think it.
Well, it's a high enough stress area that the anvil broke in half there
Granted, it was probably an imperfect forge weld that did it in, but the Haybudden style anvil has a REALLY narrow waist. Working on the horn, or on the heel would put a lot of stress in that area... though, you're right, probably not enough to break 1/2" of weld all around it...
But what WOULD be an issue, is the two surfaces in the core of the anvil wouldn't meet perfectly. Without it being solid to the core, you're taking away from the efficiency of the anvil, as some energy is going to be lost there.
-
5 hours ago, ThomasPowers said:
Dusk wolf you need to round off those edges a bit more; sharp edges on an anvil are a bad thing---"Practical Blacksmithing" published in 1889, 1890 and 1891 even has a quote in it: "I am satisfied not only that the sharp edges are useless, but that they are also destructive of good work. I cannot account for their existence except as a relic of a time when the principles of forging were but little understood." (anvils were shipped with sharp edges so the Smith could put on the edges he liked!)
I see a lot of folks wanting to either remove face to get sharp edges often taking a generation of uselife away or weld them up, many times improperly causing future problems. It's often people who may be excellent machinists and welders but do not have a good solid background in blacksmithing.
As for the milling of the base of an anvil to get a level face THAT IS A GREAT THING TO DO! No diminution of the use life or getting sharp edges that need to be rounded off. (Unfortunately I have seen several anvils where to level them they milled the Face, 2 at least where they cut all the way through the face plate in places leaving a dead flat and level USELESS anvil.)
Oh, I did round off the edges before putting it into use. That wasn't /quite/ a finished picture... The anvil is big enough that I left a bit of sharp edge back towards the heel so I could use it when I needed to (Actually needed to do so today, making some specialized tongs) but otherwise it's mostly smoothed out.
To be fair, that anvil was basically a yard ornament when I got it. There was an entire edge broken away, it was horribly swaybacked, and had 1/4" deep chisel cuts into it.
The lovely thing about metal is, it's just like painting... If something goes wrong, you can always strip it down, and do it again!
If this repair doesn't last forever, it can be ground down and welded with something else! Maybe by then I'll have a bigger shop and better tools. But for now, it's working great, much better than I thought it would. ") There is something to be said for "Good enough"
There is something to be said for "Good enough"
-
This:
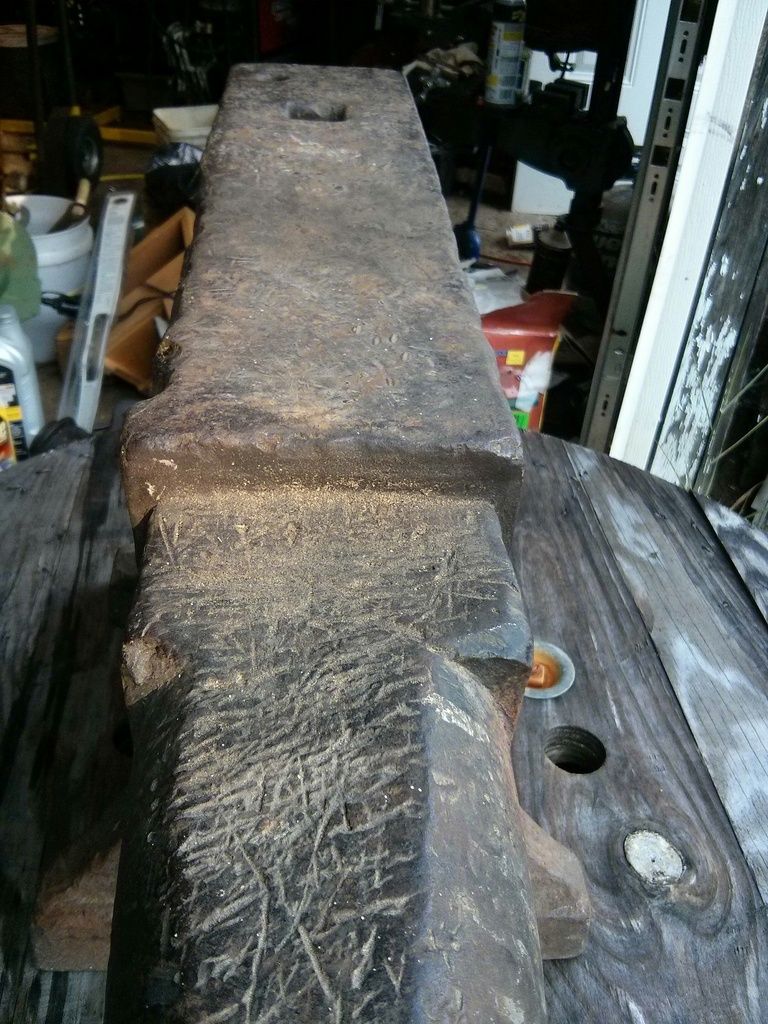
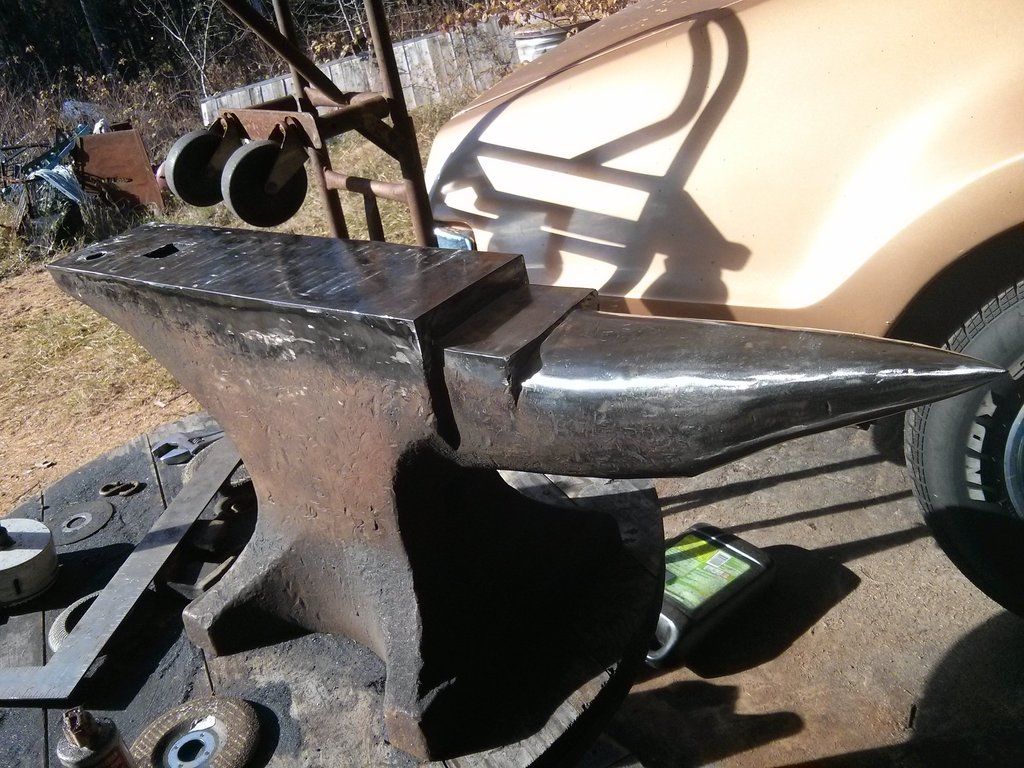
Turned into this: (It was swaybacked really badly, the middle of the face was about 1/2 an inch lower than the ends)

And came out like this: (Someone had cut off a huge chunk of the underside of the horn with a cutting torch at one point, which is why it's a goofy shape... I cleaned it up as best I could)
Also, I didn't have a milling machine
All of that is hand grinding with my 4 1/2" angle grinder, and my 7"
-
1 minute ago, Shade said:
What rod or wire did you use to weld it up? Pre-heat?
I used ER70-S6 mig wire, and no, I didn't preheat it... I tried to, but it just wasn't going to happen with an anvil that big. I've been using it for 6-7 months now, and it's held up very well. The one edge I tend to hammer on a lot isn't perfect anymore... but that's it so far. And I can always just put a bit more on and re-grind it if I feel the need to do so...
-
Eh, I welded up a 250lb Peter Wright that was a lot uglier than that one and it turned out fine. I think it's pretty common for people to tend to almost deify anvils as sacred objects that can't be touched. Personally, I'd rather see an old anvil be made useful again, rather than a lawn ornament. Best of luck to you!
-
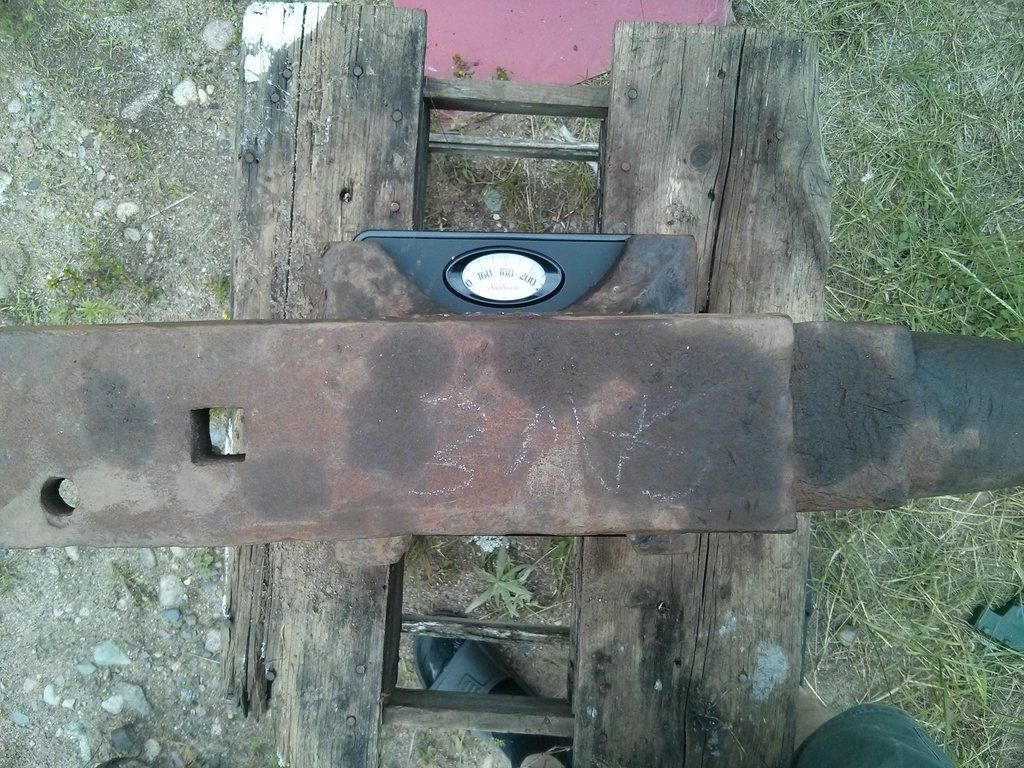
Well, I feel better about my ability to guess the size of an anvil! 179 lbs... and it's missing about 2-5 lbs at the moment.
-
7 hours ago, JME1149 said:
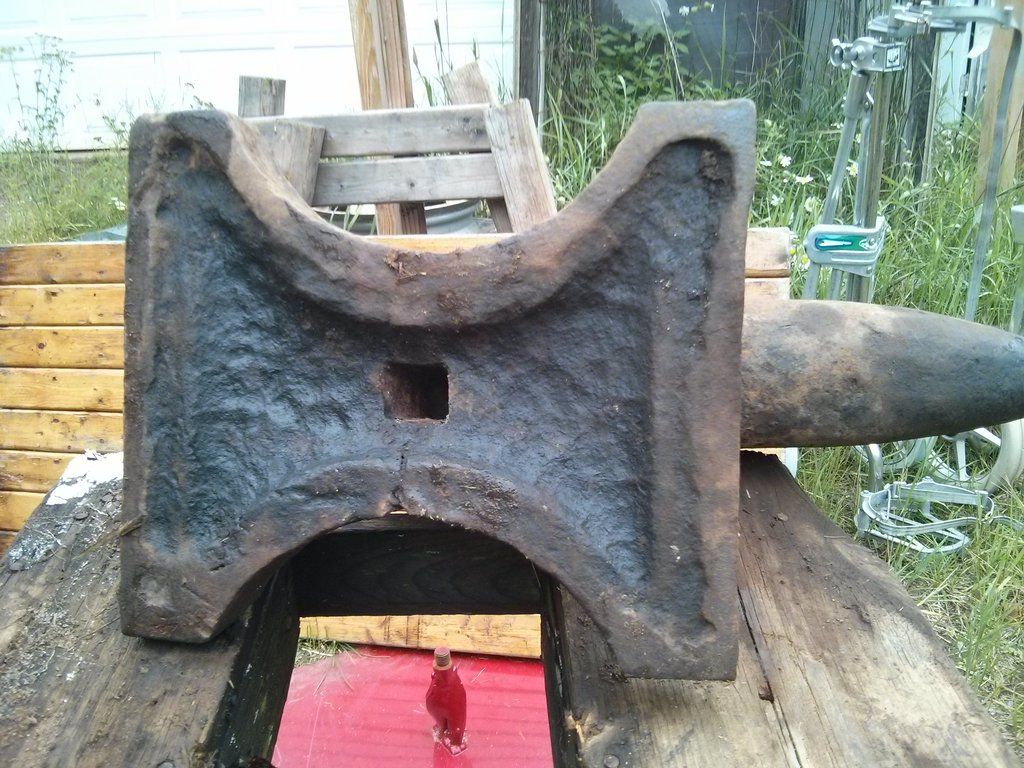
The shape of the anvil, serial number on the left side of the front foot, and that hourglass depression in the base all lead me to strongly believe it is a Hay Budden. The serial number is putting it in the very early 1900's range (don't have AIA handy so can't be more specific.
All this points to the anvil being cast steel rather than wrought iron. This is important because it will make a difference how it welds up for you. From my very limited experience, this should be much easier to weld than dealing with wrought iron.
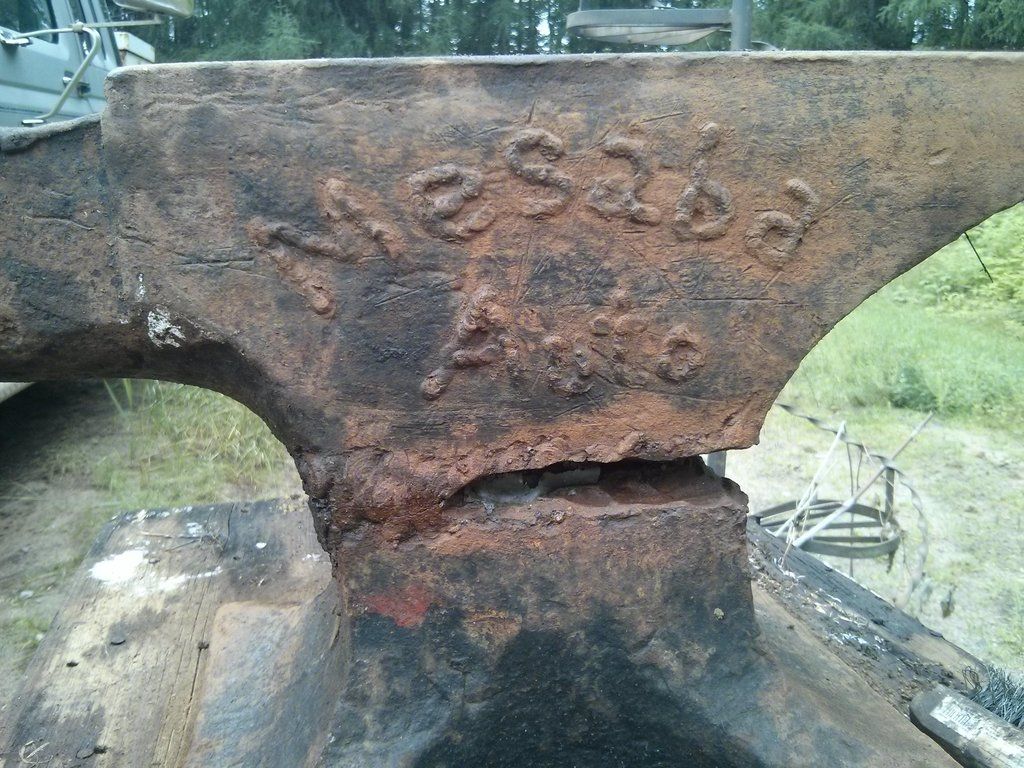
I can't tell from the photos what the face looks like, but it appears to be straight and flat. Once you weld the bottom back on, if you need to true up the face to the bottom, set it on the face and cut the bottom of the feet. Personally, I'd grind off that Mesaba Auto so the poor old girl can forget about her abusive past. Good luck with the repair and thanks for saving a good anvil.
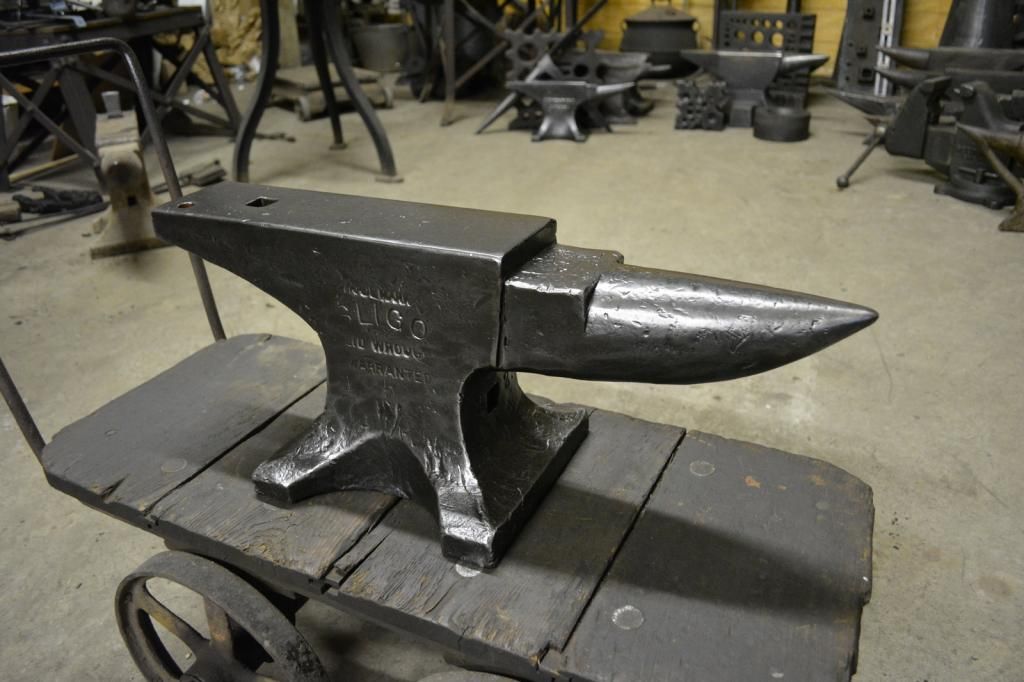
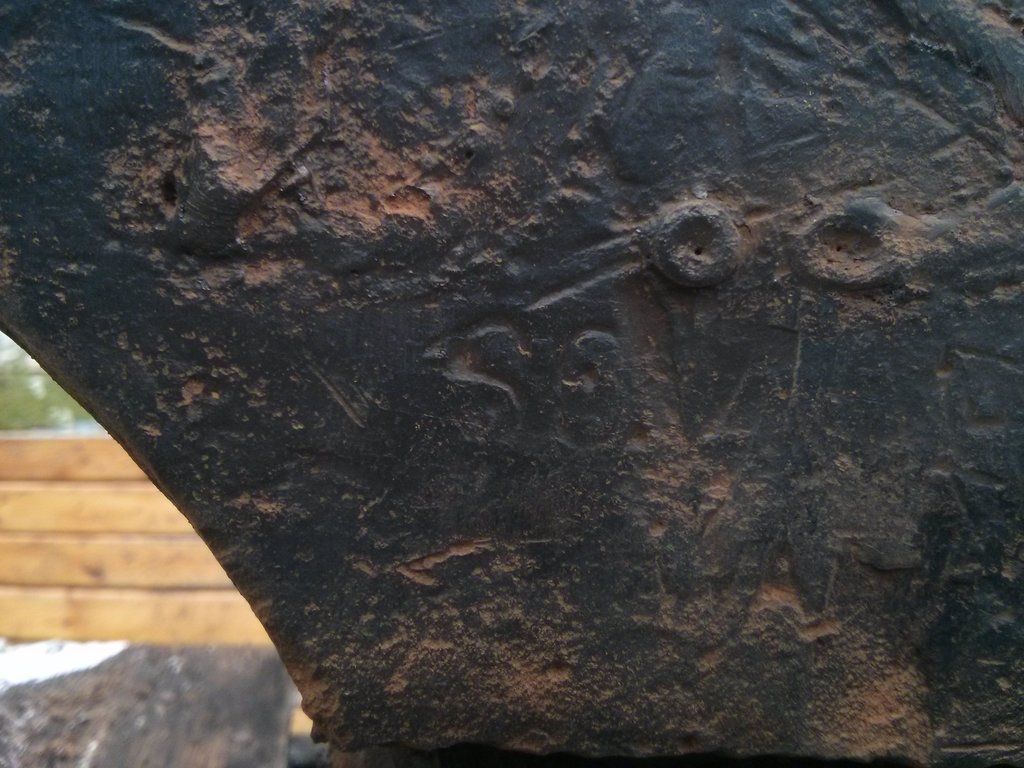
Welll... I have some new insights into this idea... I believe what I actually have is a Sligo anvil, which was still made by Haybudden. I make this guess based on the artifacts I see on the side of the anvil. The "SO" and the "WA" I think are from:
"SOLID WROUGHT"
"WARRANTED"
I cannot find any pictures of a Haybudden anvil with any markings resembling those, but they do line up perfectly with this Sligo anvil:

 6 hours ago, ThomasPowers said:
Ha! They couldn't even spell "Messed Up" correctly when they welded on it!
As some brands of anvils have an arc welded base to top it should end up being a great anvil. If it is a steel top section you will need to do the preheat slow cool on it. If it's not then it won'e be needed as it will be a low C to low C weld and a lot of mass to keep the face from going past tempering temp.
lol, I live on the Mesabi iron range in Minnesota
A lot of things are named "Mesaba/Mesabi" here I believe it's wrought to wrought, as I think the "SO" visible in the stamp is "Solid Wrought" as I said in this post a minute ago -
1 hour ago, matto said:
Hopefully the auto company was better at fixing cars!!! But I doubt it do to the fact they had to butcher a great anvil and then hid it in the dump.
Haha, no idea... I couldn't find any information about the shop... I'll ask one of the Old Timers at work and see if he knows them
1 hour ago, Dogsoldat said:Looks like an easy fix. When you started off saying it was badly broken in half I was picturing a vertical crack someplace.
That's what I thought... Down at the waist? Should be really easy to fix. And I didn't take any pictures of it, but it's got a pretty nice flat face. It's not perfect, but it's very usable.
28 minutes ago, bigb said:I will be following this to see how it comes out. What filler and process will you choose? If it does not want to weld well how about brazing? Although I doubt you could get it hot enough for brazing with the top in water.
I've been reading up on this since I got home
My research led me to an incredibly detailed report on bridge repair (due to it being wrought iron) Appendix D is where it becomes relevent... http://www.lcc.edu/manufacturing/welding/ISPCConference/Newsletter/viewcontent.cgi.pdf
But, it basically looks like it's just grind and weld it! Hahaha, so yeah, it sounds about as easy as I had in my head when I saw it. I have 100lbs of E7024 rod that I've picked up cheap at yard sales, which I just did a bunch of research on as well, and while it perhaps dumps more heat into the material than I might like, it sounds like it practically pours steel, and is great for filling in large voids.... perfect. I'll start there, and see how it goes... If that doesn't work, I'll look at maybe using my MIG welder with some ER70-S6 like I did with my Peter Wright anvil. One things for sure... I definitely can't make the anvil any worse at this point
I thought about brazing, or, rather, using brazing rods in my arc welder... Also thought about using nickel rods like with cast iron. Xxxx, I thought about what it would take to forge-weld it back together... (That's DEFINITELY not happening though, lol) So I'll do what I was originally thinking, just grinding it, and throwing what I have on hand at it and see what sticks and what doesn't...
Either way, it's gonna probably be at least a couple weeks before I turn on this project. I've got 2 reenactments to demonstrate at almost back to back, and I need to make some wares to sell while I'm there. But we'll see... I'm sorely tempted to play with it right now
-
7 minutes ago, Dave51B said:
Twilight......you may need to try the pics again.....I can't view them from here. Dave
Try again... I fixed 'em almost immediately
But you were just too quick for me!
-
I ran by my local scrap yard today to pick up some steel for a project... and one of the guys who worked there remembered the ONLY time I came in and asked about anvils, over 2 years ago, and asked me if I was still looking for an anvil... which of course the answer was, "always"
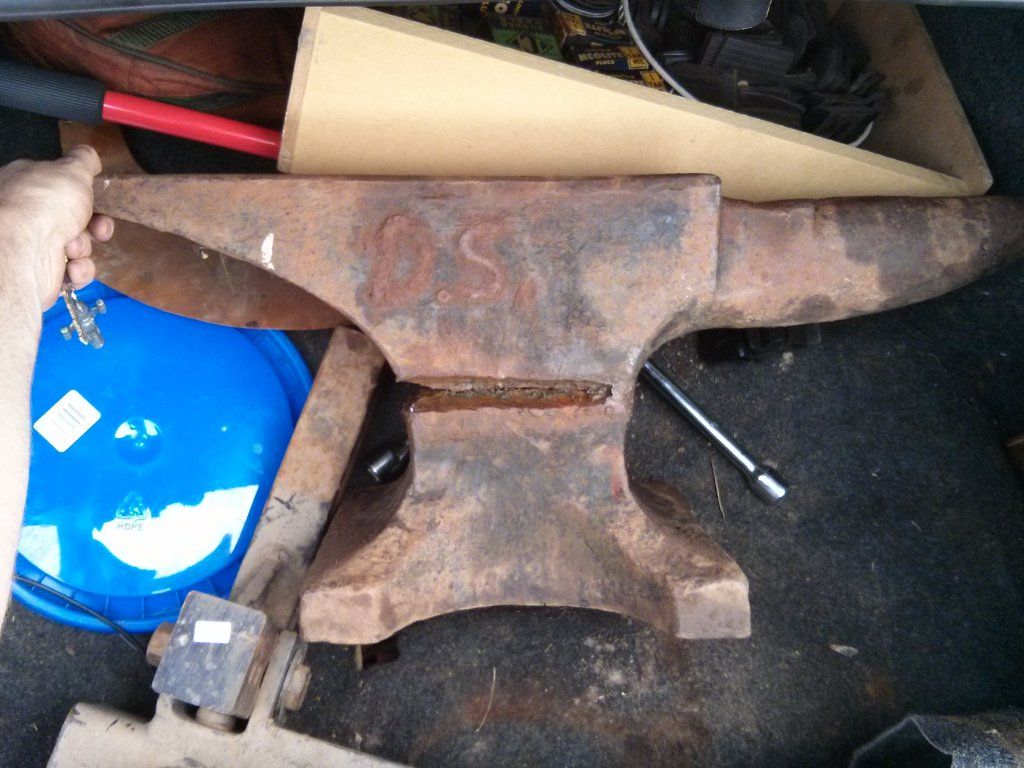
What he drug out was something of a horror story... the anvil broke in half, apparently from a failed forge-weld as best I can tell. Someone ground about 1" into the crack and did some very poor welding on the front before giving up.
But, I asked how much it was, which the first answer was $100. I pointed out it was broken in half, and he came down to $75, at which point I said I'd take it.
My first impression was that it was about 130 lbs or so... didn't look at it very closely to be honest. At $75 I really didn't care. When I first loaded it into my car, my estimate jumped to 150+ lbs. And once I got it home, looked at it a bit more carefully, I'm leaning towards about 180 lbs. (I really need to pick up a cheap scale if i'm gonna keep buying anvils...) It's about 29" from heel to horn, 4.5" wide face, and 12" tall.
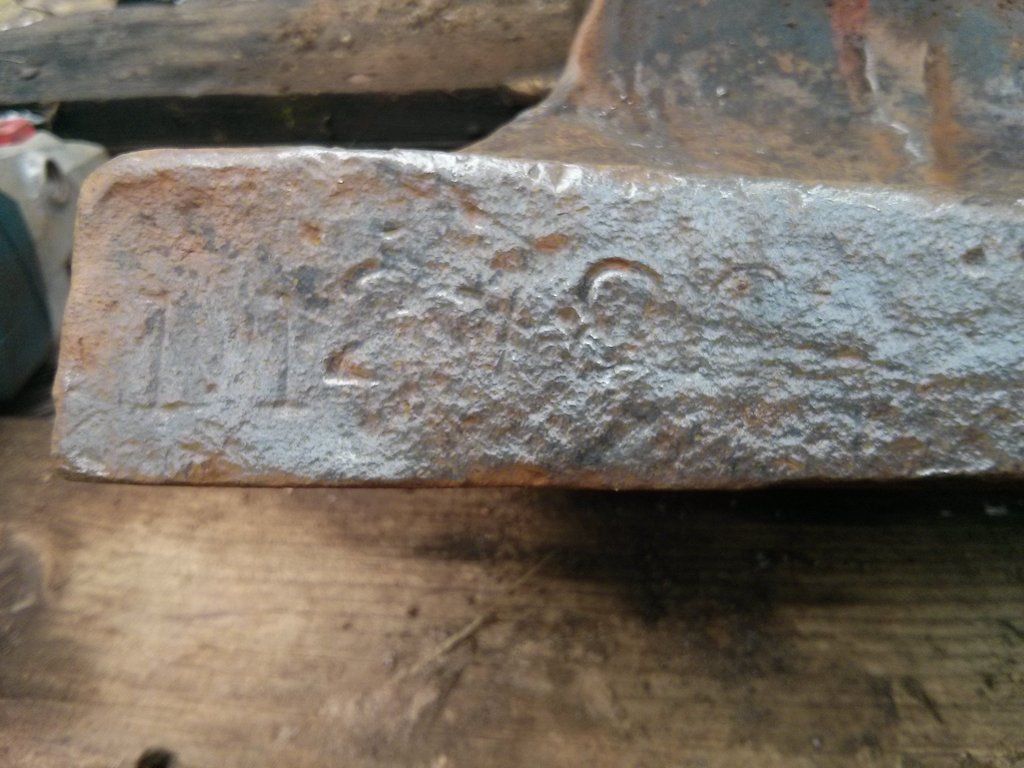
It looks like it might be a Haybudden... It does have a serial number stamped on the front of the foot, anyone have a copy of Anvils in America handy to look it up for me? It looks like it's 112(1?)8? I'm not sure if there's a digit between the 2 and the 8, or if it's a chisel mark. The number after the 8 has a curve on top, so it's a 2, 3, 6, 8, or 9.
The original makers mark is all but obliterated, between the lost material around the waist, and the arc welding done to it... there are a 2 artifacts though... What looks like "SS", "S6", "SO", or "SC", and down an inch or so there is a definite "WA" (Likely from "Warranteed"
Also, using my keen eye for detail, I have looked at some of the tool marks left on the anvil. And it is my expert opinion that it was used in an automotive repair shop
I'm thinking it won't be too hard to weld it back together... I plan to lay the anvil on its side, and give it a hit with my 20# sledge to break it back in half, then grind a bevel all the way to the center, and fill it in entirely. Doing so with it upside down, the face submerged in water to keep it from loosing it's temper... I'm slightly concerned, because I've heard that wrought iron doesn't like to be electrically welded very much... Anyone have experience with it?
-
3 hours ago, JHCC said:
It's not a hammer; it's a bi-directional, mono-manually activated, lever-actuated impact generator.
i prefer to think of it as a persuader. It politely asks the steel if it would like to move.
It's really not all that bad to swing, actually... Sure, I'm not gonna be doing it all day, but the beauty of a big hammer is, you don't need to
-
1 hour ago, JHCC said:
Looks good! How much did you have to take off the face?
That picture I posted with the polished face and the 3 cracks is 3/4" off the nose... I'm not willing to cut it back further than that...


Looking at a Mayer Bro's Helve Hammer
in Power Hammers, Treadle Hammers, Olivers
Posted
Actually, here's a question for you then... If you stumbled onto a working, good conditioned Easy Helve that you wanted to restore, what would you be willing to pay for it? I'm just trying to get a ballpark on what the thing is actually worth...
I'm talking with the seller about trading some of the extra junk I've got laying around, so maybe that will help...