

Ser Menalak
-
Posts
32 -
Joined
-
Last visited
Content Type
Profiles
Forums
Articles
Gallery
Downloads
Events
Posts posted by Ser Menalak
-
-
Hello,
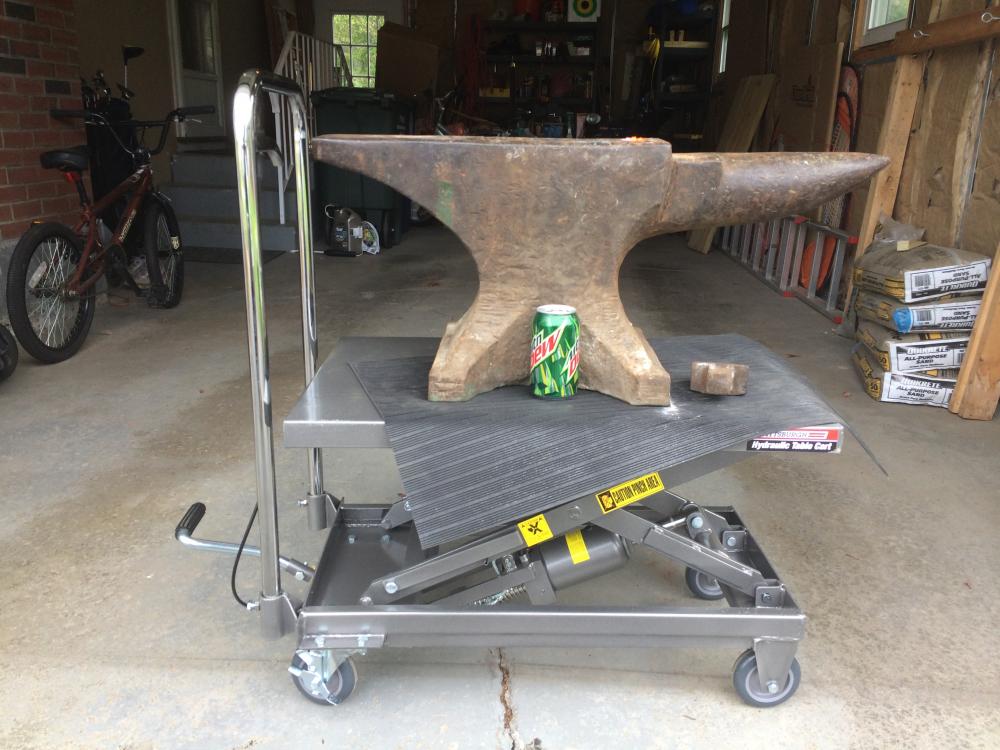
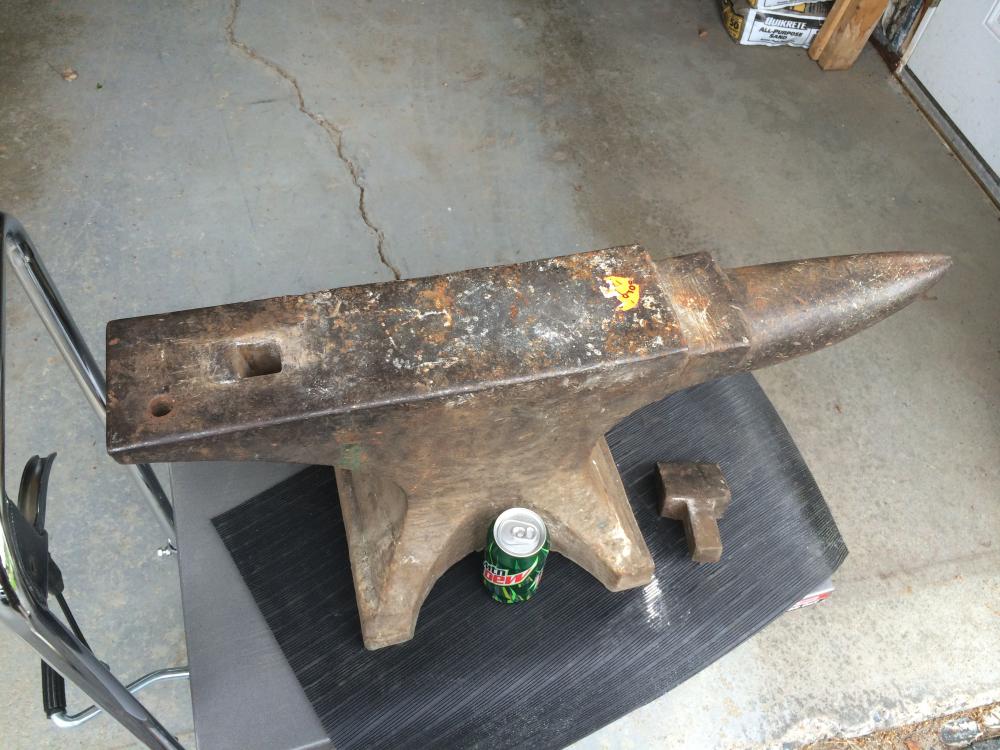
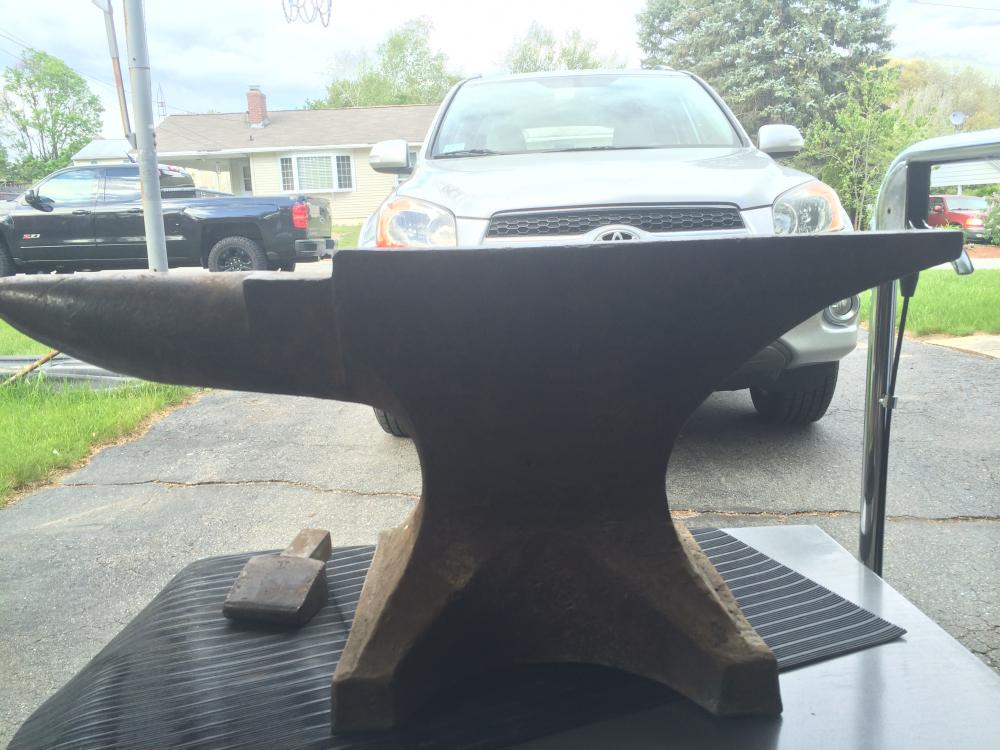
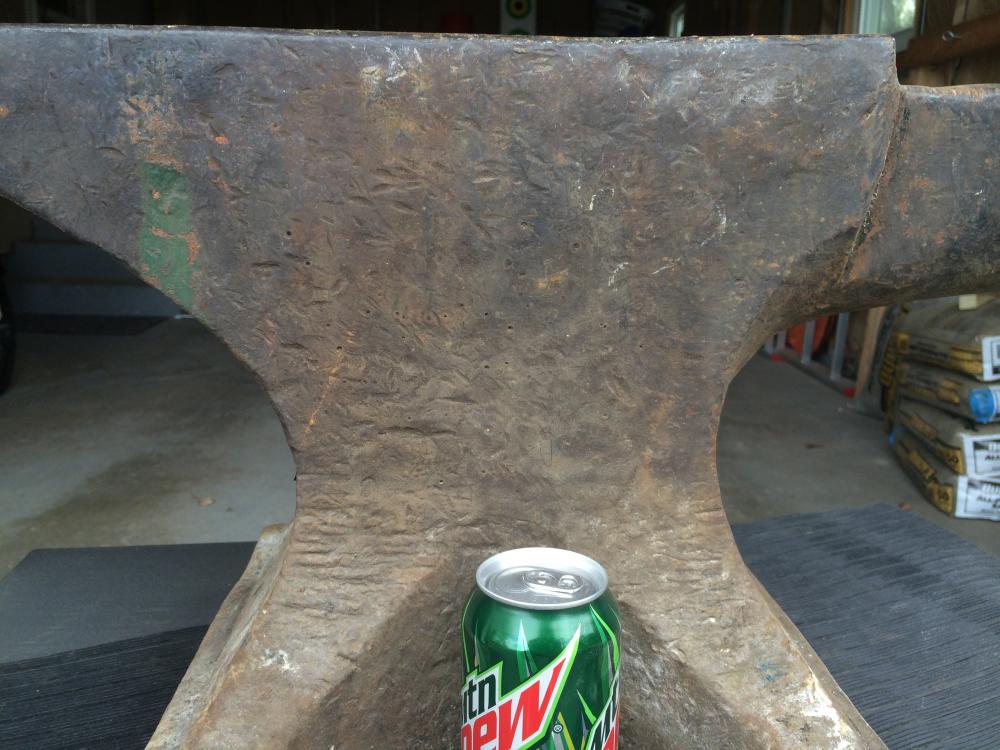
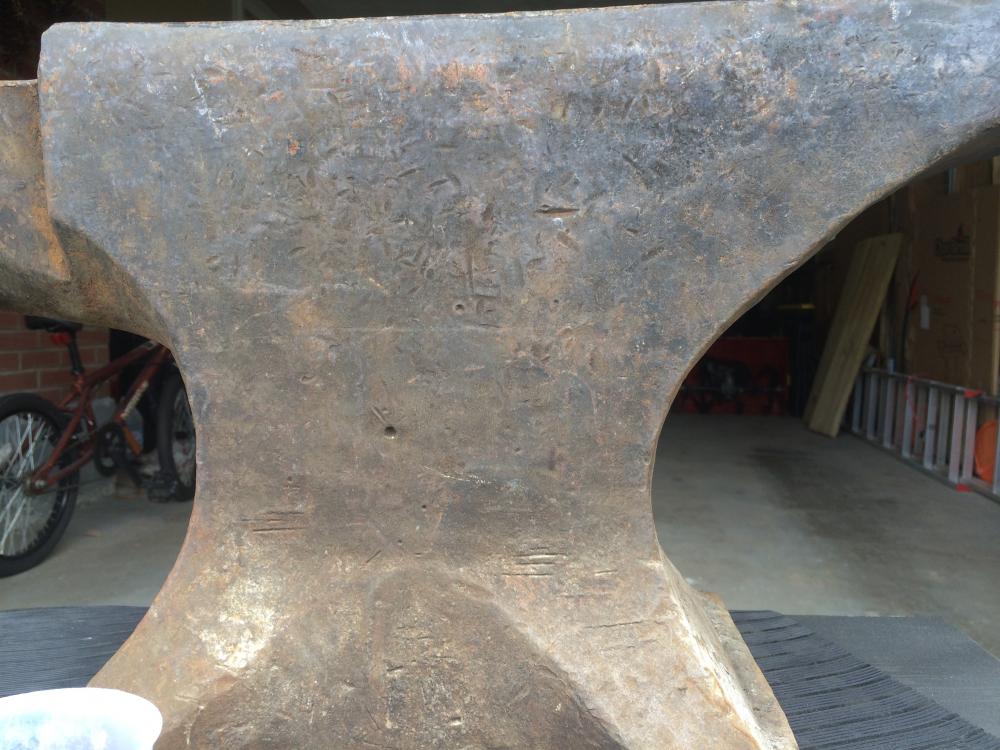
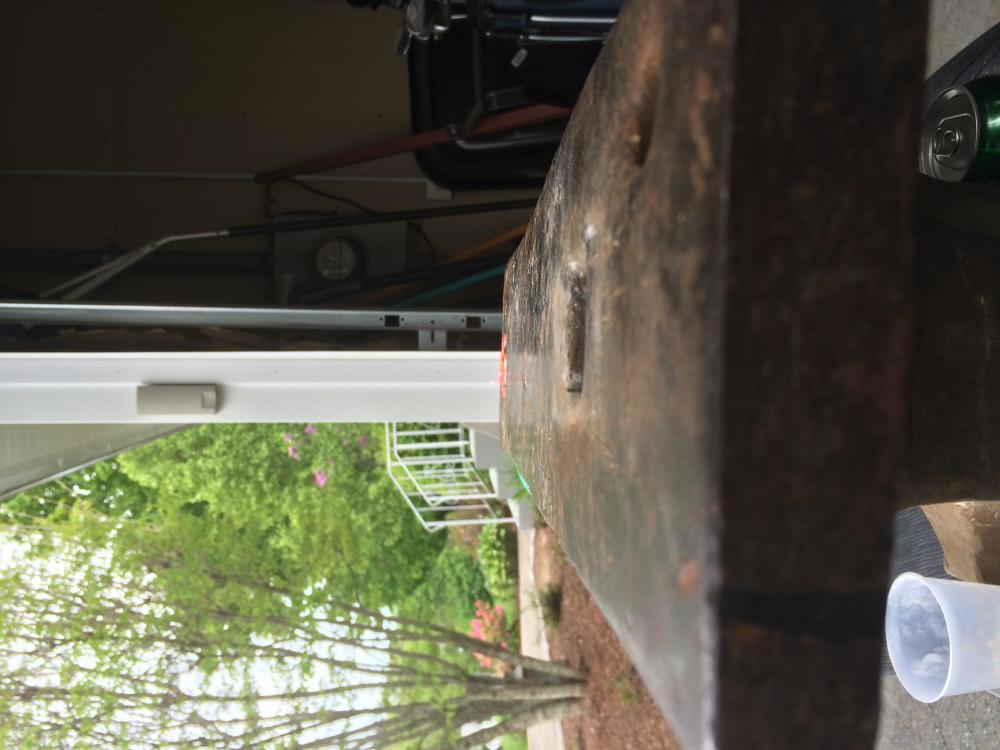
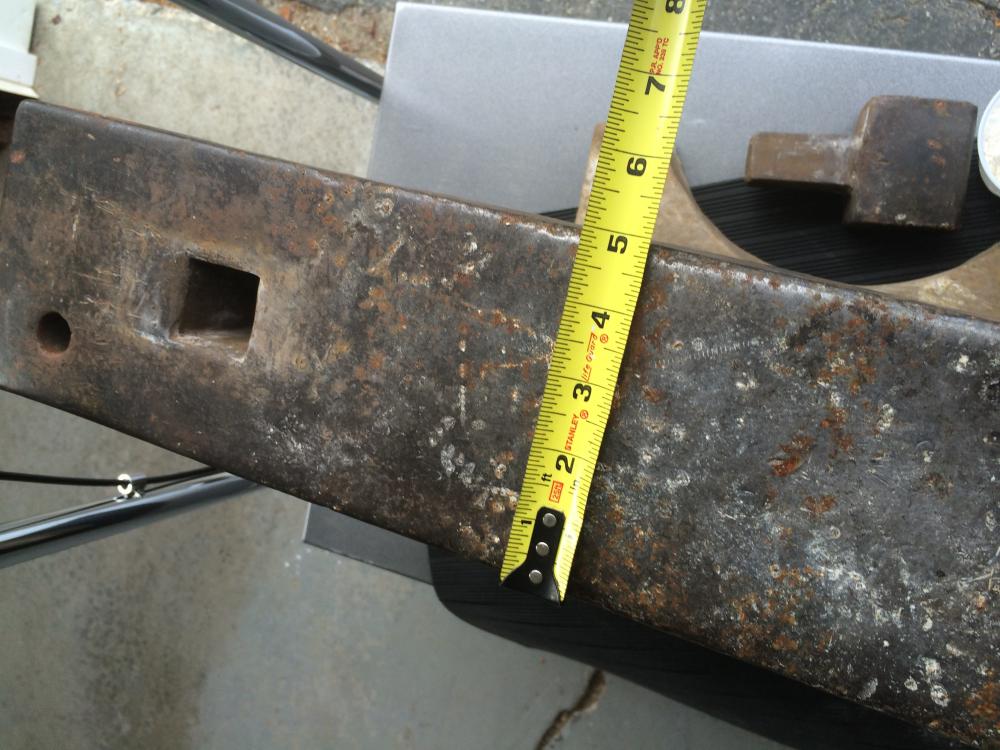
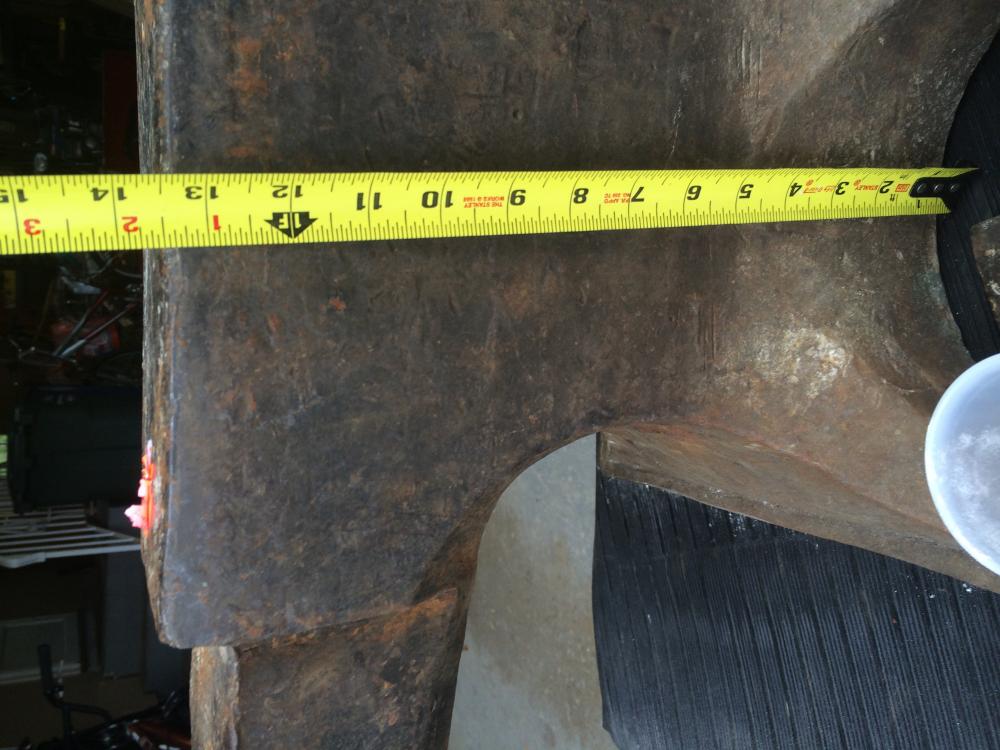
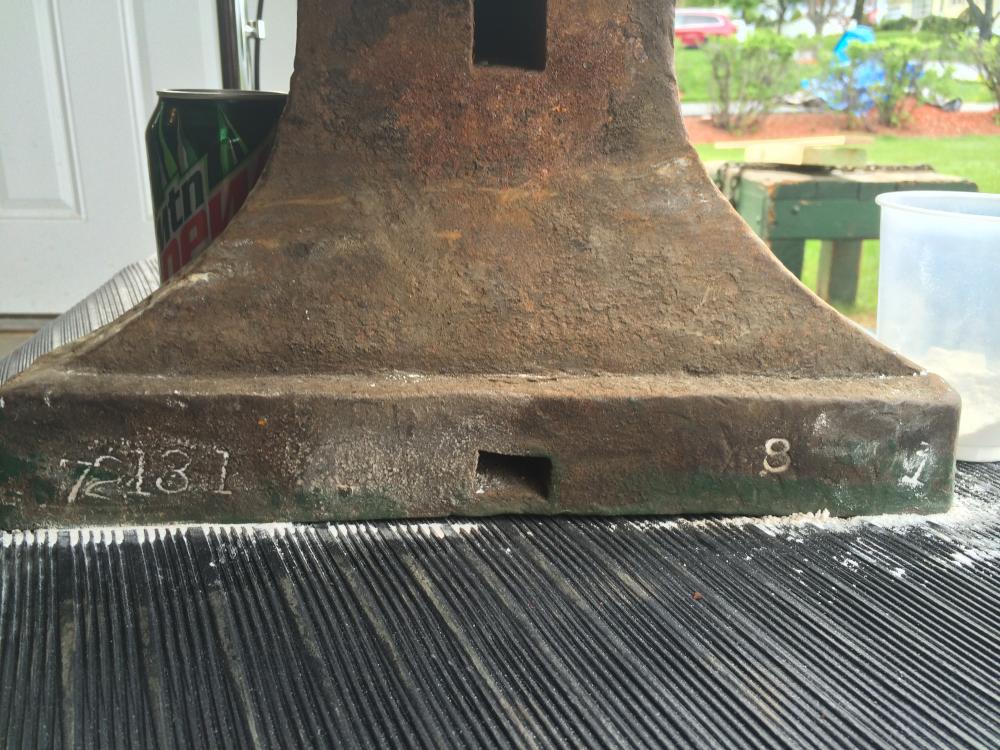
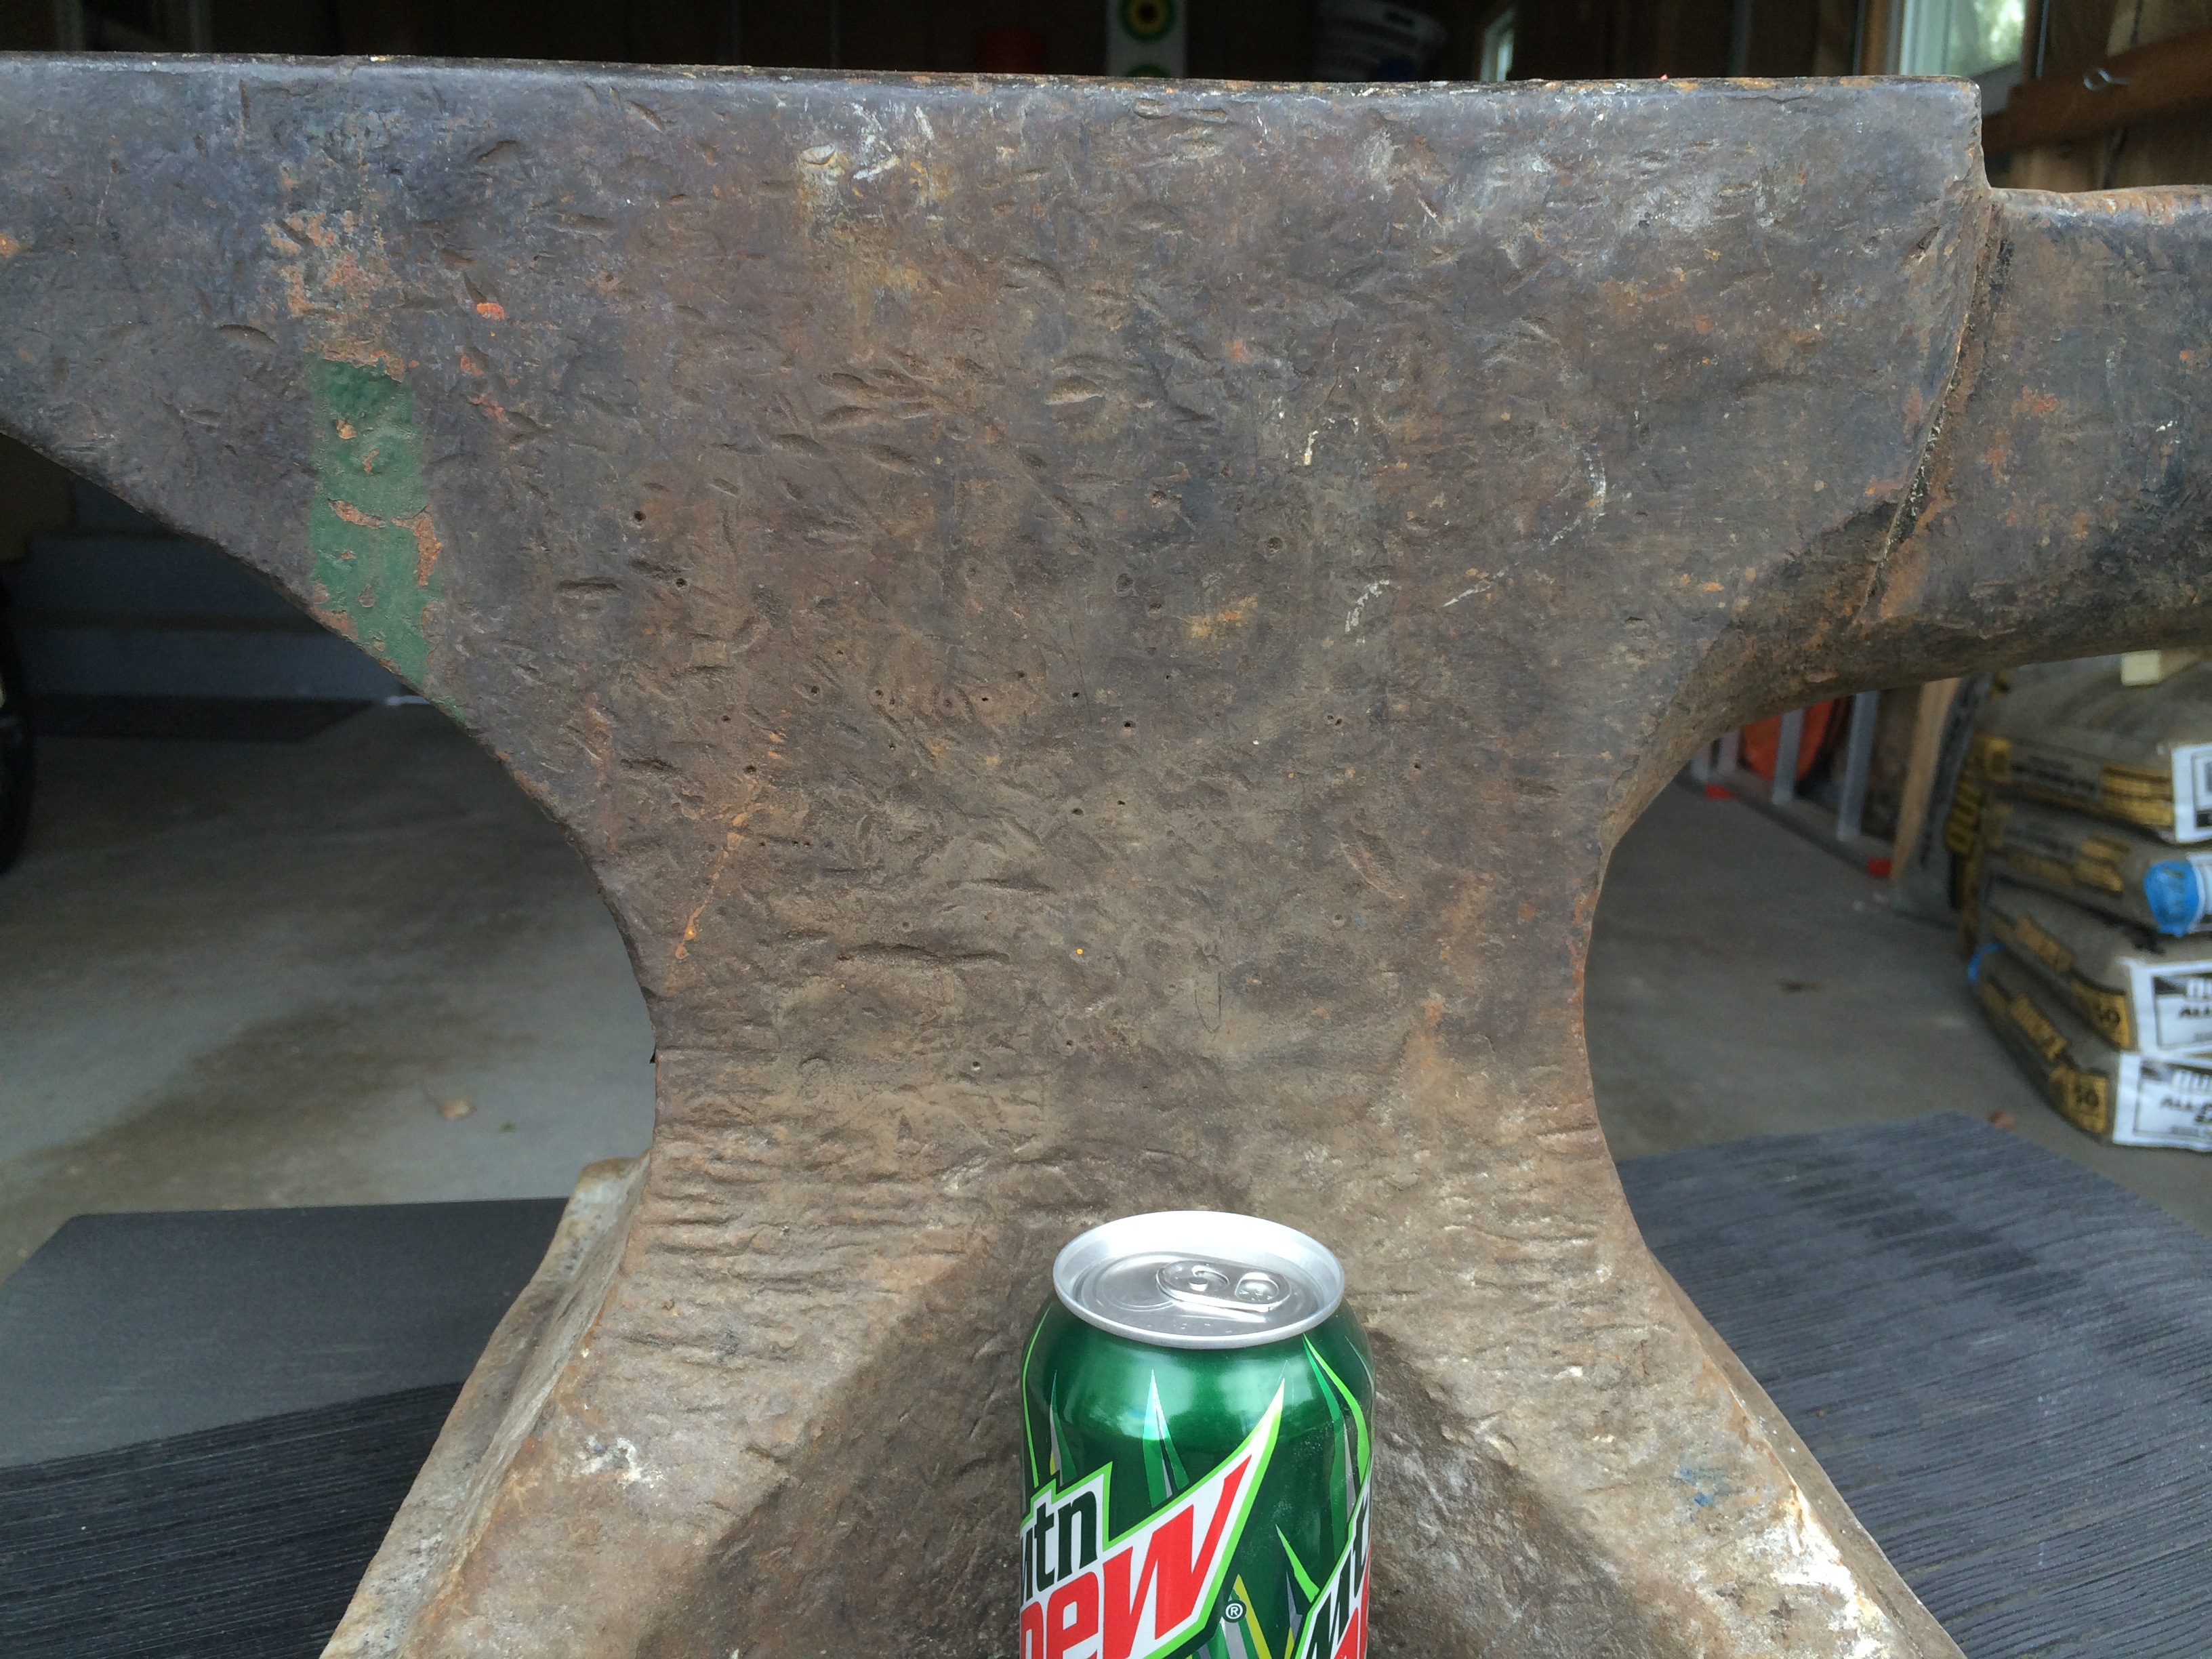
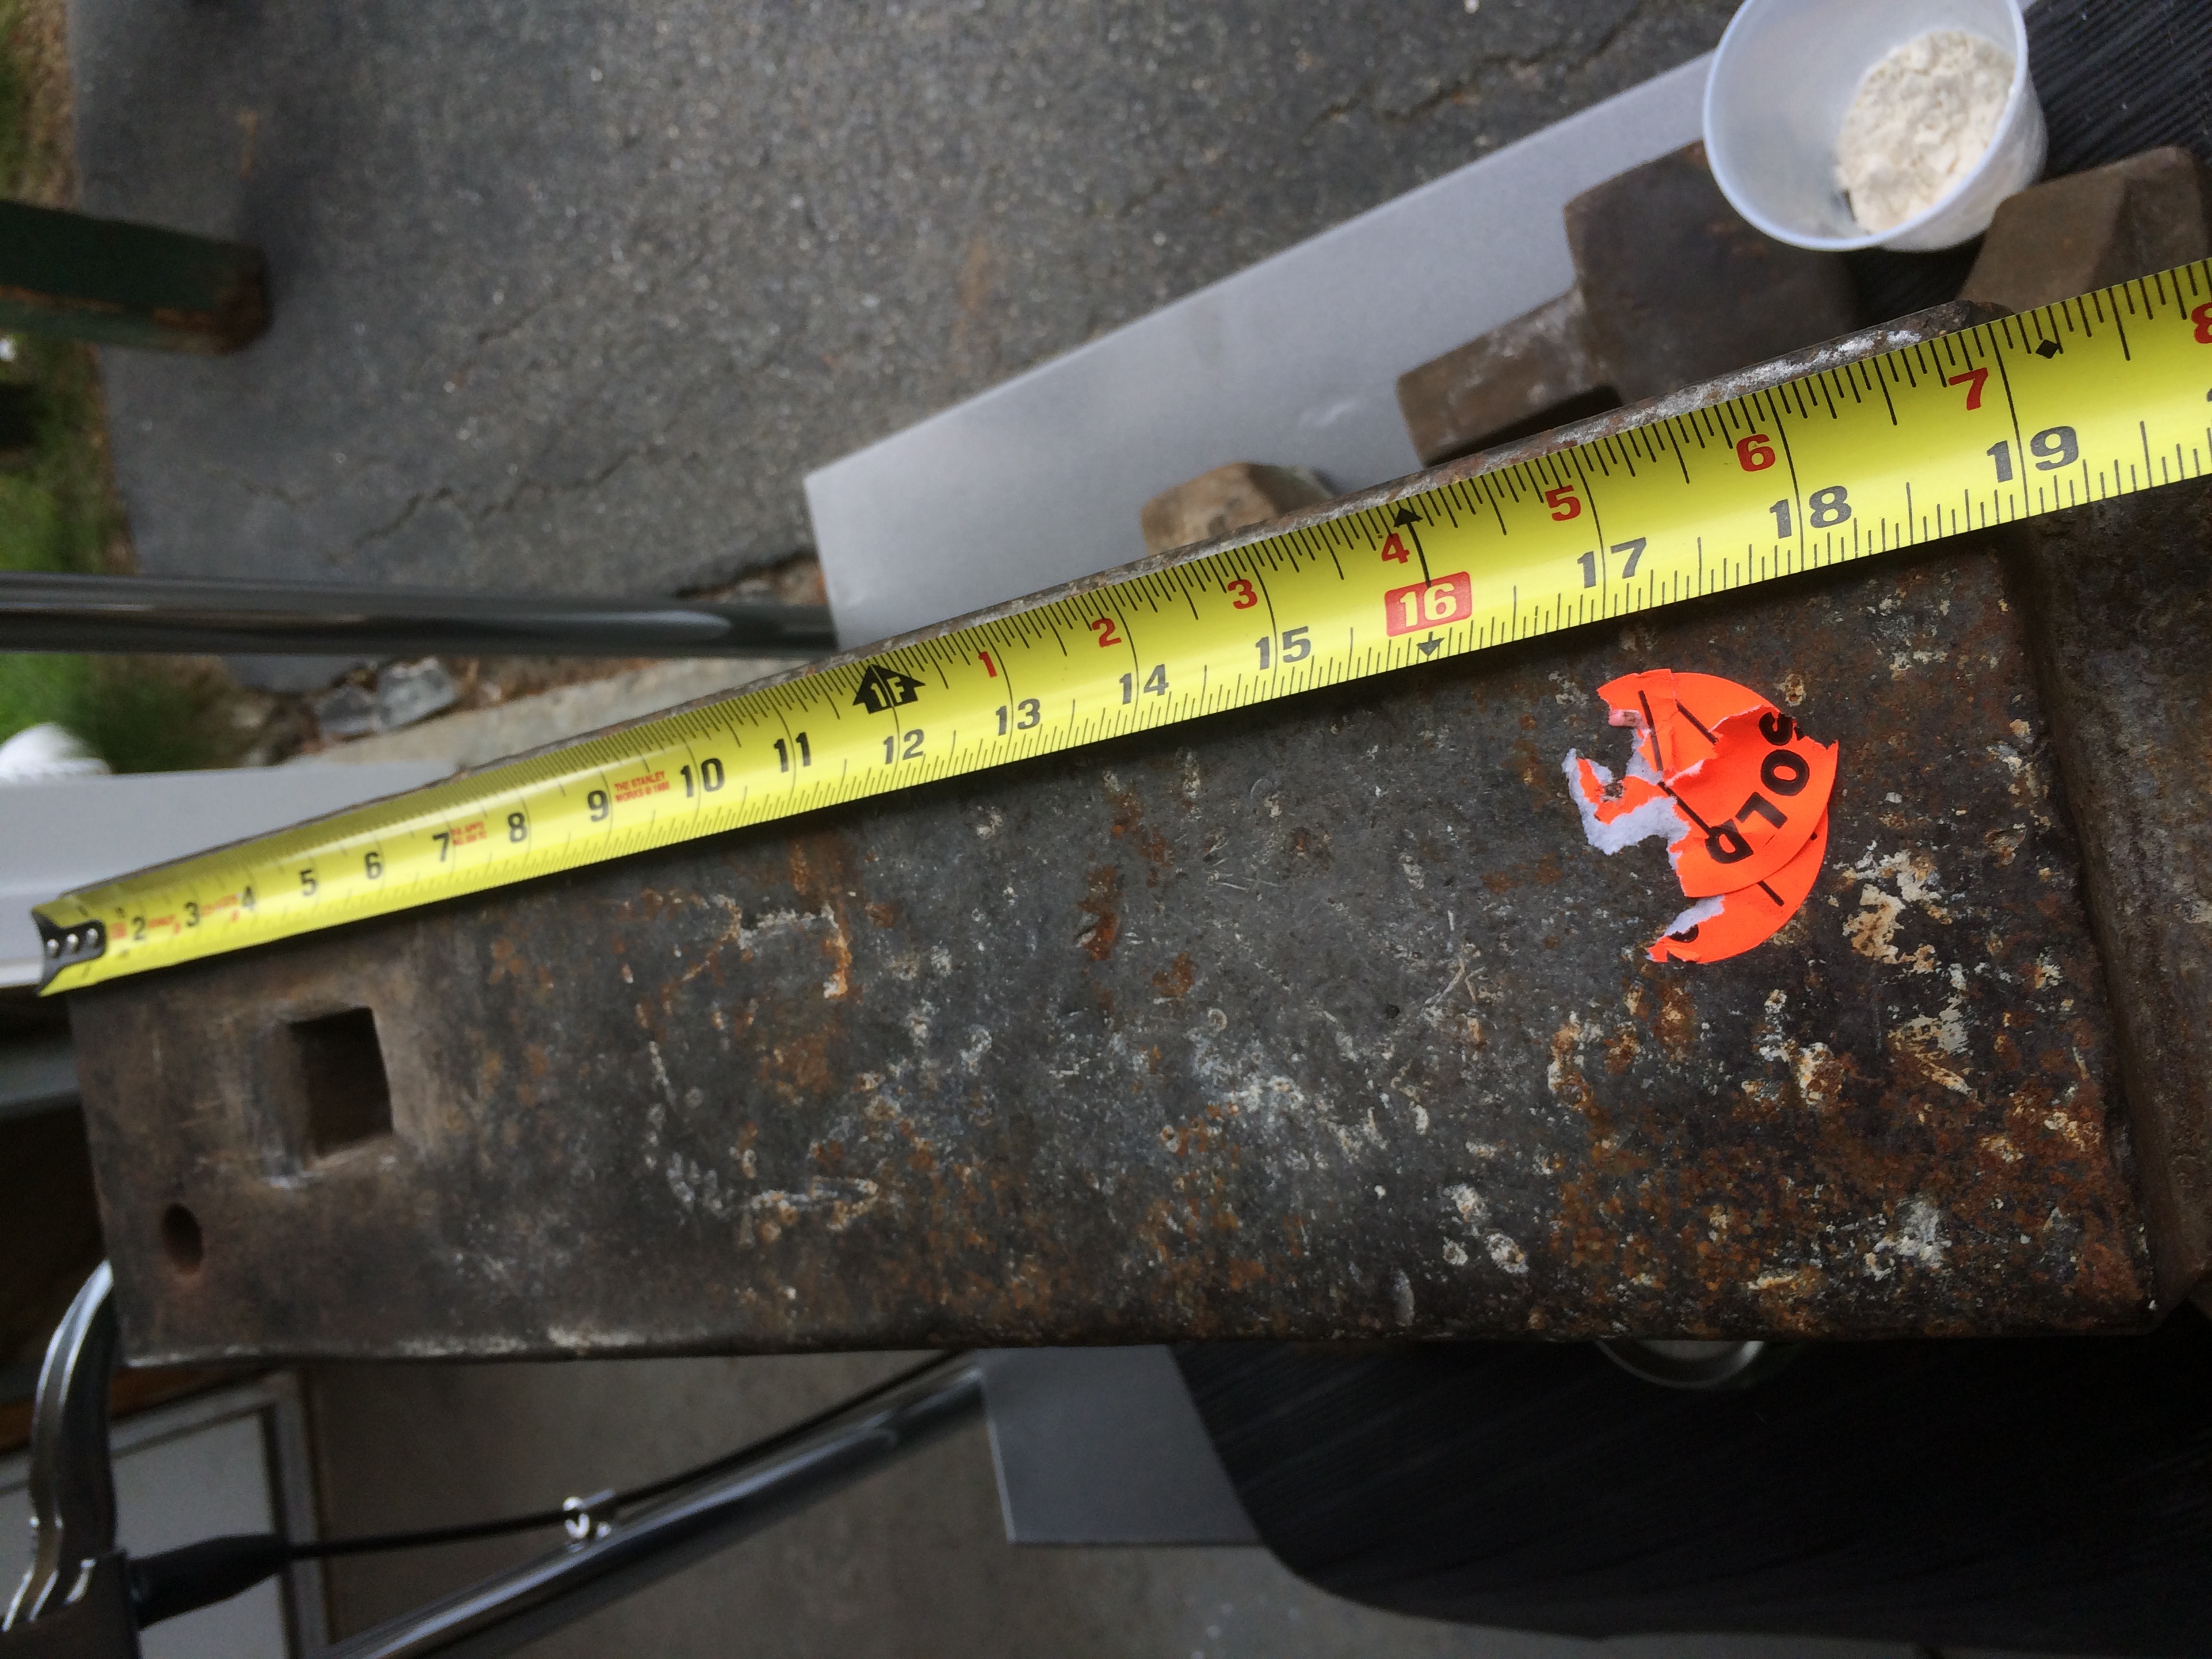
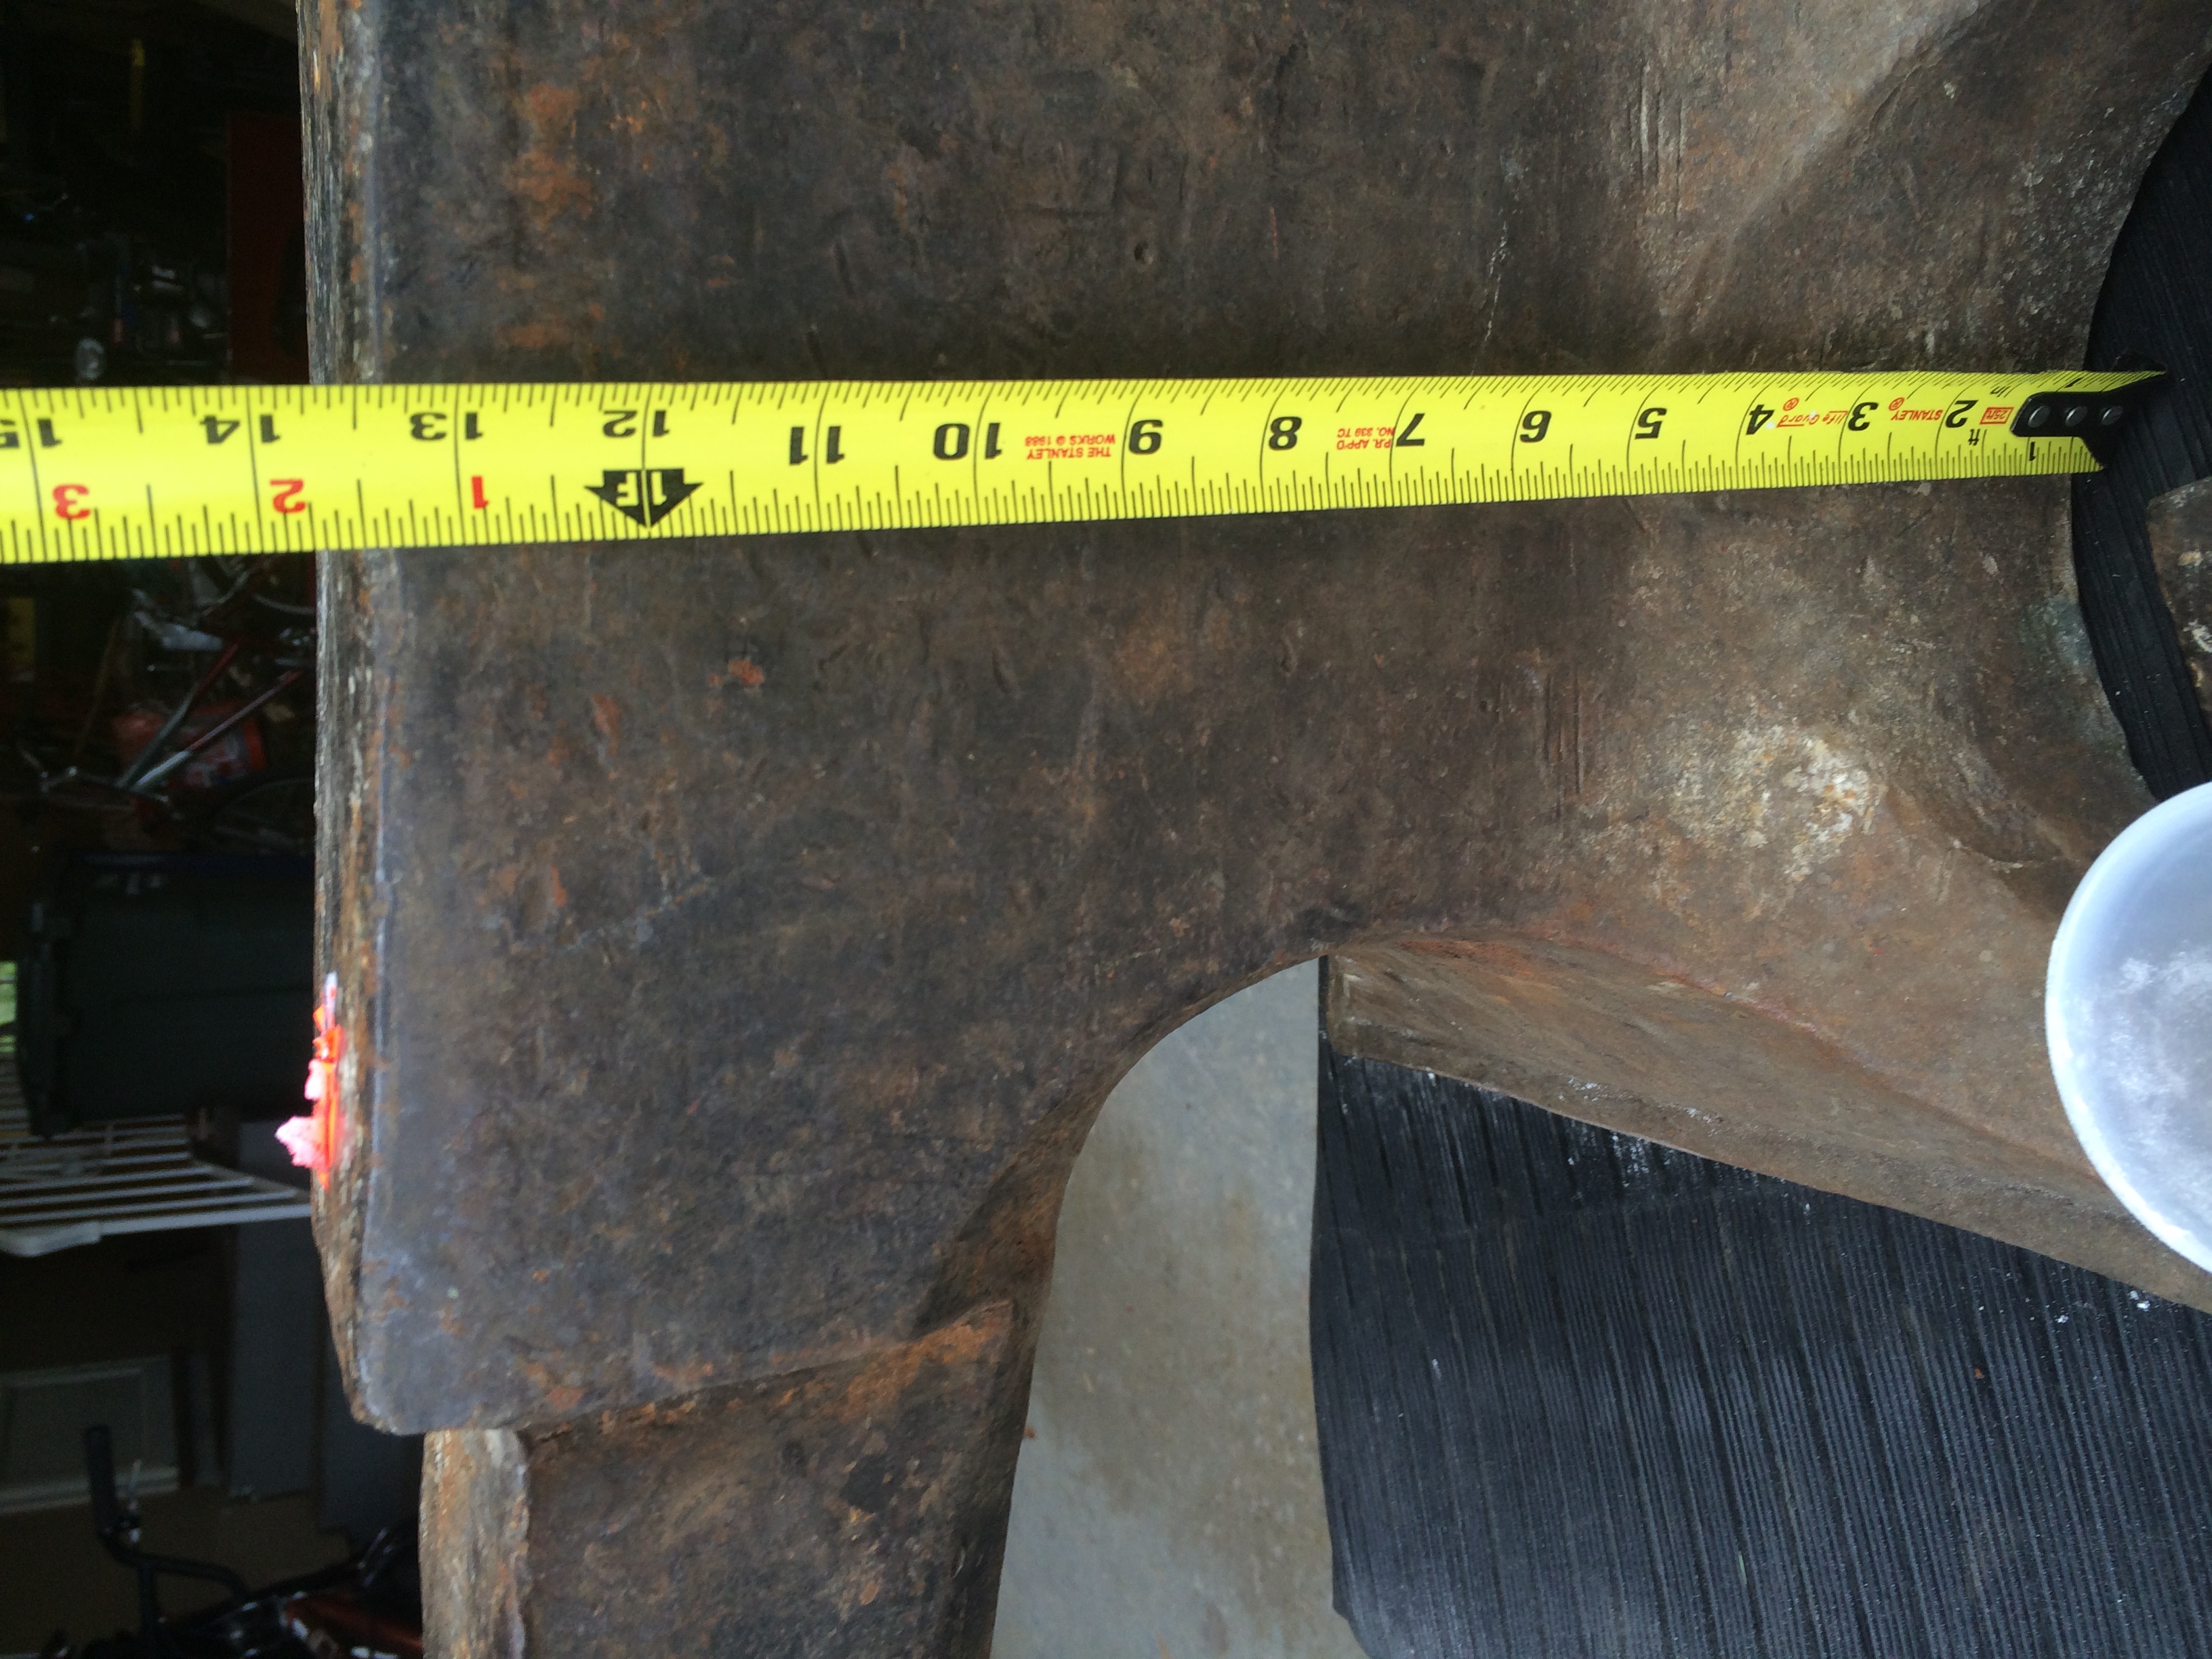
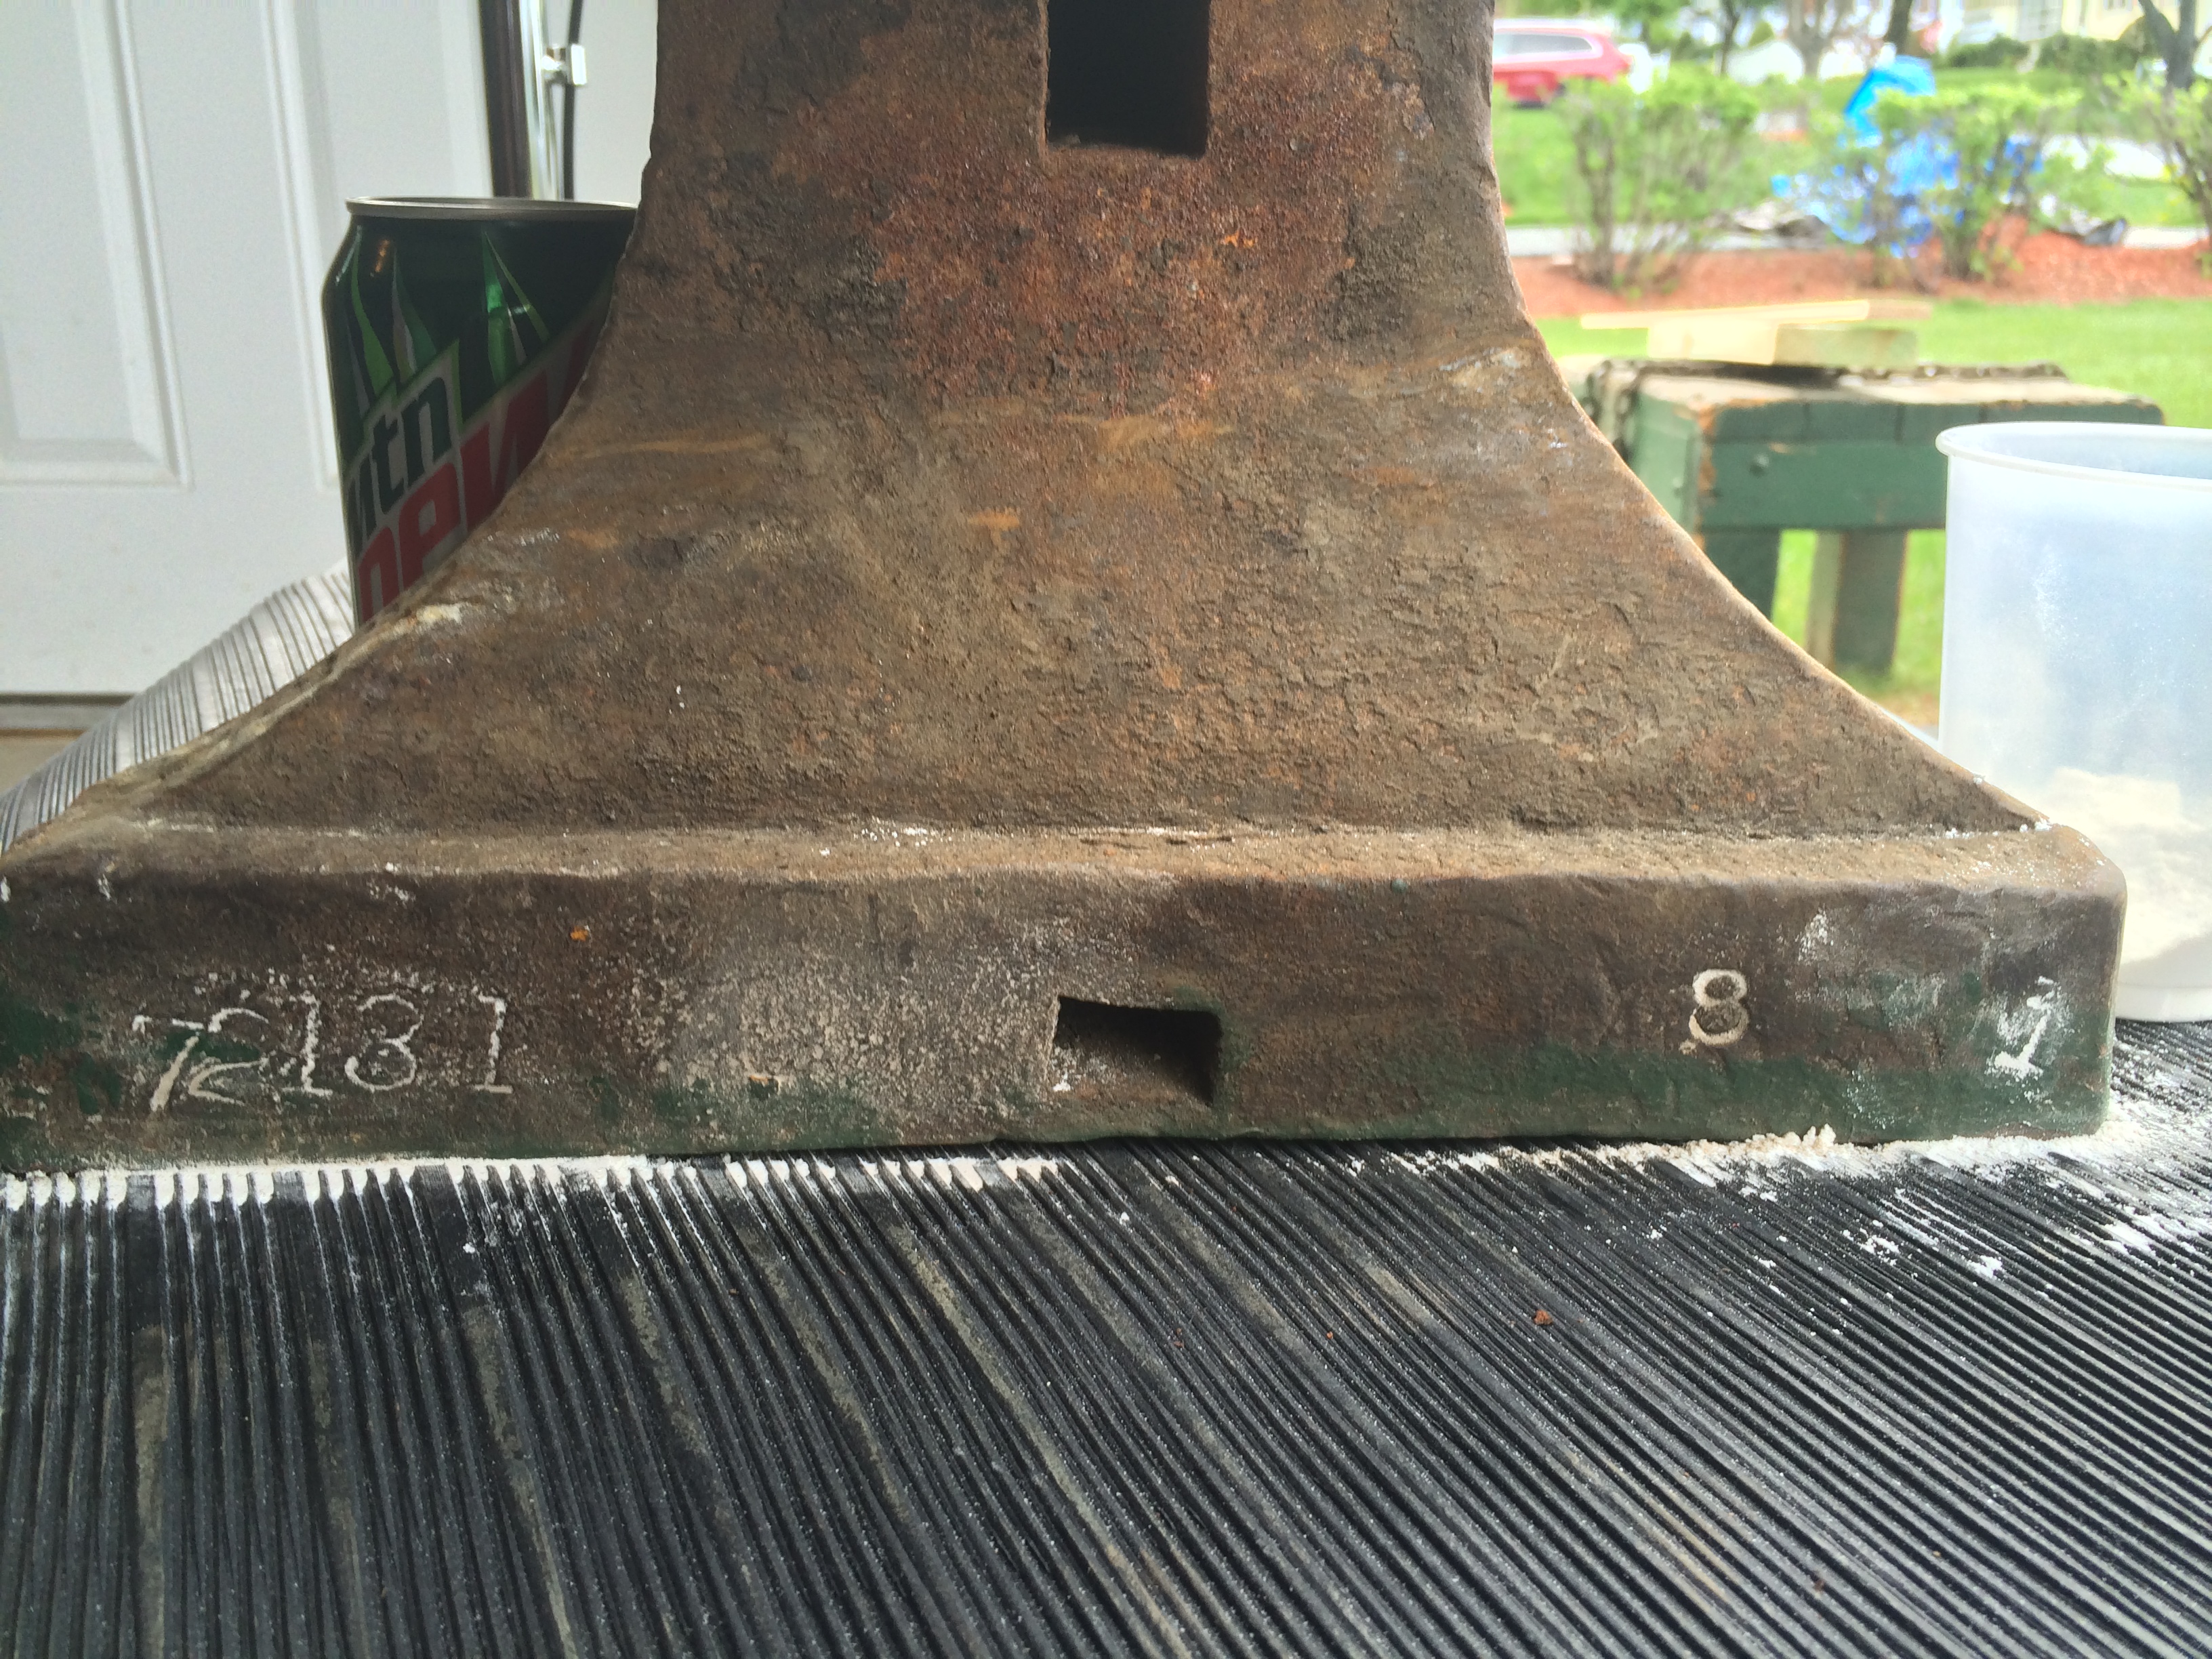
Just today I bought another anvil, this time one that is MUCH larger than my current PW. This thing is pretty dang big.'m not sure what maker it is or what weight it is. All the markings are gone except a serial number 72131 and a 8 1 on the front foot. I believe this would mean HB or Trenton as A&H serial numbers don't go this high right? There may be more markings on the foot I just can't tell. This thing is in amazing shape, I haven't touched it, if I took a wire brush and some soap to it, it would be much easier to potentially see markings. I really don't know the weight, I do know one guy could not carry this thing though. I have attached pictures of the anvil, its size, and markings.
Could you guys help me figure out the weight and the maker?
Thanks!

-
So I use a brake drum forge out in the open, you can see the picture attached (embedding doesn't work). I also believe I use really cheap coal, $12 for 50lb bag. I heard that cheap coal has a lot of sulfur and so can cause metal fume fever symptoms. When I begin to coke it it caused VERY dark green fumes. Well I forged for about two hours today which is more than before and sure enough I have a sore throat. I feel like I probably breathed a good amount of smoke in because it just goes wherever it wants since I have no chimney. It's not related to zinc as my forge hasn't changed in months and all I was working with today was rebar. Do you guys think this is what caused the sore throat or smoke doesn't tend to do that? If so, do you know of any good methods or tutorials for building a chimney for a brake drum forge? I'd like to get the smoke up and away from me as best as possible. Thanks guys.
BIG EDIT: I have no capabilities to weld!

-
Hi guys,
So I have been blacksmithing for a few months now, only about an hour or two every few weeks because of school. Every time I run into the same problem and every time I tell myself it'll be different. I have a very hard time heating what I put into the forge correctly. Today I was making a hook from 3/8 square stock and at one point I burnt off the end. It seems to always happen. As such I'm scared of keeping it in the forge long enough to even get a decent heat. I have a brake drum forge so I typically have to stick it into the coal at about a 45 degree angle due to the edges of the drum. I am also using a hair dryer which I suspect is blowing wayyyyy too hard. When I took my blacksmithing course at a shop I never had this problem it seems to just heat the iron evenly and with minimal to no burning. Does anyone have some tips for someone with a brake drum forge (other than to get a real forge) to prevent burning but obtain a nice high even heat? Thanks.
-
Fisher sign design turned out nice.
I'm not selling these, strictly for my enjoyment only.
In a two hundred years someone is going to think these were real!
-
Hey guys,
I just bought my first actual anvil. Found it on Craiglist. It's a Peter Wright, #168. I got it for $225 and just a 20 minute drive away. The main issue is with the heel. The body of the heel is in tact well but as you can see the top part is cracked. I don't know a lot about anvil so I'm not sure how this happened, if it can or should be fixed etc. There is a bolt running through it to keep it attached. However, the horn and face are in excellent condition. There is no sway to the anvil, the edges are somewhat rough but doesn't bother me. All four feet are in perfect condition. The rebound on it is very nice! I'm very happy with this purchase, what do you guys think?


-
Hello guys,
So I bought a yellow Hobart Leather Welding Apron (770548). I think it's pretty common apron in blacksmithing, it's pretty cheap, on amazon, and is %100 leather. My problem is that when I get working and sweating this runs its yellow dye onto my clothes underneath. Thankfully I wear crappy clothes for blacksmithing and I think it may come out in the wash. It's like I must wear an apron.....to wear an apron. Anyways, I was wondering if you guys have this problem and if you've solved it? I was thinking maybe soaking in cold water or something but I know nothing of leather and it's properties so I don't wanna ruin it. Thanks guys.
-
Where-abouts in MA are you? If you are nearby Boston, feel free to message me and get some hammer time in at my shop. I have plenty of anvils to use :). Welcome to the forum.
Hi there, thanks for the message. I am in Leominster but frequent Worcester and took my class at Prospect Hill Forge in Waltham. Where is your shop?
-
Hello everyone,
I have made a few posts already but I thought I'd introduce myself properly. So, my name is Brendan and I live in MA, USA. I am currently a student studying electrical engineering here in MA. I believe what got me really interested in blacksmithing was the Man at Arms YouTube channel when he made Jaime Lannister's sword from Game of Thrones. I thought it just seemed so cool, not necessarily the final product but all the hammering, heat, and historical feeling (like reading next to candlelight when the power is out). I also have a minor in history though so I have always been interested in the crafts of yesteryear and being a part of such an old tradition. So, about two months ago I took an intro to blacksmithing class where I made the S hook seen below. Since then I have tried to gather materials and jerryrig myself a forge and anvil. I haven't been able to make a lot of things because I lack the resources but I have been on the lookout. The first thing I made at home was simply a 90 degree rake thing for moving the coal around. It was made out of rebar. The second thing I made just recently is a simple wall hook you can see below. I have no proper anvil and as such no horn so I had to just make the bend on a 90 degree edge. I also have no holes to hit something through so I had to drill the hole for the nail/screw after trying for ten minutes with a punch. Anyways, I have already received a lot of good help from you guys and hope some point in the future I can return it.


-
Hello,
I have some nippers I have no use for and I want them to become tongs. I saw the $2 nippers to tongs post but I don't see instructions, just the results. The nippers are very thin on the end as they are meant to snip, so how can I get enough material from this thin chisel like end in order to form a shape to hold onto stock? If anyone knows of a tutorial or could give some instructions how to do this that would be great. I also am not sure I can take the rivet out of one pair as it is completely flush on both ends so I don't know how I would get it back in effectively. I figured doing this would be an easier introductory tong project rather than going full bore into making tongs from scratch. I would like to make tongs that can hold square stock. Thanks for the help.
-
They would have been used to separate the unknowing from their hard earned cash, IMNSHO.
This has been going on for at least a century, best I can tell. At least in the old days, reputable companies had the honesty to advertise and sell anvils in tiers of quality and price: wrought with a steel face, cast iron with a steel face, both with a one year warranty. And then for the misers and gullible, plain cast iron, usually unwarranted and nonreturnable.
I forgot to add the fact that there is about a 3/4" thick ledge with a 1/8" overhang around the face that makes it look like a really big top steel plate. Real steel faced anvils almost never have this feature: I have never seen it on a Vulcan, and it is rare on Fishers and Badgers.
In going back and looking at the ad, this turkey has sat on CL for a month now. Really good deals are gone in hours, if not minutes, now that you can run an app to notify you when something pops up.
As mentioned: the shape of the horn, the look of the damage on the face---and for me the real danger sign is the protruding "false face plate". As to why---because they can; shoot they even sold Yugos in the USA!
You see some like this that are cast steel (i've got one squirreled away somewheres), but they're still usually junk (mine is) and far too soft. They're better than the cast iron ones, but I'd still pass em by.
Thanks for the history John and all you guys. A lot of the anvils I see have a large amount of concavity to the face, right in the working area. Now, from what I've seen a lot of people say this isnt a big issue, especially for a beginners first real anvil. I did find one that doesn't seem to have this though but it has a crack on the heel, as in broken off. You can see it in the pics. So, would a concave face or a repaired heel be better? I know the right answer is probably neither.
-
"What makes you think it's an ASO?"
Obvious cast features: thick square feet, flat horn, undersize hardy hole, pritchel hole too close to the centerline.
Worst of all, serious dents in the soft face. Run, don't walk away!
Thankyou, these all sound like fine identifiers. Is this what I should look for to know it's an ASO when I can't see it in person? What would these have been used for if they're so inferior to actual anvils?
-
I'd be skeptical of the quality of that if I were you. Might be a medium quality lesser known brand (for the USA) like Brooks given the blue paint and cast look but more likely it's an ASO. Usually some good anvils on southern New England craigslists, keep looking. If you want to drive I have a Hay Budden plus some other kit on the Vermont craigslist right now, but you should be able to find something closer.
Have you joined NEB yet? We'd love to have you! http://www.newenglandblacksmiths.org
What makes you think it's an ASO? Also, Vermont is somewhat far but I would be willing to travel potentially. I am not a member of NEB or ABANA, I only took my into to blacksmithing class about a month ago (Prospect Hill Forge in Waltham under Carl) so I'm just starting. There is something called the Bolton Fair here in MA that has a blacksmithing hut with like 3 blacksmiths who work it during the fair so I'm not sure if there is any discussion of that within NEB.
-
Hello,
I have been using a railroad anvil and I feel I should move on to something bigger. I spotted this anvil in my local craigslist and I contacted the seller about whatever markings there may be on it but he has yet to get back. Could you guys help me identify the brand and what type of body this anvil has? To me it appears to have steel welded to the top but I honestly don't know. I also do not know the dimensions or if the face is very concave as it's somewhat hard to tell. What do you guys think? It is also going for $2-$3 a pound!
-
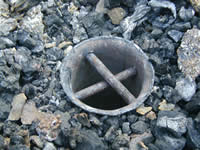
You want to restrict the air produced but not restrict the air going to the fuel. Keep the air tube open and just enough grate to hold the fuel in the forge. For the 55 Forge I use a 2 or 2-1/4 inch auto exhaust pipe and one or two pieces of 1/4 in mild steel rods as a great. This leaves a LOT of room for air to pass into the fire.
The BP0133 on the 55 forge shoes more detail.

Drill 2 each 1/4" holes in the air tube just below the flange. Insert one of the pieces of 1/4" round stock and mark where you think the other piece of round stock could pass under it. Drill two more 1/4" holes as to not interfeer with the round stock.
Insert the first piece of round stock and flatten the "other" end. Repeat for the second piece of round stock.Your a blacksmith, make the grate. Bend say 1/4 inch round stock to look like the symbol for pi. Make the 2 legs the width of the opening, and top wide enough to catch on top of the opening and not fall into the hole. If you make two of the units you can cross them and put a dimple in them so they stay crossed. You may want to try wiring them together with some tie wire or something if need be.
The local plumbing store may have a cast iron drain cover that could be put into service. Go look at their inventory.
As a stop gap measure you can jam a wad of chicken wire in the air tube . That might keep you forging until the real solution can be fabricated and installed.
Thank you all for this great help. I will hopefully try and implement some of this stuff soon!
-
Greetings Ser,
Sounds like you are havin fun... This topic was just covered on Aug 4... Look up steel plate and it should answer all your questions... Not a big deal and an a easy fix... Problems after your read the thread chime in and you will get more answers.... I wish you well
Forge on and make beautiful things
Jim
Hi there,
Thanks for the reply. Ya I actually did read that post before posting this but here was my dilemma: You said there was a good base you can get on ebay for 16 dollars but I didn't know if it was the 1/4 plate you talk of later or something different. Could you clarify this? The other suggestion seemed to be what I currently have but it doesn't seem to be working out too well for me. It could just be too thin material or too poorly cut. I wouldn't have any way to cut 1/4 inch steel either, in order to cut the sheet metal I used garden shears :P
-
Hello all,
I have been using a brake drum forge I made much like the ones seen on the internet. It works and can reach the temperatures I need, so much so I ended up burning off some hard work I put into some rebar :( Part of learning I guess! My problem is this, to keep coal from falling down my tuyere I believe it's called, I got some sheet metal I found at the Brimfield Faire. It was like this really thin tinny looking sheet used for decorating restaurants, sort of like corrugated steel. Anyways, I cut a circle of it and put it in the bottom of the forge and drilled holes into the center. It worked for a little while but now I have air coming up out and around the plate rather than just through the holes. I think it's because it has warped so much from the heat it was never meant to experience. I couldn't get a clear picture since its filled with coal. I am now burning basically an entire brake drum of coal constantly, I don't really have a center of heat, its all going. This is really wasteful I feel. I was wondering if you guys knew of any good material or piece to put in the bottom of a brake drum forge (or any forge) that will work much better? I do have some old BBQ grill....grill. The bars seem too far apart though. Whatever you guys could recommend would be great, thanks!
EDIT: I was perusing more, I have no way of actually welding something, I don't mean forge welding. So it would be next to impossible for me to weld some bars into the pipe.
-
I've been wearing the green #3 safety glasses since I first started blacksmithing. Macular degeneration runs in my family and I'm a stickler about even wearing sunglasses whenever I'm outdoors...not taking any chances with my vision. I strongly disagree that the green shades stop you from seeing what's going on. The only time I even really notice I have them on is if I happen to step indoors for a while (mine is an outdoor shop). Generally speaking I try to not stare into the flame a lot, but like you I'm new to this so I find myself checking a good bit. The green protects against IR, which I understand is the bigger danger than UV. They're your eyes...how fond are you of vision? How much do you value still having it a few years down the road? Forge on and have fun doing it, but it's not a craft where you can afford to toss caution to the wind. As they say, protect the parts you want to keep.
I really prefer safety glasses with an indoor/outdoor tint. Ouside in full sun a darker tint in needed. Shade three is when you really intend on staring into the forge. B)
Thanks guys. I also saw the forum posts about similar stuff on here and it seems like shade 3 is more than enough for anything I'd be doing.
-
Hello all,
I have been doing a little bit of research and a little bit of internet shopping for good safety glasses for blacksmithing. There hasn't been a strong consensus I've seen on the internet so I was hoping for some help. I have read that shade #3 and up are good for blocking out the IR light that can be dangerous but at high shade levels it's hard to see what's going on. I have also read some stuff on Didymium, but again they said you can hardly see the color of what you're working. It also seems popular that it's only necessary for forge welding. Up until this point, I have been using the standard yellow ones, what I call shooting glasses. What spurred this on is I'm concerned however that it may not be good to stare into the fire. As I'm new I have a tendency to baby it and constantly watch whatever I have in there. My REAL question is, is it even necessary to have any eye protection BEYOND physical protection? i.e. IR, UV, etc. If so, what do you guys use? Thanks for taking the time to help.
-
Hello everyone,
When I took my beginning blacksmithing course I remembered it saying we made the S hooks from iron. However, when I go online to pretty much all the blacksmithing sites I can barely find anything about buying iron stock, all I see is steel. I have also never seen iron stock in hardware stores, only steel. Could someone help explain to me if I am missing something? Also, on Anvilfire, there is a page on buying materials and the man says "For decorative ironwork the less expensive steel is used when available but size is often more important than the cost difference." So, is iron the same thing or a different type of steel? Are they used interchangeably? I do remember when I made the S hook it was from 1/2" square rod of something. Any help would be appreciated, thanks.


Help Identifying Large Anvil
in Anvils, Swage Blocks, and Mandrels
Posted
Thank you everyone for the replies. I haven't gotten around to scrubbing it down and putting flour on the sides to check, I'm going to this weekend. The consensus seems that its a PW but 101 HB you say you think it's a HB repair? I agree the number definitely look like HB. Is there anyway you can describe where you see the weight numbers? I can't make anything out in the picture. For the weight, I'm thinking it's 300+ lbs from general dimension to weight charts and others have said so as well.