

Phil Dwyer
-
Posts
264 -
Joined
-
Last visited
Content Type
Profiles
Forums
Articles
Gallery
Downloads
Events
Posts posted by Phil Dwyer
-
-
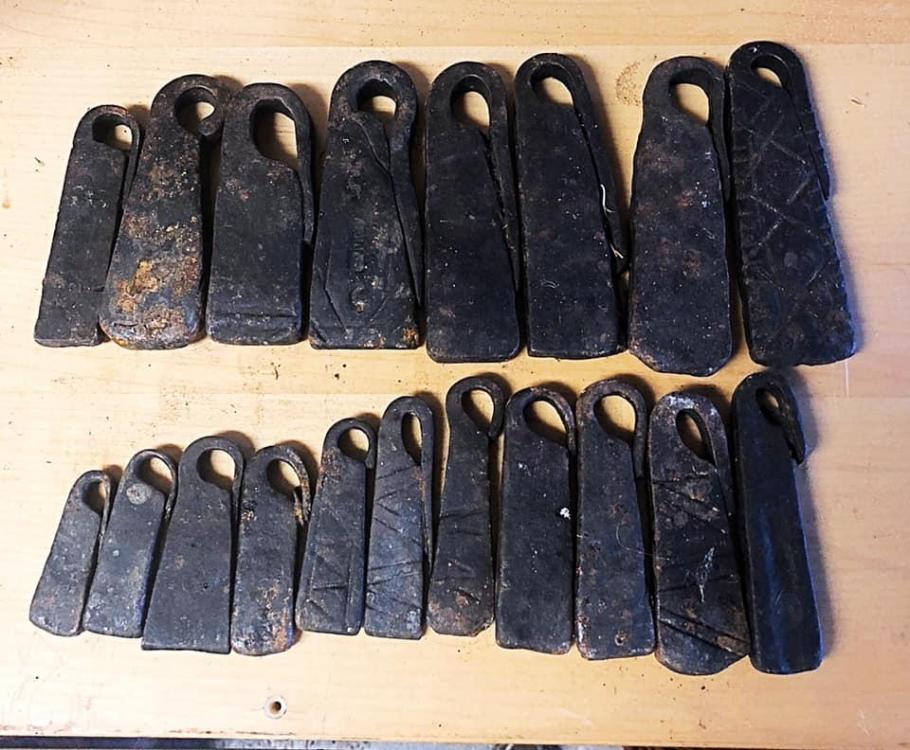
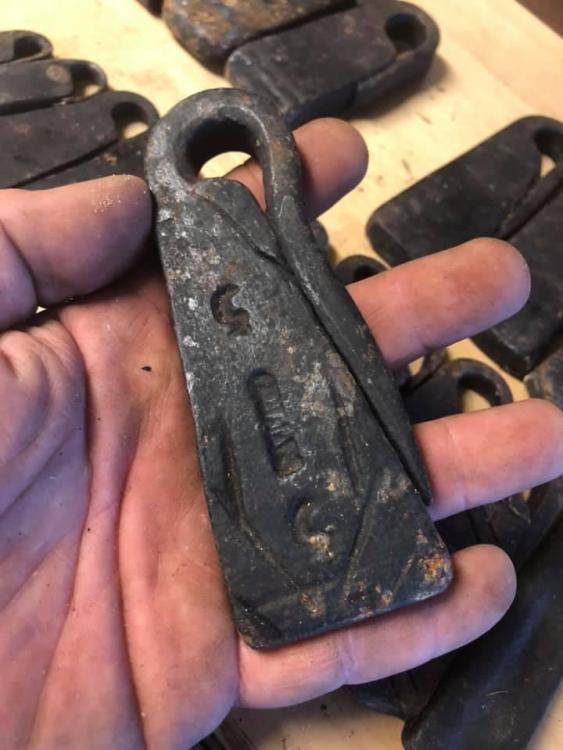
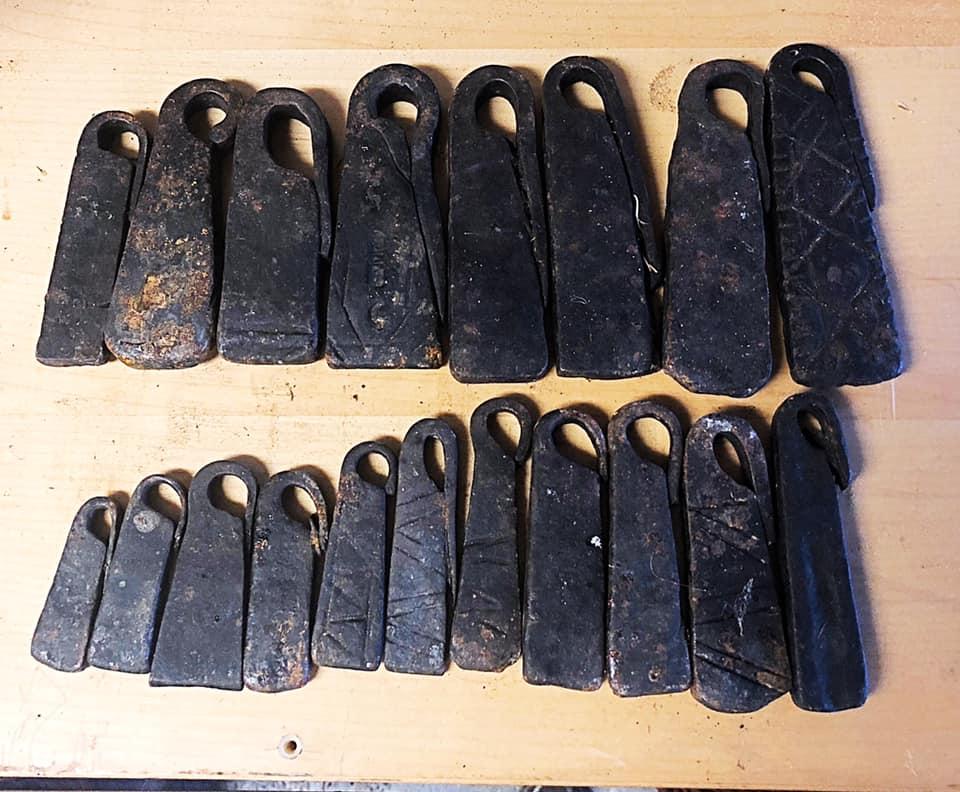
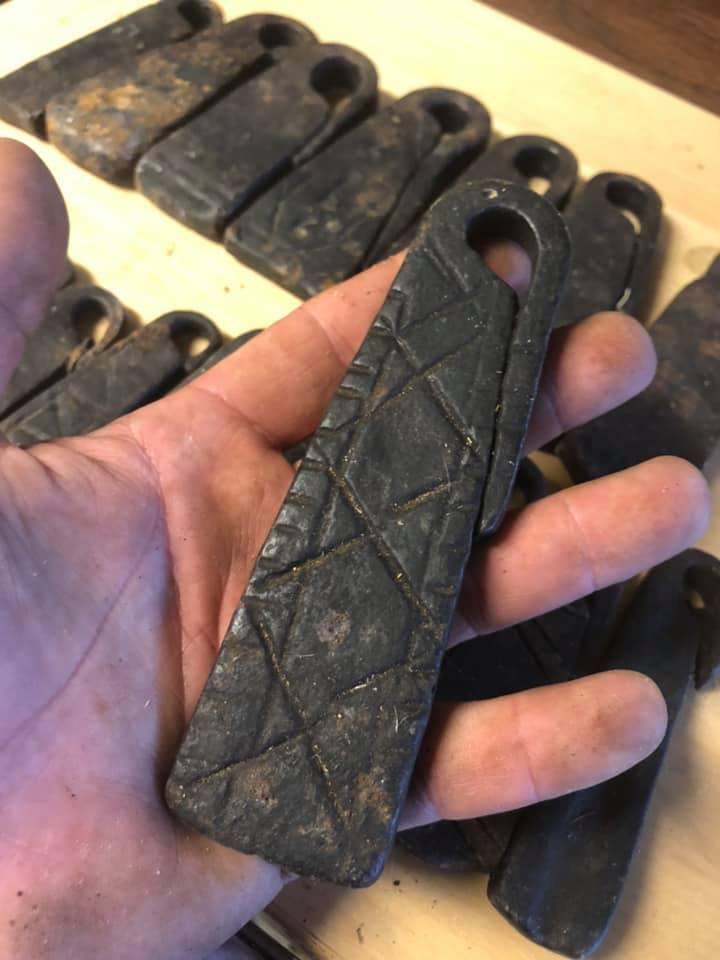
A friend found them in an auction lot of nautical stuff. Looks like they're trade weights. Folks have surmised they may have ended up being used (once upon a time) to weight fishing nets or duck decoys though.
-
Any ideas what these are?

-
That sure looks sweet John. Did you punch or drill the mortise in the V of the heart? If you punched it, how did you go about it? Also, how tricky was it riveting the tenon? Was the heart already completely shaped when both the mortise was made and the tenon riveted? I see the shoulders of the tenon set down in and take the shape of the V of the heart, which I presume holds the post fast so it won't pivot. Did you just seat it hot such that it took the shape of the V?
That is a great ensemble! You got three of the greatest and most ephemeral archetypes in one piece--a heart, a rose and a flame--rendered in one of the most solid and physical of all Earthly substances--iron/steel! Volumes of esoterica could be written about that, if they haven't been already! -
A quick search turned up the following Blueprints:
BP0387 Draw knife from a File
BP0054 Forging a Small Draw knife
Hello Friends,
I am floundering and need some help please. It appears the pages are actually not searchable. When I do searches on various terms (with search selection PAGES selected) on terms I have confirmed to be present in some of the published pages I get empty results. Is that correct? I therefore have manually perused/browsed/scrolled through the lists of the various sections of pages/articles/blueprints (I believe according to instruction, by selecting the little icon in each section to list all the items in that section) I also have not found either of these blueprints (BP0387 and BP0054). I wonder if I missed them or if they haven't been posted yet? Can anyone advise me? I noticed in this thread, Lookin for Blueprint bp0387, a similar inquiry. Is there anyway I can get them?
Thanks for the help!
All the best, Phil -
Thanks guys!
-
Any of you good folks know what these are for?


-
Here are a couple that look interesting. It would be a lot easier to use 110V input than 220V. Could I do that and still get the 220V performance out of the blower with one of these variable transformers?
Brand new variable transformer, i.e., Variac. Input is single phase 110V AC, 60 Hz, output voltage can be adjusted from 0 to 250V AC. Maximum power rating is 500 VA, maximum current is 1A at 250V and 2.5A at 120V. Net Weight: 6.1 lbs. Dimension: 7.0" X 6.7" X 6.7"
 ________________________________________________________________________________General Electric Transformer -- Model 9T92Y29


-
Thanks guys, I really appreciate your input!
This is a pretty old motor with cast iron housing and bronze bushings (no bearings). I've taken it apart and cleaned it up. The commutator contacts seem in pretty good shape. One of the brushes is cracked so I'm going to a rebuild shop tomorrow in hopes to get new brushes. That being said, it seems to be running fine. (Getting all the old iron blade fins on their cast iron arms adjusted to clear the inside of the blower housing walls is another story.)
The variable transformer idea opens another vista of possibilities, although finding 220V ones looks to be as challenging as finding 220V rheostats.
How does this one look?RARE- VINTAGE ZENITH VARIABLE TRANSFORMER- TYPE 36YInput: 240 V 50-60 HzOutput: 0-240 V @ 1.5 ASerial No. 7749* This unit was removed from an old piece of laboratory test equipment.* It is a very sturdy unit, and in excellent condition.* Dimensions are approximately 3 1/2" in diameter by 3 1/2" long, and it weighs in at about 4 1/2 lbs.


-
Hi Folks,
Some of you might remember me. I used to frequent these parts, but lost heart with the loss of the blueprints two years ago. Anyway, if any of you good people have some suggestions for me regarding setting up an old Champion No. 50 blower with a 220V brush-style motor I'd sure appreciate it. I searched and read through the forums and a number of threads, but I'm still somewhat confused. Here's what I have and think I know, perhaps you can set me straight.
Here's the blower and tag on the motor....

I've tried running the motor with 110V, but it's fairly wimpy. On-the-other-hand, 220V revs her up enough to blow the coke clear out of the firepot! I understand and appreciate the gate, valve and damper approaches to air management. That being said, I am committed to being able to control the motor itself too via a rheostat...and there lies the rub. I'm not sure what to spec out. All I know about the motor is it's 220V. I do not know what amperage and resistance the rheostat should be.
I scrounged a couple but they aren't cutting the mustard.
This Ohmite one at 50 ohmes and 2.45A doesn't vary the motor speed much at 110V and doesn't slow it down enough at 220V.

This Mac Lagan measures up to about 2K ohms. It controls the motor at 110V in the 90 to 100 range. It comes on around 90 and moves up to full 110V speed at 100. In other words, it uses a small portion of the winding. Does that mean it's too much resistance? Anyway, I think I may have fused the coil when hooked up to 220V, as the motor started just running at full bore after being hooked up for a bit.

So, can anyone help enlighten me as to tracking down a rheostat that can effectively manage this 220V motor from zero to full blast????
Thanks, Phil -
Hey thanks for posting that Mark. It is quite fortuitous as I have a 11th grade high school forge student interested in that VERY thing! I dropped Darryl an email and am awaiting further info. All the best, Phil
-
I guess that's what you call a teaser?!
I guess you guys need to find something to do in Canada in February. Who would have thought that would be it? Well done! -
Hi friends,
Great thread guys. I've been needing some help with my coke fire starting procedures. We burn coke in our high school classes to minimize smoke in our urban setting. This is all great except the starting part. I can get a fire up in about 5 minutes, but the way I do it is smokey as all get out. Coke is a bear to get started compared to coal (or coked coal). A few sheets of paper waded up in the traditional donuts just doesn't get it kicked off. I either use a whole bunch of paper rolled up into a tight 6" to 8" ball (layered up a sheet at time), or less paper combined with some wood kindling. Either way I light the paper and get it going a bit with a little air and then pile on the coke and let her rip. Smokes like nobody's business, but in a about five minutes we've got a rip snorter of a fire (no more smoke whatsoever) and can get our class under way.
Problem is the few minutes of voluminous amounts of smoke! Anyone got any smoke free starting suggestions for coke?
Thanks, Phil -
I selected coke, but wanted to also pick propane.
-
I also wondered what you meant by tin. Most of the time when I hear a person refer to tin sheet metal they are talking about corrugated roofing metal. And, as often as not, they're talking about galvanized (zinc plated) roofing. If you are, by chance, referring to galvanized metal, which, indeed, does look tin-like, I would not use it for for your purpose where heat is involved. Zinc oxide fumes are toxic and can be deadly.
-
A software change was made almost half a year ago in May. Most of the Blueprints haven't worked since. We have SORELY MISSED them and have thousands of fingers collectively crossed in hopes that they can/will be resurrected.
Here's a few forge tutorials I found via google.
Forge Design
Lytton Creek Blacksmiths
DIY Blacksmith Forge
How To Build Your Own Blacksmith Forge
DIY Propane/Natural Gas Forge
Free Gas Forge Plans -
OK, so it is a pry bar (of sorts) and does pick teeth [out] of something. So, come clean, who's Deb, and why does she need a bunch of stylish teeth pryer outers?
-
I guess I really don't understand the line of your inquiry. You want make charcoal, but not with the pit/earth/sod approach, nor with the use of drums. I'm not sure you can achieve your goals with those restrictions. As I recall, the retort plans the fella is selling on eBay call for two drums, one under the other. The bottom one is the fire/heat source which "cooks" the wood in the top one. The gases vented from the top one are rooted back into the bottom one to be burned off and contribute to the charring processes. It's quite ingenious, but rather dramatic and robust.
-
This retort construction should get you there, MAKE CHARCOAL Blacksmith Forge BBQ Fireworks - eBay (item 350109620557 end time Oct-20-08 09:17:12 PDT).
-
Whoops, sorry it was door, not floor. The roof sounds good. Keep up the good work. All the best, Phil
-
What do you mean by get the floors done? What kind of floors? I hope you get that log siding, that'd be cool, although more work than painting I guess. Have you got the roof all on now? If you haven't, don't dilly dally on it. Looking good. Thanks for sharing your joy with us! Now we're happy too!
-
Hi Chris,
You just can't help yourself can you? You're just too much of a blacksmith, aren't you? You start out to show us pix of your new shop... You get a couple of them posted, but then, hey, here's this cool new hot cut I made, I'll add a pic of that... And three more pix of a hot cut get uploaded to show us that too. Like I said, you're a real blacksmith!!!
Thanks for keeping us updated!
All the best, Phil -
Chirs,
That's just GREAT. Thanks for the news, and pix of your forge. Keep those photos coming. We want to see the shop! BTW, what are you using for a blower and were will it be in relation to the forge?
All the best, Phil -
Thanks for sharing that. Well said!
-
Hi Mike,
Looks good. That's pretty much what I've made too, although I welded pipe together and fabricated ash dumps as well. So, that's 4.5 man (& machine) hours, plus power, rod and consumables. If you charged the very reasonable shop rate of $50 per hour you'd be looking at $225. Right now Centaur Forge is selling a similar fire pot w/ sliding ash gate for $156.37 or w/ ash dump for $168.25. Hardly pays to make them does it? It's one thing when your "saving" yourself some cash, it's another when you're saving it for someone else. Hope you can get $150 anyway. Yours is a lot less fragile than cast iron (like Centaur Forge's) and doesn't have any freight charges.
Good Luck, and let us know how it goes.
All the best, Phil


Hearts for Valentine's Day
in Blacksmithing, General Discussion
Posted
Anyone know where the sequenced images might have ended up?