

Klorinth
-
Posts
88 -
Joined
-
Last visited
Content Type
Profiles
Forums
Articles
Gallery
Downloads
Events
Posts posted by Klorinth
-
-
1 hour ago, matto said:
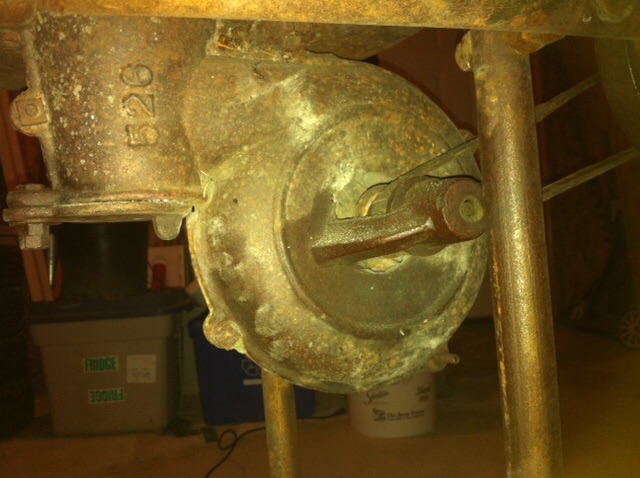
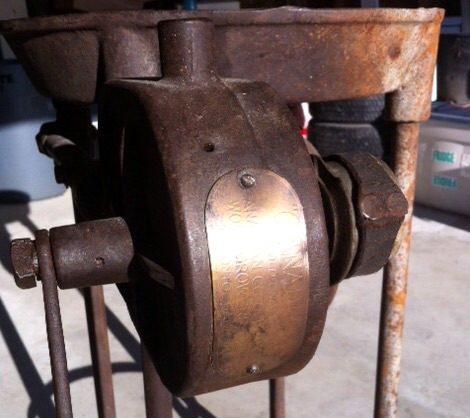
The opposite side of the gear box has the hole for the handle yolk
I think I see what you mean. If it was original the handle would have been on the other side so that you would face the forge differently. Turning the crank with the left hand instead of the right.
Given the placement of the 3 bolts along the top edge of the forge should I assume that those are for mounting some kind of windbreak or hood?
9 minutes ago, Jim Coke said:Greetings again,
Your pictures show castings on the edge that are typical of a forge with a lever handle.. The casting bosses on the bottom is also a sign of the gear mechanism mounting.. Again just this old boys 2c .. I hope this helps..
Forge on and make beautiful things
Jim
Thank you Jim. That is what I was wondering. Makes sense now that I have found a couple pictures of lever handles mounted on a forge.
-
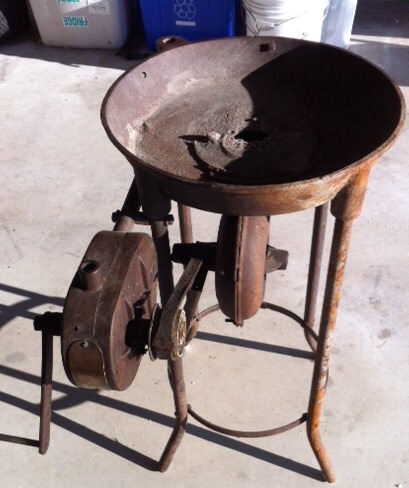
A few more pics. Please forgive the bad lighting. These are in the garage with fluorescent lights in -20 degree temps.
The large mounting point is obvious on the right front of the forge.
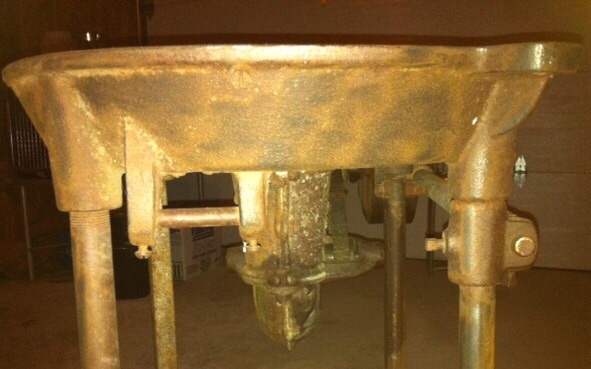
The mounting point at the left confuses me. I'm not sure what that is for.
The fan and ash dump are all one piece. There is a little bit of welding at the top where the fan housing touches the belly of the forge.
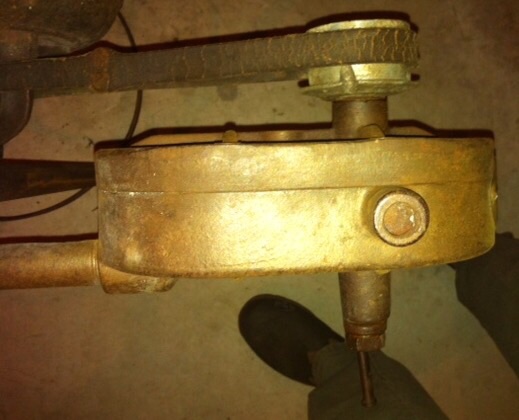
Obviously the piece that the belt is turning on is a later mod. It doesn't match the gearbox. The hole on top does not have threads. It looks like a smooth rod is meant to be inserted.
2 hours ago, BIGGUNDOCTOR said:Coal? What about charcoal, or simply wood? I have used wood scraps when my coal got low. With the blower going they turn to embers pretty quick. There is always plenty of free scrap wood to be had from various sources.
I will make some charcoal if I have to. I want to try and find a source of coal first. As much as I know I can make decent pine charcoal, a guy down the road has lots of pine for sale, I would rather not spend time and effort on it. I have lots of things that I need to be doing instead of that.
Plain firewood will be my fall back.
-
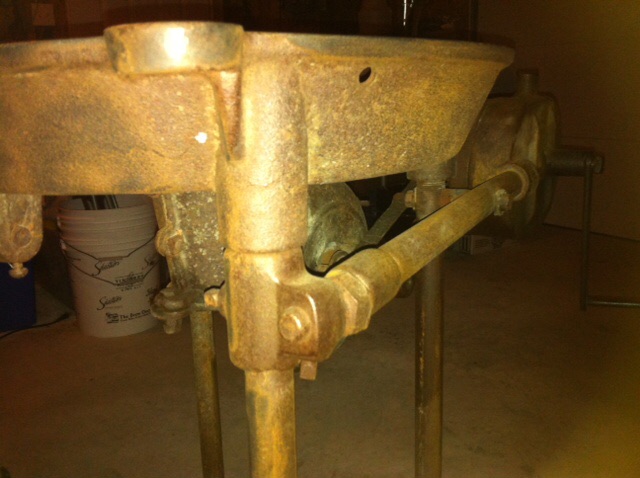
If the gear box is an adaptation or modification, what would it have been originally?
The gearbox looks like it belongs there even though the belt does not. The horizontal bar that it is attached with looks original... I need to take some better pictures of that part.
The front side of the forge does have a circular mounting point that looks like something I saw on another forge. One that used a type of lever and half gears to turn the fan underneath.
The writing on the id plate makes me think this was something made by a common company for the Woolgrowers Coop. A company like Buffalo.
-
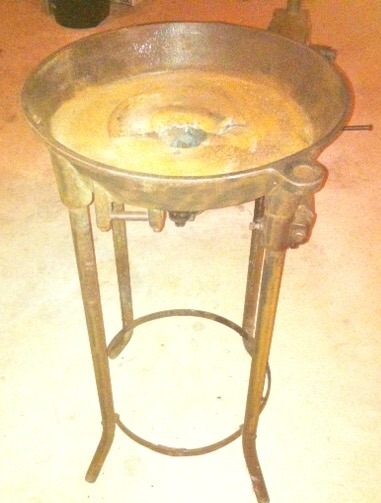
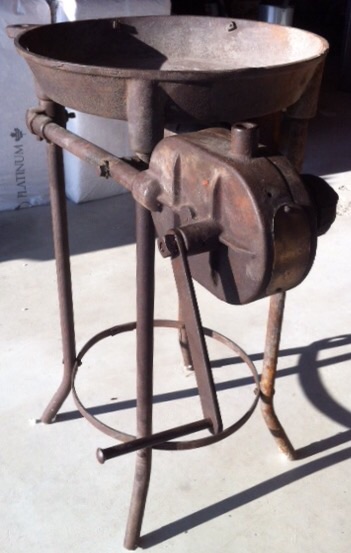
I just picked up a little forge to get me going in solid fuel forging. Nothing fancy and certainly not new. It was bought last year by the guy I got it from but he just wasn't using it. Let's see if I use it now.
The id plate says ""Canadian" sold only by Canadian Cooperative Wool Growers". The only numbers on it are a 526 and 527 on the bottom.

 .
.
The belt connecting the two parts of the blower is literally a leather belt. You can see the buckle holes in it. I do leather work so that is an easy one to replace. The blower works surprisingly well. The guy I got it from said he opened it up and added oil to the moving parts. Nothing else. He didn't even clean it.
The previous owner cut the centre out of a discer disc and put it in the bottom of the forge to lift the fire off the bottom and help it last longer. I have the disc. I happen to have a larger one already that could fill the whole forge bottom and protect the whole thing if I wanted.
Has anyone seen a little forge like this one? Or maybe I should say have you seen this blower before? The forge is simple and just like many others. The blower is the different part.
Now I just need some coal...
-
We have 3 historical sites that have a blacksmith. Lower Fort Garry near Selkirk, the Mennonite Village in Steinbach, and the the Festival du Voyageur each February at Fort Gibraltor in Winnipeg. I don't know who is acting as blacksmith at each if those right now. There may be others I don't know of.
I know of 2 working smiths near me. One does classes each summer and teaches at a historical school in the USA periodically. I will be doing a couple days with him this coming summer and hopefully I can get to the Festival for a day. I know from experience that I can learn the basics on my own but there is no replacing a teacher for taking you to the next level.
i used to watch at smith at the Folk Festival each July. We have a 4 days music festival here each summer and there usually was one or more blacksmiths that would come to sell to the tourists. I spent time watching them work as a teenager. It's been a lot of years since I have done that though.
-
Alex,
Thank you for the great idea. Being a beginner I don't have an anvil with a hardy hole. I have been trying to figure out in my head how I could have something that would work in a similar way. This would do it.
-
Hi there Jim.
I'm located just East of Winnipeg. I thought I would just say hi. I'm just starting out so not ready to visit anyone. As much as I would love to. I'll be doing a course during the summer so hopefully I will be doing better next fall.
Its nice to know there are people close by with lots of experience.
-
I'm in the same boat as you. Southern Manitoba is filled with old farms and farmers. Find a few old farmers near you and just ask them. They will either have something for you or know who to talk to.
Farm sales are the other way. Auctions.
-
Charles,
how long do you expect that pipe to last? In your configuration?
-
LOL! My wife would think I'm crazy.
-
Charles,
Once again you have me wanting to build one of these. I have all the materials for this one, although I will have to wait for spring to dig up the clay. It's frozen as hard as iron right now.
Quick question: what is the functional difference between this design (hole in clay) versus a Viking style side blast? The Viking style seems to be more horizontal for the fire. Yours looks more like a bottom blast tuyere. Is there any difference?
Also, if you are using that much clay and you use a thin walled pipe for the air supply would it even matter that the pipe will wear away? Or should you put a couple fire bricks in to block some of the heat? I understand the reason for water cooling, I just don't see its necessity. Am I wrong?
-
Charles,
Thank you for the details you have provided, very helpful. It makes me want to build a side blast forge right now. Easy to find materials and a design that doesn't sound like it could be screwed up. Perfect!
I already have a little propane forge I made last year. It works fine for small items and I can't really complain. For my first try it turned out really well. I just don't like the sound of the burner. It isn't as bad as the bigger ones I have seem in videos, but it still bothers me. I thought I would like how clean and simple it would be, and I do. I just keep coming back to pictures and video of coal forges. It might just be nostalgia. I keep going back to the solid fuel though.
Looking for info on this one
in Solid Fuel Forges
Posted
Now THAT is very interesting!
I would never have thought that up. And I have a flock of sheep and do my own shearing, both by hand and with powered shears.
Very cool.
Thank you Thomas.
It is really appropriate that I have this forge! Fantastic.