

old rascal
-
Posts
33 -
Joined
-
Last visited
Content Type
Profiles
Forums
Articles
Gallery
Downloads
Events
Posts posted by old rascal
-
-
I'm contemplating building a hammer. I have a motor and some of the material. I also have some heavy truck leaf springs, but I see many posts where they straighten the springs. Is that necessary? I would think that having them curved down would give a more powerful blow. Can someone explain this, please?
Thanks,
Jerry
-
I've had very good results with spray graphite. It's dry so it doesn't pick up the usual scale and junk that grease does. Has anyone else used it?
-
I don't know if this counts, but I'm in the progress of making a double sided bick from an old pickax that was badly blunted. I'm really starting to realise why everyone wants a power hammer. Will offer pictures when done.
-
Thanks DSW,
Unfortunately part of the safe has already been opened, the bottom, that was empty. Above that is a strong box that was inside the main door. I can see the bottom of it, but not where it opens.
-
Does anyone know what steel safes are usually made from?
My son gave me a safe that came from an old store he was remodeling. He was able to open part of it by ruining many sawzall blades. The strongbox is still closed. He didn't have a oxy-acetylene so he gave it to me. I'd like to burn it open, but I don't know if it's worthwhile as it's probably empty and I don't know if the steel is worth the effort.
-
If you're looking for building materials at a great price look for building material auctions. I bought my siding, roofing, beams, and miscellaneous for my shed at a small fraction of what it would have cost at a big box store.
Here's one in your area.
-
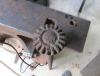
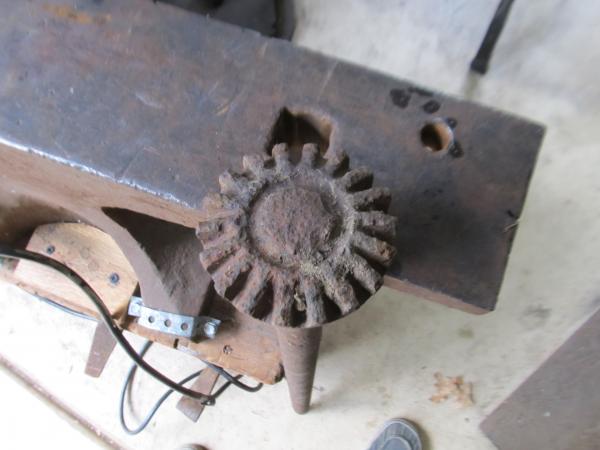
Not a pulley as it is a continuous spiral groove? And I propose that it is a ball race. The holes are blind threaded 4-40, and I am guessing that they were index pins for timing the lathe operation. I just can't figure it out.
Could it be a spring winder? When I was installing garage doors they had a lathe in the factory that wound the torsion springs on something like that although not graduated. maybe it wound a progressive spring.
-
You might try the books by Edwin Tunis too, especially his book "Colonial Craftsmen" where there is shown how the blacksmith was the toolmaker for all the other trades. His drawings are fantastic too. It's more detailed than the books by Sloane.
-
Adhahm,
I think the steel plate is the way to go. That way when you're on the plate you can exert more force without the vise moving. You might take a look at my rig on here. I wonder how you would attach a steel bucket to it though. A few good twists would tear out the bottom of the bucket. Maybe if you welded a few pieces of rebar to the plate and up through holes in the bucket into the concrete that would work.
Rascal
-
I guess I didn't make my problem clear. The jaws are parallel when closed and looking down from above, but there are gaps between them. On parts the original cross hatching can be discerned, but other parts are worn badly. This is an old leg vise and I don't think that the jaws are high carbon, possibly wrought iron. I think one or two light passes would do the job.
Rascal
-
The jaws on my vise are pretty worn and don't meet all the way across with dips. Has anyone tried running a carborundum saw blade between them to make them match? I was thinking of clamping the jaws apart with a gap just a bit thinner than the blade. Any thoughts?
Rascal
-
Vaughn,
That's what I figured the grate was for. There wasn't a grate so I'll have to make one and weld it to a piece of 1/2" rod with a weighted handle to keep it from spinning until needed to break up clinkers. That will fit the grooves on the fire pot and tuyere. I also need a piece for the ash dump gate that was missing. The grate will be 4-1/4" D. and the gate 4-1/4" D I have some 3/8" plate to cut them from that ought to work pretty good.
-
In reply to the posts.
I've spent the afternoon breaking off, drilling out, grinding down all the rusted nuts and bolts on the tuyere and trying to figure out how to put casters on the forge. I pull my forges outside of my frame building to forge. I'm going to clay 1/2" around that steel circle you see where the fire pot goes and then line it with fire brick. That brings me right up to the rim of the fire pot.
Unfortunately the people that had it had donated a couple of trunks full of tooling to the historical society. Argh, Xxxx. I sure could have used 40 or 50 more tongs and hardy hole tools. I'm not really crying, I was lucky to get this beauty.
There's two grooves on the top of the tuyere that match grooves in the bottom of the pot. Does it make sense to have the grate able to spin? Maybe to dump clinkers?
I hadn't given any thought to paint. I'll have to mull that for a while. Maybe give the blower a nice black, it sure works great. It needs ducting to the tuyere.
Can anyone tell me about Lancaster blowers? I'm curious to the age of it and the forge.
-
Thanks Gents,
That would certainly work very well. Does anyone have any history about it? Its age and pedigree?
-
Wow, What a find. I heard about this forge through my son. His friend had mentioned that these people didn't know what to do with it and were going to junk it. It had been one of their grandfather's.
I contacted the friend and he even delivered it to me.
As you can see, it's going to need some work but it'll be a labor of love.
I also need some advice. I realize I should probably clay it although it shows no evidence of having been clayed. Does anyone have ideas of how thick I should make it? Should I bring it up to the fire pot?
I'd appreciate any advice.


-
Here's the stand I made a some days ago. I put it on the plate so I could stand on it when bending and the vise wouldn't move. The leg is into a short piece of 1" pipe welded on the plate The mount was actually my first forged piece, after (mumble) heats, but I did get it done. I also made the spring. An addition is the small table that sits on the back and locks into the holes drilled in the angle that is removable so that I can move the whole thing with my dolly. The picture of the table is it's bottom showing the supports and pin heads.


-
This is my mystery steel. I'm hoping that someone can tell me what it is and where it was used. I believe it's high carbon and I would like to make some drifts from it, if possible.
It was threaded on one end with a keyway and geared on the other.[
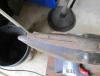
attachment=58867:mystery steel.JPG]

-
Can someone tell me where this would be used? I only have it in the hardy hole to get a picture as I don't think it would be used there. Would the tapered base be mounted in a stump? The swages are graduated from less than an 1/16" to 3/8" as close as I could tell by laying a drill bit in them.

-
Don't sell yourself short, asking advice and or otherwise collecting information doesn't put the decision making in someone else's lap. You're making and adapting your tools
The mix dried chalky and crumbly because it's just dry clay, unless you fire it it'll always be friable and water soluble. It's only purpose in the forge pan is as a heat shield. If you poke and scrape it, it'll gouge and scrape leaving loose dust and grit. Just take it easy on the forge table and it'll last a while.
The problem with using mortars is they will glue themselves to the forge pan so when they wear out and you need to replace it you'll be spending a lot of time getting it out. the mortar mixture recommended on the fire clay bag is for laying brick fire places, BBQs, fire pits, etc. not forges. That mix will withstand wood fire temps with minimal chance of the portland cement spalling but running the temp higher and I don't think so. The forge WILL get hotter around the air grate and the heart of the fire.
Just so you know, I'm a propane forge guy, I've used charcoal and coal, even have a couple few solid fuel forges around but I'm primarily a propane guy. I did spend a number of years working in the State materials lab where you can ask darned near anything having to do with construction materials and if somebody doesn't know the answer there's a book on the shelf. Believe it or not, I did indeed look up how to mix a refractory from fire clay. It's been WAY long ago I did it but the recipe isn't a formula there's wiggle room so the recipe I posted is close enough to work. Probably NOT in a ceramic kiln but maybe, I'd have to bug one of the guys where I used to work to look it up for me for hard numbers.
If you want good hard numbers hit the library and check out a kiln making book or have them do an inter library loan and get you a copy. Humans have been making kilns for thousands of years and they typically take much higher heat than a forge.
Frosty The Lucky.
I finally found some fire clay. In my area (Northern Illinois) it's nonexistent except from a masonry supplier and very pricey.and a two or three week wait. I want to hit metal. I thought and figured out who uses it. Potters use clay and after a few phone calls was directed to a pottery supply house where I purchased a bag. He also gave me a recipe to mix it that they use to line kilns. I'll give it to you and would appreciate thoughts on it before I mix.
! part clay
1 part portland cement
1/2 part sand
2 parts coarse sawdust
2 parts vermiculite
I asked about the sawdust and he said it was to keep it a looser mix. As this will not be applied vertically i wonder if it's needed or maybe more vermiculite.
I wish I'd found this site years ago and I'd be way ahead of where I'm at.
-
Here's a couple pictures of my forge. It's cast iron, but as you can see, it doesn't have a fire pot. I have to build my fire quite high to to keep the iron from the air blast.
If I cut an opening could I set a fire pot in? I could weld one up or even use a brake drum. My problem is I don't know if it would crack the cast iron.
The blower I could lower with some threaded rod or use flex pipe.
I'm Northwest of Chicago and wonder if there's any members closeby.


-
Looking for someone in McHenry County, Illinois. Anyone?
-
Thanks for the replies. My forge is cast iron and has no fire pot and has a Champion hand powered blower. I think that the next time I go I'll get a bag of coke and try it. Can't hurt, can it?
-
I'm a newbie too Well, maybe I shouldn't say that as I'm 78 years old, but I'm new to smithing. I was able to buy some equipment some years back because I've always been interested in it, but didn't have a place to pursue it. Now I do and am rarin' to go.
Here's what I have. I attached the pictures. The anvil is stamped 1-5-3 but when I weighed it it was only 145 lbs so I don't think that's an English stamp. The rest of the markings I can't read yet but will try to. I can read part of the word wrought, I think.
The forge is cast iron, but it has n't a fire pot so I just have to build a higher fire.
The vise is about 40 lbs with a 4-1/2" jaws, a little loose on the bottom hinge so I'll have to shim it some. I'm in the process of making a mount and spring which were missing. I hope you can see from the picture that the screw looks pristine. I'm puzzled as to why the female half is brassy looking.
Any information anyone can give me on this would be appreciated.


-
I'm just starting out and bought my coal from Centaur Forge in Wisconsin. After leaving their establishment I realized the sold coke at the same price as coal. Wouldn't I be better of just using coke rather than coking the coal or is there a reason for not doing that?


Anvil questions
in Anvils, Swage Blocks, and Mandrels
Posted
I just acquired a Hay Budden and would like to know more about it, if possible. I'll give as much info as I can but for some xxxx reason my computer won't accept pictures.
Below Hay Budden on the side it seems to say ???? factoring. Of course below that is Brooklyn New York. Below that is stamped 150. Probably the weight as I could hardly carry it, but at 80 years old I guess that's not too bad.
It's stamped 6665 on the base below the horn.
Dimensions are 25" length, 15-1/4" x 4" face with a 7/8" hardy hole and 7/16" pritchel hole, 10-3/8" high.
It has a square hole in the base and two more in the waist under the horn and tail. There's what I believe to be a round face welded on the side of the horn. I've seen these referred to as clip pieces for farriers. That may be as the horn has a ridge in it, maybe for rounding shoe stock.
Any information would be very appreciated.