
Stephen Olivo
-
Posts
319 -
Joined
-
Last visited
Content Type
Profiles
Forums
Articles
Gallery
Downloads
Events
Posts posted by Stephen Olivo
-
-
Thanks for sharing. Always fun to watch hot stuff :D
-
all about the ball bearing test. Sound means nothing only rebound will tell you if it is an aso. Don't worry an aso still will serve a good purpose in a shop as a bench anvil.. I have mild steel blocks and an aso that I use as much as I do my anvil. Just different use than the anvil.
-
Ok so there are a few options. Drill and chisel out a bolster plate to serve the need. drift by hitting once supported on far side of anvil and then move to near side and one hit then back and forth repeating. Open post vice must be post vice even a small one will do like Rashelle talked about doing so the cheeks are supported and drift. place drift in and stretch cheeks by hammering with fullers on cheeks to stretch hole larger and upsetting back and forth till the drift fits in where you want it to. place drift in securely and hit drift on anvil to drive it up through the bar so top of axe is down. Same way you might do a double bend on the horn without a hammer. support using horn as you hammer drift through moving it around to support a different side for each hit. Kinda a lot of work. take two hard wood boards and a spacer bolt together and drive drift through center. put drift in hardy hole or clamp in vice small end up bend a bar to make a u so that it fits around the drift from the end down and hammer cheeks down onto drift with u shaped piece. Um those are all the ones that come easily to mind right now. All will work some better than others. What can I say I love swedge blocks. Bolster plates are nice to but more limiting as they are made for specific operations.
Oh and there is also the option of cutting the back of the hole open using fullers to spread the cheeks till they are long enough and then do a lap weld around your drift as seen in the viking axe making video Don't remember the name though of the guy. Think outside the box. Or make the box so you can step outside it. -
The hollow or negative punch I made first. http://ipneto.deviantart.com/art/Makers-mark-negative-stamp-v-1-392858739
The first try at my makers mark. Found it worked awesome for endgrane marking but required to much force/larger hammer to make a good one hit impression in steel. http://ipneto.deviantart.com/art/Makers-mark-v-1-392856947
The second try at it that fixed those problems. http://ipneto.deviantart.com/art/Makers-mark-v-2-392858378
I have plans to make at least 3 more one more of this style and 2 of another. Will show when I get to making them.
-
Yes water or even some moister in the air can make an acid that eats through the metal. But till I can store it outside metal is the best I have been able to acquire for storing of my coal. 4 or 5 years going on and the bottom and sides have not rusted through on mine so I figure thats pretty good.
-
Out here the guild buys a truck load of coal at a time and stores it in a gated area outside I think there are wood floors to it but don't remember last time I scraped the bottom. We get a load probably once a year. 7 dollars a five gallon is what good blacksmithing coal goes for in our guild. pile is about as tall as me and we haven't had any issues with heat or degradation that I know of. Each load can differ though as to how much sulfur or ash or clinker sand sorta stuff in it. I store mine in a 55 gallon drum with no top and in some 5 gallon plastic pails with tops. No problems with it. I usually get 10 buckets about 2 - 3 times a year. Amazing how much you can go through.
-
Wow … wish I had a collection like that….Awsome score. Just one more thing that makes life easier. :D
-
Awsome. I love how you were able to take something broke and give them back whole :D
-
Lovely. if you think flint and steel is hard try friction. :D any way to start a fire is fun for me :D thats just the piro in me talking :D
-
Usually the amount of oil that is left on my hot rasp/file is such a thin coating that it offers no real danger during hot filing minus a possible small amount of smoke. The oil left on tongs during my heat treating steps just gets almost constantly burned off/on to the tongs as I hold or put the next piece into the forge. Using it to cool punches can be interesting as it flash fires often as you place it on the metal/in the hole. Usually though it is only enough to burn for half a second and then it goes out so I have never found it to be more than just something to take into account when you work with it. Sometimes I have a oil rag handy to wipe the punch against so the amount of oil is gone before it creates any sort of flame.
-
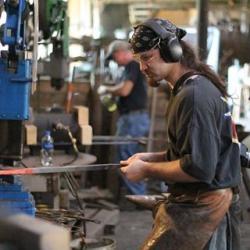
I keep thinking about setting up to use air hammers as I have seen punch/drifting and slit/drifting done with them as well as a bunch of face work or animal heads. One of the smiths who used to live near me used them quite a bit and through some of the stuff he has done showed me how useful they can be. Here he is using some air hammers.
-
I can see why you would use that way especially with beginners. I will have to try that and some other things when I get the chance to forge again. Thanks. :D
-
Thanks for doing this. Always interesting to see how someone works.
-
No I know. Mine have been 3 layers of rasp for the blade section. We just have slightly different ways of going about it is all.
-
Ok the term pin refers to the large piece of metal (much larger than what the file normally creates and can even cover several file teeth) that wedges itself into the teeth as your using it causing a deeper scratch in the piece you are working then the ones the file makes. Often a card won't remove them as they are wedged in pretty good. This makes it harder to get a nice even finish. They are a big pain as when working with finer and finer files all of a sudden there will be a deep gouge causing you to either grab a rougher file or take a lot more time trying to get to the bottom of the gouge.
I tried to get a picture of it but its not turning out. I only managed to find one of my many files that I haven't used yet that had pins in it. Most of my files have been given to me as dead files when really they were just clogged or pinned up pretty badly. Remove the pins and oil them and they are still as sharp as ever. When I started blacksmithing I let people know that I was looking for files no matter how bad they were. Out of the many I have been given so far only 2 were actually bad (they were broken and missing large gaps of teeth). The rest became my tools.
-
I see now you just wrapped and welded. The ones I have done I folded over one end and then bent for the eye and then welded. This gave me more mass to draw for the beard but the front of the eye is always a problem that I think I have only now got a handle on. I will have to try just a wrap and weld on the next one when somer is here and I can drag out the forge again. Thanks for sharing the process.
-
-
The line is from or for wedges that lock a hardy into the hole. Talked about on another thread on here I believe.
-
Looks like a really good layout for teaching it. Nice job. How does the front of the eye look. Usually the part I have had problems with. I think I have figured out how to fix that problem. They must have been happy to walk away with all that.
-
Some stuff I was thinking about as I was in my basement doing my …must have been around 3 hours of filing tonight. Its really important to pick the right cut and file for the job at hand. Over the years of using files I have found that too often people reach for to fine of a cut to start the work with (heck I still do that sometimes and have to stop and remind myself) and are always trying to force the file to do its job. Its like a saw let the tool do the work. Your just there to guide it and move it back and forth. Oh and the oil has made it so I don't have to deal with pins at all allowing more time for work and a smoother more even scratch left behind by my files. Files are like sandpaper so many different ones gotta start rough and work down towards smooth. Just some of the things I have noticed when working with other people on cold work.
-
Porta bands are awesome as long as it isn't hardened. Yes they have a limited throat but they still can do a lot. I use my cheep one all the time and am looking at investing in a much better one soon, I would advise anyone to invest in a high quality one, as I use it so much this one is dieing. A while back I replaced the little forked "platten" with a piece of angle iron and a piece of steel for a platen. I now use it almost entirely in a vice vertically to cut all sorts of sheet and bar and what have you including wood. This setup allows you to run it in a vice as a vertical bandsaw for smaller work and more decorative or finer work or to in seconds take it out of the vice and use it to cut down long lengths without doing anything to the machine. Partly why I went this route is that most places I go I will have a vice with me if I have the portaband and its simple. I have found it to be as useful if not more then my angle grinder. I use the angle grinder on springs or other hardened material as most won't cut on a bandsaw. Bed frames you can cut with it though.
Here is what I did to mine.
http://ipneto.deviantart.com/art/Platten-modification-for-bandsaw-323162990
-
I like oil as I never get a pin and it provides such a nicer surface. I do wipe my fingers across the teeth to unclog them or using a brush I brush them as they do collect shavings from time to time. I store some of my needle files in corrugated cardboard as it keeps them separate and every other void is the perfect size and distance apart. For my larger files I use a tool roll made out of old recycled work jeans. I have them in it in such a way as to always have a layer or two of fabric between them any any of the other files when rolled up. I haven't been as careful with some of my files mainly because they are nearing the end of their useful life and are already pretty dull. I may try acid sharpening them but I have made a file chisel to make my own and a rasp punch for rasps as well. Now I can make any sort of weard file I may need. :D
There may not be any evidence that hot filing/rasping was done but it still is a good way to use the massive rasp/files that ferriers won't use as they are to dull for them. When you still have a bit of clean up it can be much easier to get their closely with that and then only use the other files to touch up when forging it closer isn't advisable. Scale is also quite abrasive as the japanese have been known to use it in their polishing so you want your old to dull to care about files to remove the scale before your good files go to work on clean steel.
-
DSW- Makes sense in that context but why not then just clean it right before going into the salts so that you know its clean going in. Just seems a better way then just telling people not to touch. I haven't met many who would listen to that anyways.
I always try to watch some of the episodes as they come online. PBS.org is my friend :D
Billyo-I must reread each of my posts a ton of times and still fear I said something wrong :D
rockstar- I have found if you need to press a file more than just a little the teeth are clogged and its time for a brushing with a stiff brush or your asking the file to take bigger bights than it is meant to take. I have always found friction to be the enemy of cutting as your trying to part or split the material. Kinda funny how logic just doesn't seem to work for some people huh :D Plus some people are just set in their ways and don't like to be proved wrong so they just get more intrenched. Thats also why I always tell people to try what I say and then find other ways and try them as well. That way they aren't just trusting what I am saying to them but what they find works best for them. I always found the best teachers were the ones that made you question things and in asking the question find out and decide for yourself not just be told. I am a fan of the path walked backwards.
-
Good looking fro you have there. Too much leaf springs?or just wanted to work hard? First one I tried was out of leaf spring as well. To many problems so I went to mild steel. Easier to weld and faster/easier to form. They don't need a sharp edge and often are better with a rounded edge. The bevel ideally should go all the way to the back of the "blade" as this tool is just one large wedge. Think of it more as a splitting wedge then a knife. Got your maul all made up for it to? Oh and a good tool for making handles it is.
Hammer quenching...?
in Blacksmithing, General Discussion
Posted
Wet forging means you have a lot less grinding to do or filing. I use it on blades often. I also sometimes use it on other decorative stuff as it makes scale pitting a none issue. It really is a good technique to use.