

Charles McDonald
-
Posts
142 -
Joined
-
Last visited
Content Type
Profiles
Forums
Articles
Gallery
Downloads
Events
Image Comments posted by Charles McDonald
-
-
Thank you very much! These are fun to make and Im not sure why I havent made more...
-

Hey thank you for the nice complement!
-
Thank you! That texture is easy, just use a guillotine tool with 3/8 fullering dies. I really like the raw forged look of it myself and aim to use it on more things in the future.
-
Thats pretty awesome!
-
Thank you both! The next one needs a larger belly, arms and legs with a meaner grin! ( the father of this little fella )
-
Hey Thank you!
-
Nice!
-
Hey thank you very much!
-
Thank you very much! Ive been making more of these lately, but I am frustrated to death by the fact that I cant seem to upload new photos...
-
Thank you for the complement!
I really like that forge quite a bit, it does everything I expected it to, including weld and I couldn’t be happier with a gas forge. My only thing against it I guess is the obstacle I’m faced with when fitting certain odd shaped objects into it. -
Thank you!
-
Thank you and you should!
-
Thank you!
-
Thank you! My work area has changed dramatically, but Ive yet to figure out how to post new photos. It seems undoable at this point...
-
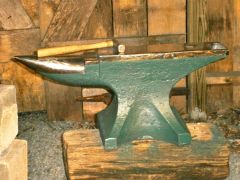
Thats a nice clean looking anvil!
I wouldnt mind having one myself! -
Thank you!
I didn’t make the hammer sadly, I’ve yet to make my first hammer, but hope to very soon!
It's a Picard 1000 gram that I re-hafted and changed the face.
ha ha!
My anvil was feeling self conscious so I offered to help with the chain girdle. She had been jealous of all those slim farrier anvils for some time now... -
Yes I actually traced the base of my anvil onto the stump and used a router to sink it in about 3/4 of an inch and then used those straps to lag bolt it in. I used this page as a reference ( http://www.blksmth.com/Anvi_base_preparation.htm )
It doesnt move between the anvil and stump, but at the base of the stump it rocks since I didnt burry it into the ground so I used three very long T-posts and drove them into the dirt and lag bolted them all into the stump. Sturdy and doesnt move at all now!
Good luck! -
Thank you! Happy you like it!
-
Thank you, I appreciate the good words!
-
^^^ You know what Im talking about ha ha ha!
-
Thank you very much!
-
Thank you very much!
It's been a while since I've made these and I think Its time to make some more... -
Thank you very much, and yes I do take photos for fun on the side.
I keep the shed locked up, but of course windows can be broken. I am thinking about making something decorative to bolt up behind the windows just as a precautionary thing. People are nuts in my area...
That shed isn’t easy to access and if I caught a guy carrying my anvil off and over the fence, I don’t think I’d want to mess with him. My 44 mag is fearless though... haha! -
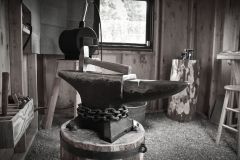
Thanks! The floor is pea gravel and the 8’x10’ shed was built by me. It’s a little snug, but it’s what I could afford at the time. The comment about the good lighting is most likely in regards to the photography not the actual lighting in the shop. It's actually nice lighting in there with the doors shut, but it looks incredibly bright since I bumped up the exposure on my camera. I can see the colour of my metal just fine.


Inside of my smithy
in Smithys
2Posted
Sorry I'm never on here anymore. Its 8x10 but i added an outdoor section where the forge is now within reach of the anvil and vise. So its more like 8x16
I have a swage block and a treadle hammer in there now. Amazing how much stuff you can fit in such a little work space.