

Ozark Nick
-
Posts
60 -
Joined
-
Last visited
Content Type
Profiles
Forums
Articles
Gallery
Downloads
Events
Posts posted by Ozark Nick
-
-
Ok, here I am dredging up an old thread. fellow asked me today to make him a branding iron for his cattle. he insists the brand has to be made out of 1/2 inch round stock.
didn't sound right, but I thought what do I know. now I've read this thread. will this guys idea even work at all?
ps- by brand I'm referring to the logo. -
Yes! Thank you! That allowed me to find the title which is, "Cockeyed Cowboys of Calico County". LOL.
-
there's an old western I saw once. where a blacksmith needed to find a wife. it was kind of a comedy. but there's one scene where it looks like he's actually forging on a piece of steel. I'm desperately trying to find the title, but am not having any luck so far.
-
Howdy all. Haven't had much time for blacksmithing this past year because of work. But things are slowing down now and I've been able to fire up the forge quite a bit. I found I had to relearn much of what I'd already learned because it had been so long! LOL!
Here is a photo of my most recent work.
-
The bolt you have circled in white will allow you to remove the outer jaw of the vise.
I recently got an old leg vise too, removing that bolt and giving that whole area a thorough cleaning brought it back into mostly working condition.
Good luck! -
Got a stand made this morning.

I do wish I had done this a long while back, Thomas! -
Hi people .
This is a small wrap and weld style hawk shape based loosely on the early style
brought in from France and England.
Mild steel wrap with w1 edge , deer wrap snake wrap, copper .,
leather , brass studs ,feathers , bit of scratching with spotted gum haft some file work .
hope you like .
Chris
That's nice. Love the etching(?) in the metal. -
So hey, here I am to dredge this back out of the depths.
I finally got around to working on this thing today.
I got the pivot bolt out. I cleaned it up and oiled the heck out of it and now the jaw operates they way it ought to.
Yay!
Tomorrow I'm going to make a portable stand for it so I can finally use it. -
Are you working outside in full sunlight? Colors look different depending on the lighting, your eye, and other factors.
Phil
Outside in shade.
Maybe what I thought was bright orange was actually yellow. At one point it did throw some sparks when I took it out of the fire, but I thought it was the charcoal. -
too hot this time.... sorry
Haha! Seriously? I thought it was only at bright orange. :D -
Okay, so I went back out and tried it again.
Was working at a bright orange temp this time. I rearranged my forge last weekend and I think I created an air leak between the forge and blower, it just didn't seem to be getting as hot as it did before.
Anyway, I cut off the damaged bit and went to work. I got more cracks in the tip again, but they're different this time.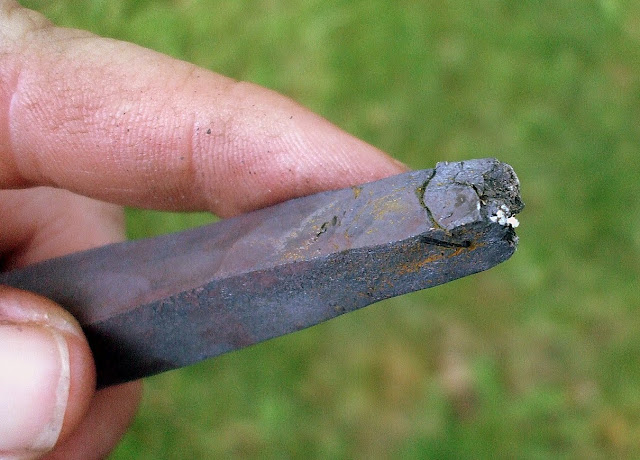
Is this the same problem or something else?
Thanks again for all the help. -
Cut the defect off and keep going. You can work a lot of steels right up to where they start sparking. If you google
"XYZ steel specifications"
for the believed alloy in question you have and it will give forging temperature recommendations.
Phil
That's good to know, except this was a scrap yard find. There isn't any way for me to be really sure which alloy it is, is there? -
That's a persistent old wives tail.
Interesting.
Now the question that comes to mind is, Can this be fixed? Or do I just lop off the tip and start over? -
Not hot enough?!
Ok, I thought high carbon shouldn't be worked above a dull orange. I think I'd read that somewhere.
Thanks for the help guys. :) -
Found the shaft from some kind of auger at the scrap yard. Spark test seemed to indicate it was a higher carbon steel.
So I tried to make my first punch with it.
While drawing out the taper I noticed a crack forming in the tip.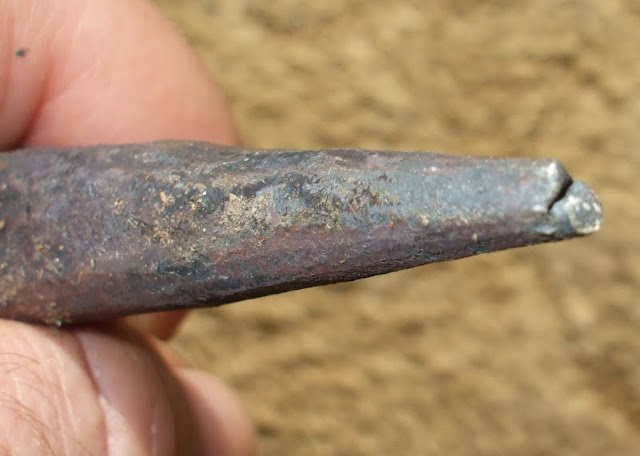
Any thoughts as to why this happened? Did I get the steel too hot?
Thanks! -
Thanks again for all the kind words everybody! I'll keep practicing!
Dave, I haven't drilled or punched these yet, I don't have the tools necessary to do either one here at the house.
As for the mounting area, I'm still really trying to get the flattening technique down. Those half-hammer blows take a little practice to get them in the same spot! :) -
Wow, that is incredible.
May I ask which end was the ball peen? -
You may wish to put a fish tail scroll on the end of those hooks that are use for hanging a jacket so as not to poke a hole in the fabric.
Fishtail on the end sticking out from the wall? Will those little pigtail finials I've been doing tear through a jacket? -
Still practicing on hooks.

Took Dave's advice and got some 3/8-inch round stock to play with and worked on my techniques for shaping the hook (without the benefit of a horn).
Funnily enough the far left was my first attempt and my favorite. I'm kinda thinking I need to video myself making these so I can see exactly what I did to get certain results after the fact.
-
Looks like I missed that part. :wacko: Well, now Dave does a good job of showing you the technique without the horn.
Practice, practice, practice...
LOL ... that's ok. I don't think I mentioned it in this thread specifically.
Yup, I like Dave's vid a lot, jumping at the bit to get out and try it but it'll be tomorrow or maybe the weekend before I have a chance too. -
Hey Dave,
Thanks very much for taking the time to make and post this vid.
I can see right off the bat my hammer motions are similar but I haven't been adding the complimentary motions with the other hand.
Can't wait to get out and try it some more! -
6. Cuss and swear at them until the "match"
I learn something new everyday! ;)
Are there specific swear words to make hooks match or will any do? lol. -
Forget the pipe or round stock. The old smiths didn't weld up another tool every time they did a simple job. That's what the horn is for. Just don't bend the hook over the horn perpendicular to the face. The bend is made 90 degrees from the point along the outside curve where you start bending. Then it won't twist. Do you have "A Blacksmithing Primer"? It's all in there.
You don't need to change the type of end, just practice drawing out a tapered point. Move the hammer to the far side of the anvil when doing it. Not in the middle of the face. The far edge allows you to draw out a real sharp point. Remember any time you are drawing out do it square. If you want it round then you do it square, otagon and then round.
You're doing good just keep doing them.
My "anvil" is a piece of railroad track, so I don't have a horn ... that's why I was looking for alternatives! ;)
Thanks for the compliments.
Dave, eagerly awaiting the vid! -
Or take a stump, forge a spike end on a section of 1/2" solid and make a stand alone fixture for nested pipe sections...
This made me realize ... I need to find a large piece of steel and forge my own "horn" and weld that to my rail.

branding irons
in Blacksmithing, General Discussion
Posted
Did some more reading. The article on branding irons here at IFI says to use 3/8 or 1/2 inch.
He also said he wants the symbol about three inches tall. But the article here says 4 inches or larger. Guess I need to do a lot more research.