

Dan P.
-
Posts
720 -
Joined
-
Last visited
Content Type
Profiles
Forums
Articles
Gallery
Downloads
Events
Posts posted by Dan P.
-
-
I use saddle skirting, it's stong & very little stretch ,easy to get. I like it because bits of hot slag do very little damage. You said the piece on yours maybe 100 years old. replace it once right and be done with it for your life time. The people who made them thought it was best.
That's a persuasive argument. What weight (thickness) of saddle skirting are you using, and how many straps? I've only (in a very short search) been able to find it in sides. Is the whole side suitable?
Many Thanks for your help.
Dan -
Also the helve has some strange in-lets (whatever you call them; bits that were chiselled out), was it turned around at some point in its life, the way you might turn around a grinder belt?
-
it just flings the head harder!
Thats what I heard, but was curious if there was a discernable reason.
How tight did you wrap your strap?
-Dan -
Sweet looking hammer!
My first choice for strap replacement would be ......... leather ... !
I found it on the same website that I found the Beaudry that I posted over on BB.
Why do you say leather?
And, as it is a question concerning this hammer that I was going to post on BB, but one that you would probably know the answer to, do you know where one would pick up a suitable drive belt in the UK?
Thanks,
Dan
-Dan -
Most interesting.
Check it out; If in the future someone wants you to teach them (or tell them) how to make a sword, and you don't want to, say "no".
It is a very ancient technique, and very effective.
Or, if you are smart, offer them a course in bladesmithing (as per my esteemed colleague, above).
Whatever it is you do, the kind of shrill histrionics coming from some of the alleged grown-ups (poor things, they've been hurt before!) in this thread should not be included in your tactics.If you think its only histrionics to warn people about the dangers from a blade breaking, your education is lacking, Also this could be taken as an abusive attack by some.
-
I use a hand held electric jackhammer with the other end backed up by my Bradley hammers anvil. The end I'm working on is held in a low mounted vice.
This is lateral thinking. -
Interesting hammer, thanks for the photos. I think you should fix it up. It might be better than the one you have!
-
I don't know how the thumbnail of the schematic got attached to my post, but thank you whoever did that!
Thank you also for the replies.
Peacock; From the sound of what you say, I think that the idea of leather straps might be difficult to realize. Just out of curiosity, and perhaps for the sake of posterity, could you explain what kind of leather is the right kind of leather, and why it is your choice?
Stewart, I have two questions; First, what made you think to replace the toggle arms with canvas strapping/belt? Second, why do you suppose it is that the strap allows or causes the hammer to hit harder?
I'm afraid the hammer is still in its box, so I have no detailed pictures at the moment, but here is one of it at its old home;
-
I think upsetting the bars the old-fashioned way is the best option, especially if you only want to upset them 50%. 45" of 1" square should be plenty heavy to upset itself by dropping.
However, failing that, what I would do is get a piece of 1.5" stock, draw down one end to 1", and weld it to your length of 1".
That might sound naughty, but it is actually much more traditional than all this epic drawing down and upsetting that people do these days, and does not necessarily involve a power hammer. And if you don't care about tradition, it is still a practical solution to your problem. -
I have recently purchased what might be called a "strap hammer", by which I mean it is a mechanical spring hammer with leaf springs, but where the ram of, say, a Little Giant has a solid toggle linkage, this one has a flat belt/strap. It is the system commonly seen on Japanese forging hammers. The ram weight is about 20kg and it is driven by a slack belt clutch system. It was designed for the forging of "arms, cutlery and for the heavier work of a coppersmith", and was manufactured by Bouhey sometime before 1914. http://www.archive.o...ge/162/mode/1up
It isn't in bad shape, but is in need of a little TLC, and I'll be posting some questions about foundations, set up, etc. as I go along. I am a total novice when it come to this kind of thing, and I'd be grateful of any help!
My first question; can anyone (preferably with experience) suggest a good material to replace the strap with? The current one appears to be made of leather, the last perhaps 100 years have not been kind to it, and it's gone a bit saggy.
Many thanks,
Dan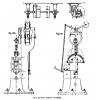
-
i use a 5-6 pound hammer and i use it really well (not a ding on my anvil yet after using it 6 days a week for a year).
Do you not go to school?
I don't like to sound condescending, but you boys will do damage to your bones and ligaments that you won't feel (and regret) till much later in life.
-Dan -
This vice, in a rural life museum, must have had jaws about a foot across!
-Dan
Okay, maybe not a foot, but at least 10".
Okay, 8". -
Just had a quick peep at this thread, and felt that I should offer my hapenny's worth; I think if you are a beginner you should stick with something around the 2lb mark.
I have noticed the weights of hammers that people claim to use going up and up, and I don't think it's necessarily always a great idea.
Alec.S, you are correct that slow and steady with a heavier hammer is better than going crazy with a hammer that is too small.
However, if you are only fourteen, I would not recommend using quite so heavy a hammer as you are. Looking at some of your videos, you seem to be struggling with it a bit, and as your muscle and skeletal development are not yet complete, I would urge caution. -
Why isn't anybody curious about the alloying of iron with chlorine?
And on the subject of how long it takes for something to fossilize, you want to see what's going on in the back of my refrigerator.
-Dan -
Thanks for the replies, everybody.
-Beth, yes, I'm at Didbrook Forge. It is still being re-wired at the moment but I'll be properly moved in in a week or two. Feel free to pop by.
-John, is there an individual that I could contact at the WCB? I have come to a few dead ends when trying to contact the Company in the past.
Many Thanks,
Dan -
Prince's Trust are good on funding small businesses, but have age restrictions, they do grants and low cost loans, many new blacksmithing ventures have received their backing. Worshipful Company of Blacksmiths may also be able to give some guidance as to where to get funding from, they also give grants and bursaries in some instances. What equipment and tooling are you looking for? The Guild has some gear available for sale.
Thanks for the reply, John.
I'm unfortunately too old for the Prince's Trust by a good margin!
I hadn't thought about the WCB, would it be possible for you to give me a contact for them?
The gear I'm looking for is mainly on the fabrication side and 3 phase; plasma cutter, mig, compressor, heavy-duty abrasive wheels, etc. etc. I'm also missing some of the basic forging stuff, and it all adds up.
What do the Guild have for sale? Is there a website?
Many Thanks
Dan -
Thanks Colleen, yes, the cuts to arts funding are not good. Even before then it was easier (seemingly?) to get funding through the Arts Council than the Crafts Council, something about the Crafts Council not agreeing to pay for second hand machinery.
Beth- I am in a forge formerly occupied by Mark Farmer (RIP), outside of Winchcombe. -
Does anyone know of any grants that I should be looking out for. I have recently moved from London to a beautiful old forge on Gloucestershire, which is nice, but I am short of funds for filling it with the necessary equipment.
I have been poking around on the internet for funding, but would be very grateful if anyone were to be able to share knowledge or experience of acquiring funding for setting up a small business.
Thanks,
Dan -
-
http://cgi.ebay.co.uk/Old-vintage-anvil-/250699076086?pt=LH_DefaultDomain_3&hash=item3a5ed451f6
Has anyone any idea what this was for?
It's a German anvil that has fallen to bits and been repaired by welding a plate onto the side. You can see in the picture an enormous crack coming down from under the plate, which someone has tried to weld up. Why does the plate have two hole in it? Probably because that was the bit of plate they had on hand.
Anyhow that is one knackered anvil! -
Repousse is not only a legit form of metal work but has all kinds of room for learning and uses. A really good way to learn the technique is by using Altoid or cookie tins. Attached is a cookie tin I gave it a try with. It's a rough piece but the tin holds my repousse tools and it puts a grin on my mug.
Frosty the Lucky.
Frosty, that is awesome!
Not in reference to your piece, Frosty, but using repousee you can nail your family Xmas gift list in an afternoon; bracelets, belt buckles, gew-gaws etc. using bits of scrap and what have you. It is September already! Repousee; for profit and for fun! -
Thank you, Dodge. I did it all cold. With material of that size there would be no point to do it hot. Doing it hot requires a little more tooling, stakes and so on, but not a lot. I think I may have started out "normalizing" but by the end I had ceased to bother. Mild steel is very forgiving and can be pushed pretty hard.
Dan -
Thank you Steve, I'm glad you found it interesting. Repousee seem often to be overlooked, perhaps because people think it too "dry" a technique, or a bit girly, or too difficult, but it really has a lot of applications, even practical ones.
-
I have some very small, very strange and rather ugly red worms living in my front bosh (quench tank). With the amount of toxic nastiness that's in there I'm surprised they can survive, but they seem pretty happy boogying around down there, so I just let them be.


New Aquisition
in Anvils, Swage Blocks, and Mandrels
Posted
Oh boy, ThomasPowers got SCHOOLED!
Nice anvil, by the way!