

Nicodimas
-
Posts
26 -
Joined
-
Last visited
Content Type
Profiles
Forums
Articles
Gallery
Downloads
Events
Posts posted by Nicodimas
-
-
I would offer a round about way of going about finding the proper steel. Go to the user...
The user has some helpful view's on which ones you may want to start with and branch out from there. Once you know what the user likes for whatever reason then you will be able to invest your time into a particular steel. I collected knives for 15+ years, before starting into this hobby and would without a doubt say the end-user is the probably the place you want to go.( I came into this to make knives and rapidly found how much fun/aggravating general forging is... ) The end user has some interesting notions for sure, but rather get them now, before you open a table someday.
-
That Haybudden went for $9 pound just recently...any reasoning?
-
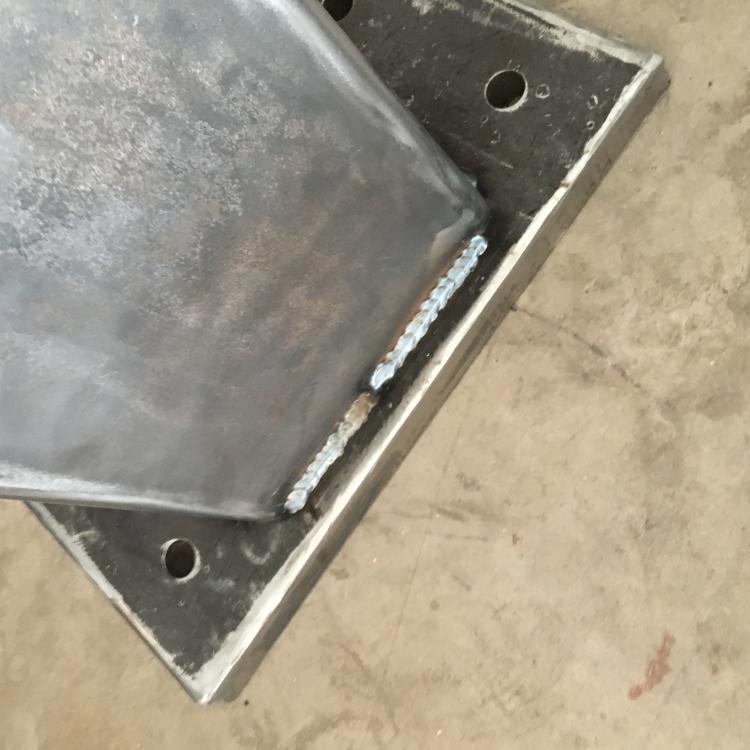
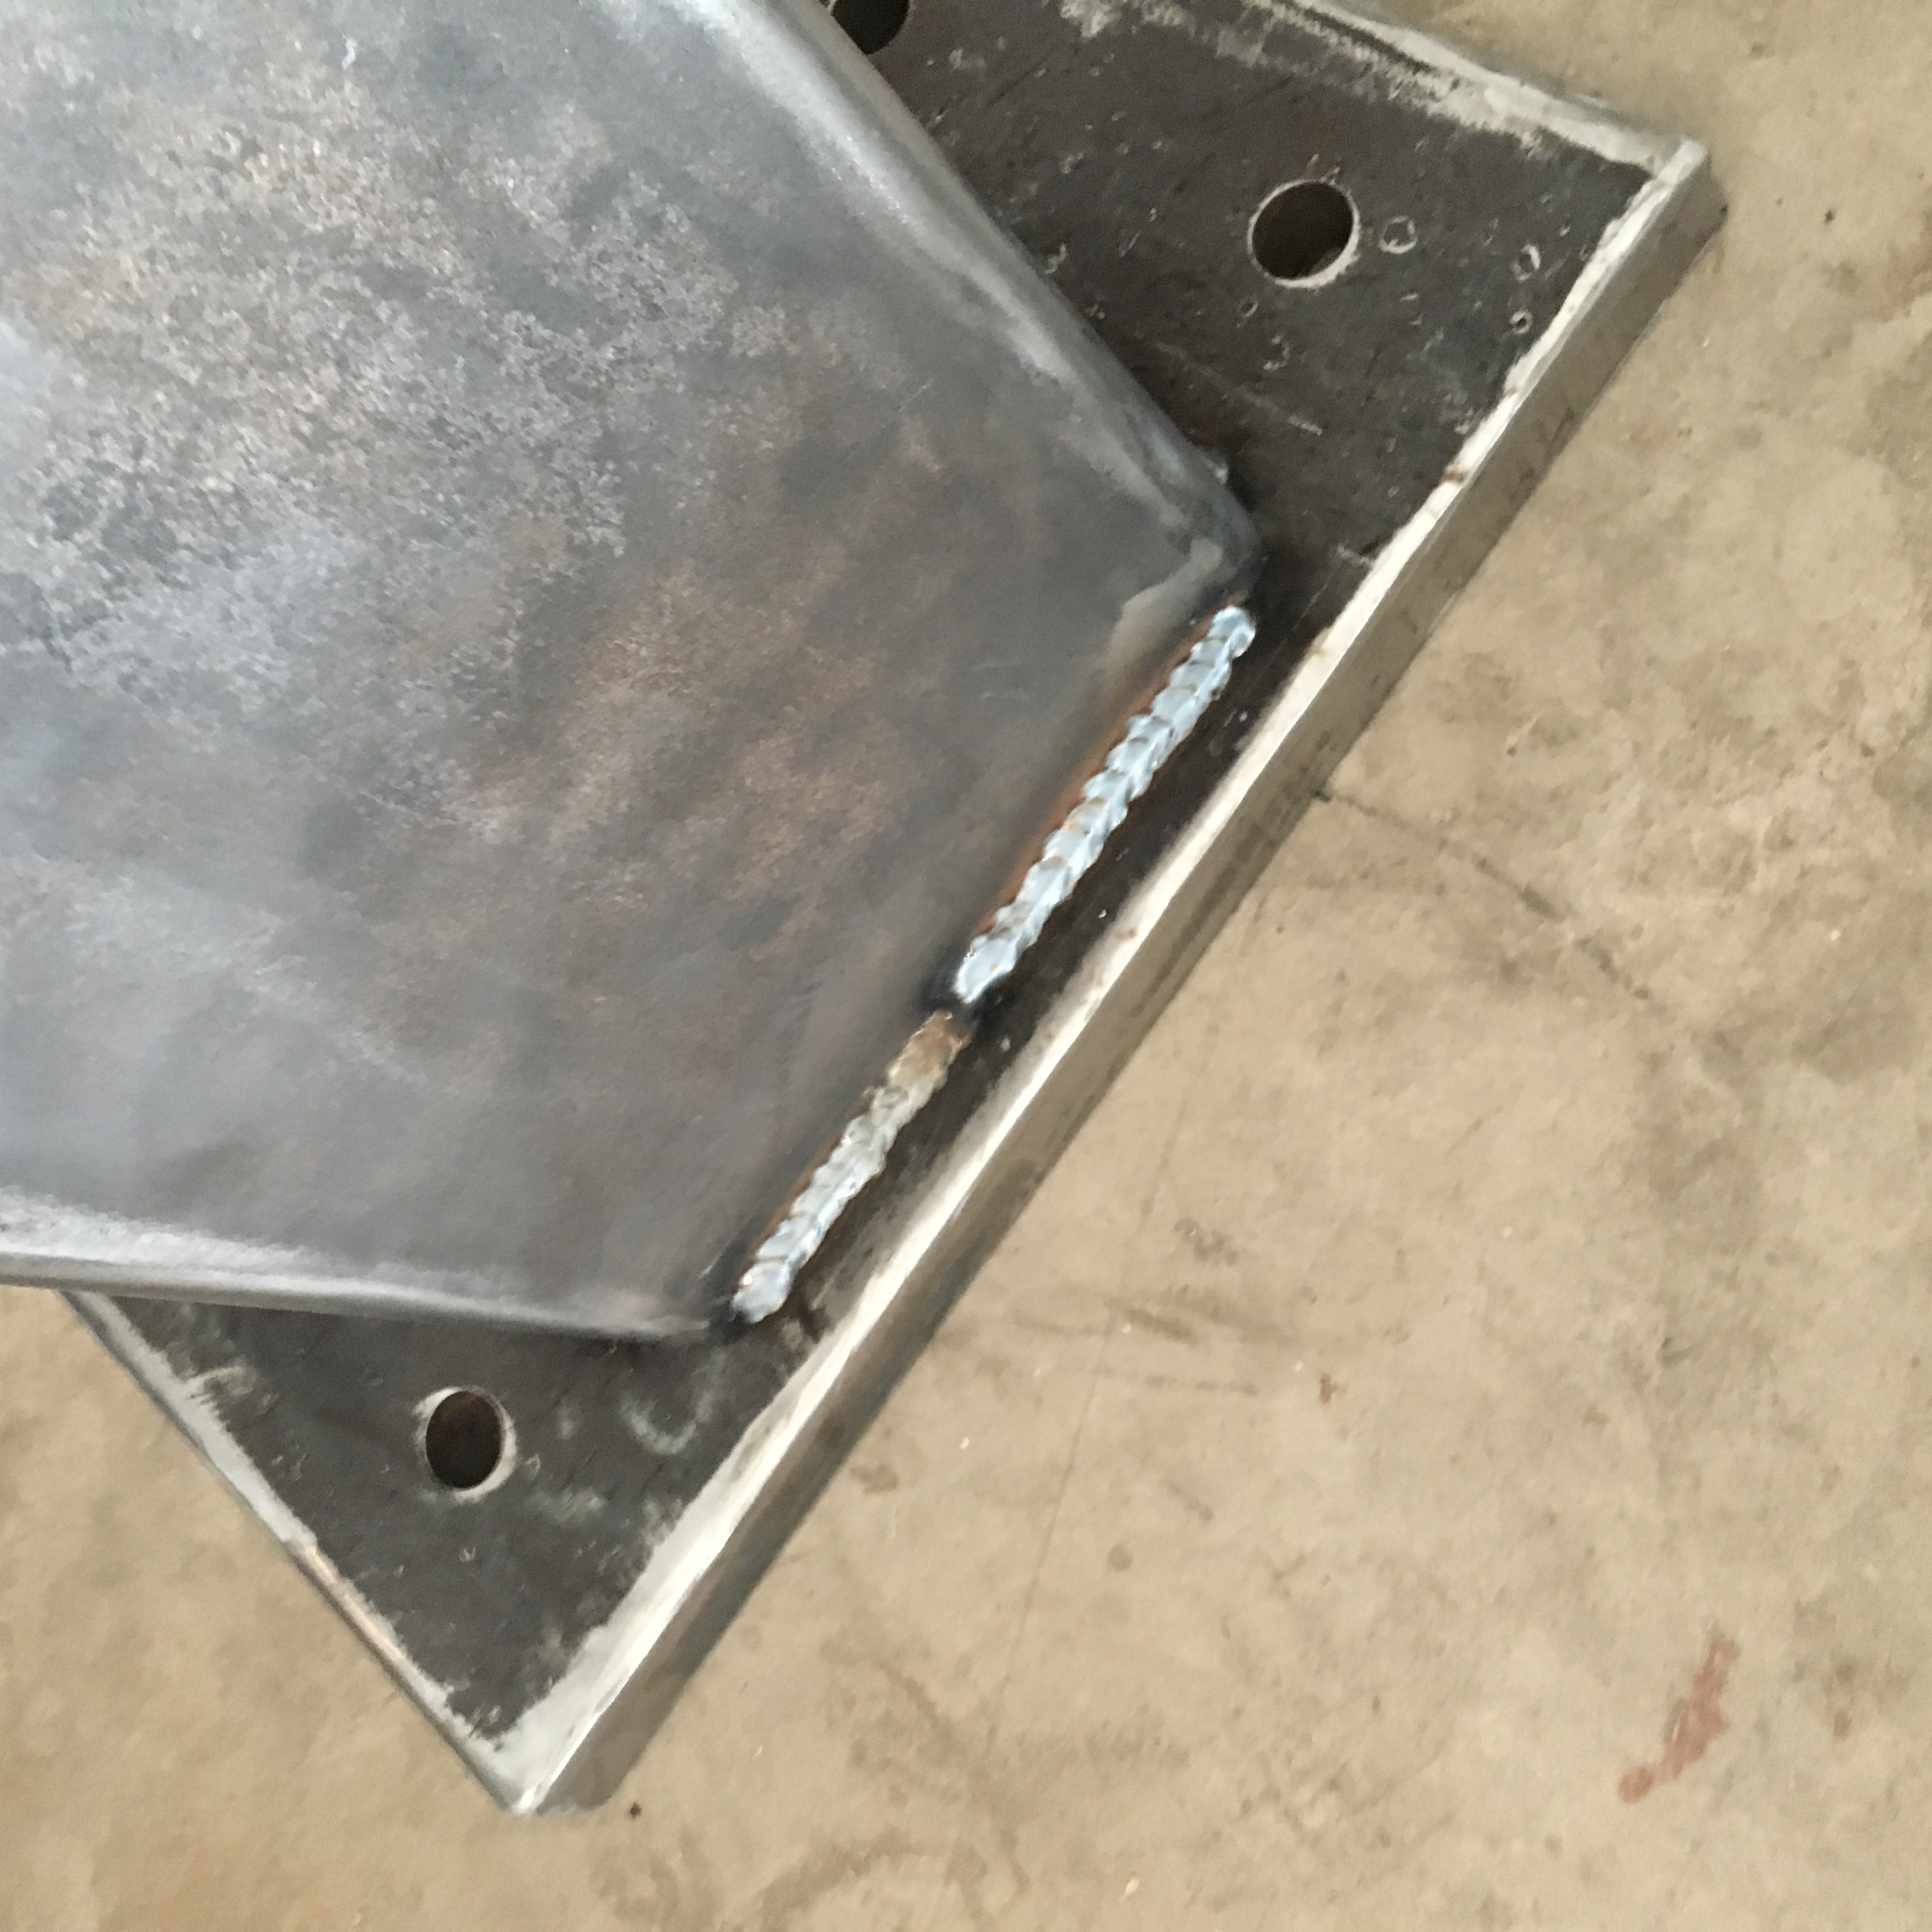
I don't know if you can tell from that picture, but I have two more holes in middle outside for support items if needed. I may come up with something, so far not moving...Those plate's sit parallel with the peter wright flat sections there.
When I get my larger anvil I plan on welding tall angle iron <4 Corners> and dropping in plywood as needed for height..
-
I finished this stand this weekend. Here is the final result. I can lower if needed and make it taller with plywood.. I welded a 1 inch plate on it.
I have angle iron for when I place a larger anvil on it someday, doesn't seem to be needed.
Forging on a stable stand has made this so much more effective!! It's a Peter wright at 101 pounds. The stand clocks in with sand at 185... Lol
Dont mind the mess. New post vise stand is next....

-
Hi All,
I wanted to brainstorm making a chess board, only difference is this would be for a different game...
So I don't need a full 8 x 8 to start.... However I want to probably make a board that goes either 5 x 5, or 6 x 6 as the first board too see what I can come up with..
The forged in look would be the goal. Does anyone have any suggestions about creating a metal board. Been Brainstorming and looking for a push in the right direction...?
-
^ only problem is I only had 8 x 8 square tubing. They have a bunch of remnants so worked with the two pieces that looked the best (..I should have put something in the pic's for perspective).
Easy Path
So a plate is going the best bet and just weld to the top, and cut up 4 piece of angle to create corners, and then two holes with something* holding down anvil.
or
Hard Path
Cut up four pieces of angle and weld to the top and create a support. Plate would then have to be drilled into 4 times to secure it. Honestly, don't know how to do that part. This creates a problem in welding those 4 piece perfectly flat..I could see that being problematic. Then the four holes would have to be sunken in the plate.
Weld 4 corners with angle iron onto plate and two holes with something to hold it down.
-
Ok did part one with scrap and got at least two pieces together.. not much progress I guesss...(again first welding class taken..it's for final project)
I have created a bell so far.....wow..lol. So definitely got to fix that. Place sand inside..right?
Next I have to decide if I want to Weld a top plate on, or create some sort of removable one, would a removal one be a good idea even?
.thumb.jpeg.8377a3afe1bb73b579b1139676e141f7.jpeg)
-
^ my property has termites, so avoiding stumps. All Excess wood has all been removed from my property, used to have those old railroad ties out here. The house is being treated, but yeah... It's really bad we all got together with neighbors to treat.
my current stands are wood so trying to swap them out.
I didnt really consider moisture being in Phoenix...
(oh yea this is the final project for my welding class, so the steel is included in the cost of the class. So trying to maximize benefit, but odd random stuff to work with)
Alternatively I could make a post vise stand.
-
Ok.. was going to make an anvil stand and wanted to double check my logic, before I made this...
Steel Square 8 x 8 x .25 thickness.
2 x ---> 5/8 Inch Thick plates. Top/Bottom. Should these plates be thicker?
(will be bolted into the ground)
The anvil weight will be right around 250 pounds.
I was going to place support gussets under the plate on the anvil side.
The support column should I fill this with sand..or keep it hollow..thought I read this somewhere.
-
Really over 80? its over 80 here already haha
-
Think Roxul would work for insulation + drywall.
https://www.youtube.com/user/ROXULINC
I would worry more about a fire moving up into an attic anyhow.
My brother is a career firefighter..I could ask his buddies if they have good ideas too. I have extinguishers and fire hose/hydrant outside.
-
Yeah booked a hotel and registered...looking forward to going
-
Ok I am still leaving it a garage, this is a temporary thing until I can get a shop. I just want to insulate, run an AC (for coolness) and for noise mitigation . This is is more of a stop-gap as I am novice until I can put a workshop down..someday. So I can still open the garage door if needed.
I guess for me I want to make this comfortable as possible as I did a warehouse job for a couple of years and their was no A/C to speak of in that place. It was a overnight thing, but did I ever hate that job. The place I am training at over the next year uses swamp-coolers, so I will see how that goes. Maybe I can find one via CL.
if the technology exists to keep it cooler..I'm taking that path for sure...
-
Attached Garage- Phoenix Arizona Questions.
I would like to fix up my attached garage to make this workable. It seems most cost effective from what I can spend.Ok so this is the situation as I have a attached garage and would like to convert this to a shop. Its' 19.5 x 21.5 with a 8x10 area in the back. I am just a hobbiest getting started, so someday a real shop...That is a goal.
Here is the situation, I live in Phoenix so the summer is coming and would like to make this fairly acceptable when its get's over 100+ for those 100+ days.
So I have to insulate and Air Seal this area and I plan on using Roxul for insulation... I will being doing a complete tear our of current drywall and reinstalling. This house has brick on the outside as a note and has one and half walls that face the exterior. This will allow me to run more electrity too and allow me to install a mini split for A/C purposes. So I would need to install C02 detectors too from what I have been reading. Then the subject of ventillation comes up quite often. Ok don't want to poison myself...or others.
1) I could open a door in the corner that allow's for me to place the forge outside. This is what I have been doing as a note*
2) Ideally I would like to leave this door closed...I would have to ventilate a 500 sf space with 10 feet ceilings roughly?... I obviously don't want toxic fumes to vent into the house.
a) Can I do the above with a single burner propane?
") could I upgrade to a coke forge with a chimney that vents outside eventually.
could I upgrade to a coke forge with a chimney that vents outside eventually.
3) Specific blacksmithing challenges that I am being ignornant on..
4) Anyone in Arizona have any suggestions to make this a workable space for our summers..
-
I guess one of the advantage of being a Native Arizonian ( Phoenix) ..Im not camping there for sure...but this sounds like a great opportunity so really want to check it out..
-
Thank you this is good information and exactly what I was looking for..!! This should work perfect
-
I want to head to this conference as it's relativity close and just wanted some details from people that went in the past... In terms of Demos are they from Thursday to Saturday?
-
I have this same question, but Im on the other side of the country..anyone know of any good schools in the Southwest (Arizona)
-
Also in Arizona and look forward to exploring this hobby way way more. Really new to it myself taking mainly Mesa art center bladesmithing and blacksmithing. Taking the MCC course next and maybe welding... I think as a newbie the toughest thing for me is a set of projects that ramps up the difficultly..well that's how I personally learn. make these 10 things...now make these 10 more...etc
http://azblacksmiths.org/dir-desertrat.htm
http://azblacksmiths.org/cal-desertrat-20160116.htm
This exists on 2nd Sundays too so found out about these
-
Got this working, went to a open forge and found out..there was shipping material stuck in the line.
Forgot to post a response..or It didn't actually go through..
Works really well and Yea I definitely have to start it and turn it up as it gets hotter. I definitely will be investing in a larger cylinder in the future.
-
Thank's Y'all. I am in classes too out here for the foreseeable future..(until next June). So i will probably ask the teacher this week and bring it by..
This will be my second class...(they are running a Natural Gas//or a Coke setup)
Just so close to figuring it out and want to get hammering!! on my own to practice this stuff that I am learning....
-
I have been reading around and found this information and this sounds what is occurring then, I have the choke fully open to.
http://www.atlasknife.com/graham-100k-burner
^ This one.
If the flamefront speed exceeds the mixture speed, at first the flame travels back down the burner tube until it runs out of mixture to burn. With nothing to burn, it goes out. The gas keeps flowing and it draws air in, so fresh mixture reaches the chamber after a short delay, ignites in the hot chamber and the flamefront again travels back down the burner tube. This cycle repeats, with each occurence heating up the burner tube slightly and increasing the flamefront speed of subsequent events, until the flamefront establishes at the point of mixing in the Venturi throat. The noise made during this is distinctive and you can usually just turn up the gas pressure and stop it if you catch it in time. If you leave it until there is an established flame in the throat, the burner tube gets properly hot and it's often not possible to just turn up the pressure and get the flame back where it should be.
-
Ok it's a brand new forge..So if I start it and getting it running, it eventually "sputters" from a rolling flame and then goes to this-->
-
Thank you, more of an inexperience thing, asking the maker too... will try a video too.
Happy Halloween all!

.jpeg.fd7aa62391e341fd77f42e36f26b2b0a.jpeg)
Out of shape advice
in Blacksmithing, General Discussion
Posted
Run!
Stop drinking alcohol and soda...cut SUGARS!! sugar is poison.
Find a HIIT gym and have fun...
Run in your 30s, so you will in your 40's, so you can in your 50's...think about it...its true.. you can do it..and just make the lifestyle changes. You will be happier for it.