

woodsmith
-
Posts
176 -
Joined
-
Last visited
Content Type
Profiles
Forums
Articles
Gallery
Downloads
Events
Posts posted by woodsmith
-
-
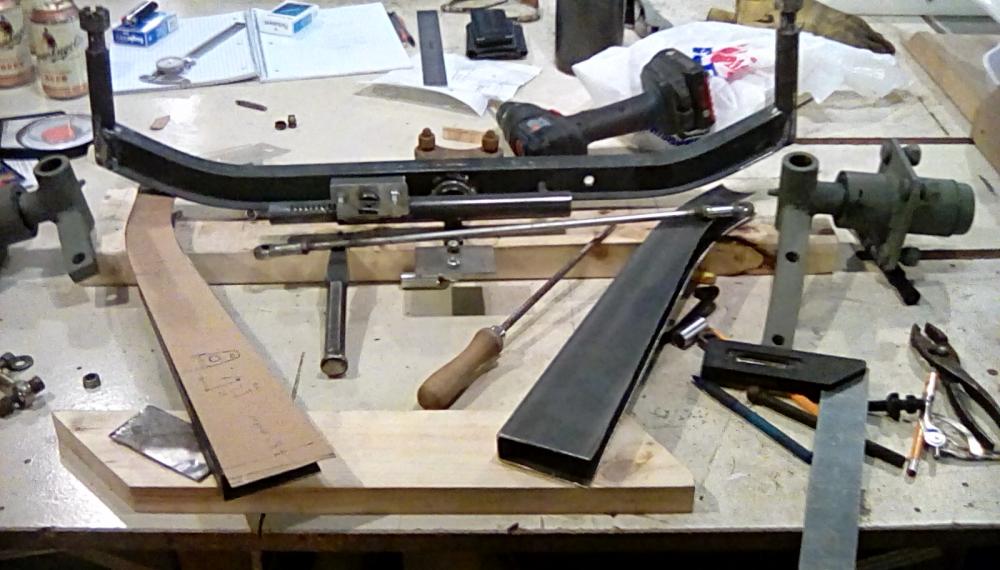
..started building a 1/2 scale speedster (similar to a 32 model A frame with speedster body) have the engine, rear axle (baby Dana) , most of the drive train and suspension (air bags) made the front axle by welding together 2 C channels (cant get 1.5" I beam) heated it up in the forge and bent in the offset, welded on kingpins, got it dead on 1/2 degree positive camber, patterned and sawed out the frame horns, cut down rear axle for width, currently fabricating the rack and pinion assembly, lots of modern fabrication and welding/machining, tons of big ideas, salvaged parts of Golf carts and riding mowers, drawings and plans, eventually the sheetmetal (panel beating), marginal on the amount of normal smithing here but sure there will be more forge work in this build, gotta credit my base of knowledge being in smithing that I am taking on this project at all (it is the reason I have the other skillsets) and the reason I figured I could do it

-
On 7/16/2017 at 9:23 AM, George Geist said:
Looks like a nice one. Good work
")
Have you tried it out yet?
George
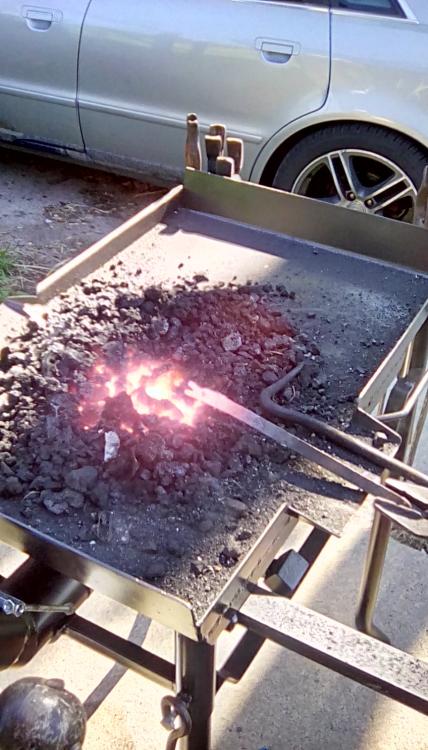
First fire results, its breaths really well less air leak in the tweyre or ash dump than most any forge Ive used, the clinker breaker is less restrictive, very little effort on the crank makes more than enough draft. Getting the stock hot at a good rate. The header paint already seems superior to stove or grill paint Ive used in the past. The first thing you might do different: blower is close enough to the firepot for high flames in a breeze to get a bit close to your cranking arm, workable, just not ideal, could have put the pot in the middle, just liked having it offset in the hearth, dont want the blower farther out, then it out balances the weight of the pan and gets tippy. This will be resolved with a sheetmetal deflector, wanted to do that anyway as a windbreak, expect to use it almost entirely outdoors so have not planned on adding a full hood or sidedraft at this point. Happy with the rig so far, taking it to a guild meeting tomorrow and a metal moot next weekend were we have a small bloom to consolidate, that will put the clinker breaker to a real test
-
16 hours ago, Daswulf said:
Some are super thin and hard to work with. Yes, lots of plastic and much is brittle and replace only.
We do have to deal with the bandit cars, the Trans Am is something like the current last American muscle car, so plastic, urethane rubber and bad fiber glass, on one build Ive replaced it all in custom shaped steel, big project......we are looking for a new full time guy in the metal shop.......its a big shop
-
The stand I use for demonstration, 109lb HB, bolt-clamped down ( I didnt drill the holes they were there when I bought it) my own variation on the hold down, foot lever you can lift with you toe and hold down with your foot for fairly strong clamping, in the middle of the linkage is a one way slip joint like on a hog catcher (works like a snare) so you can slip the hold down, up far enough to grip 1/4" stock or 2" stock then apply pressure with you foot while you heel is still planted on the ground. Dont want to be punching or chiseling with an unfirm footing, no point in holding the stock real still if your balancing on one foot yourself. Made from white oak and ash, should be heavier for stability, but when it was built 10 years ago I needed to be able to travel "light" fit the forge kit and tenting gear and fuel in a normal car so the stand also served as a box to house tools while in transit. Still use it all the time even in the shop for the hammer rack, hold down, and quietness of the anvil, heavier work goes to my bigger anvil on a stump


-
Great ideas, Once I discovered DOT tube for 2" Ive made good use of it for tooling on the welding bench and telescoping /pivoting stands (for holding car doors and fenders at work) could work great for the interchangeable horn idea wich has real merit, both to be useful (and to get tooling heavy) the 1" stake pockets/hardy holes I use 1-1/2" tube 1/4" wall you can chisel the weld off the inside of short lengths but a 1/2" dyna file (band file or little pnuematic belt sander) works great to get rid of the difficult to remove weld inside of steel tube
-
On 7/25/2017 at 10:00 AM, Daswulf said:
Cool. I like the added lights. Nice piece.
Photos could be better. (I'm even still working on a setup to take better photos.)
The things to make with just the sheet metal alone are infinite, then throw in the rest of the parts and you can have a lot of fun creating fun sculptures.
Man, working with the old sheet metal on cars is so much better then the ultra thin stuff on modern vehicles.
Looking forward to seeing more.
Very true, the oldest automotive Ive worked is 1917 and the newest is 1978, all new panels and patches are made in 18 or 20 ga drawing quality sheet (AKDQ) super forgiving, I hear the new stuff is a real pain plus they are half plastic. Thanks to everyone for the input
-
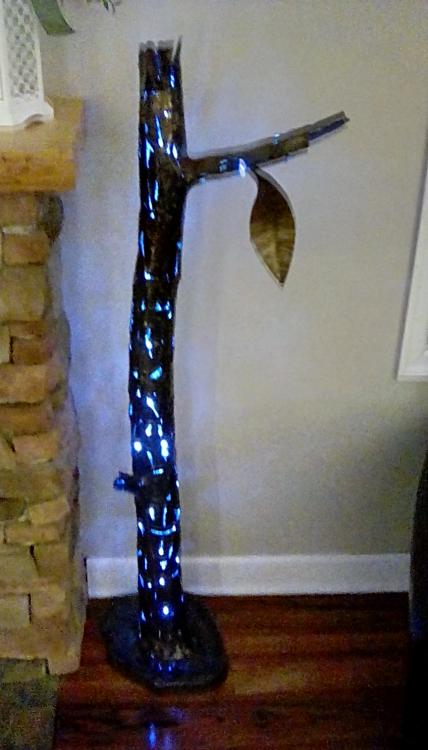
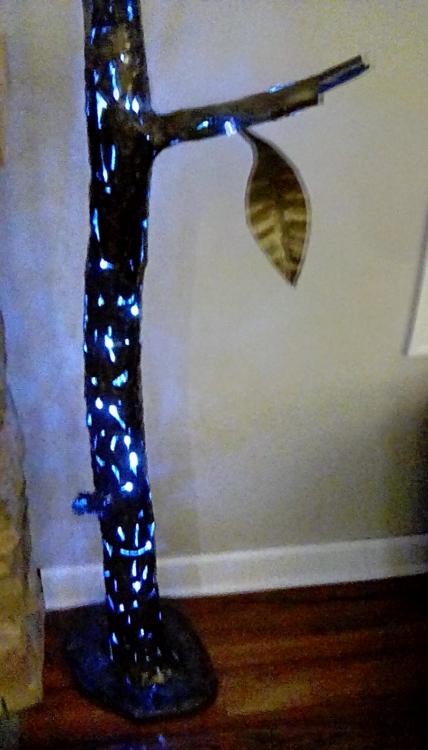
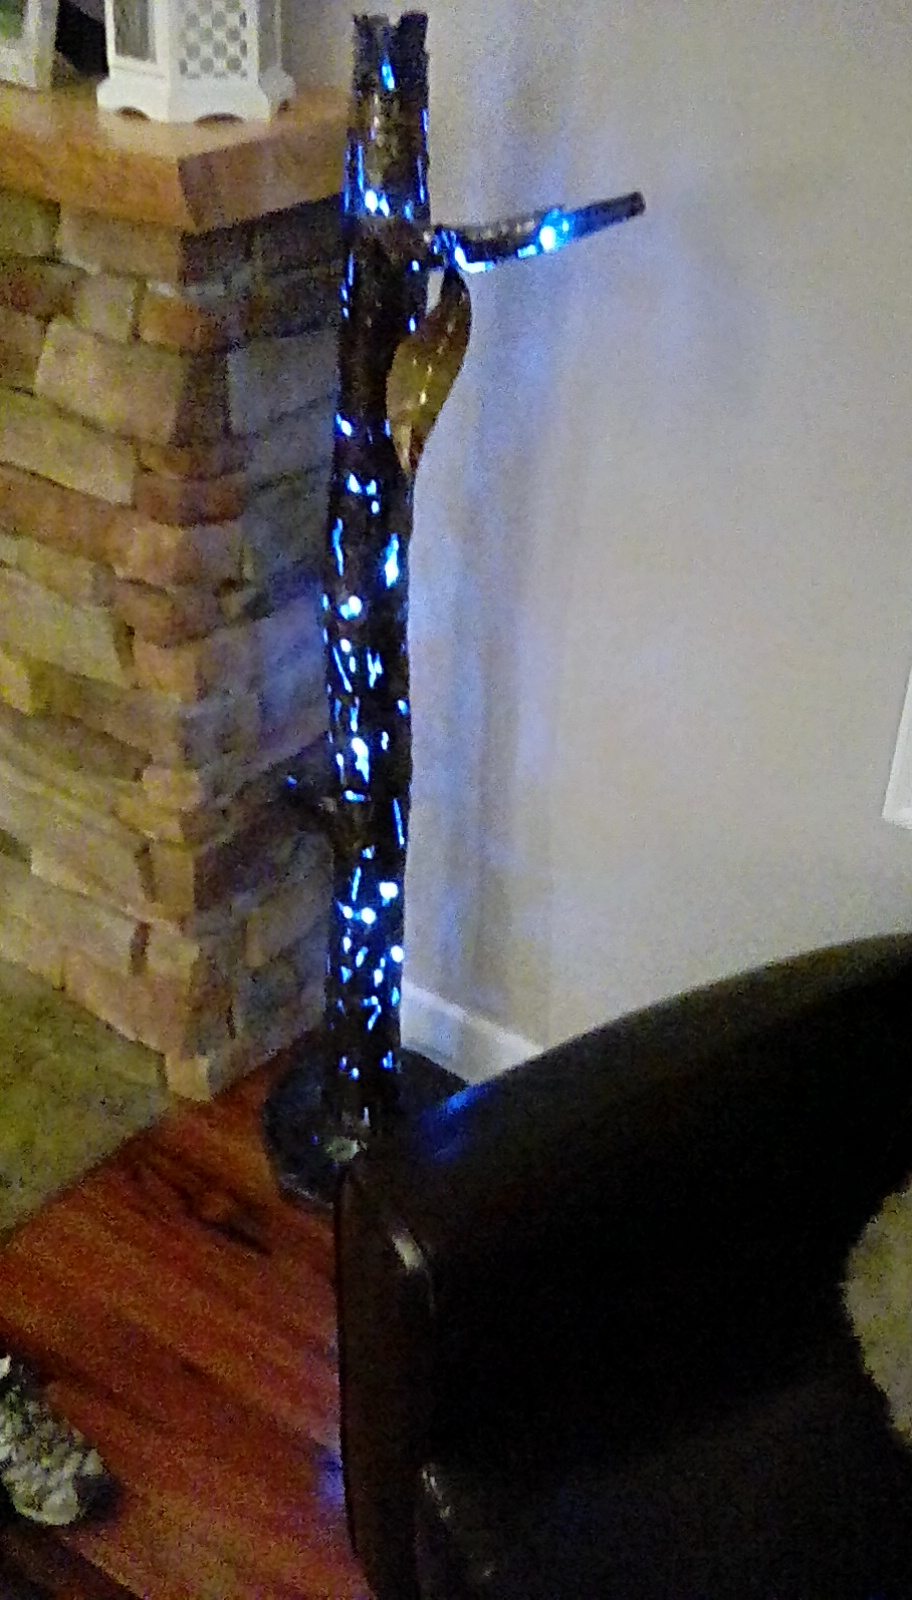
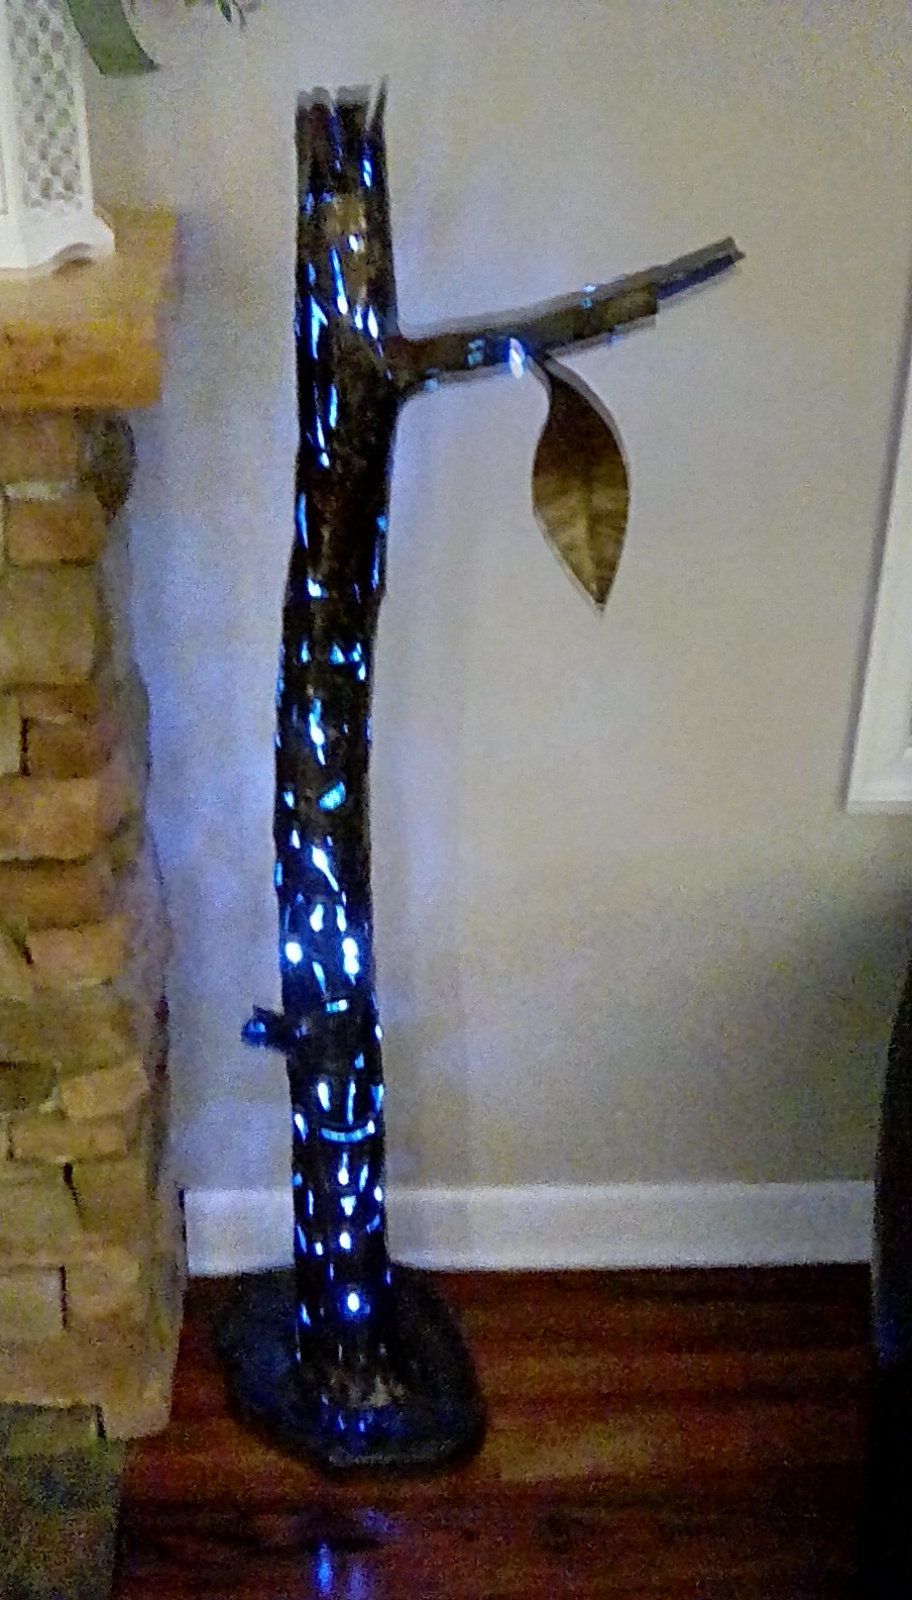
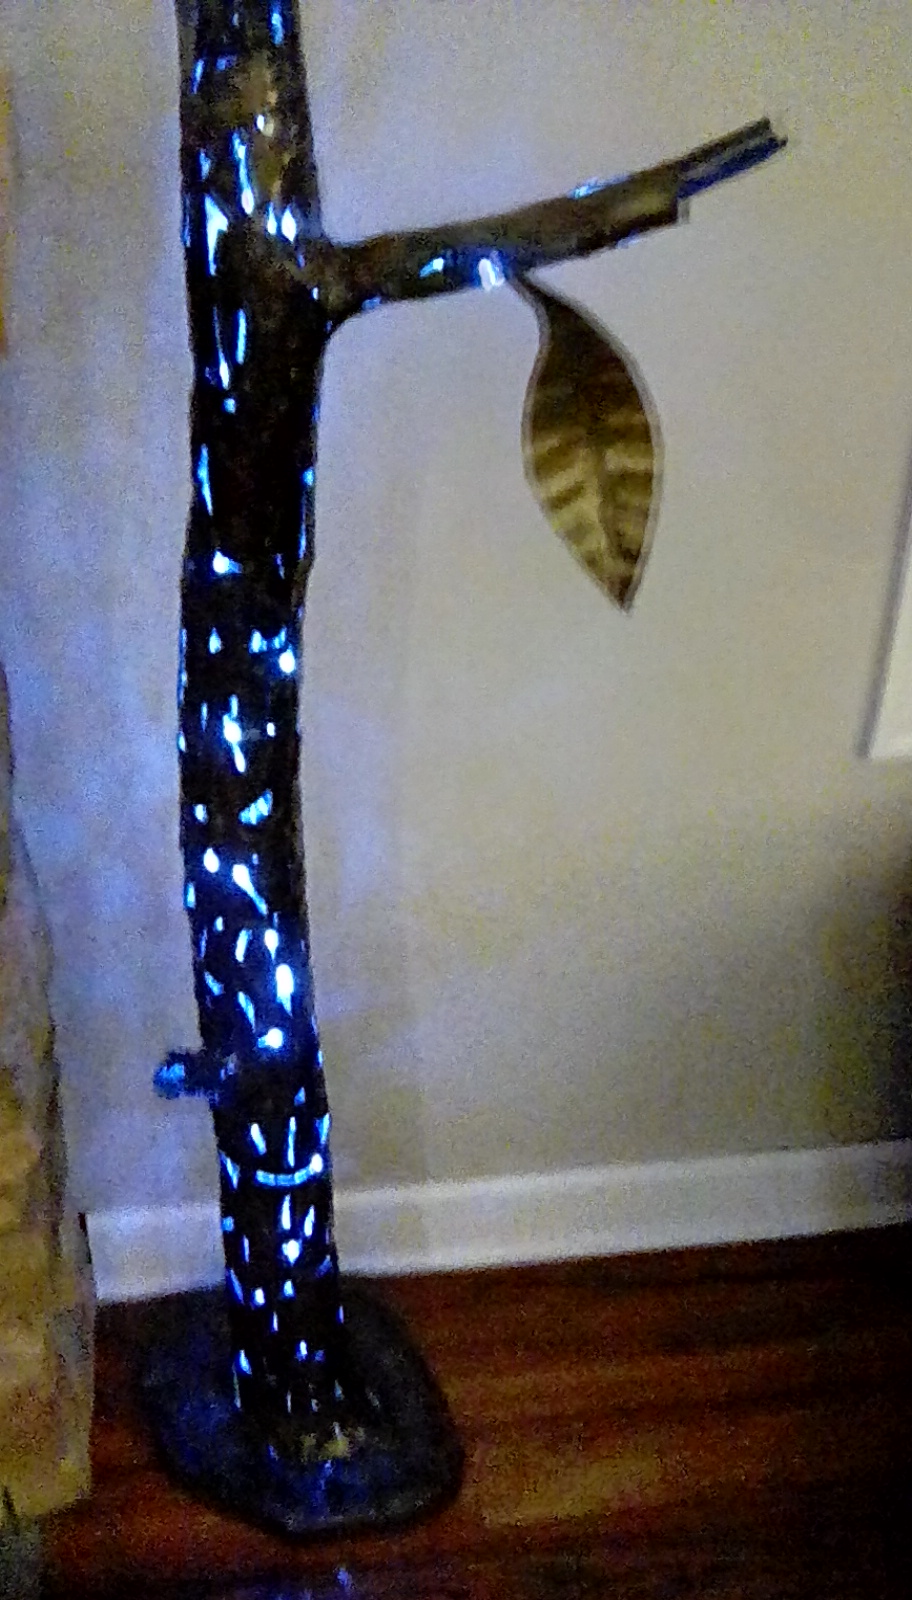
My second tree shaped sheetmetal sculpture, (probably also second sculpture Ive ever done) made as gift. I work in auto restoration so we are constantly pitching replaced body panels, the cars are chemically stripped before we start metal work so the steel is perfectly clean, free of paint or rust, so this was once part of the quarter panel of a Dodge Polara convertable, sheared up into random shapes, hammer textured, roughly shaped and stitched together with a mig, picture fails to show surface detail entirely, texturing and mig welding is patterned together to create vines running up, I have 100' of led fairy lights inside so it has a remote control with multiple brightness settings. (I was thinking of the multitude of tiny lights effect from the trees in the Pandora movie)
In any sheetmetal shaping, making a complex shape from one piece is very time consuming, making bigger pieces always adds work and challenge, this approach of sticking together small pieces like a puzzle helps to get from a small sculpture to a much larger one without things turning into an enormous effort while the overlaps and extra joints add depth and texture, more easily lead to organic shapes (long as I can stop the machinist side of my brain trying to make it perfectly cylendrical) ongoing expirement, turned out pretty good, I should think of something other than a to do tree next time

-
thanks for the input, one of my own ides for this design is fabricate a jaw with geometry like a post vise and have it hinge near the bottom of the pedistal, run the acme right thru the post, I expect a portable combination tool would not take the place of the anvils or bigger vise in my own shop but could be handy for special projects and a good option when demonstrating on the road where haul space gets limited or you just dont want to load unload (repeat) any more schtuff than needed
-
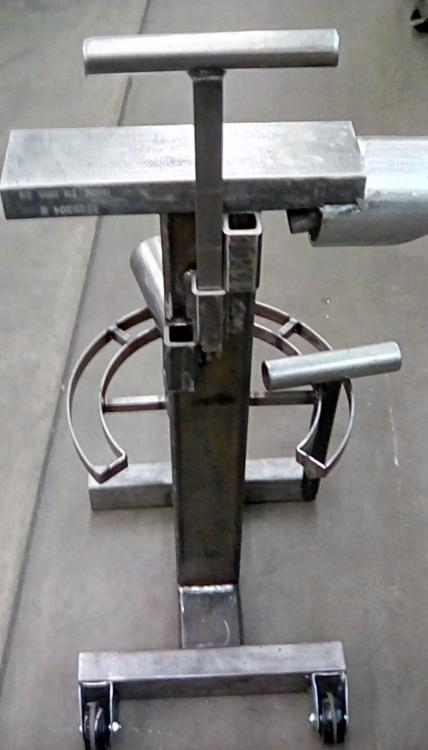
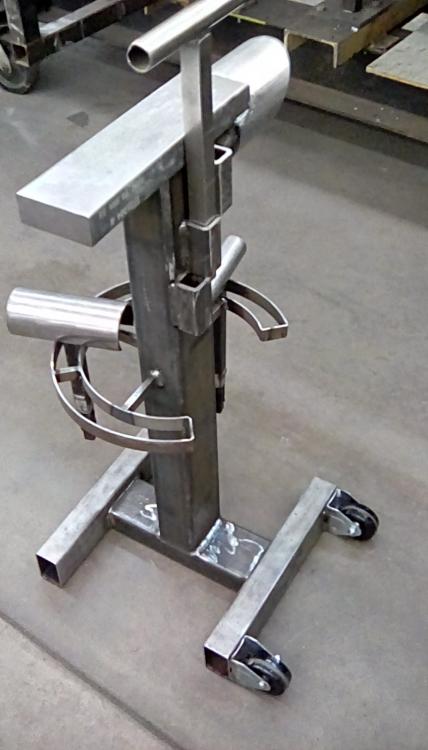
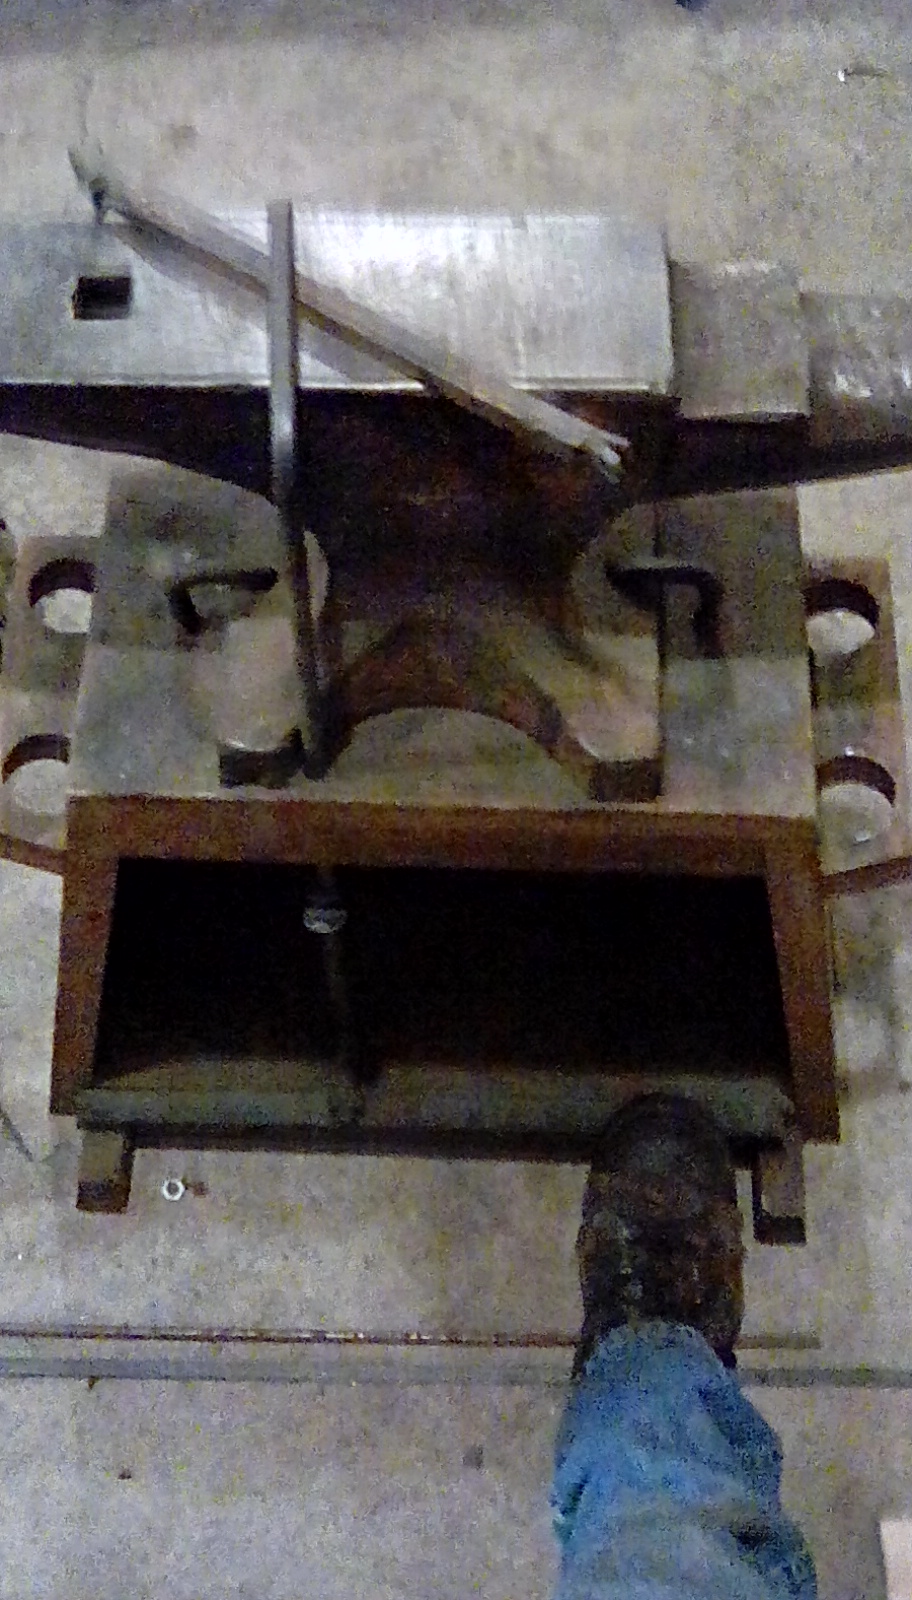
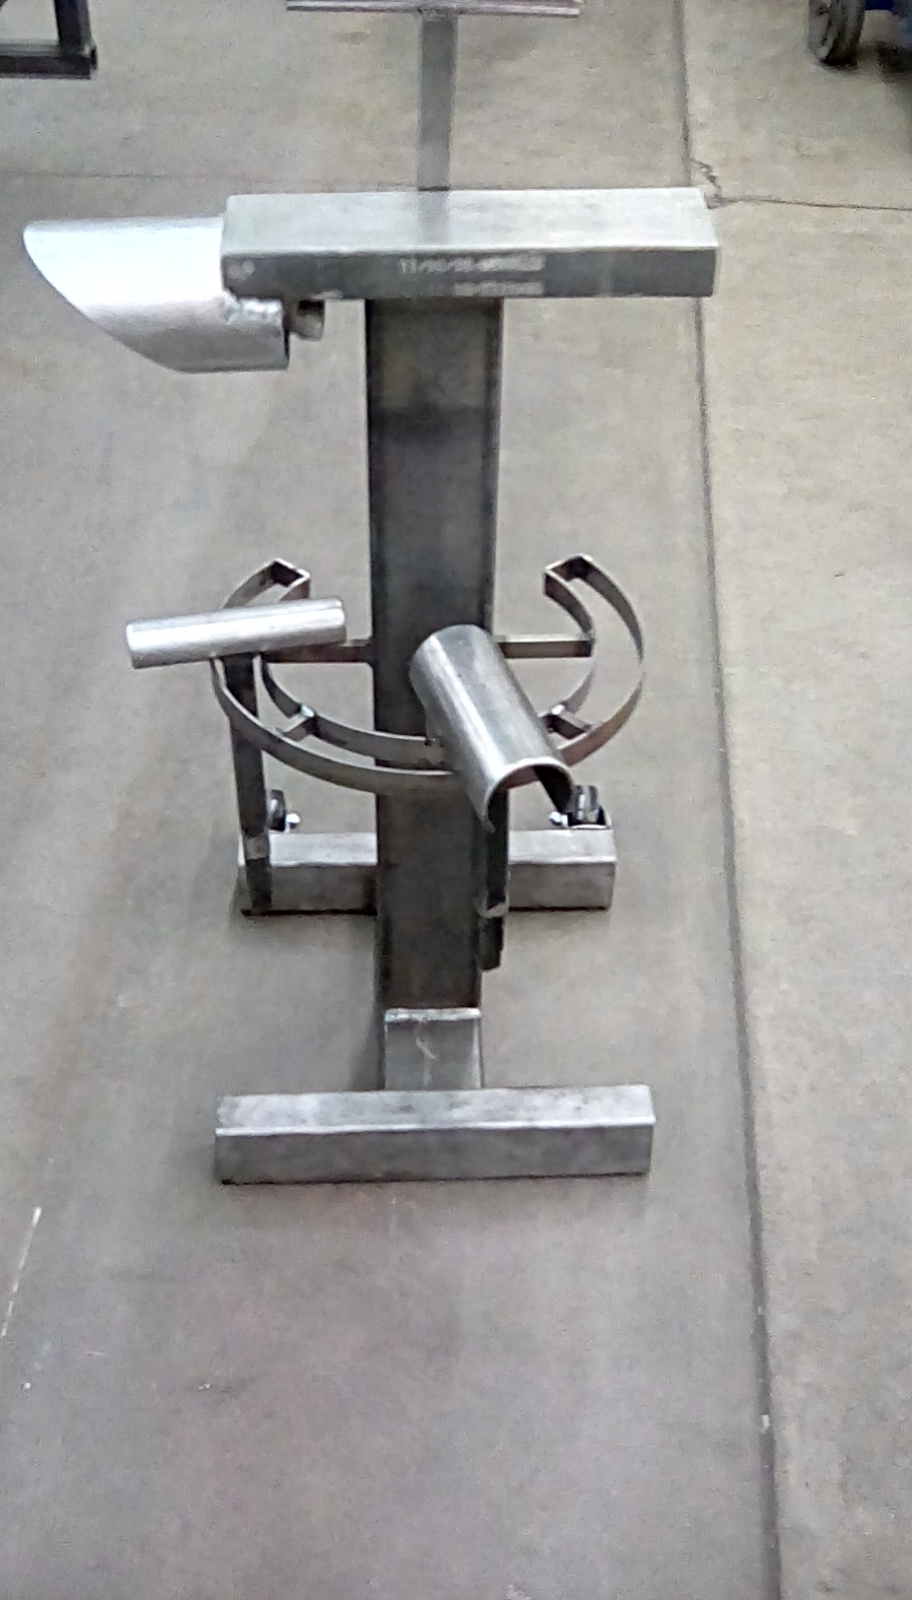
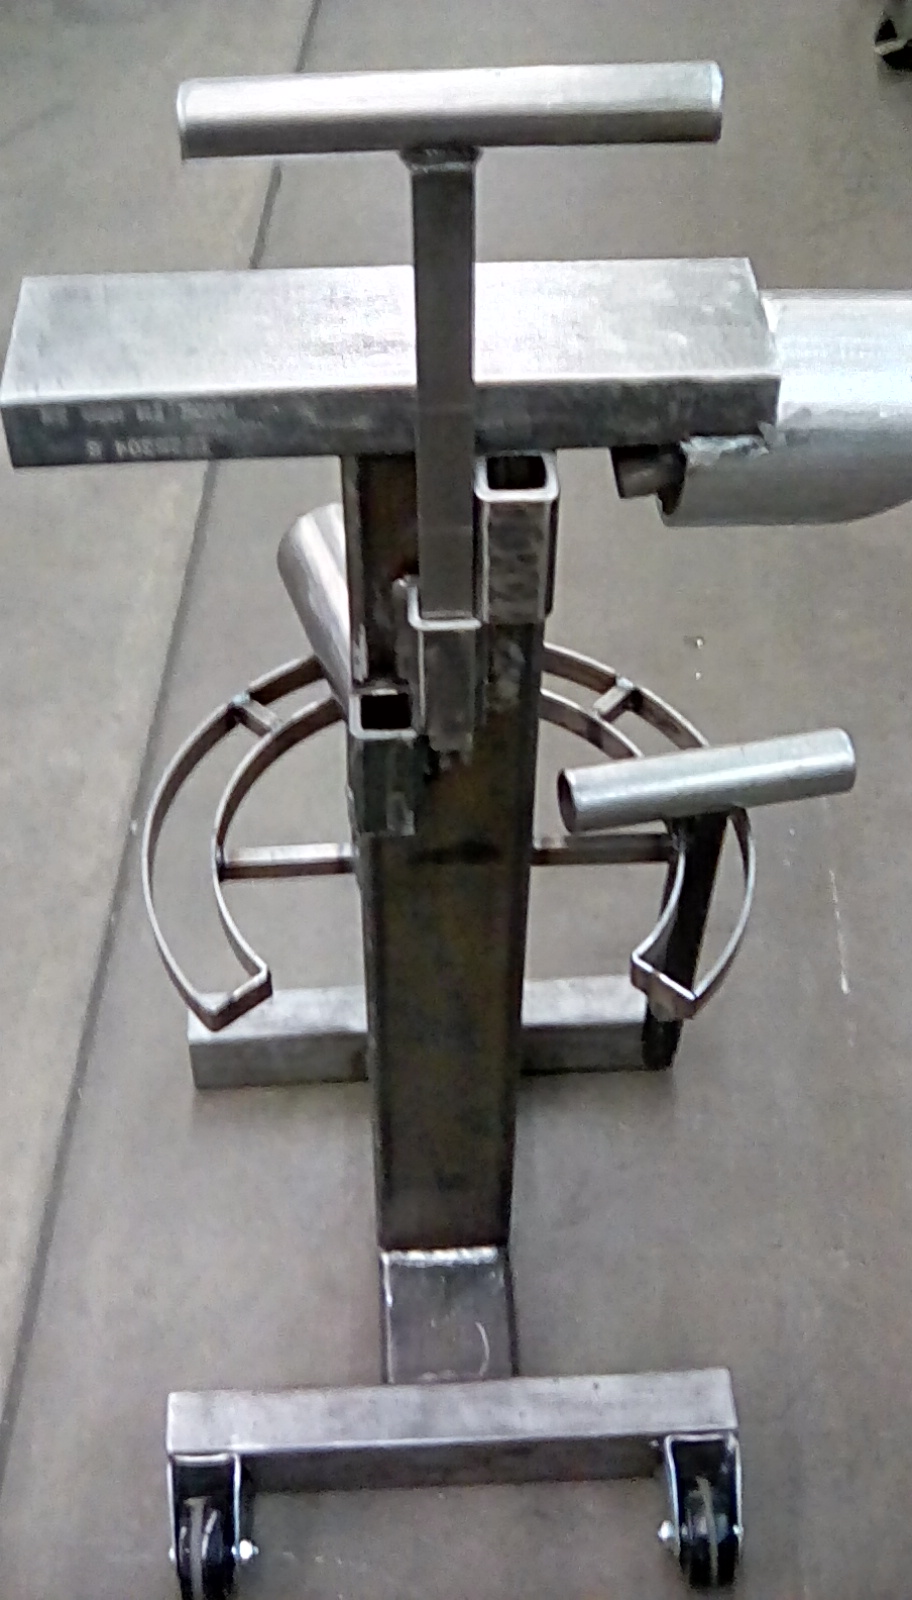
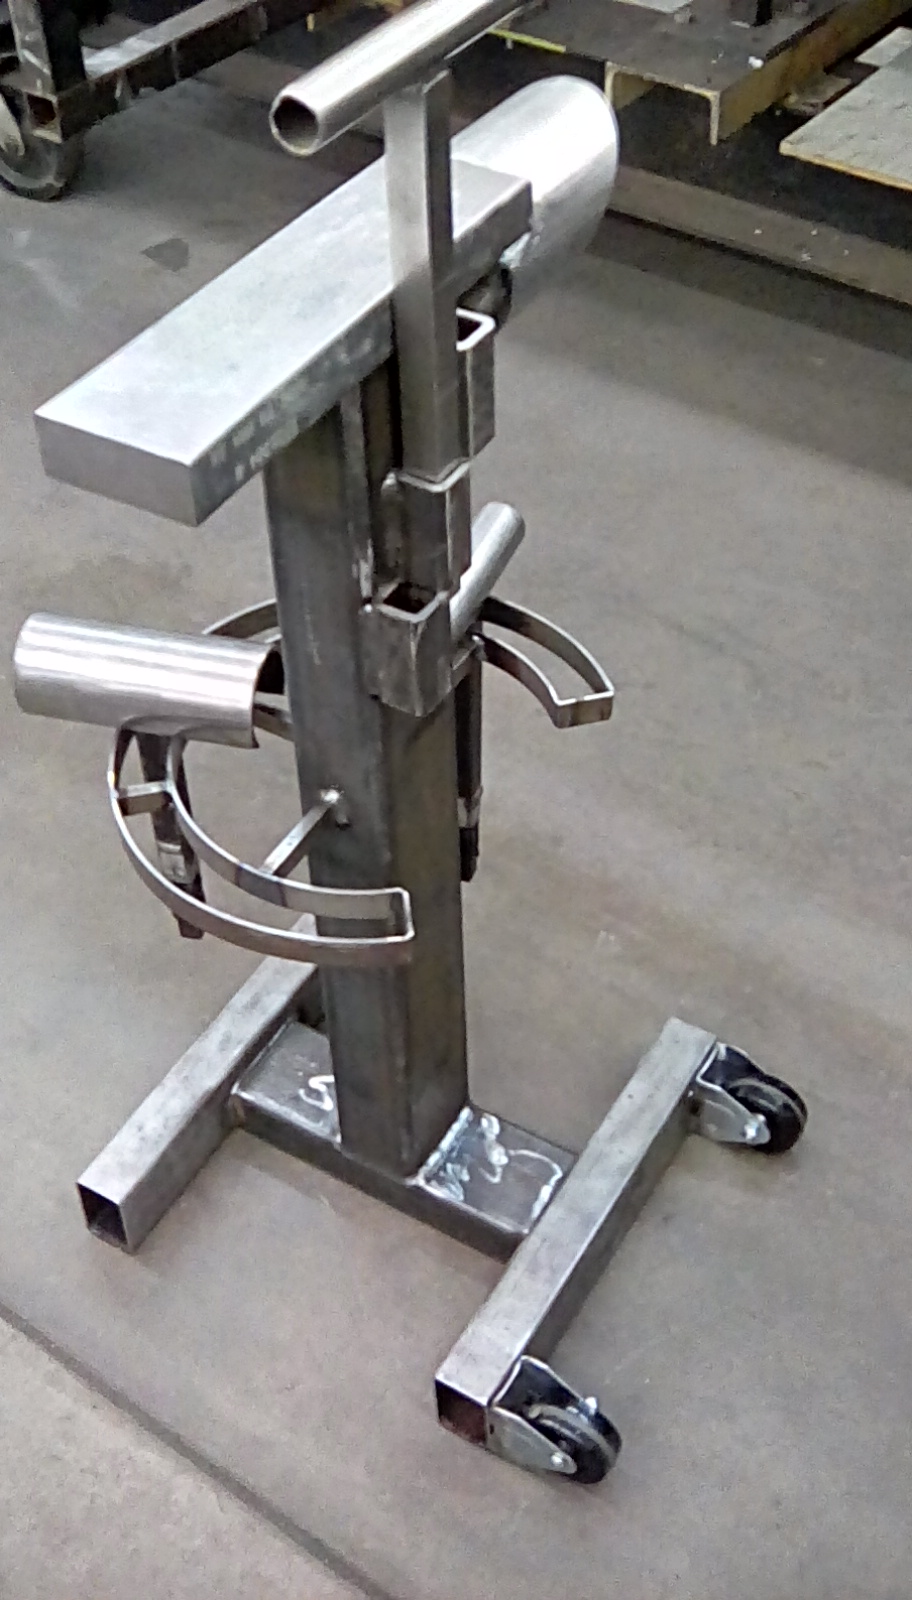
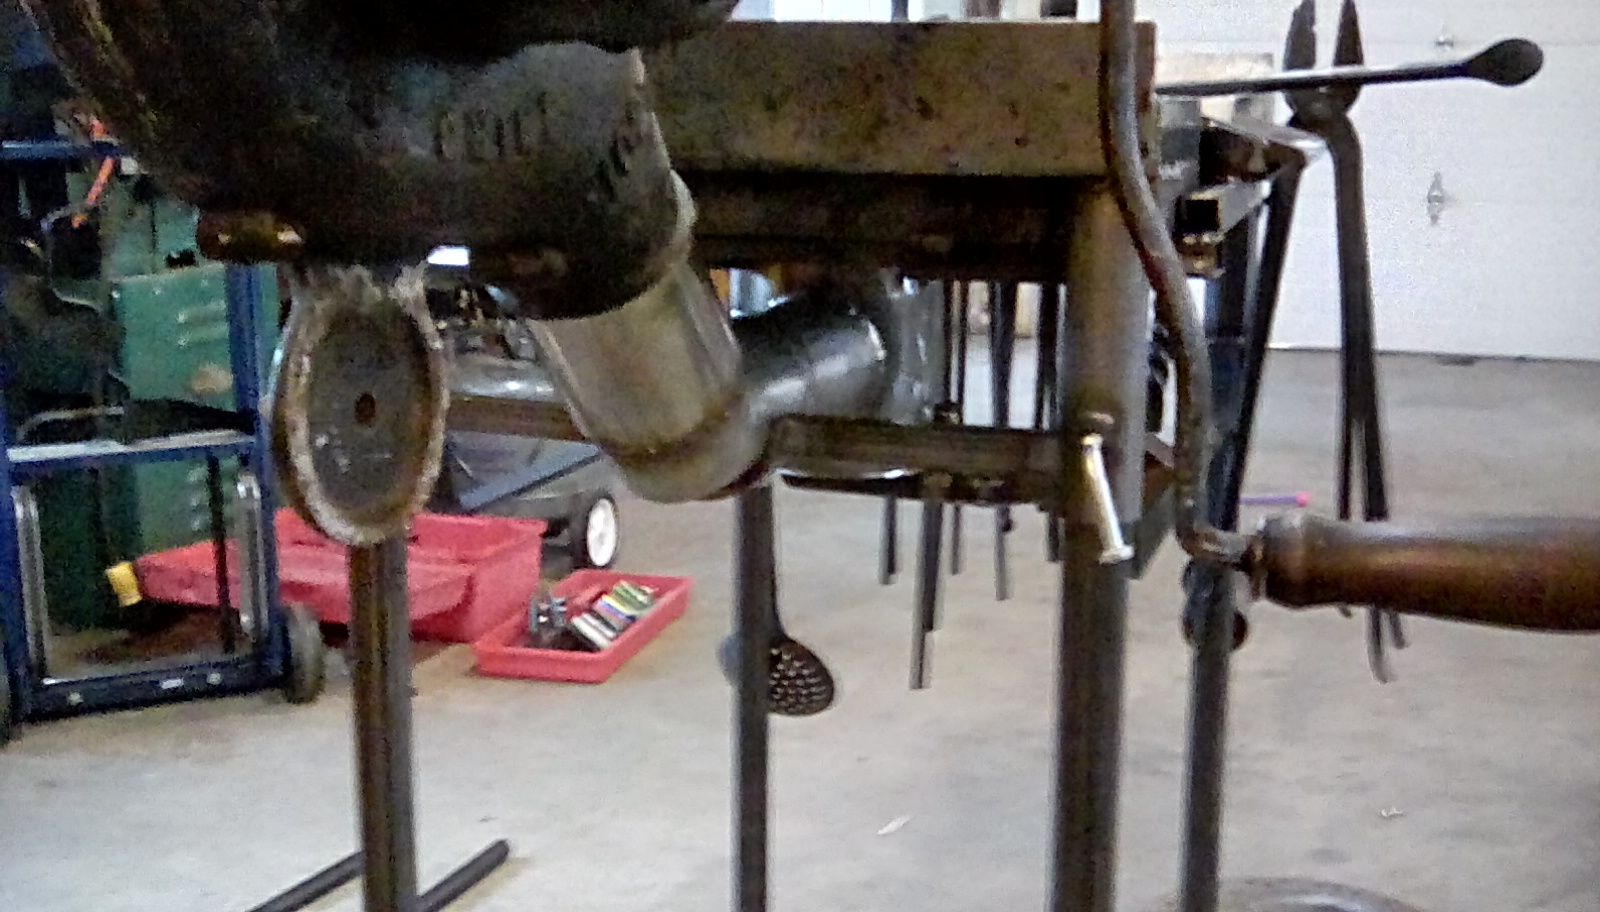
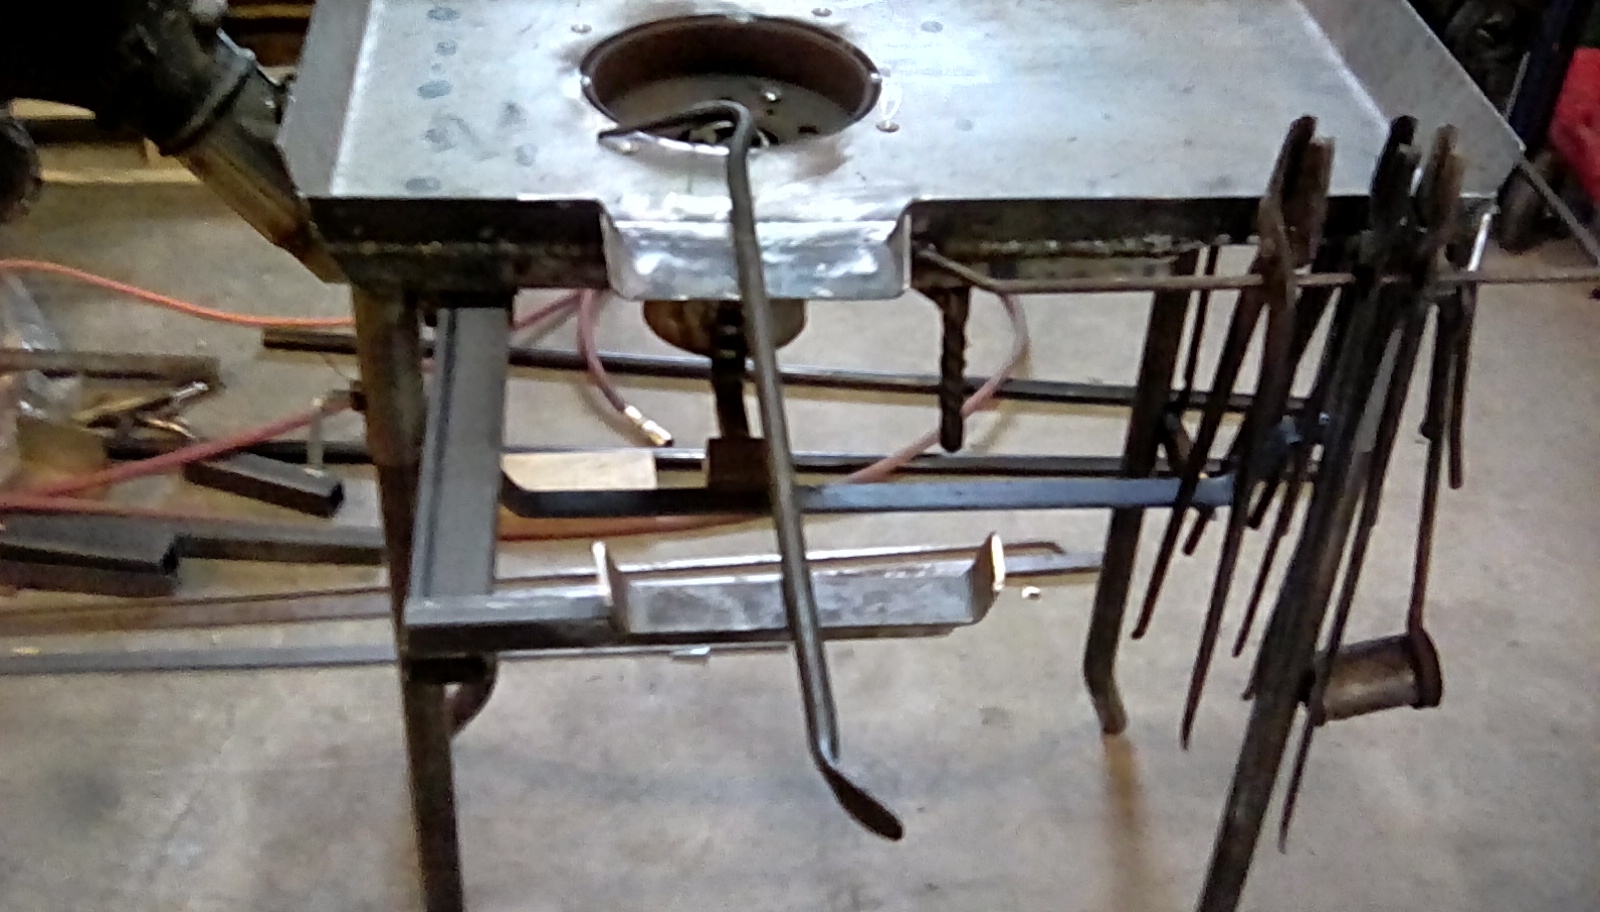
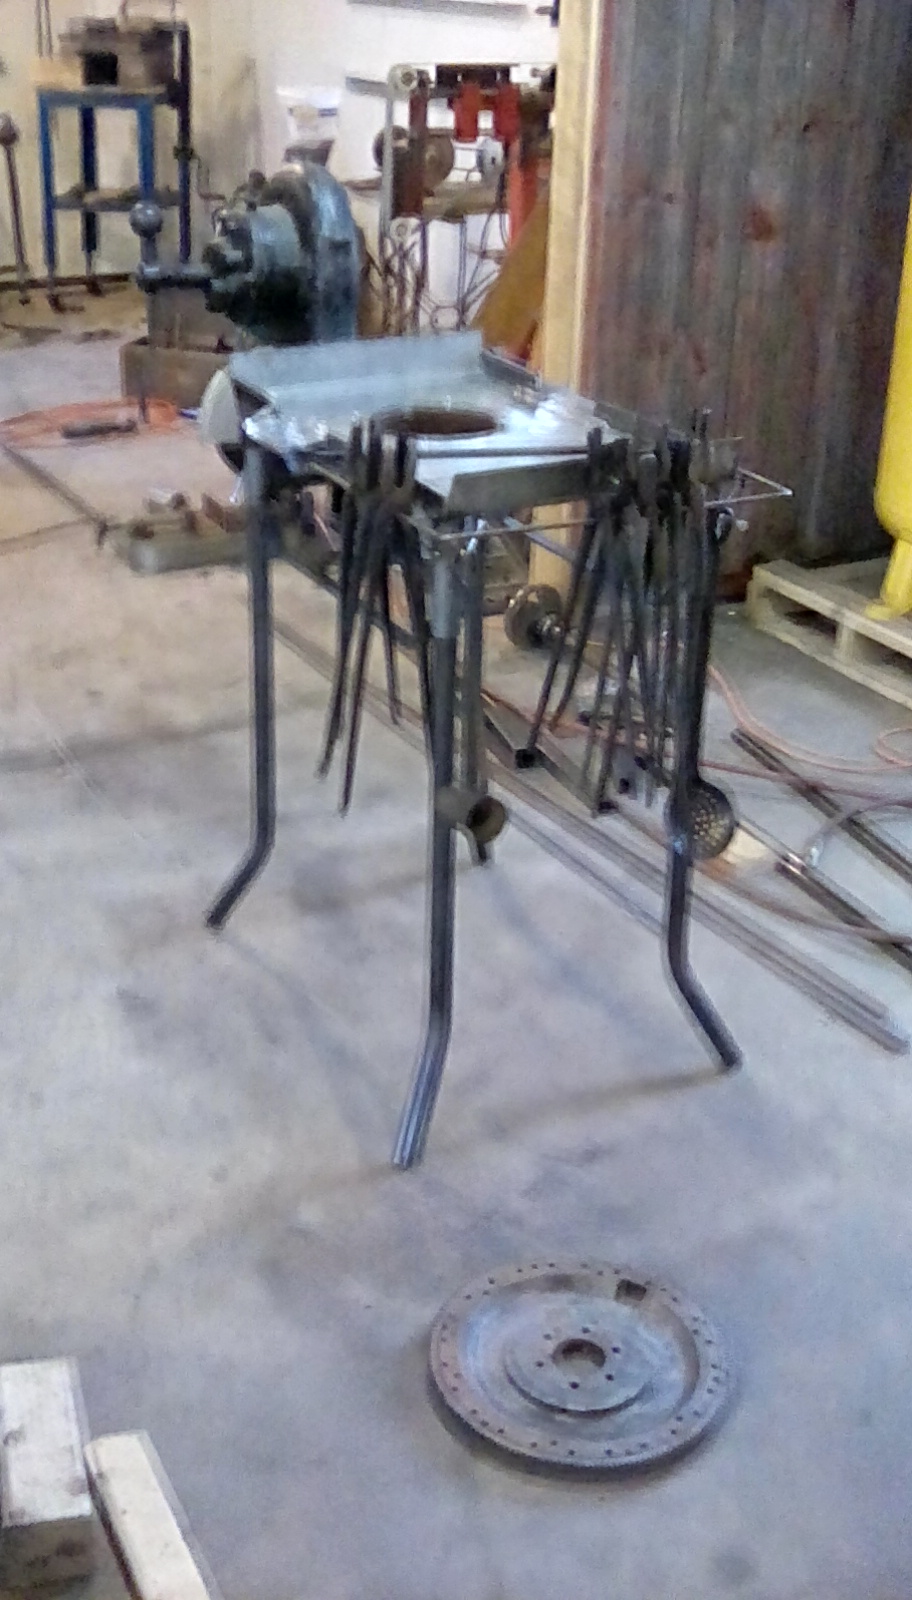
call it improvised or scrap built, or call it custom, as construction is tailored to the function more than restrained by materials avilable either way it is cheap to do. This is the third such anvil I have fabricated in a similar fashion, all were made for use in automotive restoration shops (where I work) thus the use of sheetmetal forming stakes and multiple height stake pockets. All my early experience is from blacksmithing so I prefer my stakes to work like a 1" hardy rather than the various commercial tapered sheetmetal stakes. Still Im quite convinced this design could be fabricated just a bit differntly and be a very good blacksmithing anvil. The top of this one is forklift tine, heavy wall rectangle tube makes up the base and post, "horn" is 4-1/2" but one can always make stakes or hardy tools with other diameters. It weighs less than 75 lbs, but the rigid construction helps it perform more like a heavier anvil, works great for thin metal and of course could be built heavier, the casters that only touch the floor when tipped are very handy in a big shop. Not as beautiful as a traditional england pattern for sure, but still not bad looking and very functional.

-
that is the real test of course, when you find out what you might have done differenly, almost got a chance to light it last weekend but its been raining daily here, even flooding to the south of me, just waiting to get some VHT header paint on the new steel before taking it outside, there will be fire by Saturday, rain or shine.
-
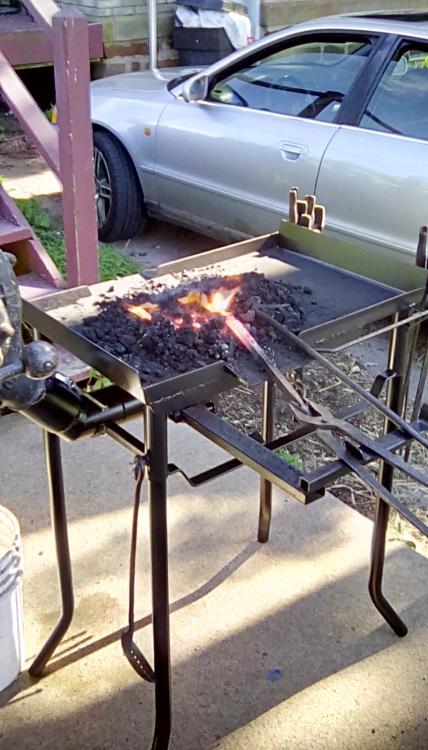
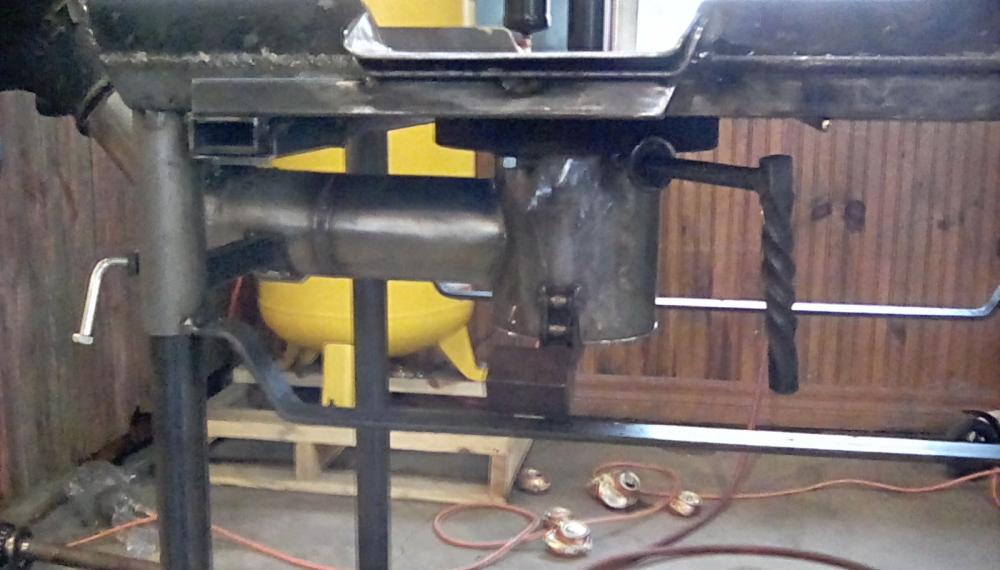
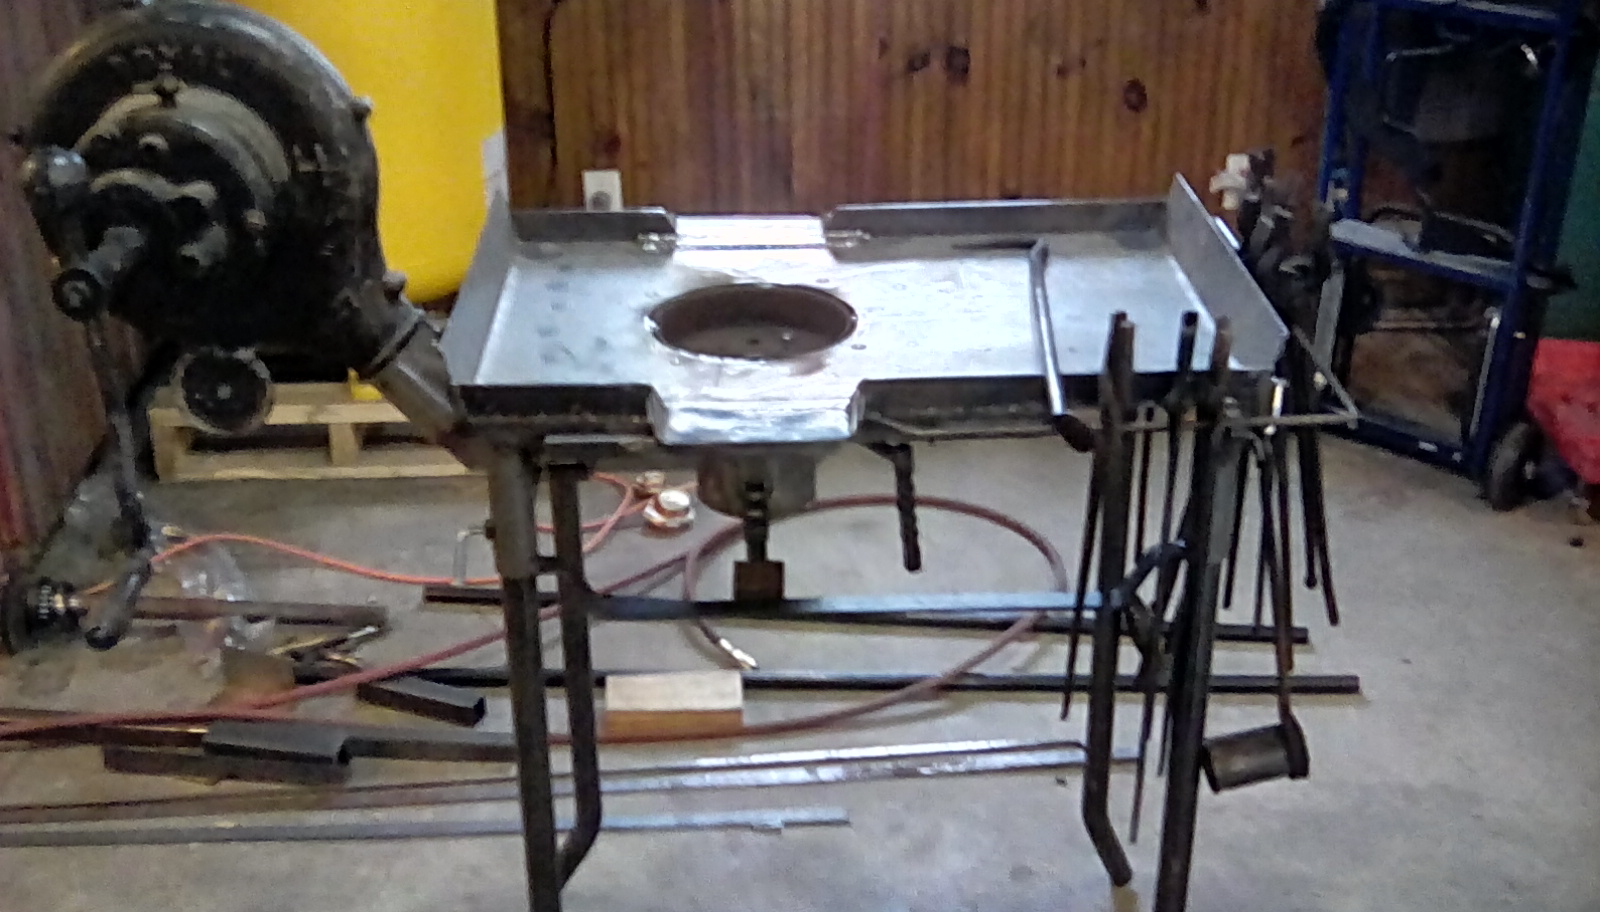
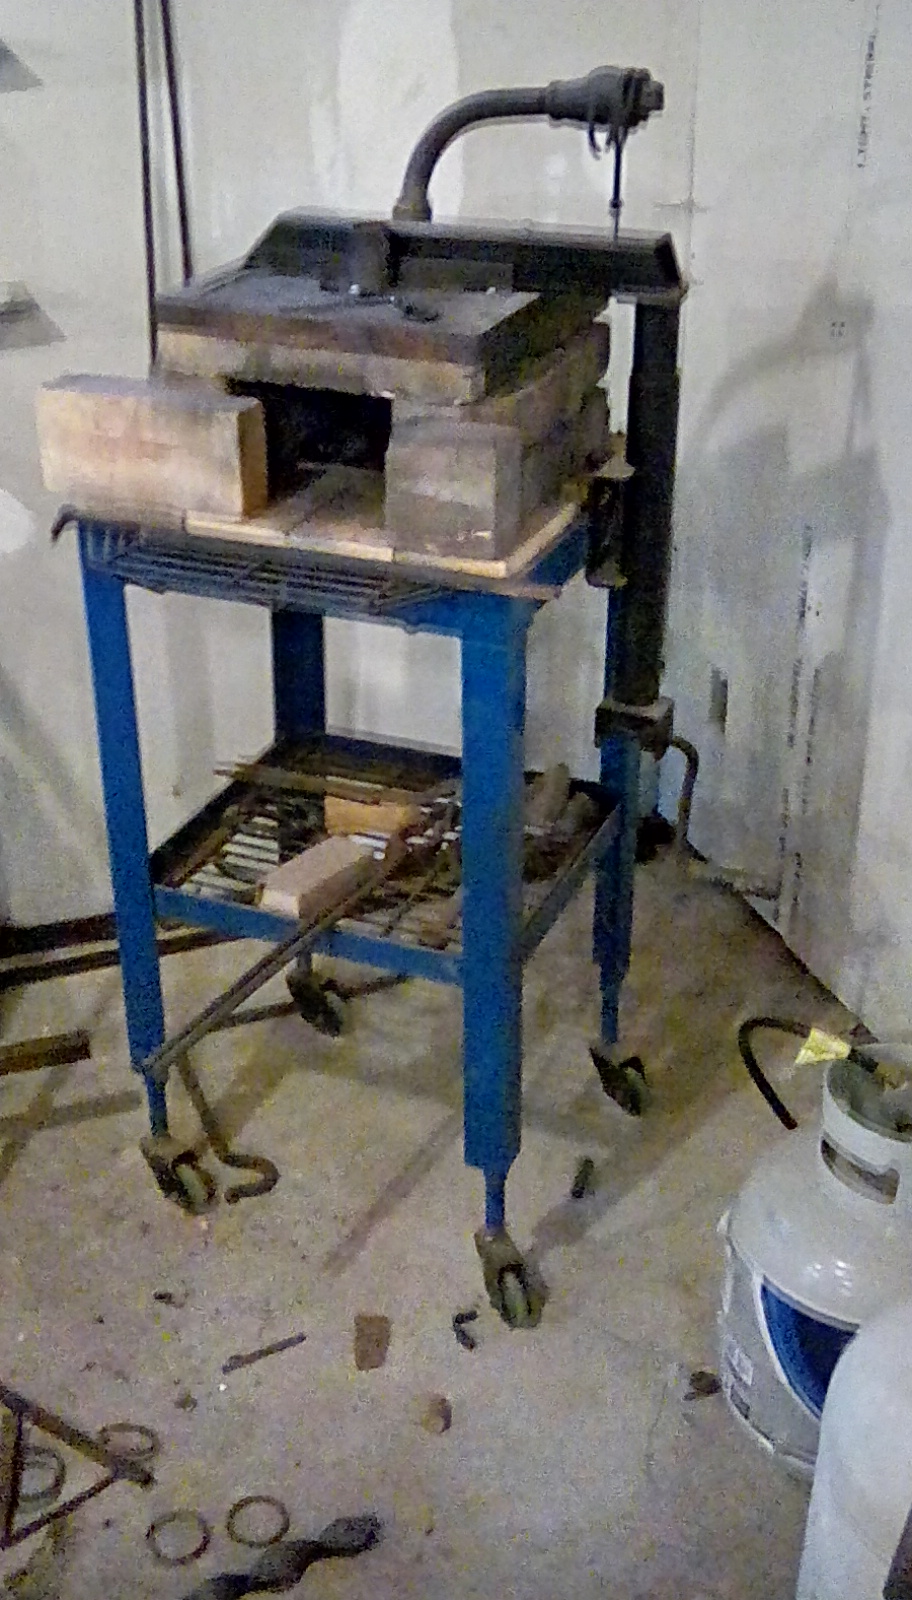
deiced to fabricate a new portable coal forge, needed to be light weight, handy to transport, assemble easily without wrenches, and have better capacity than my last portable wich has served well enough the last 10 years. I welded up a tweyer from 3" stainless exhuast pipe scraps, terminating in a clamp sturdy enough to mount the blower without additional support, made an ash dump hinged on 2 links of roller chain, tong rack and slide out stock support. Pan is 17x 24 (14 gauge) so I added the little wings to the hearth to reduce coal spilling, a brake rotor fire pot, ash dump and tweyer are bolted into place to keep the clinker breaker easily replaceable, the breaker is a bit of an experiment being made of coil spring and other alloyed med carbon steel, if it burns away too quickly it will be redone in stainless or something else, possibly cast either way I will learn something. Legs are 1-1/4" tube socketed into 1-1/2" .109 wall DOM for snug fit, 35" tall to the pan. Flat stock attached to the bottom of the leg sockets is offset to the lowest point of the assembly, so that when the lgs are removed the forge sits flat and can be easily slid in/out of the car trunk or truck bed, may still add a rectangular slack tub, still need to make good sized winged bolts for legs and blower mount to improve appearance and assemble without wrenches.


-
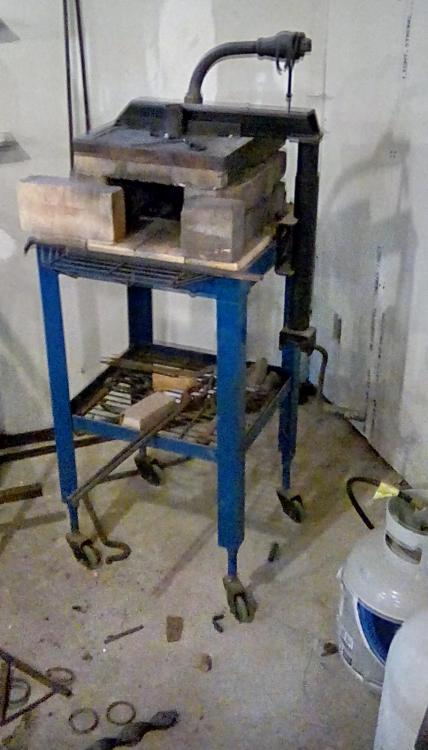
built this from a borrowed idea, trailer jack supports top while reconfiguring walls of insulation brick, restackable to many different sizes, floor is hard brick two sidearm burners are run on 2 seperate regulators 2 seperate 30lb tanks not attached in picture, you can forge weld with one burner if stacked small, and easily weld biiger stuff when running both burners, pros; very efficient, much quieter than a blown gas forge, good capacity, cons; this brick is not durable, its not very portable compared to compact lightweight kaowool lined cylinder forges
-
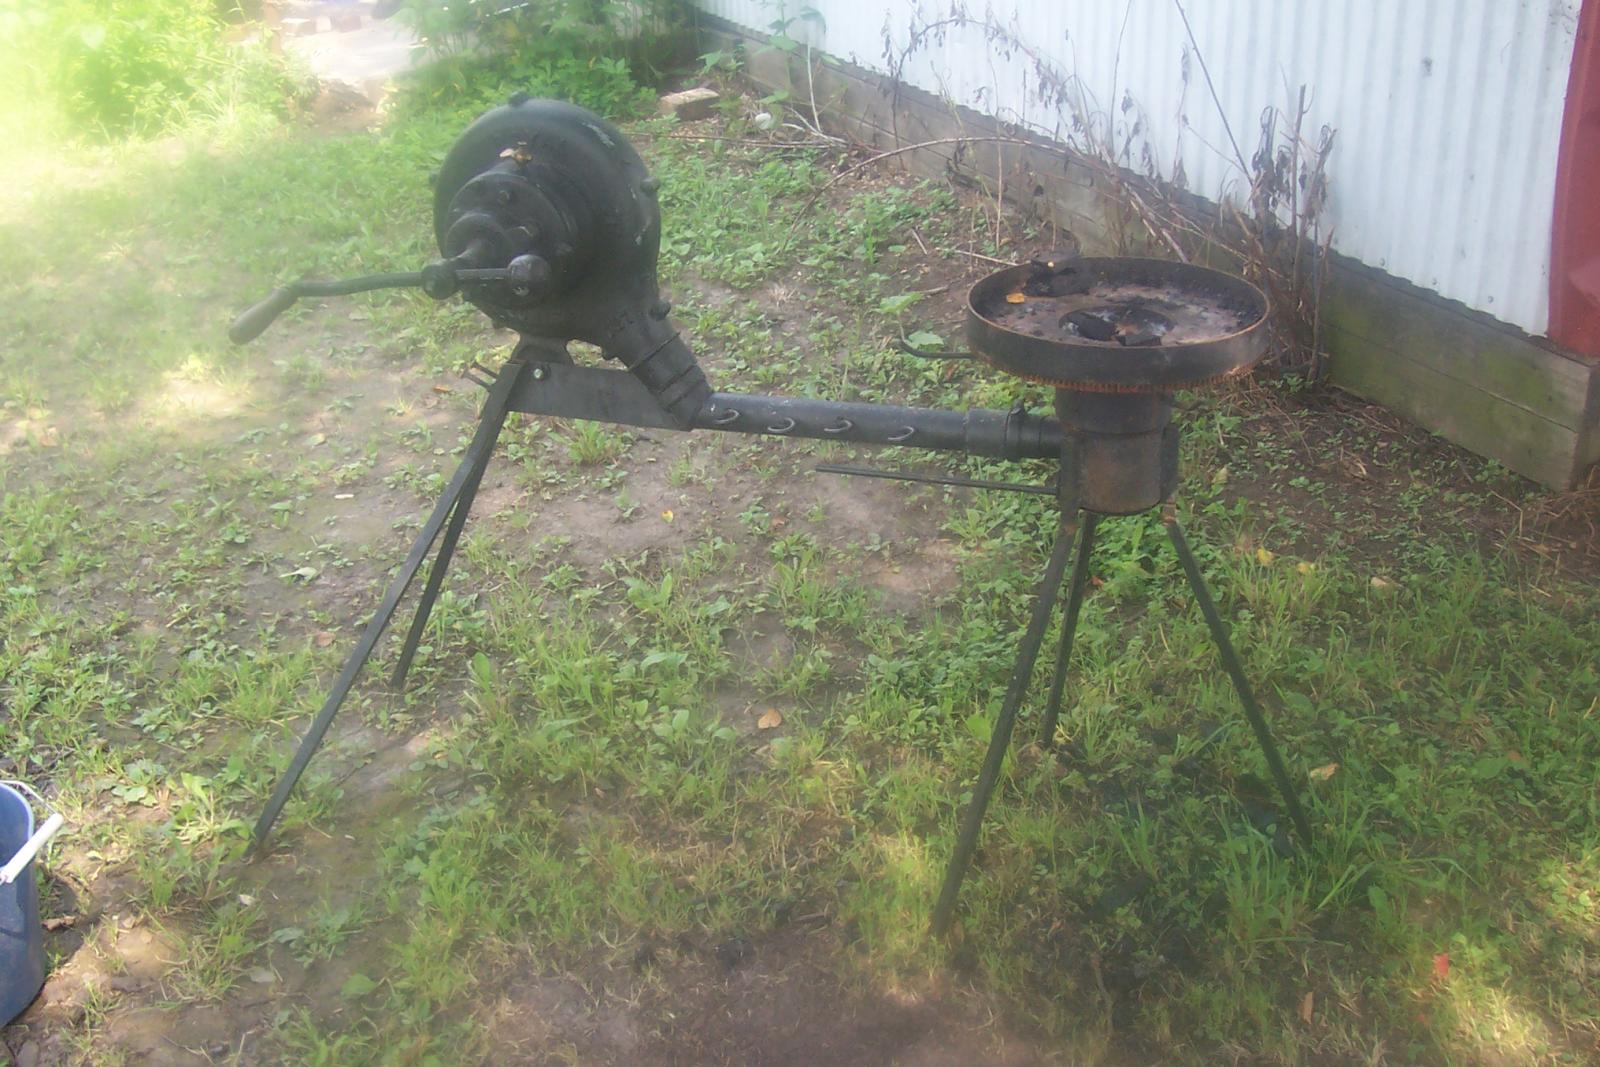
knocks apart in to small pieces, has a tong rack , a swinging grill for making coffee, cooking on charcaol could be bigger but I have forge welded throwing axes made from farriers rasp in it, use a tripod mounted vise 120lb haybudden with hammer rack on the stand

-

on a high end built 1970 AAR Cuda, upgrading with parts that didnt play well together was causing failures at the track, even after I feinorced the control arms we needed adjustment in the sway bars and the rear one was just too weak, no after market options, rather than just welding new ends on I stuck my blacksmithing neck out and said we should just make new ones the way we wanted (the customer, an engineer, went for it), ater running everything thru solid works, i made the easy front bar with two bends and ears in 4140, and the rear with 12 bends on different planes. Car Craft magazine picked up the project, and after professional heat treat ( I was not going to attempt to temper anything this big) the new anti sway bars improved performance on track day according to the data logger and driver. http://www.hotrod.com/articles/how-to-make-a-custom-sway-bar/ blacksmithing is not just a compliment to the fabrication, sheetmetal and machining we do its the foundation of all of it and the entire reason I got into this this career
-
I actually got my first starting blacksmith lesson in Sca reenactment, flailing away at my first try at a leaf or anything, with crowds of people assuming I was an actual blacksmith asking questions, at one point I actually resorted to, "Im not really a blacksmith but I did stay at a holiday Inn express last night" (for those who remember those commercials),
I have since (learned a bunch) and done many public demos, the list looks pretty complete at this point, one thing I might add, if you are working with or around other smiths, bring a means to deaden the ring of the other guys anvil, though my HB sucured tightly enough to the stand to stop the ring, 1 or 2 other guys with small anvils bouncing around on stumps with shrill rings threatening to crack your safety specs make for a high fatigue low fun experience, you want to be able to talk with your audience and be in a good mood at the time. I have improvised a heavy magnet and shop rag under the heel, rope, etc, (with proper diplomacy) but a spare rubber bungie cord to wrap the waist might work better, not a fan of going deaf for no good reason
Woodsmith
-
Hay Buddens are great anvils, all of them consistently well made, Ive since purchased 2 more, 127 is the weight in pounds and is very practical size, heavy enough to do real work and not too big to move, sounds like your off to a good start
Woodsmith
-
if you snap the blade into 14"ish lengths and bundle them together, (like wiring up for making a billet) it makes a very aggressive rasp, even if the teeth aren't sharp it will shape wood,roughly but rapidly, Ive also used it to rasp down alluminum castings, the deep gullets of the teeth do not load up like a fine file or sand paper, you can tape the ends together good then wrap with cloth and then more tape to make a comfortable handle at each end. sounds crude but works very well, not as great as a $40 body file but its basically free
-
I have added steel powder to borax when forge welding, fairly fine steel from the shop floor, picked up with a magnet, not swept up to avoid abrasivewhell dust, I mixed it with the borax just before spooning it onto the weld, wasn't sure how it would do if stored in the borax container, wich is not perfectly free of moisture , this was mild steel only though, and I understand pure iron would be better, I think it helped in sticking a tricky weld, but have only tried it a bit so I wouldn't call it definitive proof.
Woodsmith
-
using a throwout bearing does sound slick, hadn't thought of that,
-
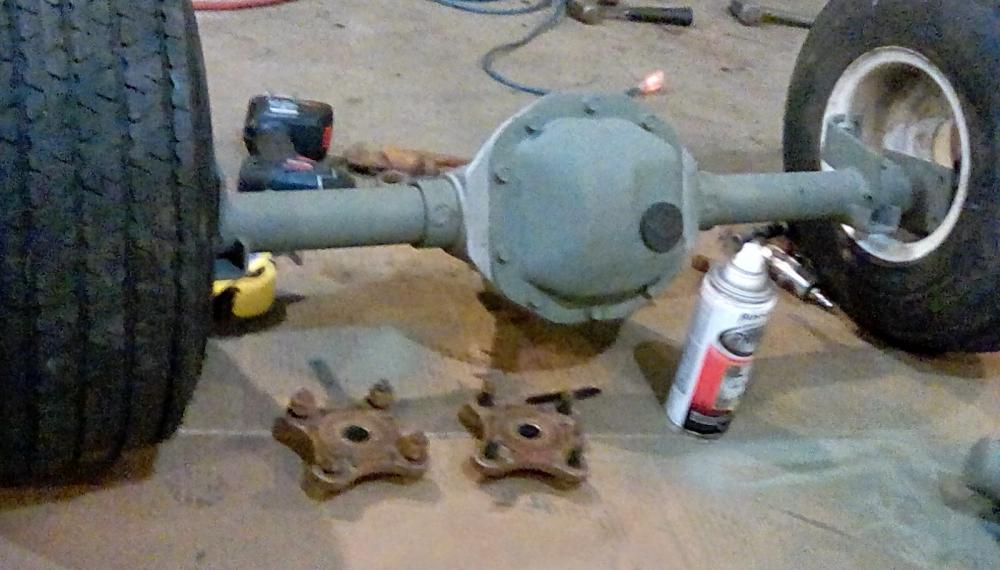
Yes we have the gear to copy, it the differential gear that attaches to the splined end of the axle shaft, right and left are the same, and we have another complete assembled diff for reference also. I think we have gotten estimates to reproduce one such gear ranging from $3500 to maybe $1700, when we get farther into the build we may have to go for this if it is our only solution. Yes it uses a generator, bizarrely we found one that matches up in a little old shop right near by in Mn when we had them rebuild the starter on our first basket case restoration.
Thanks again for the input
Woodsmith
-
I use the Milwaukee portaband with 5x5 throat constantly, cant say enough good things about it, very powerfull cuts gaudge material through 1'' solid or 4'' square tube, quiet and clean compared to abrasives, built a benchtop stand with a table makes it even more versatile, easy to repair and get parts, bought used for $150 its paid for itself many times over, with some talent and a well lit fine scribed line to follow I believe I can cut miters and shapes with great accuracy, (straighter than the blade track on many mounted band cutoffs) it improved my daily quality of life by reducing fatigue compared to putting up with angle grinders and abrasive chop saw, also use a 12" encoe plate shear rated for 1/8" sheet, and 1/2" round, you could fit both of these in your budget I think, Im very very pleased with mine, the bandsaw is the best purchase Ive made in years.
-
Nice job, I made a pot rack and matching utensil rack set, as gifts from similar 1/8 mild steel forged and riveted, seeing them after several years I am quite pleased how the bare steel with just an oil finish does not seem to rust, in the kitchen it is apparently more likely to get greasy and not damp, I think the black metal looks much better than painted. In other places were I used copper rivets on steel and they remained oiled I have not seen any corrosion even after several years of use, I have found bracing wire for fencing at the hardwar store, uncoated and annealed I think 8 or 9 gaudge (about like 1/8 round) can be cold worked for braided handles or small chain, and work hardens to become quite stiff, also a huge fan of using scrap of course, keep up the good work
-
I use vinegar to derust parts a lot, its slower but works fantastic, Ive seen the electrolysis done and I belive it will not work on scale, but is faster at removing rust, and Im told, you don't want to use stainless for your sacrificial plate or you get hexovalent chromium in the solution in the tank.
-
We have priced having one such bevel gear made, and eventually found a shop that would actually give a price instead of just saying itll be too expensive, We are waiting on this a bit as it is quite expensive. I am primarily a fabricator/designer not an expert on parts sources for rare/foreign autos, so thanks for the input. Good parts and material sources are really valuable. even though I made the request largly as a joke in chat, (because it is so off topic for the site) I appreciate the thread. If anybody else is looking for an odd tool or part feel free to ask me I guess, we have a bunch of old Jag and Mercedes stuff laying around.


What did you do in the shop today?
in Blacksmithing, General Discussion
Posted
Thanks Mel, keeping in mind when you half scale a frame the size of a A you are about the size of a big go cart, so prettty lighweight, I have a briggs 16hp horizontal opposed twin, several reasons, having both heads sticking out the side of the hood is a good look especially for an aircraft themed look, it sounds less like a lawn mower especially with the right exhuast, it is a flat head that helps too, (I think)the configuration fits the size constraints well and the look, down draft carb with proper air filter top and center. I have a comet style torque-a-verter variable pitch centrifigal clutch good for 18hp, having real axles, inline engine, proper drive shaft etc really helps make the build a mini car and not a go cart with a body or modified lawn mower type deal. Has enough power to lift the front of the tractor mower when you dump the clutch...can be geared for a good speed range. Plan is to metal finish the body work good enough to clear coat with exposed rivets etc, so anyone can tell from a distance that its not a fiberglass body kit that anyone can buy. I do have experience with this level of sheetmetal (build/restore cars for a living) .....and I still want to do this