

petersenj20
-
Posts
125 -
Joined
-
Last visited
Content Type
Profiles
Forums
Articles
Gallery
Downloads
Events
Posts posted by petersenj20
-
-
if its an item intended for sale or trade in return for real goods, currency, or services from others you want your craftsmanship to be clean and consistent, or risk running out of customers in a hurry. so it behooves you to streamline your tooling and processes to produce the most precise and consistent output, which often requires a lot more forethought than just grabbing a nail and eyeballing it.
Hence the reason for my post on iforge. I know my weaknesses and strengths.
Thanks for the help tonight.
-
You left something out in chat until later in the conversation.... that this process needs to be repeated competently one hundred times. I still do not see that in this thread. Since you want to sell these. Which means you need to do this somewhere between 200 and 500 times depending on how many you place in each gang punch. When you leave important information out, expect inexact results.
I hate chat. I usually spend upwards of an hour composing my thoughts. (and I still miss some)
However, I don't think it matters if i'm making 100 or 1. Buying retail is not a fair answer on this site.
I actually want to trade these.
(Only took 45 minutes:)
-
second thought while i was finishing the dishes, drill it out, turn the edge down almost to final thickness on the lathe, take a heat on the tip and forge it lightly to collapse the circle down to oval.
i also forgot to ask why you are tapping threads as well as soldering?
if your drift is tearing the edge when you attempt to reshape the hole you might consider leaving the edge thicker and sharpening it afterwards, that way it will have more resistance during the drifting process. it could also be that your drift is oversized to the hole you are drilling, causing the perimeter to stretch and therefore crack.
Thanks so much for the help. Chatroom was wrought with salesmen:)
The most important part is the indexing of the tool. I was too focused on the sample tool.
I used a formula for an elipse and as you said, not exactly what I was trying to make. If I use a stud for the index, then repeatability is built-in.
Was going to thread and solder since there will be a lot of impact.
Will be using mild steel for the base and tool steel for the cutting.
I dont know if these weld together properly for long use. I have never researched this joinery.
-
Doesn't have to be 5 holes but needs to be at least two for indexing perfectly.
Make it five and you strike twice on a watch band and production speeds up.
I guess what I really am looking for is a relationship between round drill hole size and elipse size, so a drift can be driven through and reshape exact every time.
I don't know the math to figure. Maybe just a bit of trial and error. but I dont want to waste a bunch of stock and time in the process.
-
I have been trying to find a project I saw somewhere a long time ago for a spill plane. Cool stuff.
-
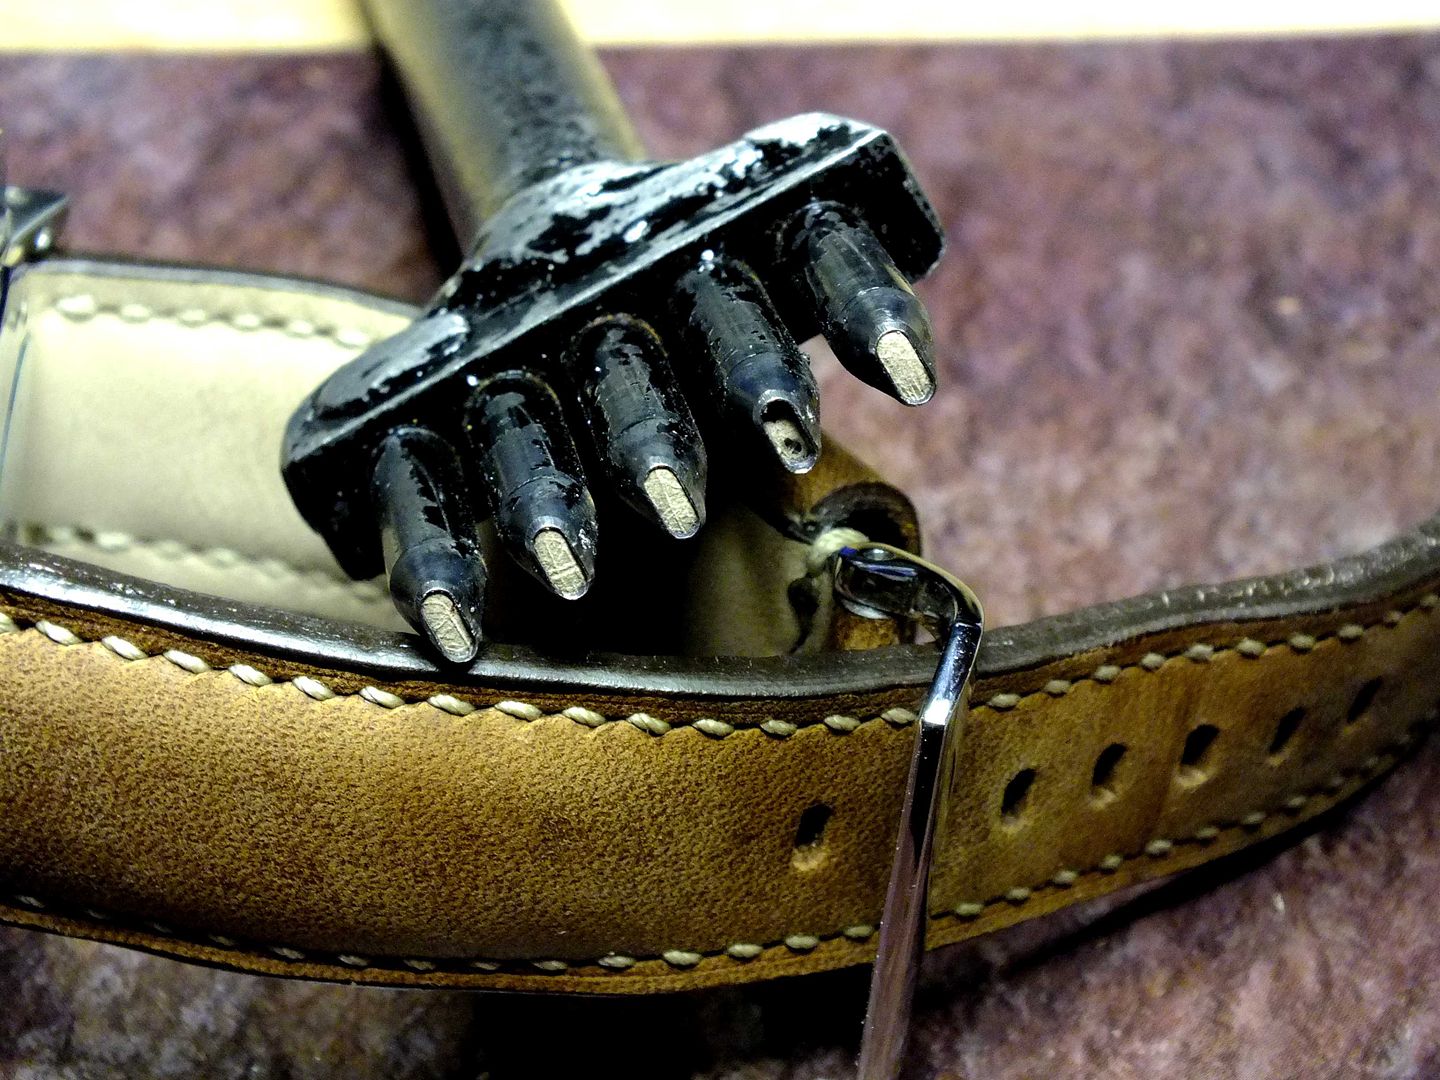
I am trying to make this style of punch for making leather watch straps.
I'm going to use 1/2" square stock as the punch base, drill, tap and solder to accept the five individual punches and allow for the punched divots to fall out.
For the punches I have used 1/4" O1 drill rod, center drilled with a #36 drill, and tapered and sharpen the end on a lathe. I made a drift punch to drive into the end to do the shaping. This is not very reliable as it sometimes destroys the metal and tears at the taper. I harden after shaping the hole.
Is there a better way? I was thinking of a drift punch that would drive all the way through, but maybe the hole will need to be a bit bigger? I haven't figured out how to calculate hole size and this may be cause for the tear-out if I am using a punch too big for the hole.
-
April 10th and 11th in Americus, GA.
I don't have all the details but a couple of us are planning on going. -
Well, I just got a bike last summer (and its a baby) but you can count me in for a half-a-week or so.
Depending on the route and how far it goes. I am in Douglasville. No reason to wait that long for a get together. I know there is a hammer-in south Georgia in April. Would be a good ride maybe. Maybe. -
Wow. Looking back, these really are crappy pictures!
I couldnt help but notice that the dies aren't above the top of the side pieces. Isnt that a problem in using it?
I have welded strike buttons to the top of the die. Works fine.
I am building one of these for myself today and after seeing your photos I am simplifying the build. Thanks for posting. Pics to follow. Steeler.
I got the same idea from someone on this site. Sorry I can't give props. Snowed in today. I'm gonna try to get a couple more dies made. -
I snapped a couple pics. Sorry for the quality but what can ya do?
I want to make a V groove die for tong jaws, and a length wise fuller for knife "blood groove" fullers.
I used the 3/4" fullers last night to draw the reins on a set of tongs I have been working on. It worked nicely except for the strike button weld broke. I have a better idea to fix.
The side cutter will be a life saver. I cut 3/4" square in one heat and was still at forging temp. Better than having to quench and take to the bandsaw and start over.


-
After seeing KYBOY's guillotine tool I decided it was time to make one. I have no hardy tools and figured a guillotine would work well. Along with the frame I have made the following dies:
Top and bottom side cut
Top and bottom 3/4" fuller
Top and bottom 1/4" fuller
Lower flat anvil to use with the 3/4" fuller specifically for making tong hinge transitions
I tried all but the flat and fuller together. They worked fine except I need to weld the strike pins better. Plus my son can do the grunt work for me.
I would like to see what dies people have made for theirs. I have a couple ideas for more, but would like help. I have seen a few on the site, but not a whole bunch. -
True on all accounts accept they are 1095 carbon steel.
Knew I read it somewhere. Here
These are up to about $75 new around here. -
The only leaf I have made was as you say, long and weepy.
We had a hammer-in demo where he started with 1/2" square and drew a point but did not flatten much.
He left the point alone and worked on the base of the leaf. Only part I can figure being key.
Hammer-in video
http://www.youtube.com/user/purgatoryironworks#p/u/6/CS9KiGmA-8A -
I thought it was Will Zoelner that built the wagon but I been wrong before
-
One of the Foxfire books also had a great example on how to make these wheels. From making the hub to the iron process.
-
I saw a Modern Marvels where they tack welded the ends together and chucked in a lathe equipped with two 4 jaw chucks.
Used the straight line-up of the bed to align and manually spun chuck to twist. This was at a high production light maker. -
Very nice screen "and irons". What is the gold over the balls? Is it wire brushed and how will you keep it from burning off?
-
Like cooter said.
I don't use the jewelers saw. A good file works well once you get the hang of it.
By the way, the tools you describe sound like a pretty decent shop that a lot of people don't have. I have found once I got all that stuff, I really do prefer the peace and quiet hand tools offer. Although I won't deny the ease of work an angle grinder and bandsaw offer. -
The first one is very cool. It has a nice masculine look. Good or bad. I would love that look as a fence for my yard. If I was that talented. I like the third second best. On the diamond.
Good luck either way. -
What part of Georgia are you in? I'm in Atlanta and would be glad to show you my casting techniques. I don't do a lot but can certainly explain the process. What has worked for me and what I would do different. I have a gas burner and use wood and have been known to make charcoal.(Which usually gets used in the smoker or BBQ)
You have asked a lot of questions. Ore is for smelting as is the bloomery furnace. Not really what you are looking for I think. Smelting is reducing the "rock" to metal. Far too many sources for materials to waste time smelting.
Aluminum cans make great material contrary to what some people say. They have drawbacks, but are readily available.
Like Frosty said check out the back yard site for more specific info. -
I enjoyed the video as well. I wish I could get more like it.
-
you bought ten didn't you?
I get roughly the same to a dollar for mine at the market. -
I don't really care for Fastenal. If you are in a pinch and need that thing right now, they're ok. Nuts n bolts are fair priced, but everything else is pretty high.
MSC is much better, but they have far fewer locations. McMaster -Carr has even more exclusive items but at a much more exclusive price.
Fortunately living on the West side of ATL I have access to all three big dist centers.
Mild steel will always be higher at a hardware supply house as they like to deal in small items. That large storage and transpo comes at a price. -
Those torque converters are pretty much maintenance free. Check out the Comet website for assembly. The usual reason is misalignment or out of adjustment. Belt may be too loose.
Could be the pre-load spring on the driven pulley is worn out or maladjusted(There are usually 3 holes to allow for different preload weights) causing the sheave to engage at too low RPM for how you use it. ie driving on hills engaging for top end too early for the load.
We just fixed our torque converter, and have to fix the carb. Gokarts are fun, but a PIA when needing work. Just piddly little problems seem to plague you.


Rectangular hole punch
in Problem Solving
Posted
Alright, here are my measurements for the final hole size:
W-.100
L-.150
R-.025
This comes out to a circumference of .4571. This calls for a #27 drill. Much bigger than what I was using. Closest I could get at the tool store is a 9/64 drill bit. I will make one up and report back.