

Bob_Nor
-
Posts
22 -
Joined
-
Last visited
Content Type
Profiles
Forums
Articles
Gallery
Downloads
Events
Posts posted by Bob_Nor
-
-
My first try will be to mount it on my ancient tool grinding machine and to try to remove the superfluous material without harming the useful surfaces.
But I sill haven't done this step.
Bob
-
Hi Mike,
Alexander G. Weygers wrote a lot about making tools in his book
I'm sure that this book could inspire you.
Bob
-
Hi Thomas,
most areas of the vise is still very hard so a file wouldn't be happy to touch it. I might have a fine stone or a diamond file that fits into the gap to reach the sharp edges.
Bob
-
Hi together,
just a short progress report:
I welded the vise as I had planned and heated it afterwards 3x to about 410°F.
It worked well and the vise holds up to being tightened with a wrench.
I want to grind away the sharp crack inducing corners on the other side and remove weld that is above surface level. When I'm finished I will post some pictures as it might help somebody with a similar problem.
These electrodes really seem to hold up to what the manufacturer claims!
Bob
-
Hi Frosty,
thank you for sharing your experiences and this nice story! So I will attempt the repair this way as soon as I find time and report back how it worked out.
Have you noticed the red and black grooves at the sides of the vise? While the vise is very precise in the important dimensions the grooves were cut in in completely different heights. So I made separate clamping nuts for the sides and painted them differently. These russians!

Bob
-
Thank you for you replies!
These vises are typically hardened to 60 HRc throughout, probably made from medium to high carbon steel.
Stick welding is all I have available. For use on my 60 year old small industrial milling machine I already have a new vise. I would like to use this vise for other things in the workshop a it can be used resting on the ground sides too. It is written off so what ever the repair will manage is welcome - if the repair doesn't work: No big problem.
-
Hi together,
I have a repair job to do where I need some advice:
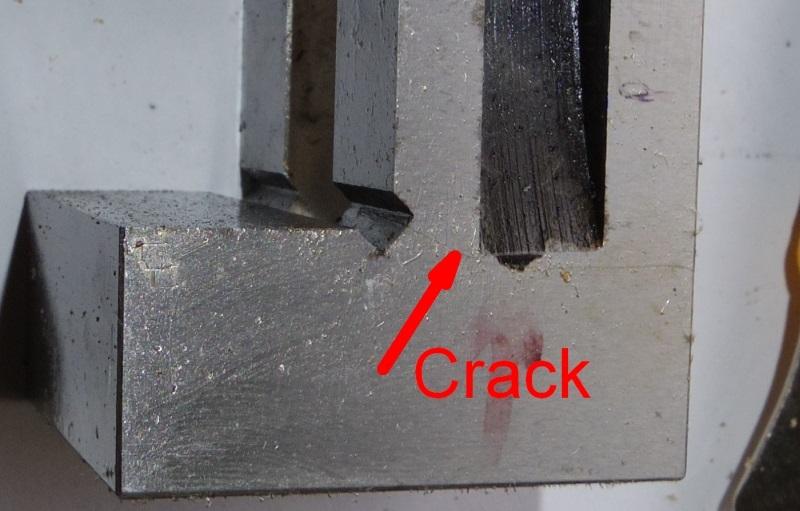
This is a russian precision vise used for grinding and measuring. It came with a quality document that proove it's precision of a couple of µm in important areas.
I made the mistake to overtighten the vise and crack it apart. The crack started from a sharp corner and runs right through one side of the vise.
The vise has been replaced since with a somewhat bigger and stronger model out of chines production. I wrote "Crack" on the old vise and put it aside but found myself using it frequently because it is so handy with it's ground sides all around. I know that I won't be able to repait it to it's old precision but I would like to try to make it usable for less demanding (my typical) work.
I don't want to soften it completely and reharden it because I don't have a surface grinder to get it halfway flat again.
My idea was to grind into the crack coming from the jaw and from the side. Put a c-clamp over the vise to keep everything in shape. Then preheat to ca. 400°F and stick weld with Castolin Xuper 680 S which is intended for welding tool steels. Then cool slowly.
What do you think about this repair attempt?
Bob
-
For my wood splitting I also use a bucket full of wooden single- use wedges and a wooden hammer. In a book about green woodworking I read that use shouldn't make the handle longer than 30 inches, otherwise it would tend to vibration. I regarded this (probably too simple) rule and there isn't much shock in the handle.
Carpenters often use hammers with steel handles and sink lots of nails with them. The typical german carpenters hammer has a rubberized thick walled steel tube handle, thicker at the end. The amount of rebound is not especially high from my experience.
-
1 minute ago, JHCC said:
Looks like straight peen, diagonal peen, small cross peen, soft cross peen to me. Am I missing something?
Sorry, of cause you are right. I mixed up the expressions...
-
Using O-rings as damping material is a good idea. The damping properties could be changed by varying the number and elasticity of the O-rings.
Maybe I'm wrong but the overall design doesn't look as if it has been through a demanding practical test.
-
The standing frequency of the handle will be lowered if the handle is made thinner. A very stiff handle will have maximus and minimums within the lenght of the hands grip. In this case the position of the hand wouldn't matter very much. My 3kg sledge has a short, fat handle and is extremely uncomfortable to use. Compared to the 5 kg sledge the shape and texture are nearly the same, so the "death grip" argument doesn't count here.
Probably the handle of the 3 kg sledge would have to be thinned first to make it tuneable and then the shape and length have to be adjusted to the least vibration at the grip point. It might even be possible to show the standing frequency on the handle by finely spreading some powder on it and look where it is shaken off.
I sure that one feels the best point on the handle with your hands, but I don't really like to hit with a hammer holding it more than a hand width from the end of the handle. So for me it would not be easy to test for the best point.
Compared to the position of the maximum amplitude the overall level of acceleration of the hand by the rebound is more important from my point of view. My 3kg sledge has a very harsh transmission, probably due to the short fat handle. I don't use it much, so optimizing it is a low priority project.
For me it's very interesting to see how much details have to be right to get a hammer that is a joy to use. The hammer - the most basic tool, a better club. Not really !!!
-
You are right, I forgot the probably most important part: The lighter the grip, the less shock is transmitted. And the shape of the face also influences the generation of rebound, when the workpiece is not hit straight.
Here are som pics to illustrate the topic:

It is clear, that the wood handles are not shaped very well. They don't expand to the end, they get slightly thinner. The big 3 kg splitting hammer is a standard type that is sold in Germany in masses. The handles are also quite fat. Maybe the splitting hammer handle is made to withstand inexpert use.

from left to right:
1. Ball peen hammer with round face, handle expands, but could be a bit thicker for the weight of the hammer
2. Diagonal peen hammer, good grip behind the head and at the end of the handle. The finish is a bit too smooth. The wood should offer quite good damping, it is soft and flexible.
3. Small ball peen with round face, good shape but a bit too thin
4. Soft ball peen, handle could have a bit more shape

5 kg with long handle, german standard type, ash handle could probably be a bit thinner and could have a much better shape
3 kg with fat short handle, german standard type, in this condition completely useless, much more rebound than 5kg version. Ash handle needs to be a lot thinner and must have a much better shape
So probably the starting point always has to be the shape and texture of the handle. What I would like to find out is, what a shock dampening connection between handle and head could offer in addition. Has sanybody had the opportunity to compare a Sikaflex-Hofi-hammer with a comparable shape of hammer with standard wedging of the head?
Bob
-
I earn my money in the office and do quite a bit of different hand work in my spare time, but I'm not really perfectly suited to the hard physical work I tackle. We heat our house partly with wood and in the past my wrists and hands were the body parts that limited my work volume when splitting wood. I then bought a Fiskars plastic handled axe without expecting much and was really astonished to realize, that it had much less rebound in the handle and made splitting wood much easier for me.
The handle is made from fibre reinforced polyamide and is hollow. It won't be possible to produce such a handle for a hammer and plastic handles would't survive long in blacksmithing anyway.
A couple of years ago I was astonished to hear that Hofi fits the heads of his hammers with Sikaflex elastic glue to reduce rebound and immediately like the idea. Has anybody looked closer at the different possiblities to design a shock absorbing hammer?
Different design ideas come to my mind: Sikaflex-mounting, rubber bushes, hollow handles, shock absorbing handle cover. For me shock reduction would be most interesting in a blacksmith hammer, a smaller sledge and a framing hammer.
I would like to make some shock absorbing hammers and would like to discuss the design. What is you experience, what are your ideas?
Bob
-
Sorry, no pics of the straightening process.
It is a Rockwell porta-band saw.
If somebody had the same problem, I could bring him onto his way to a repair.
-
I like how you have taken up the idea of the streaming gas / water for an electric device in the second and third lamp.
Must have been a lot of work - and worth it!
-
Repair completed!
I straightened the frame with two strong F-clamps. It was flexible, so I had to twist it quite a bit further and then let it spring back.
Alltogether I managed to remove 90% of the twist and left the rest as it was.
The tracking was already much better. Since this is about the only band saw without a system to align the tracking (other models oft this saw have), I did the rest by shimming with washers.
Now the saw band tracks fine and the saw is a joy to use.
Cutting speed is about the same as a strong small angle grinder with a 1mm - cutting disc, but there is much less noise, no smoke and no abrasive dirt on every surface in the workshop!
Thank you all for your help!
-
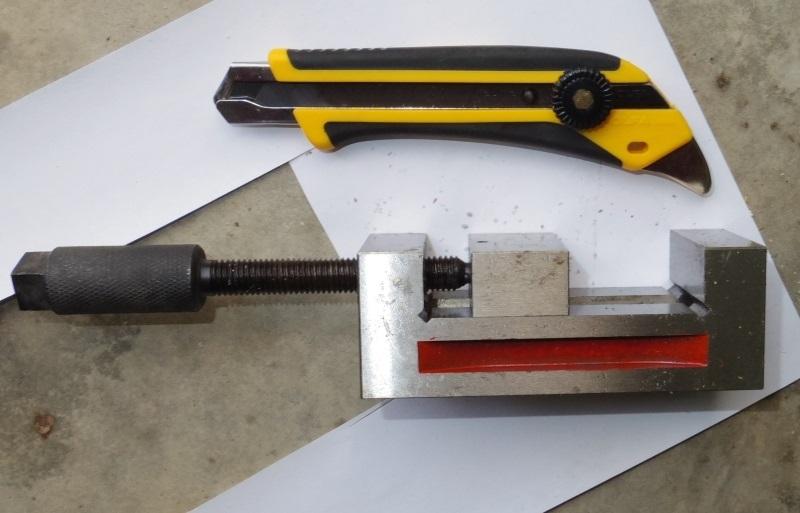
I use CAD often to do this:
-Draw a part
-print out in 1:1 scale
-stick the paper with paper glue stick to the flat raw material of wood/plastic/metal
-punch the marked centers of holes and drill
-cut out along the lines on the paper with band saw
This has prooved to be a very fast way to make machine parts. Precision is usualy better than +/- 0,5mm.
For multiple parts I can just print out the needed number of drawings.
Bob
-
Thank you for your replies and the work you spent on solving my problem.
I will give it a try at room temperature.
The casting is not that ridgid, it's an open box cross section. In normal use it doesn't have to withstand much load since the band tension is not very high.
The saw was mounted in a heavy stand and I think it may have been dropped together with the saw.
Adjusting the tracking didn't work, putting washers under the non-powered wheel allowed for the best tracking, but still not acceptable for longer use.
It's good to hear that the alloy might be weldable though I don't own the necessary equipment.
I will post the result of my attempt at straightening but it might take some days until I get it done.
Bob
-
Hello Rich,
The way the tracking is off fits perfectly to the way the wheels are out of alignment. So I dont think that I will get around fixing the alignment.
A repalcement part won't be available here in Germany since this Rockwell saw is a true exotic here.
Compared to real forging of the metal the necessary twisting of the frame is a very small deformation.
For me it would be interesting to know whether it would be an advantage to lift the temperature from room temperature to 300-400 °F.
Hello macbruce,
my idea was to use the flat areas around the wheels as a reference an clamp these to a table or I-beam as you suggested. Then I would use a strong clamp or a bar to twist the casting. I would place the frame so I can twist a little over "well aligned" to compensate for the elastic back twist.
I would be very happy it I could make this saw usable again as it would save me lots of dirt compared to the angle grinders.
Bob -
Hello together and a happy new year!
this is my first post here after learning a lot by reading the posts in this forum.
I now have a task where I could do with some help.
A while ago I have bought cheaply a handheld bandsaw made by Rockwell.
Unfortunately the frame is slightly twisted an the band is not tracking properly.
The frame has flat reference areas with which proper alignment can be checked and with which the frame could be clamped to a ridgid surcface for straightening. I am not new to metal working and have bent (and occasionally broken) quite a few parts.
Since the frame is from cast aluminium, I am not shure whether to straighten the frame cold or in heated condition. How much heat would be enough to reduce the brittleness of the cast aluminium?
Does someone have experience with tasks like this? Have you successfully bent similar parts in cold condition?
Here is a picture where you can see the slight twist:
http://i1249.photobucket.com/albums/hh505/bob_nor/DSC04196klein2.jpg
It would be nice if someone could offer me an opinion about this.
Bob
Crack repair of hardened precision vise
in Welding/Fab General Discussion
Posted
a complete regrind of the vise would be uneconomical, even if I had a surface grinder myself. So I try to repair it to a simpler standard that give a usable vise for my typical not too precise everyday stuff. I just have to get rid of some material that keeps it from lying flat and the jows from closing fully.
I will show the result when I have finished the job.