
Rick Barter
-
Posts
243 -
Joined
-
Last visited
Content Type
Profiles
Forums
Articles
Gallery
Downloads
Events
Posts posted by Rick Barter
-
-
Guess these ones came from the foundry this way. He's looking at options, figured I might come up with an easier fix than sending them all back for a reheat treat. And it might get my anvil shipped a little sooner. :) He tried dropping one from 10' off the forklift, guess that didn't work. found a few links on degaussing ships and pipes all interesting reads.
Dogsoldat, You must be talking about a Fontanini anvil. I've been talking to Steve about that. He tried dropping it while I tried another route. My Fontanini came magnetized. I just successfully de-magnetized it. At work we have a Blachard grinder with a 36" magnetic chuck. We put the anvil on it face down and ran it through a few cycles. It took 7 cycles and some creative positioning (to get the side shelf to cross as many rings as possible) to get the job done.
I am interested in the other posters' responses about wiping it with a welding lead while welding. I don't know if any of that would work, but someone please try it and post your results!
And Eseemann, a magnetic anvil is a royal pain! Think about it. Ever see one of those arrow magnets after you grind near it for awhile? It's hairy with grinding dust. Now imagine you're working at your anvil. Scale is falling off and collecting on your anvil. You go to wipe the scale off your anvil (so you don't mar your work or press scale into your work which flake off sometime after it's painted and installed in your customer's home, taking paint with it) and it just slides all around. It doesn't come off. My $0.02. (WHY IS THERE NO CENT SYMBOL ON KEYBOARDS?!!!)
-
I'm confused. Is there an actual organization now? I signed up for the mailing list, but have yet to get emailed about a meeting. I admit, I was laid up for a few months with a badly broken ankle, but am now back in circulation. From the other groups I've been involved with (Houston, Texas and Indiana), there were monthly meetings. That way, everyone knows when the meeting is (e.g. 2nd Saturday of the month). What are we missing? A place to meet? What is required for that? Do we have to have forging stations for everyone or just one forge used in giving a demo? What's a meeting consist of, demo, eat, socialize, leave?
-
As I said, I heard about the meeting via an ABANA email. I don't know if they've gotten as far as compiling contact lists from KBA.
-
I thought it might an old treadle for a press or something.
-
All,
There was a meeting this weekend (1/26/2013) at Maynard Studios in Lawrenceburg, KY. I was alerted to it via an email from ABANA. I will post the email below. The meeting was to gauge interest and to see about revitalizing the Kentucky Blacksmith Association (KBA). I met Matthew and Karine Maynard, Lewis Meyer, Scot and Laura Kellersberger, and Daniel (I'm sorry, Daniel. I forgot your last name).
The consensus was that the majority of people were there to network and learn. Lewis was the past Treasure of the KBA and was going to work on figuring out what was left in the old accounts. Daniel was going to set up some IT resources for emails and a possibly a web site. I was very late and am recounting this from memory, so I may not be 100% accurate with the details. I also believe Lewis is going to host a hammer-in at his Louisville shop in March.
We all put down our names, phone numbers, and email addresses to be contacted in the future as things progress. I would urge any interested in participating to get Karine (http://www.maynardstudios.com) their information.
I will also post any new information I get to this thread.
ABANA email regarding revitalization of the Kentucky Blacksmith Association:
Kentucky Blacksmith's Association "Call for Revitalization"
Matthew and Karine Maynard would like to host a meeting to discuss therevitalization of the Kentucky Blacksmith's Association (KBA) from 1to 3 pm, Saturday the 26th of January at Maynard Studios.Maynard Studios is located at 1986 Fox Creek Rd, Lawrenceburg, KY 40342. (Business only, no forge required).If you have any questions, please contact Karine Maynard at. -
Well, I wrestled with making the jig, but got it done. It then required some tweaking, but it was looking good. So, I tried it. It worked, but I realized I had a flat spot in the jig. I reworked it again with the help of my brother-in-law and re-formed the scroll on the jig. I find it very challenging to be patient and easy with the torch and the scroll wrench. It is definitely a finesse thing. But, I feel good that I got a nice scroll and the customer is happy. Therefore, I will be able to finish the remaining 7 scrolls. They are about 16" each. Thanks to all who gave advice and guidance. It definitely helped. This craft is very humbling and rewarding. I'M HOOKED! ;)

-
Good advice. Thanks, FCIron.
Hmm, just got caught up on this thread. Plenty of good information.
A couple of thoughts for Rick: at the beginning, you can draw a box the size you need and then draw the scroll to fit it. That way you only need to focus on getting a pretty scroll, the size will take care of itself. Sometimes you can get a longer heat in a small fire by moving the bar back and forth through the fire to heat a greater length.
The kink you got when you tried to bend into the cold part of the bar was because the metal follows the path of least resistance. The hot part is softer, so the hard cold metal acts as a lever and pushes the hot part away from the form and into a sharper bend (allowing the cold metal to remain unbent or less bent). Sometimes this can be corrected by pulling the bulge toward the form with a bending fork while unwraping the cold part of the bar ever so slightly.
If the metal is held tight to the form at the end of the head (with a second fork or a clamp) you can then bend the hot part. HOWEVER, the form must be stronger than the material being formed, so if you try to wrap your 3/8" stock around your 1/4" form the metal had better be hot. -
If I had large enough stock, I could, but I don't have anything larger than the 3/8". The largest I have is 1/4" x 2".
Do you think you could use the fire for the small part of the scroll, then do the rest cold? You hit the proverbial nail when you said, "Even heat (or non-heat) is best." With 'Even' being the key word. Heat just makes it easier.
-
[ BEWARE: This is a bit long, but I said I would update everyone when I started and I think it may be of value to others ]
OK. I got the steel from the ornamental iron company and started work today on the scroll jig. Full Discloser... it did not work as I planned (whenever you get cocky, the gods make you pay)!
But, do not fear, True Believer! Where there's a will there's a way. It may be kind of a goofy way, but I have to get this stuff done and get the dough-re-mi (pun intended).
Leave it to me to completely underestimate just how much effort it takes to forge 1/4" x 2-1/2" stock into a graceful scroll of 15" - 18". And, by the way, the stock I need to scroll is 3/8" x 2"! So, my scroll jig started to get all out of whack while forging it. And, having learned it's unwise to throw a fit, I backed off, took a breath and analyzed the situation.
The beginning of my scroll jig was nice. So, I cut it off and put it aside. Then I set about to make the larger portion of my jig. I did it and marked where the first jig left off and the second jig took over. Then I grabbed a test piece (5/16" x 3/4" I think). It worked pretty well except I didn't have vice grips handy to clamp the start of the scroll to the jig. I got some vice grips and carried on with work. Heating, clamping, bending with scroll fork. It worked out ok. So, I bravely grabbed a 5' piece of my 3/8" x 2" stock (they gave me just enough for the job :o) and started heating in the coal forge.
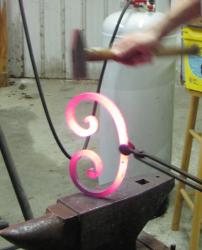
I tapered the stock a little and then was ready to start my scroll. I am doing them freehand on the anvil to start and then going to the jig. I pu the piece in the jig and bent it around. Great! This is easy (I'm sure you all know what's coming)! So I go back into the fire for another heat. I come out, clamp the stock to the jig and start bending around with my body and my scroll fork. Nice! it's coming along just fine. Except I got a little impatient and decided to see what would happen if I did some cold and tried to get more bang for my buck. BAD IDEA! I got a kink. So i had to stop, heat it back up, hammer out the kink as best I could, and go again. I wound up getting it squared away for the most part, but I still see it a little and may go back and tweak it with the torch and the scroll wrench.
Now it's time to go to the second operation: larger jig.
So I heat up the piece and am disappointed that I can only get about 6" or 8" of a heat on the piece. But I go slow and just do a little at a time. Patience is something I am continually trying to learn (I've had mixed success). It came out ok. I don't love it, but it's a scroll. It's 16" or so and I've sent a picture to the ironwork company for which I'm working. We'll see what they think. If they're happy, I'll make the rest and live to fight another day. If not, it's back to the anvil. I have learned a lot about what doesn't work. I have a lot to learn. But, isn't that always the way? That's why I am taking Frank Turley's class this year. The important thing is to DO. I find I don't learn a darn thing unless I'm DOING IT. Every time I do something, I improve. I'm no Francis Whitaker. I am, however, striving to get better. Anyway, I figured my experience might help others.
So, here's what I learned:
1.) Bite off more than you can chew. It's the only way you'll grow.
2.) Make sure you use the heat you have. Don't try and bend a little bit further cold. Even heat (or non-heat) is best.
3.) You can only heat up so much at a time. I need to learn how to heat up more of my bar or just refer to #2 above.
4.) I need to learn to use a coal forge better or build a permanent one with a chimney insid!. I was buried in smoke because I have to forge outside and have no chimney to get the smoke out of my face.
5.) I need to make better fire tools and get more training. I have a LOT of questions.
Thanks, everyone for reading this. I hope it wasn't too boring.
P.S. - If anyone wants to share the best way to heat and make large scrolls, I'm all ears!!!
I am going to try something. I agree with Frank. All this formulaic nonsense is really just spitting into the wind when it comes time to make something. I need to make some scrolls for a job. I need them to be 15" to 18". We're blacksmithing here. We aren't building aAn aircraft.
Here's how I started. I got a piece of soapstone and stood at my crappy, little welding table and drew out a scroll about that size. How did I know it was that size? I guessed! You develop your eye after you make stuff for awhile. I put a tape measure up to my freehand scroll and voila! It was about 20". No problem. I just don't need to make them as big. So I took my hand and erased some of the soapstone line. :D
Next, I took some mason line and "traced" my soapstone mark. I then stretched my mason line out and measured with my tape. I found that to make about an 18" scroll I need about 5' of steel. Boom! Now I know about how much stock to use to get what I want.
Now I have to fire up the forge, heat up some steel, and freehand a scroll to "match" my soapstone drawing. To quote Randy McDaniel, 'How are you going to make a scroll jig if you can't make a scroll freehand'? It takes practice. It takes pain. It takes suffering. It takes diligence. It takes perseverance!
I will update you as I proceed. I need to get an estimate together because I need to price out how I will make 8 of these bad boys for a local ornamental iron shop. Stay tuned!


-
I am going to try something. I agree with Frank. All this formulaic nonsense is really just spitting into the wind when it comes time to make something. I need to make some scrolls for a job. I need them to be 15" to 18". We're blacksmithing here. We aren't building an aircraft.
Here's how I started. I got a piece of soapstone and stood at my crappy, little welding table and drew out a scroll about that size. How did I know it was that size? I guessed! You develop your eye after you make stuff for awhile. I put a tape measure up to my freehand scroll and voila! It was about 20". No problem. I just don't need to make them as big. So I took my hand and erased some of the soapstone line. :D


Next, I took some mason line and "traced" my soapstone mark. I then stretched my mason line out and measured with my tape. I found that to make about an 18" scroll I need about 5' of steel. Boom! Now I know about how much stock to use to get what I want.
Now I have to fire up the forge, heat up some steel, and freehand a scroll to "match" my soapstone drawing. To quote Randy McDaniel, 'How are you going to make a scroll jig if you can't make a scroll freehand'? It takes practice. It takes pain. It takes suffering. It takes diligence. It takes perseverance!
I will update you as I proceed. I need to get an estimate together because I need to price out how I will make 8 of these bad boys for a local ornamental iron shop. Stay tuned!
-
A couple of items. The scroll tool can be made of mild steel, but should be thicker and wider than the scroll to be wrapped around it. After offsetting the fishtail, the end of it is cut at right angles to the stock length. When you start the bend, if you're right handed the offset is facing left. If left handed, it faces right.
It is difficult to free hand a scroll to look like another scroll, even if based on the 'golden rectangle.' Archimedes had another way to lay out a scroll, and on paper, it looks kind of like War Room coordinates...concentric circles and criss-crossed lines. We should realize, however, that neither the golden spiral nor Archimedes spiral is like a chambered nautilis or a snail shell. They have different ratios. Some are tightly scrolled with less negative space between convolutions. Some are "loose." Yet both are legitimate scrolls. A good designer can make a quite open scroll using the proper sized steel, and the negative can dominate the positive.
One can make scrolls all day long on paper, but then what? To make it of steel, you must know how to free hand it. If you transfer the paper scroll to a steel plate or table, you can attempt to match your tool or scroll to the layout. I suggest that this is a pain, that it is time consuming, and that it will be a "back and forth dance" of bending and unbending. Drive ya' crazy. It is easier to make a scroll form to your liking without using a pattern. Make the tool a little oversized, so that you can make a soapstone mark on top of the tool to show you where to stop bending. In that way, the finished scroll will fit your designed module.
The catch is to forge and watch the negative space grow in an exponential fashion. Arithmetic was not my long suit in school, so I'll try not to get lost explaining "exponential." Another way to say it might be, there is a constant rate of growth from the center, and it may be more easily seen in the negative space that the positive. If the negative looks good, then the positive should look good.
One way to check the scroll is to draw radiating lines from the center outward, and between convolutions. As you get away from center, each line gets a little larger. If the lines stay the same length, you're no longer "growing." If the lines are getting smaller, whoa! You can drop back to see where you've started to go bad, and you can open it a bit from that point and rebend if necessary.
How can it be done, If you're not using math and geometry? By practice, and by realizing that you're involved in art and craft, not just math and science.
There is another type of scroll that we see in early ironwork. Once you get a little ways from the start in the center, the negative space distance between convolutions remains the same. The negative space does not expand. On this scroll, you will use more stock than on Mother Nature's style of an expanding scroll. Is this Archimedes spiral? Perhaps.
Another scroll which I personally like, is an oval or elliptical scroll. These were used in old time ironwork. They are a little tricky to forge, if you are used to forging with circularity.
Another consideration. Let's nit pick. You want the outside of the bend to be "flat," a bent plane surface, because of the way the tool is used. But when you bend flat stock, it concaves on the outside of the bend, and the corners stay high. I'm talking about cross-section, and this is a concomitant of forging. My old horseshoeing teacher used to yell at us, "It draws on the outside of the bend, and it upsets on the inside of the bend!" This can be overcome by using common sense forging. If you draw the hot stock lengthwise through a bottom swage in conjunction with a top fuller, you can forge a mild concavo-convex cross-section BEFORE BENDING THE SCROLL JIG. When bending, have the convex side up and it will become the flat side upward instead of concaving.
When you make the finished scroll on the scroll form, it should have a little of the concavo-convex, because it is a nice aesthetic.
"Practice doesn't make perfect. Perfect practice makes perfect."
http://www.turleyforge.com Granddaddy of Blacksmith SchoolsThis is so well-said and helpful. Thank you, Frank!
-
Thanks, BigRed. I'll look into it. Lots of good information in your post!
rvb -
for starters or a quick process review check out "The Grid method of resizing"
at: http://sibleyfineart...ridding-art.htm
Thanks! -
I use AutoCad, paper/pencil, and such.
In any format I like to use graph paper type background so re-sizing full scale is not that big of chore.
I have been unable to find information on how to transfer a drawing to full-scale. Is it just a question of drawing the grid to full scale (e.g. 1') and re-drawing your scaled down drawing in the bigger boxes? I would like to see this demonstrated somewhere. Might you have any links and/or resources to guide me through this? I'm sure we had to do this in art class when we were kids, but, alas, I have forgotten it.
rvb -
Will do! Thanks for the information. I am familiar with the Golden Mean, but will look into the information you provided. Thanks!
I'd be happy to have you come down sometime. I'm pretty busy now, but things will slow down in a month or so. Shoot me a PM sometime with your email.
I haven't been on the forum much and let this thread get away from me. I noticed though that you said you have a difficult time drawing freehand scrolls. You and I are part of a large crew on the same boat. Freehand scrolls are a headache.
One thing that helped me was the Golden Rectangle. I'm not going to lay it all out here because I don't even remember it all. Basically it's a geometric formula for drawing a perfect rectangle. You can use that formula to draw a series of perfect rectangles, and then use those to draw a perfect scroll. It's like connecting the dots.
Do a google search and an IFI search for the golden rectangle and the golden scroll. You'll find enough info here and there, to figure out how it works.
I used the Golden Rectangle formula to draw some "perfect" scrolls back a year and a half ago. Since then, I have had much greater success in drawing scrolls freehand, because the Golden Rectangle method trained my eye, to an extent, to see a good scroll. I now draw all of my scrolls free-hand.
A light table is also a great help with scrolls. -
Glad to help out! Sharing information is what the forum is all about, right?
-
I am posting this link for all who want to download these great resources. They are free and contain a wealth of information.
http://www.hct.ac.uk/Downloads/craftpublications.html -
Oh wow! If I had this book a year ago, I would have made money on my gate job!!! I had the worst time with C-scrolls doing them by hand. I couldn't get both sides to come out even because I couldn't reach all the way in when bending freehand. I wound up bending each close to where they were to finish then taking a full heat on the scroll, standing it on end, and giving it a good pop with the hammer to bring the ends toward each other and bulge the back (which was straight) out into a graceful C. Let's just say I learned a lot about doing scrolls freehand. And my pile of junk scrolls was bigger than my good scrolls. But, they all became something else (welding jigs, welding practice, scrap, something to step on). ;)
-
BTW, Page 35 in this file ----> WROUGHT IRONWORK PART 3_tcm2-18921.pdf tells about making the scroll jig. Thanks, Frank!
-
I think I found it! The guy that has beautifuliron.com had it posted. Here is the link to the books so everyone may enjoy them: http://www.beautifuliron.com/links_blacksmith_farrier.htm
-
Now you have me on a hunt! Is it the companion to the COSIRA "The Blacksmith's Craft"? Thanks for your help.
Sorry!! I retract "The Blacksmith's Craft." The scroll form is in its companion volume, "Wrought Ironwork" out of London, England. It is a free download if you can find the right url. It kept changing. -
Well, let me go find my copy and look at it again! I anticipate my butt being in your class in May!
Rick, You betcha! When drawing to scale, it helps to use inch-lined paper with inter inch lines, as well. This paper is usually sold with pale blue fine lines
There are different types of scrolls and ones with various ratios even though they may be the same size overall. There is a golden ratio scroll, an Archimedes spiral, eliptical scrolls, etc. It is best to learn how to free hand them with mucho practice than to try to plot them via geometric tricks. Making a scroll form (jig) is shown in "The Blacksmith's Craft." You need to be able to visualize. Francis Whitaker said, "If you can't see it, you can't make it." -
Frank, might this be demonstrated in your class? :) I received your hard-copy brochure. I did something similar to your process for the gate and grilles I made. I welded up the frames laid them down on the floor of my barn and drew scrolls with soapstone. However, I would have liked to make sketches/drawings to which the customer could agree and from which I could give an estimate. My wife will be my guinea pig on the next project. She wants a 'scroll-y piece for the mantel'. :)
-
Thank you so much for your nice reply and compliment of my state! I love Kentucky!
For the gate you see in my profile picture, I just freelanced the design based loosely on some window grilles I made for the client. I made the frame and then drew with chalk on the inside of the frame right on the floor. It worked ok. I'm trying to get better at the design and drawing process. I lost money on the gate job. I did 2 sets of drawings the customer didn't like and didn't bill an hour for it. :(
Do you give them a quote or tell them an hourly rate once they have approved the design?
BTW, your Anne Ville is a cute idea. I just didn't understand it at first. I have a tendency to be too serious. :)
Rick, I have A1sized heavy paper/card so I lay it out and tape it together to cover the span of the drawing, (ideally you could use paper rolls). I either do this on the floor at home, I have a good sized floor space in my living room, or I have a drawing table at my workshop, but on that I can only do a section at a time, so I prefer to sprall out over the floor, or you could do it on a wall, walls of my workshop are corrugated sheet though, so doesn't lend itself very well to drawing on!!
I use the bottom of the paper as the ground level, you can draw out the stairs, or wall or whatever features you need, etc. I draw out the measurements I have made on site, and then just literally draw out the design as it would appear, full size to measurements. You can then roll this up and take it to the site and sometimes discover that you need to change something on the design because of some unforseen thing, or usually just something you haven't taken into account at the time. Like I said, I have only used this for smaller jobs, so it might not work for much bigger ones, this I have yet to discover.
By the way I only do this full scale drawing if a smaller design has been agreed upon, and I have received a deposit for the thing! I also bill the client for the time spent drawing and designing after the initial rough sketches, for me those are what I need to do to get the job, but the scale drawing is part of the job itself.
If I need to I transfer the drawing to my work bench, I do this by rubbing over the back with chalk, and then drawing over top to transfer it to the work table, or often I will just wet the paper and use the drawing as a template.
I am by no means an expert, but this is what I do and it works for me and I would welcome any tips also. I have thought about using CAD programs but I already spend too long in front of the computer, and I enjoy the drawing process.
And, my name is Colleen, "Anne Ville" was a bit of a silly joke and I've been meaning to change it back but not got round to it!!
Kentucky is a beautiful state, my father has been attending the Derby, for many, many years, I went when I was 10!


Magnetism and Anvils
in Anvils, Swage Blocks, and Mandrels
Posted
I found this which was interesting:
You need to create a solenoid. Get acquainted with Lenz's law and a few other things pertaining to magnetism (any A-Level physics book will contain those things).
Just take copper wire, and coil it around a paper tube of the diameter you need. You then need an alternating current source, or alternating movement.
Let's say you have a 9V battery attached to a coil wrapped around a paper tube (use a resistor in series with this or prepare for fire!).
You want to demagnetize a nail. You can use a constant DC current and move the nail in and out of the paper tube to simulate alternating magnetic fields, or you can provide alternating current. That, is as simple as using a "push to make" or "push to break" switch in the circuit, placing the nail in the paper tube and attempting to see how long it takes to contract arthritis.
Either way, you want the magnetic "grains" to line themselves up uniformly, for a magnetised object, and to demagnetise, you need to throw them out of order.
Read more: http://www.physicsforums.com
Perhaps the "wiping" people are talking about is enough to "simulate alternating magnetic fields" as in the excerpt above. Or, as it also says above, "you can provide alternating current".
In any event, I would like to see if wiping the anvil with current would do it.
PLEASE do not drop back ground colors in behind your text, it makes it very hard to read on some screens and is a royal pain to edit out