

DarkFire
-
Posts
5 -
Joined
-
Last visited
Content Type
Profiles
Forums
Articles
Gallery
Downloads
Events
Posts posted by DarkFire
-
-
All, Thank you tons for the information!
I would now like to let y'all know how the test fire went issues we had and successes we had.
About 4 days ago we started the build by creating the insulation from plaster of paris, play sand, and water. This was going to be scrapped as it was just leaking and almost sweating out water for about 2 days. The bucket was placed outside as we finally got a sunny day and that seemed to help harden up. we let it sit for another day. Then yesterday it was hard enough to support itself but still not hard enough to do anything with. We built a wood fire to see if that would bake it and harden it.
First we learned this, were not as good at starting a wood fire as we thought we were. We finally got a good fire to take, and stated practicing adding air into the fire, needless to say the kid came out in us for a second when it started roaring. Who would've thunk just a little controlled air would take a fire to a full blaze. We burned wood in it for about 4 hours, practicing getting that to a full blaze down to a calm fire, back up and out. Then practiced more how to get a quick fire going. Once we got that going comfortably we grabbed feed corn. Now remember we are not fully equipped for the science side of the house yet. Here is how the corn fire went.
I don't have any numbers, or rhyme or reason but I can tell you we learned how get corn burnin, and how to get it HOT. Through many failed attempts of course. Please read for those curious on the corn side!
We had a good little fire going, wood base just little, then dropped a handful of corn into the fire. this smothered the fire and almost immediately put it out. We got the wood to catch but couldn't quite get the corn to catch immediately and that was creating lots of issue. Eventually we had a small struggling flame and way more corn than needed. We got the fire out, and cleared the pot to try a fresh start. The second run we lined the edges of the bucket above the fire to hold corn (tried to copy coal style of feeding in piece by piece) we got a few pieces of wood going and let that burn for a bit, we noticed the corn would start to scorch up a bit and started to push those ones in just a couple at a time. these would drop in and crank out a hot blue flame, we finally got the fire to about a 90% corn fuel and 10% wood (left over charcoals) and following the same method it seems as though heating the corn up by fire first then introducing it into the direct blaze allowed it to absolutely roar and then drop down and coke up into great powerful clumps that burned amazingly. When we got that figured out we started introducing air and that fire was HOT. We had blue, orange, and pinkish flames without yellow in sight just raging through the bucket. While do to design we are unsure if it would have for sure melted or not but I am 100% confident with the right set up that fire would have melted.
We let that fire burn out, collected the coke and charcoals formed through the last burn. Then did one last burn this was an attempt to see how quick (safely) we could go from empty bucket to blue and orange corn fire. We started with even less wood, and had corn on the bottom under the wood a small coating, as well the edges with a heavy coating. Once the fire was established and the outer walls stated cooking, we started sprinkling that corn in and very quickly did we have a roaring blue based fire with no input air we started applying air and it quickly came to life and boom we had a beautiful HOT fire roaring.
The corn did seem to burn quickly, we found we could kinda tap the bucket with the tongs and it would vibrate the corn in. But seems you need to have quite the stockpile ready to go as it burns fast and very powerful.
We did throw the crucible in on the last burn to get some practice putting it in, pulling it out, and pouring into molds.
As far as molds go, we learned were not so great at that and if anyone has a good mix for making molds id love to hear it!
Again remember folks, this was a first time, with lots needing to be changed. Safety to be applied, and lessons learned.
Share the knowledge, help us to be better safer blacksmiths, and we are HOOKED.
-
23 hours ago, Frosty said:
Welcome aboard Dark Fire, glad to have you.
Frosty The Lucky.
Frosty,
Will add my location there, after trials last night I can absolutely see what you mean by neither both.
We did utilize the bucket, and stayed upwind from it, seems as though any coating to have existed on it was torched away fast, do you have a better recommended for melting? I would like to get more of an open top table style for the forging portion but feel the melting side needs some renovation.
correct there are no fail safes yet, last night was more of a fire practice run, see how everything worked, practice with fuel source, (we used feed corn, and little bit of wood. placing the empty crucible in and seeing how it reacted as the platform of fuels below it shifted. I have a couple years experience working at a big foundry up north, have seem some crazy things with molten metals, absolutely understand how dangerous there are and rest assured no metal will be melted until many changes have come! Thats a crazy story and I don't disbelieve it one bit. We must respect the molten metals. However I have NEVER built a small scale melter, so absolutely new side for me. I have some casting classes ill be in later as well that I am signed up for.
like I said, this is goin to be a slow studied process. Ultimately learned a lot last night, and learned a lot that needs to change, from set up, running, handling, design. however it was a successful night with absolutely no issue.
Thank you for your help! lots of great info to take into mind.
21 hours ago, Irondragon ForgeClay Works said:Along with what Frosty said, be sure and get the very best PPE (personal protection equipment) designed for casting.
Yes, when we actually start messing with melting attempt I have full casting PPE from an old job where I was around molten metal constantly. and will be gathering more.
14 hours ago, George N. M. said:And get and use LONG tongs for lifting a crucible of molten metal.
I definitely need some more sets of tongs for handling, we practiced working the empty crucible with high temp metal in there to practice handling the crucible in and out pour etc with some weight in it. Checking that metal constantly to make sure by some luck we weren't melting with a sand pile ready to dump into if need be.
Do you have a recommended change from the bucket as well?
14 hours ago, Goods said:Also, make sure you working area is not concrete. If something goes wrong and you end up with a spill, you don’t want to have spalling concrete and molten metal filing around at high velocity!
David
Do you think for melting like this it would be better over like a big sand box? Thats what I was thinking of changing to, building a box around it fire clay the wood and then fill with sand so if any meltdown happens, spill happens, etc it goes into that vs on dirt, ground or concrete. Thoughts?
27 minutes ago, Frosty said:As drawn the ash dump in the bottom would PROBABLY serve as a spill drain. You'll need a large pan of sand under it though.
Frosty The Lucky.
Would that be bad? The whole melter will be sitting on a big fire clay lined sand box (unless that changes) so that any failure will release there not anywhere else, unless its a upward boom of course. However do you think that pull trap door would work to drop ash and keep the pile down able to keep feeding fuel?
16 minutes ago, Frosty said:Very well! Open exhaust it is!
-
On 5/22/2021 at 1:29 PM, Charles R. Stevens said:
As your in Oklahoma, my first suggestion is to join the Southfork craftsmen. The are your local artistic blacksmith association. You don’t have to join, any one is welcome at a meeting, but you do get access to the club coal piles.
I live in Bradley, that is south of OKC about 40 miles.Okay! I will look into this, thank you!
23 hours ago, George N. M. said:Dear Darkfire,
Welcome aboard, good to have you. It looks like your furnace is more designed to melt metal for casting rather than getting it hot for smithing. Correct?
George,
Thank you! The goal is yes to melt, cast, then hot forge. For the exhaust would you say rather than a spring loaded flap maybe more of a smoker style flap that pivots and I can release by control rather than pressure and lose the risk of that build up and loss of oxygen? As well after the test burn I for sure would like a valve on air inlet to control the flow. Thank you!
-
Happy Smithing all,
I am located near Hinton OK for any of you seasoned blacksmiths in the area, would love to get in touch.
I hopped on this hobby after really just spark in my head to be more self reliant and get back to the roots of man, creating tools and weapons for survival, while not quite applicable anymore the idea of casting and forging sparked my interest. I have read in the forums roughly 4-5 hours worth now scattered over a couple days, wow what a lot of great info.
now im asking for some feedback! While there's some things id like to change about the entire set up this is what I had around and im DETERMINDED to make it produce, like ive read a million times a hole in the ground will do just fine, so I reckon any contraption someone is crazy enough to build could work. Either way gonna try and report back!
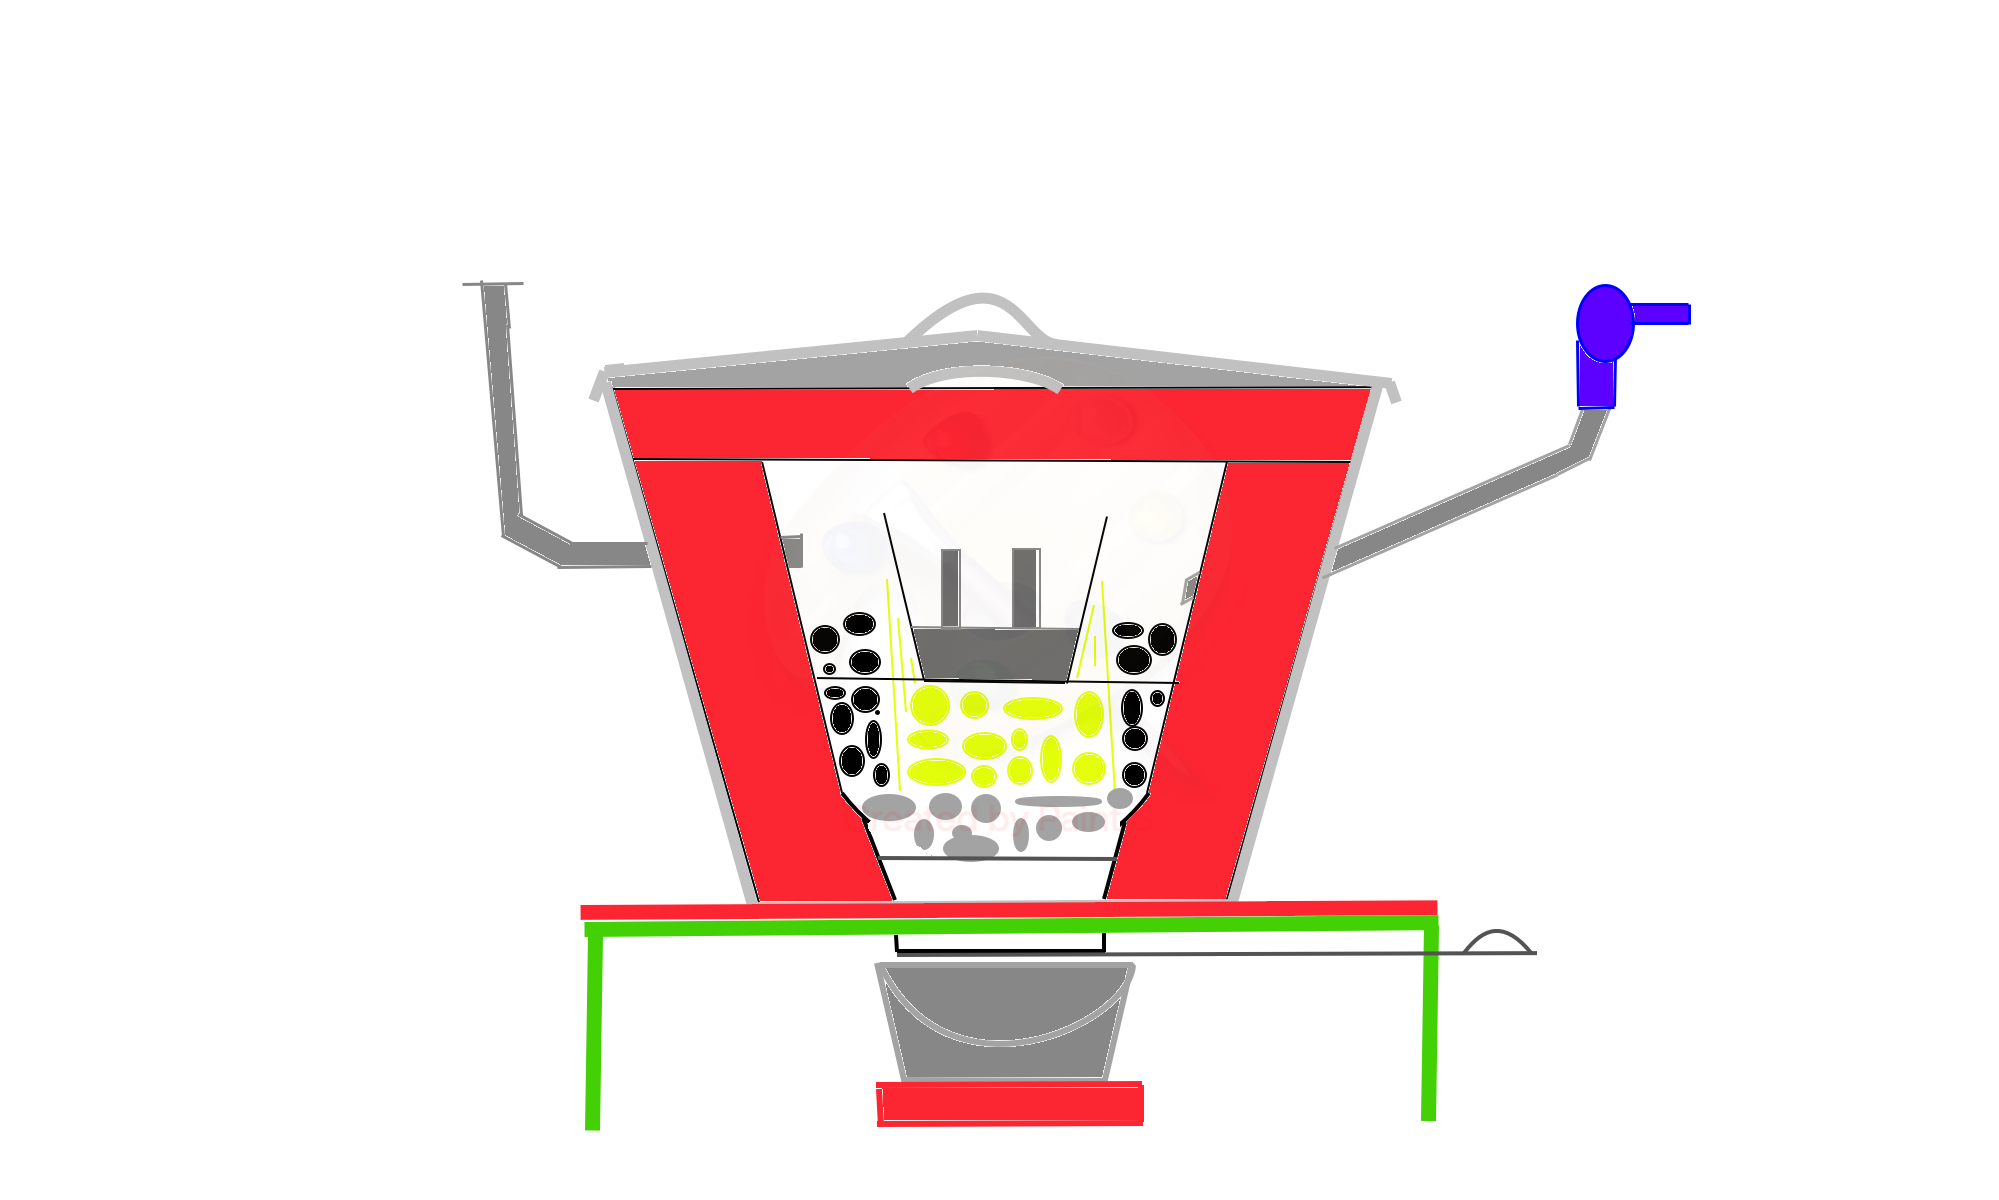
I have a 10 gallon galvanized Steel bucket, I am lining it with fire clay for added insulation, using steel piping for air inlet fed by a hair drier, I absolutely want to get a hand crank later on, just workin with what's on the property. I intended to add 2 sets of grating 1 for the crucible to sit on, 1 for the fuel source to sit on, and fall through as needed, this bucket will be sitting on a wood table with a hole cut through matching the hole in bottom of bucket for ask droppings, there will be a steel sliding door that can be pulled to both create an updraft and allow ash to fall into the bucket below, which will be sitting of a fire clay block, as well the top of the table will be lined in the clay.
I have also added an exhaust tube, same steel pipe as the air inlet, however will be putting a flapper on it, thinking to keep it where the pressure of the gas and smoke from fuel will force open as need be to not let temps drop but let gas formation escape. Hopefully at least!
as far as the rest, it will be double lidded with the galvanized lid, as well a clay lid. Im not quite sure this is necessary from my readings as ive seen countless open top fires, and may not need it, however going to construct anyways would rather be prepared than not.
I have a drawing I made up of it, hopefully my words were visual enough to help the picture make sense.
I would love and appreciate any and all feedback on this design, improvements, changes.
Coal isn't necessarily hard to come by but its not quite easy either. not planning to melt high temp metals right off the dot, or am I. either way, looking at grabbing a couple bags of charcoal, no not the grilling kind, I promise I been reading! and I got some feed corn already around and found the corn v coal situation highly interesting, so will be attempting both soon.
also one last thing, for the fire clay, I know it needs to be baked for hardening, I was planning to just do a wood fire at first, and then upon further inspection and cooling if all goes well start playin with fire and see if I can't melt something.
Thanks!

Bucket Furnace
in Smelting, Melting, Foundry, and Casting
Posted
Thanks fellas! Will intake all this and apply to the future JABOD build that will be coming soon. Going to use the red dirt clay around my property (western ok) test burned some that I gathered and it hardens up real well seems to work perfect.
Lots of revamps more up to “code” are coming. As well a plan to build a “melter” and a “hot forge” if my terms are correct to the blacksmithing world.