

Bakeforger
-
Posts
5 -
Joined
-
Last visited
Content Type
Profiles
Forums
Articles
Gallery
Downloads
Events
Posts posted by Bakeforger
-
-
hello, I posted a while back and finally got my forge design up and going. I was wondering if anyone new a good place to look for steel to use for Pattern welding? (Other than a steel supply place) basically looking for cheap/scrap I can use to get a start into it. Thanks!
-
Thanks guys! I made Frosty's t-burner today and lined the forge with ceramic insulation, lit it up and worked great? Just curious the temp got really high however the heat seemed very localized, should I add a second 1/2" burner towards the rear to add heat to the back end of the forge?
I just listed the basic ratio for building an ejector type burner like your Side Arm in another thread. I'll repeat them if you can't find it. The jet that works well for a 1/2" burner is 0.023" - 0.025" mig contact tip. The basic how to for a T burner is in the gas forge section of IFI.
A brick pile forge like you have is a fine forge design. If you use a split hard fire brick for the floor and light insulating fire brick for the rest you'll have pretty good luck.
Another type is a cylinder lined with Kaowool or equivalent ceramic blanket. Again a hard, tough floor will make it live a LOT longer, a split hard fire brick or kiln shelf work very well. A good kiln wash on the fire contact surfaces of the forge will keep them in good shape longer.
ANY gas forge can benefit from a kiln wash, high zirconia wash is preferred as it's really bullet proof where welding flux is concerned. ITC-100 is pretty much THE kiln wash. I have it on the flame surface of my forge but the stuff is just too expensive for me anymore. It's over $100.00 a pint/lb. + shipping and I just can't afford it anymore. Our club bought zirconium silicate bulk and we're experimenting with a matrix material to stick it to the flame surface.
Sorry, I get carried away and you really just need something simple to get you up and working. Light fire brick with 3,000f split hard fire brick or kiln shelf for the forge floor. Figure the volume and shoot for between 100-150 cu/in volume and you'll be golden. There are a LOT of examples of simple light fire brick forges in the gas forge section of IFI. Take a lunch, something to drink and a comfy chair there's weeks of good reading for you there. A couple days worth in the forges sections.
Don't hesitate to ask me questions but do some reading first please, it'll make it faster and easier for both of us.
Frosty
-
Thanks for the feedback! I will definitely be doing some research into the 1/2" burner. Also what type of insulation or "insulating refractoy" should I use and where would I find it?
Not to mention that a hard firebrick forge may take over an hour to come up to full temperature where as one made with an insulating refractory may be ready in 5 minutes.
-
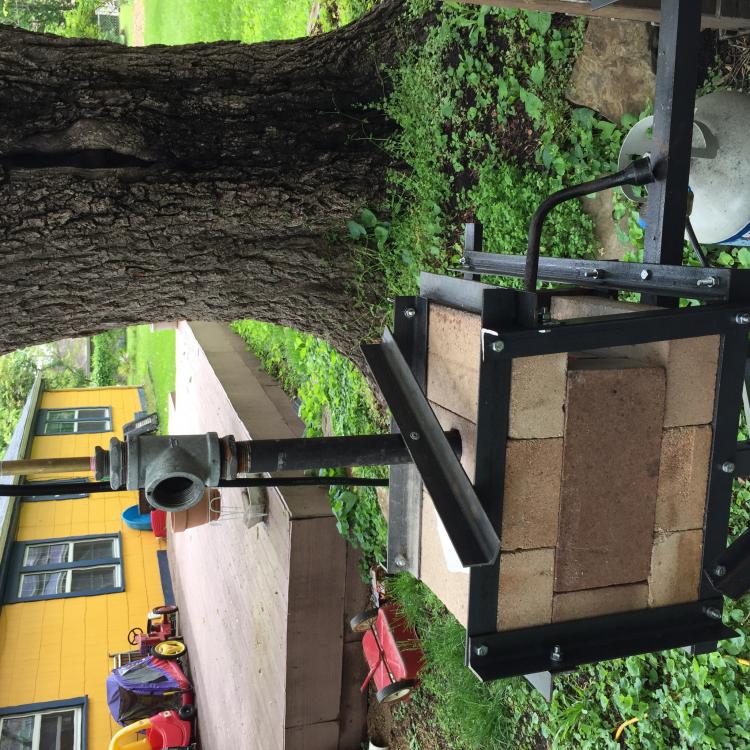
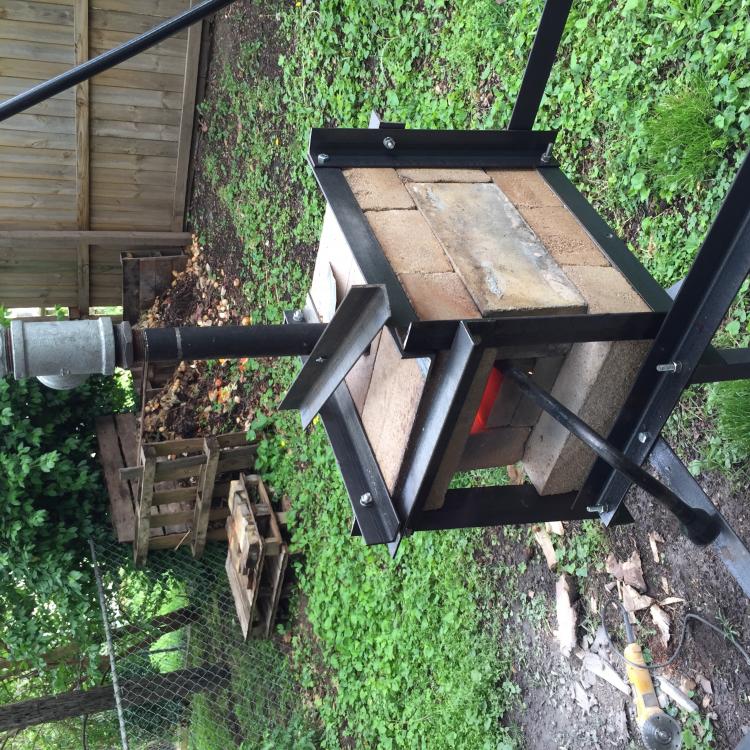
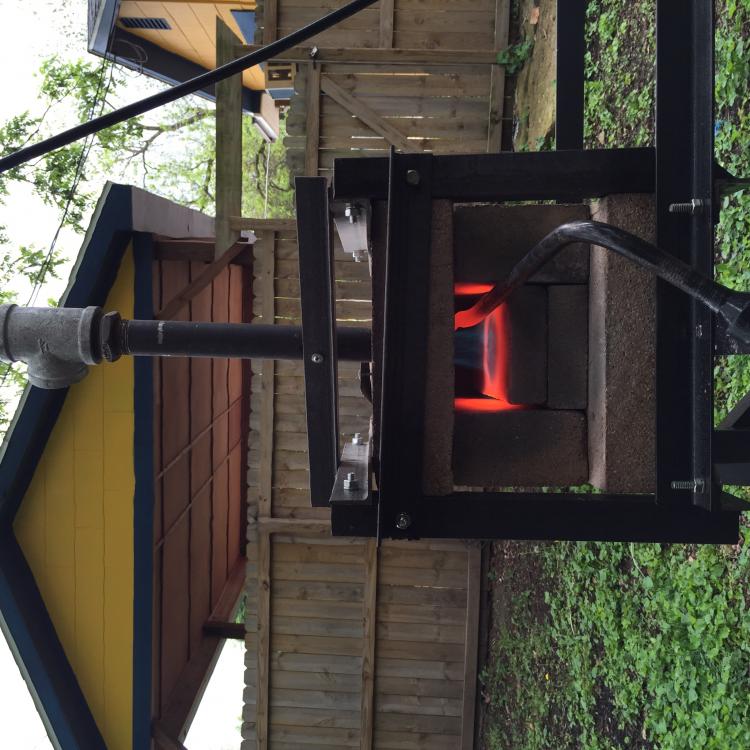
I built the gas forge pictured, I read about a few different types of burners and thier capabilities, I decided to go with the 1" burner design shown. I used a 1 1/4" tee and a .030 mig tip, the tube is about 11-12" long and goes directly into the forge just down to the inside of the chamber. Inside dimensions are 2.5"x 4"x 9". The burner seems to flutter a lot as well, spitting fire out the front. And just runs very inconsistent. The way I have it set up I am running about 20psi and still cannot get the inside of the forge to get hot enough to get to a nice yellow hot it just gets to a orange glow. Any suggestions?


T Burner Illustrated Directions
in Gas Forges
Posted
Frosty, I noticed on your doc you had a pic of one of your forges that had burners coming in at a 45 angle and mounting with floor flanges to the forge. Is there a particular design advantage to this vs. straight down into the forge as shown in a latter picture in the document.