
Tiefer
-
Posts
43 -
Joined
-
Last visited
Content Type
Profiles
Forums
Articles
Gallery
Downloads
Events
Posts posted by Tiefer
-
-
Yeah, thats the idea of what i was getting at- good example- i could have saved the effort of trying to describe it and understand it by finding a picture and asking "how do you do that?" ! Thanks
-
Super helpful info guys! Really helps in the wrapping my brain around it part. I will look up those books to- need a few more on hand anyway. Thanks a bunch- will keep ya posted, though it might be a bit
-
ok, I'll try to get a sketch in. I guess the ultimate question is about the angle of the shoulder of the tenon. The normal monkey tool type thing will give a 90 degree shoulder, how do you make a different angled shoulder? Hmm, well to the drawering. thanks!
Might need to try to flip the image -
So I've been striking out on what I think is a common technique. I can't wrap my brain around the process and oddly enough I can't find a single reference on the ol' internet- and I haven't been able to get to the library. Maybe I'm looking under the wrong topics? Would love a reference and/or discussion.
A bit of a two part question- the first leads into the real project...
Part 1
How do you make an angled mortise and tenon joint? This seems to be a common technique in traditional stairway pickets in order to maintain a nice joint while keeping the picket nice and vertical and the handrail at it's correct angle (that is without the handrail cap). It's really a question about the shoulder I think; I can make a nice 90 degree joint, but how do you make that joint a different angle without bending the tenon and ending up with a sloppy looking joint?
Part 2
Ok, so the project I'm working on is a firewood holder (and sorry, no pictures yet and we'll see how far my description goes). Think 2 half circles next to each other with the ends/top being closer than the base like a cradle- or two tires leaning on each other if that makes sense. The circles would be joined with stock tenoned on both ends flush with the inside of the two circles. The Upper joint would be perhaps 1 foot wide, and the base/feet would be riveted at about 1.5ft. I know I could just rivet some stock on the outside of the circle with this spacing, but would like to figure this out.
Oh- I'm using 5/8 square and looking at a diameter of about 3.5ft wide and about that tall (we'll see if I fall back to 1/2''!)
Hope this isn't to confusing, but appreciate any thoughts and suggestions!
Thanks a whole bunch!
-
Yeah, I think updates and rebuilds will just be apart of it... on to the next thing!
-
Well I wish I would have tried that... (and geometry is still very math like to me...but that makes a bit more sense). I gave in to the old standard and fudged it. Not pretty... not even close, but it works and much better than my old brake drum! Almost like it's supposed to! Next task is to figure the chimney. Might do the standard design on that. Thanks for the input, next time i will try the simplified version!
-
Thanks Glenn, good idea. I started with that but thought there might be some 'generic' angles floating around to guide the way. I think your right though, without a good lesson in compound angles it will be easier to eye ball it till I get there.
-
Ok...I'm a math flunky and I'm trying to build a new fire pot for my coal forge. What I can't figure out is at what angle do I cut the sides so that I have a square or rectangular pot that fits together?! There is probably an easy way to figure this, but is unbeknownst to me. Could someone give a pointer or two? Is there a calculator for geometry dummies out there or do I have to use online pyramid equation/calculators (which still keep me lost). I want to build a relatively standard firepot and I have 5'' by 1/4 plate. I thought 13 or 14'' sides would be good and about a 4''ish base for a 3'' pipe. Would love some help figuring this...Thanks!
-
Thanks thomas! Ive been thinking about building one like that but have heard little about them. Seen a few pictures and a youtube but didnt know if there were other tricks out there either. Guess ive been a bit slow to try it because i keep ending up in a bit of a 'hey i could build that tool! Cycle' instead of just forging! I like the idea of keeping it simple with digging a trench to try my idea instead of commiting a bit of time to a forge i may not need yet. Thanks, great feedback!
-
Hi. Im not sure if there is another forum on this that ive misses but im striking out on a specific how to. So i have a basic brake drum forge and am trying to do a long heat (longer than 8 inches, closer to 24 inches), so i can do long twists. Whats the best way to do this? I can only get the 8 inches at best from the brake drum and the torch only goes so far as well. Is there any way to get a long heat without a propane forge? (Not had luck with the propane latley). Has any body done a long trench style coal forge? Thanks for any suggestions!
-
John, i meant to ask about specific kinds of brands that you would suggest...
-
Thanks ya'll I appreciate it! John i think your onto something. As ive looked over the openers ive done 2 to 3 weeks ago a bit closer, there is a bit of pattern where the rust is showing up. A bit of inconsistant cleaning withthe nooks and cranys with a wire wheel that doesnt hit all surfaces evenly with the random greasy paws and sweat makes sense. Any suggestions on metal prep chemicals that could help? Either something like a degreaser of sorts or neutralizing type thing? Thanks folks for some extra clearity here!
-
So here's my problem: within 2-3 weeks of finishing things like hooks and bottle openers with wax I'm starting to see a light "dust" of rust on various places of the piece. I am fairly new to this whole thing but thought it would take longer to see rust type stuff. I'm not sure if I'm doing something wrong or just placed to much trust in my wax. Here's what I've been doing... forge the thing, cool, wire brush with a wire wheel to a bright finish (no scale or rust left), heat the piece with an oven, propane torch or the coal forge, apply wax (the bees/turpentine/boiled linseed oil), let cool to warm and apply a second coat. Seems to be kind of a standard thing but I didn't expect rust after a couple weeks. Being in Western NC it is humid but am I missing something? I would appreciate any suggesting and feed back. I love useing the wax... its classic, has a great look and feel and smells great but am wondering if the rubbed black rustolium is the solution for at least the traditional look? Thanks
-
I've been looking but it's time to just ask... I'm considering an apparently pretty good deal on a Peter Wright off of craigslist. Will try to post pics but we'll see. The question is: On the front left foot there looks to be an 'H' stamped in. Is this the stamp of the builder? What else could it be. The rest of it seems pretty clear... 108lb, 1850-1890ish, Peter Wright Patent (stacked). But what is the H? Despite the edges being a bit rough, the face looks nicer than my Trentons! $183 ain't to bad!


-
And there you go! Great info, thanks! Used it for the first time yesterday, worked like a champ! Right tool for the right job even! Very pleased. Now if we could just do something about the guy with the hammer...:-)
-
There is a square hole below the horn, above the heel, on the very bottom, and the hardie and pritchel holes. 5 I guess. According to what I read on an abana forum, and in line with fatfudd, boker (a Trenton agent/dealer) imported anvils in with the Trenton name from Germany and England. The English ones had solid wrought written in a circle made by Peter or Henry Wright. Might have gotten the best of both worlds. Either way me thinks it will work! Time to hit it...pun intended:-)
-
Just found this. (Apparently the last post didn't post), it might be a English or German import. Maybe English because of the ' solid wrought' written in a circle and the small steps on the feet which it could have been made by one of the Wright's which seems to be in their style.
-
Just found this. (Apparently the last post didn't post), it might be a English or German import. Maybe English because of the ' solid wrought' written in a circle and the small steps on the feet which it could have been made by one of the Wright's which seems to be in their style.
-
On an abana forum I've found a little info that stated it could be an English or German made Trenton made by one of the Wright's potentially due to the 'solid Wrought' written in a circle and the small steps on the feet like P.W.s. Could be a second to.
-
One more. Better pic of the bottom. Now ya got me wonderin!


-
Could be a 5,3 or 6 maybe on the right foot
-
Oh yeah, the saw Dr anvil is about 70 or so. Not done much research on it. How do you mean called shape? Can't see anything on the right foot that looks like a number though.
-
So as far as I can tell that's what the logo looks like. Real hard to see the whole script. I tried to highlight the letters with a little flour, might help a bit. I don't know if there are other brands that use that sideways diamond logo. Here's some pics.


-
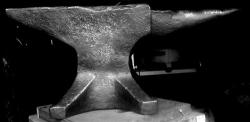
So I finally picked up my first 'real' anvil! Might have paid a bit much at 450 for it but been striking out for a good while and saving for that time too. Figured I could work with a little chipping and sway because it has decent rebound and ring (along with being a Trenton!). Could anybody help me with a general date? The only markings are on the side; the Trenton logo below the face, a faded solid wrought below that and a clear 147 below that. There could be a 1 on the other side. There is nothing at least that I could tell on the feet. I hit most of the surfaces with a wire wheel then waxed it but nothing showed up. Would this be an 'early' Trenton? Would love any other info if you're willing. I will post up some pics as well as the evolution of my anvils. It's comical in the addictive sense. Oh my first anvil is not pictured; think of 3/4 in angle iron that's 6 in long on a railroad tie and there you go. Thanks and happy hammering!


Hofi style chimney
in Chimneys, Hoods, and Stacks
Posted
So I see this is a real old thread, but if this goes through, Thor, thankyou for that post. Sometimes the most simple solution is the one I should have thought about long ago, before I wasted my time making two chimneys that almost worked! What's even funnier is that I looked at the angle iron trick for a super sucker chimney but still decided to test never welded sheet metal skills... phew. Great quote to. Glad this topic was posted. Off to build another- hopefully functional chimney!