

JAKA
-
Posts
38 -
Joined
-
Last visited
Content Type
Profiles
Forums
Articles
Gallery
Downloads
Events
Posts posted by JAKA
-
-
Refractories vary greatly in how insulative they are. Since temp in a forge is a balance of heat in vs heat out how much heat the refractory soaks up or transmits out is an issue.
Having a regulator on that propane line is a *must* IMNSHO makes tuning the forge a whole lot easier. Talk to a local propane dealer about getting a "redhat" regulator or other type that will run between say 0 and 25 psi. Getting friendly with a Propane dealer is like being given free money! Lots cheaper to get tanks refilled than to use an exchange service! (and my local dealer has a frequent filler program where I get one tank free for every 4 I fill---a 20% discount!)
There is one best air/gas mix to get the most heat out of the system FOR EACH LEVEL OF AIR OR PROPANE. So you can set the propane and adjust the air till you get the best or set the propane and adjust the air. Or you can work both up from some stating value till you get the heat input you want.
I tend to tune the air unless I need a totally different level of heat and even then I will usually start at what I'm used to and then add/subtract propane and then tune the air to the new value. Coarse tuning can be done by sound, the burn is best when loudest. Fine tuning can be done by eye, the burn is best when the refractory the flame impinges on is brightest---have to allow some lag time as it does take a bit to come up to a new temp.
If you are worried about decarburization in high carbon steels you may detune it so it runs a bit rich---HOWEVER this tends to up the CO output as well so MASSIVE VENTILATION is suggested. (Actually with a gas forge it's ALWAYS suggested!) My system tends to run a bit leaner when hot so when I notice that the scaling is a bit heavier I will tune it again.
Blown forges generally do not need a fancy gas orifice, they do need mixing---why the right angle fitting right before the gas inlet to provide turbulent flow.
Was this abrasive enough for you or shall I taunt you some more!
I love it when you taunt me. Thank you for that wonderful information. I can already see where I need to go with my forge. By the way, I wasn't offended by those who would like newbies to gas forges like myself to do more research. I understand that one can get frustrated answering the same questions over and over which is why I feel it's on my head to corral as much info as I can. It certainly wasn't aimed at the two of you who replied on this topic. I just felt like I had touched a sore subject. Thanks again and I will trap my propane dealer next time he arrives and will visit about a pressure valve. -
I've started reading some of the other posts and see that there are those who take offense at questions without adequate research before the questions. I can understand the frustration if questions are asked over and over.
In that light, I think I'll hold off on asking advice on just where to get started until I've learned more on my own about forges. beslagsmed and ThomasPowers,
Thank you for the info you've freely shared. It's appreciated. -
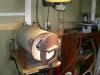
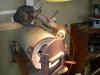
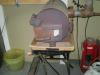
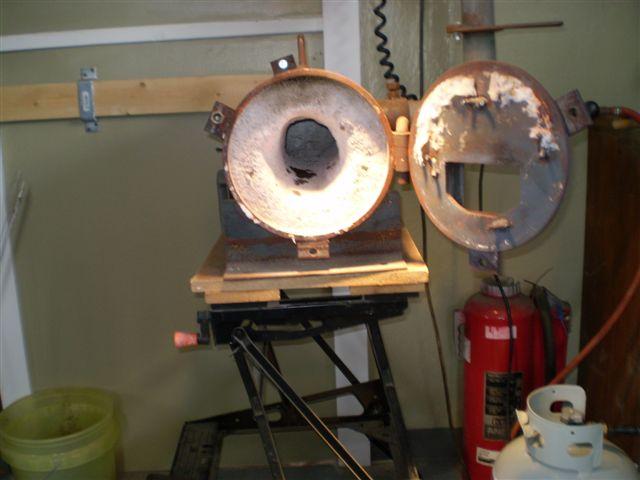
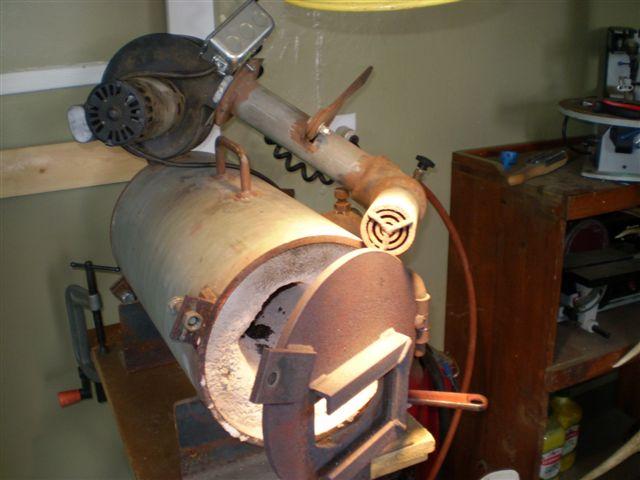
I was fortunate enough to have some friends make a propane forge for me several years ago. It heats up just fine but only has a small sweet spot in the forge for the iron to get hot and at that it's never hot enough to weld with.
As you can see from the attachments I think I need something more than the two inch pipe for a burner head but I'm not sure where to start. It runs right off the propane bottle with just a small fan for an air blast. I have a sliding plate in the inlet line to restrict air flow if needed. Any suggestions welcome. Thanks.
I don't really have a gas orifice other than the ring spacers on the end of the 2" pipe. I also do not have a gas regulator. I'm really pleading ignorance on this one. I've always used a coal forge before so this is virgin territory for me.
What looks like insulation is actually refractory such as that used in furnaces. -
I was fortunate enough to have some friends make a propane forge for me several years ago. It heats up just fine but only has a small sweet spot in the forge for the iron to get hot and at that it's never hot enough to weld with.
As you can see from the attachments I think I need something more than the two inch pipe for a burner head but I'm not sure where to start. It runs right off the propane bottle with just a small fan for an air blast. I have a sliding plate in the inlet line to restrict air flow if needed. Any suggestions welcome. Thanks.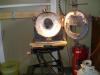
-
Absolutely wonderful tutorial. The knife turned out to be beautiful. Really nice work.
I have a couple of questions for you.
You said you peen the edges of the guard. Are you talking about the bottom edges of the slot or the top?
Also, you mentioned that you hammered the guard onto the shoulders. Would it not fit prior to this?
Not criticizing, just curious since you've achieved a really nice fit on the guard/blade. This is really useful informations and it is appreciated.
Thanks. -
I have posted about some of the knife scales over on the lapidary forum I frequent so maybe you could ask that question over there, some of those guys sell knives for a living with lots of different stone types. http://gemstone.smfforfree4.com/index.php/board,34.0.html
They are a friendly and knowledgeable group and always seem able to rise to the occasion in answering questions.
Thank you for the suggestion of the website on the lapidary forum. I just finished going through some of their forum subjects and it's a great site. Thanks for sharing. -
Thanks to all of you who commented on the bayonet conversions.
Just FYI, the owner was advised of the loss of historical value before work was started and was fine with it. I also buffed up a pair of German SS daggers for a co-worker who said the same thing. The knives were brought back from war as trophies and they (the owners) said they would never consider selling them.
On the Malachite; it's brittle but I put a macarta spacer on each side of the malachite spacers with epoxy before any finish work was started and did not have a problem with them. However, if the knife is used as a hammer I can't speak for the stableness of the malachite or any stone.
Thanks again for all the kind critiques. Forums like these are what gives those of us in the knife field encouragement. -
I posted these on the Blade Forum but would like to post them here for comments also. A coworker who owns two World War One French bayonets wanted them converted to daggers.
Results:
#1. Nickle silver guard and pommel. Ebony handle material with flutes carved in.
#2 Brass guard and pommel. Handle of Osage Orange with twisted wire in carved flutes. Spacers of red macarta, malachite, and brass
If you hold down the CNTL key and spin the wheel on your mouse you can increase/decrease the size of what you're viewing. -
Wow!, It looks fantastic.
JAKA -
Don't you know that years later when they pull that, perhaps rusted, scroll or spoon out of where they stored it that it will bring back fond memories of their forging experience. Thanks, it's good to know other get as much out of giving of our craft as I do.
JAKA -
It's good to let people know you're interested in blacksmithing.
I was surprised to get a phone call from my regular UPS delivery man one Saturday. He had seen a seldom used, small forge sitting outside my garage and wanted to know if I had any blacksmithing tools I could sell him. He had read a lot of material on blacksmithing and wanted to start forging but couldn't find any equipment other than new (expensive) stuff.
I, having 5 sons, had collected anvils over the years to supply each of them with one. I had two anvils left just gathering rust so I sold him his choice at a really good price for him and threw in two sets of tongs and a hot cut for the anvil.
The man thought it was pure gold and it really warmed my heart to see how excited he was. I'm hoping he takes me up on my invite to come back anytime and to also show me some of his forgings.
JAKA -
To all who responded to my query on patterning. These knives will be used for show only and as usual in the blacksmithing trades, you've all given me some good tips and ideas. It's much appreciated. Thanks.
-
Thanks. I had emailed one knifemaker who did use dies but cannot find my email. (I probably deleted it already).
Being a Kansas native, what do you mean by granite cobblestone?
JAKA -
I've heard that to obtain the forged, antiqued, blacksmithed, look on the upper half of blades it's usful to form the pattern from dies that are handmade. Has anyone had any experience with this. I would like to try it but have no idea how the dies are made that would give this look.
JAKA:rolleyes: -
JK, that is so cool. I love the way your table tracks turned out. I understand perfectly what you're saying on the manufacture of a ring punch. I'm anxious to give it a try. Thanks muchly for the help.
-
Has anyone tried to punch rings in metal bars? :confused: The rings I'm talking about would be appoximately 1/4" in diameter and would look like the rings left in wood when making plugs with a plug punch. I don't want to take the metal plug out of the hole, just want to make a 1/4" ring in the metal about 1/8" deep. I can't think of any ready made tool to use. Thanks.
JAKA -
Patrickrock,
I agree with most of what has been said in reply to your quest in that spikes are good for forging practice. I try to stay away from making knives out of them and stick to letter openers. I use them as gifts and they don't need all that much of an edge.
JAKA -
Thanks for the generous welcome to the forum and for the information on the broom construction video. Now maybe I'll have the nerve to finish the last of the fireplace tools. (The dreaded broom).
It's always been gratifying to see the outpouring of help on either blacksmithing or knifemaking forums I've been associated with in the past. This one is no exception and I'm certainly glad to now be a part of it. :D -
I appreciate the kind words and always glad to hear from a Texan. I and my family are native Kansans. We are currenty working/living in Ohio but miss the plains.
JAKA -
I'd like to say hello and introduce myself.
Ken Admire: JAKA
I've been dabbling in blacksmithing for over 20 years. I make custom knives by both forging and stock removal methods. I'm the sole author of them and do my own tempering. I can be reached @ either kenneth.admire@valero.com or jkadmire@watchtv.net.
I'm looking forward to enjoying hearing from others.
First question: How does one attach broom straws to forged fireplace broom
handles?
Thanks
:cool:


Damascus Fighting knife WIP
in Knife Making
Posted
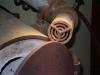
This is the side that faces the blade. Can you see the dimples from the ball peen hammer? They expand the metal at the edges of the slot, and make the slot slightly smaller. Then the guard is driven onto the tang. Then the guard is taken off and the surface ground down until the dimples are gone.
I always try for a fit tight enough that the guard has to be pressed (or hammered) on. This just helps guarantee a good, gap-free joint. I guess I forgot to mention that the tang is slightly tapered. It's thickest at the guard location.