

Jmercier
-
Posts
362 -
Joined
-
Last visited
Content Type
Profiles
Forums
Articles
Gallery
Downloads
Events
Posts posted by Jmercier
-
-
yeah that was my thoughts. and if i dont buy it i still got money to look for an anvil.
Hey Vinny, It's Justin Mercier, from at Mace's hammerin. Did you get my facebook message? I've still got that anvil for sale that I didnt drag over to Mace's hammerin 2 weeks ago. No horn, but with a hot-cut hardy already matched to it, but other than that very usable and I've got it priced to move. It's been used plenty in recent years, but like i told you, my shop got downsized when i started restoring this car, and I'm dumping my extra tools =)
I've got the pictures and stuff over here on bladeforums.
http://www.bladeforums.com/forums/showthread.php?t=796643
EDIT: I 've also got a different anvil, a bit larger around 160lbs, with a nice conical horn but no tail, from the early to mid 1700s Very cube shaped. I havent posted it for sale anywhere but it's potentially available too. -
good old 20 mule team borax from the laundry isle at walmart =)
-
This whole year i've had far too little time in the shop to do much of anything, but I finished another knife.
Cable damascus sgian dubh
8 cm blade
9 cm curly maple handle (1cm brass center, 8cm of wood)
full flat grind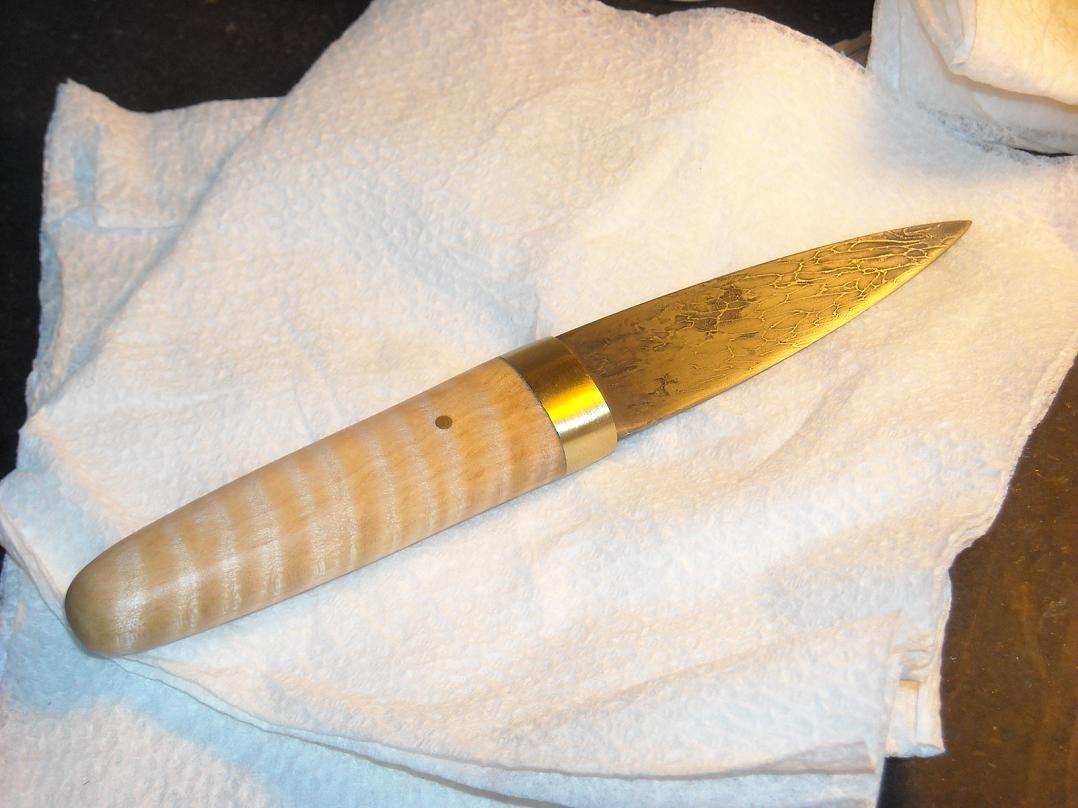
-
You guys don't realy trap bears do you? Sounds revolting. I'm not anti hunting, but traps....... These things were outlawed over here years ago, are they not ilegal in the USA???
I hope you don't trapped in it yourself.
Phil.
They're illegal in the US as well. -
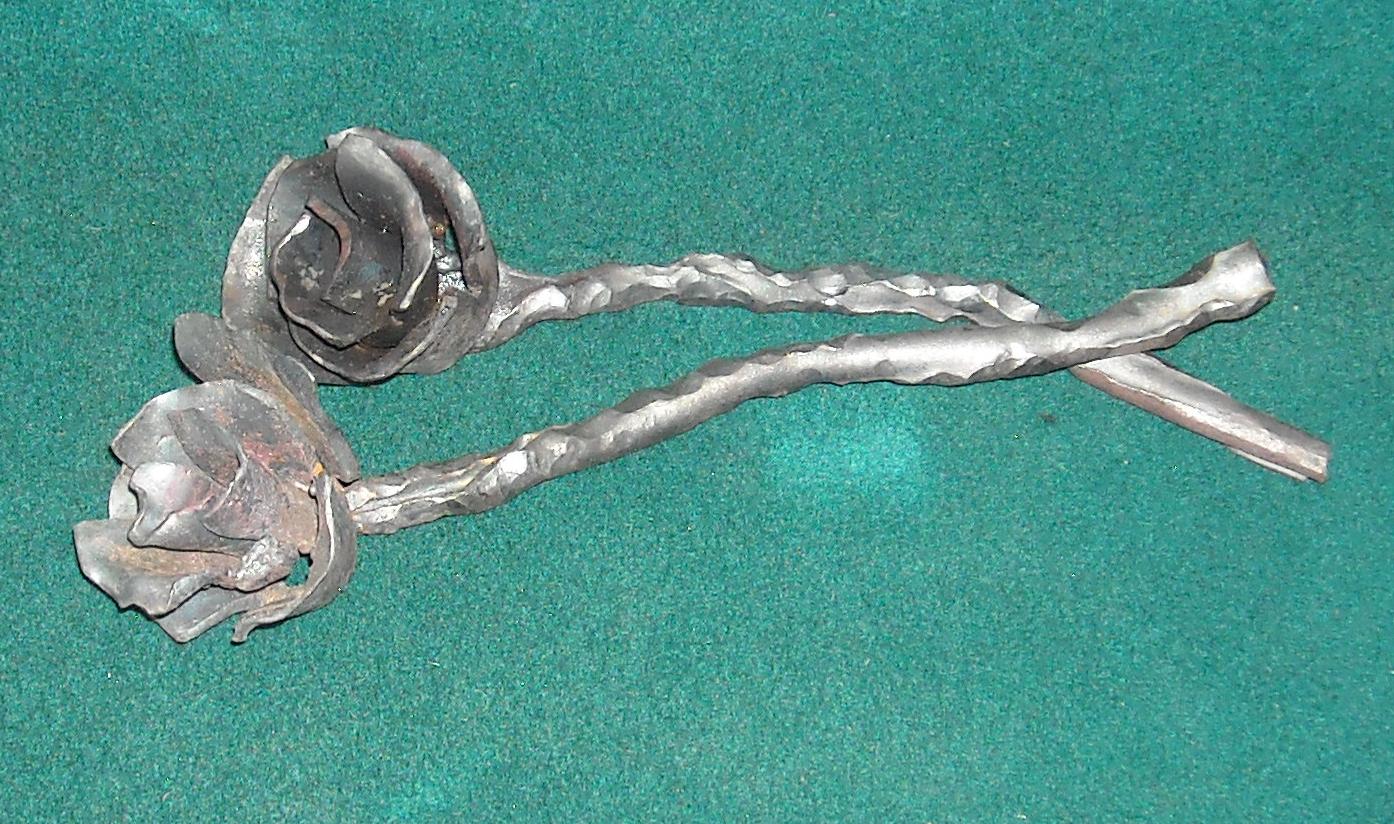
The forum is yelling at me to post something whenever I visit... so here are some one-piece blacksmith roses that I made this weekend. I like to give the stems an almost spiky texture top and bottom fullers to make them look more organic. It's not quite forging a thorn on them, but i think it makes a nice effect.
-
Fisher was the last to be casting iron anvils with steel faces, and they've been out of business for over 40 years
-
I weld a lot of cable, once you know how, it's pretty easy. The two big things are getting the cable clean, and getting it hot enough. You can clean the cable in the forge, with a lot of wire brushing, heating, and fluxing. You'll be able to tell when it's clean by when you stop getting a bunch of crud out when you brush it.
Heat is the most important part. My guess is you're not near hot enough. At forge welding temp you cant look in the forge, it hurts your eyes, and you will get sunburn standing in front of the forge for too long. Good eye protection from UV is important, you dont realize how much you're giving off when you forge weld until your forehead is bright red the next day and starts to peal. When your forge is at the point where you cant really look in it, the cable when its' the right temp should just about 'disappear' into the forge, you'll know it's the same temp as the forge. At this point the flux should be a slick glassy coat over the cable. That's the point of the flux actually, to coat it and prevent oxygen from getting inside.
When you're setting the weld, a twist works fine, but the important thing is, do your first weld, and then brush it off quickly with a wire brush, re-flux, and get it back in the forge again before it cools down much at all. Be quick about it, don't allow excessive fire scale to form (as you've got a lot of surface area due to the strands)
Once the initial weld is set, take your hammer... put it aside, grab a hammer half the size. Trust me, do this. You do NOT want to hit hard at all. You will not be doing any 'forging' blows for a while. Now while at a welding heat still, with your light hammer, follow along the twisted strands of the cable, moving from the back to the tip in quick light blows, twisting the cable to keep your blows on one strand. then go to the next strand. When you're losing heat, brush it off again with your wire brush, reflux and get it back to welding heat. You'll repeat this several times, and as you do it you'll be able to feel the cable consolidating and solidifying under the hammer. Eventually you'll start to hear the difference as your anvil starts to ring through the light blows on the cable, that's the indication that you're basically solid. Only when you reach this point should you pick back up your normal forging hammer to work on the billet and draw it out.
After you do a few of these you'll get a good feel for it.
It can also help, when you're doing the hammering along the strands, if you use a bottom half circle swage of a slightly smaller size than the cable you are welding. A good swage block with a series of half circles is great because as the cable consolidates you can keep using the progressively smaller sizes to cradle the cable. The bottom swage will help prevent any accidental 'blow out' from too hard of a blow while the weld is being set, and can help you keep the cable in place for faster more efficient work while at welding heat. -
Pretty good that it's victorian but pre-dates the georgian era ! that must make it an oddity ! =D
-
for non-threaded things, like freeing up old hand crank drill presses and the like, I just use a lot of wd-40 over time, for threads that are rusted up, i like liquid wrench
-
Someday (not any time soon unfortunately) I'm going to have my own anvil cast, but it wont be 'just' an anvil, it'll be a piece of sculpture too. It's been too long since people made art with their tools, and I want an anvil with a face on the side and stuff >_<
This desire was more or less inspired by the post vise at the Higgins Armory in Worcester MA.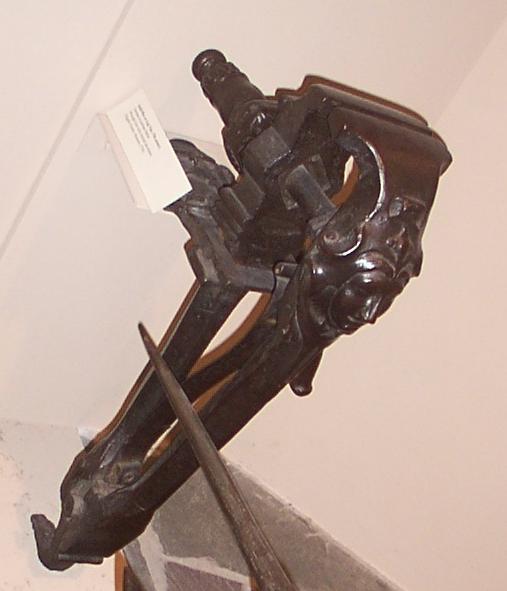
-
I just built a bellows a few weeks ago, couldn't find any good 'complete' plans so I just winged it using pictures from this site and others. It came out fine but wasn't pushing as much air as i felt it should because the top wasn't 'ratcheting' up as i pumped it. I used canvas for the sides, and bellows themselves were pretty large and the planks thick. Turned out I had the opposite problem that many old bellows have, where they need to put a rock on the top to push the top plank down faster, and instead I had to put a pulley on the top and hang a 3lb hammer head from it to reduce the total weight of the top panel by about 3 lbs and now it works just great. I made the 3 panels of mine out of 1x12s joined side to side with dowel joints. I made the stand to hold it so that it comes apart into several pieces and lays flat in my truck for transportation
I didn't remember to take many in progress pictures
http://www.tharkis.com/images/hi/nebspring09/DSCN0078%20(Large).JPG
http://www.tharkis.com/images/hi/nebspring09/DSCN0079%20(Large).JPG
http://www.tharkis.com/images/hi/nebspring09/DSCN0080%20(Large).JPG
http://www.tharkis.com/images/hi/nebspring09/DSCN0081%20(Large).JPG
and lastly the finished product, overall 5 feet long, 32 inches wide, and both the top and bottom sides open up quite deep to ~22 inches each. One thing that I did was put my center valves for the middle leaf and the bottom leaf on removable pannels so that I can get inside and service them in the future.
http://www.tharkis.com/images/temp/bellows.jpg -
I prefer magic ! =)
-
That's where an induction forge shines the most, they're incredible for repeated applications heating the same object over and over.
Pretty impressive pile there ! -
Just dont use a large hammer on it, it's not hard to break the horn or heel off of those small 20 or 30 lbs anvils.
That one is in great condition! -
That's a 2 inch pipe
-
One of the things I like about a box or accordian bellows is how compact they are. What I haven't seen though is a box bellows mounted the way accordian bellows are, vertically under the forge itself. It could be operated with a lever/treadle and counter weight and it'd be a terrific space saver.
The one drawback I can see right off the top is flamable gasses flowing down into the bellows making one of those wonderful boom noises. Routing the air pipe up higher than the air grate, then back down to it, an inverted "J" trap like under your sink, would cure that though.
Frosty
Funny you should mention the treadle, I have been planning to make a box bellows and mount it vertically, with a 'handle' on both the top and the bottom, and a weight attached to the top, so i can step on a treadle and push up and step off and have it return down , pumping air in both directions. Instead I ended up building a pair of great bellows the last three weeks, so the box bellows is on hold for now.
http://www.tharkis.com/images/temp/bellows.jpg -
The key to a forge fire is volume of air, not air velocity, smaller holes will restrict volume (and increase velocity) which is not a good thing. Also the bellows do sound small. Over the last 3 weeks I built a pair of great bellows myself, and just the air chamber (without measuring the front 'cone' part is 48 inches long by 32 inches wide (overall length around 5 foot 3 inches long)
-
Someday I plan on owning one of these =) Unfortunately that someday is after I get a power hammer in my shop. I just got a digitally controlled electronic heat treating oven, so the last (major) tools that i can even /think/ of that I want in my shop are a hydrolic forging press, power hammer, and induction forge.
I do more bladesmithing than anything else, and it seems that an induction forge would be wonderfully suited to bladesmithing, however I dont know a single bladesmith off hand who actually uses one. If I could afford it, I'd love to be the first =) If anyone knows of a bladesmith currently using an induction forge, pass their info along, i'd like to talk with 'em. -
Bring a camera =D I saw that add and thought about calling, but I've got no money right now. My shop got started with a similar craigslist add 2 years ago and I bought a whole shop.
-
I've had a 125lb stake anvil shipped to me by just serran wrapping a shipping label tapped to the face and putting a few "heavy" stickers on it (as if it needed it) If they're heavier than UPS will ship,, just sell them with the caveat that the buyer arranges all shipping at their expense.
-
That's the first Art Deco forge that i've ever seen =)
-
Now i just hope that I can get both this and the forge i'm building done in time =) I'm supposed to be doing historical blacksmithing demonstrations for the Historic Highlanders recreation group at the rhode island highland games in 5 weeks, and I never have enough time in the shop as it is =P
Thanks for the help. Hopefully I can get the 3 planks joined and glued up and ready to cut out the teardrop shape in them tonight so that thursday or friday I can take a saw to them. -
The forge is bottom draft, I measured my lumber and I've actually got enough width in the boards to do 48x30 if I'm careful with how i join the boards together to make the 3 "solid" sections, so I should be alright. (the dimensions are basically .75x11x48 pine boards that iv'e got, i guess they're supposed to be 1x12 boards 4 feet long)
Any recommendations as to the type of joint to use between the boards ? A biscuit joint? tongue and grove joint? doweled butt joint? -
I just spotted this set of bellows on ebay 220344541639 which are 20inches wide by 44 inches long, which is a little smaller than what I've been planning, so it looks like while on the small side of great bellows 24x48 should probably work. I'm not so concerned about forge welding with a demo set up, since that's not the most crowd friendly thing to be doing, but i want to be able to forge comfortably =)

My anvil is uglier than yours!
in Anvils, Swage Blocks, and Mandrels
Posted
The guy probably wouldn't know how to spell 'ruined' if he did know =/
That poor anvil =(