
Nazelhammers
-
Posts
45 -
Joined
-
Last visited
Content Type
Profiles
Forums
Articles
Gallery
Downloads
Events
Posts posted by Nazelhammers
-
-
I’m not that proficient or well versed with steam hammers or steam hammers converted to operate or run on compressed air. However, I could conclude from the pictures posted an older hammer of that type would run much better on steam rather then air because of the advantage of steams expansion rate. Take a look at the size of the main feed pipe on the hammer before the throttle and the fitted narrowed down adapter to a 1 inch air line. I would suspect you would need a huge air compressor to supply the correct amount or air pressure and volume needed to feed the hammer. If you do decide to run the hammer on a boiler you need a steam boiler not a hot water boiler or a hot water furnace. Steam boilers are typically rated in horsepower. You could get an estimate of ram and rod weight by measuring the cubic inches of each times .2833 or you could simple remove both and weigh them. Once you figure out the ram and rod weight you could seek advice from perhaps a certified boiler operate the best horsepower size steam boiler for the hammer. In the United Sates it’s my understanding you need to be certified to operate an industrial type steam boiler and that is who I’d trust to give good advise when it comes to operating something on steam power. An exploding steam boiler can do some significant damage if not installed or maintained correctly.
-
Take a look at the dust (paper) cover on the book of Anvils in America. I'm pretty sure Hay-Budden Manufacturing used Macdougal and Porter hammers to make thier anvils.
-
Looks like a old style Macdougal and Porter steam hammer.
-
Nazelhammers.... Thanks for letting us know how you remove the ram cylinder head. Much better than my suggestion.
Will you share the process you use to determine the needed wear guide thickness (which may be different for each side) using the position of the ram when the plug is in the cushioning bushing? I'm not sure I understand where and how you would measure. It seems like you would have to measure distances right up close to the top of the thinner part of the ram, which would be above the ram guide. Without the guides in place, it seems like there would be "wiggle" on the lower part of the ram when the plug is up in the cushion. It's not clear to me where you measure to determine needed thicknesses. Also, do you recommend machining the wear guides so NO shims are used?
Thanks in advance for your guidance....
With all the front cylinder components out of the hammer the first thing we do is measure everything to get a base line on the ware. We measure the ram cylinder head and ram along their full length. We then fit the cushion plug center to the ram and then parallel the flats as needed. We work off this center point outward. The same tolerances or fit apply to the cushion plug, cushion bushing, ram cylinder head, ram and guide plates. Both guides should be of equal thickness and we do not use shims. We bench fit and test all components separately and together before assembling them in the hammer. Patients and close attention to custom fitted details is the key when putting the hammer back together. The fit and details is the art that made Nazel Hammers what they are. They shouldn’t just be slapped together haphazardly and hope you get it right. There is no sweeter sound then the symphony of a Nazel Hammer running correctly with all its parts doing what they were intended to do. Take your time, nothing should or can be rushed. It might take two or three times to get it right. But when you get it right you'll know its right by the feel and sound of all the parts working together. It’s almost like the hammer is living and breathing with its own sprit. The hammer should not sound like parts are going to fall off when running.
Just to add, a jack along with an over head crane is a viable option if the ram cylinder head somehow gets stuck in the ram. If you remove the ram cylinder head bolts, loosen the guide plate housing and jack the ram at top dead center with the die removed and lift at the same time both the ram cylinder head and ram should come out of the front cylinder together. You need to be careful and crib the ram as things move up and out of the hammer and take extra precautions that the two parts along with removal do not separate or fall apart from each other causing damage. The point of separation might come when the ram clears the guide plates and housing but be prepared anywhere along the distance of removal for separation. If the ram cylinder head and ram clear the hammer together you’ll need to secure them together somehow. If they are not secured and they separate while overhead 250lbs to 300lbs of falling weight will leave a mark on whatever it hits.


-
The ram cylinder head and sundry may be warn..hard to tell since #3 will not come off. There is very little air leaking around the ram..would there not be more if things were very warn?
Where are the specs for the clearances on the moving parts?
Wedge:
How can a loose bottom die crack the ram?
Ric
Factory clearances are 10 to 15 thousandths for a 3B. Could spread out the tolerances a little more if the hammer is used for extended periods during a work day and it reaches a full heat cycle.
A loose fitting bottom die won't crack the ram. I should have made it clear by saying an ill fitted top wedge could crack the ram. I had a brain fart while typing because we are machining a new ram for a 2B that cracked because the company who had the hammer used a straight wedge without the 5 degrees added to the taper. If either top or bottom wedges do not have full purchase the full length of the dovetail and die it could cause stress in one spot or area causing a crack in either the ram or bolster. A proper fitted wedge has a distinct sound and feel. It almost sounds and feels like it is being sucked in while you’re hitting it with a hammer. When you get it right you’ll know it because it will feel and sound right. -
OK,
Indeed in my Nazel literature the part I can not remove is #3 the Ram Cylinder Head.
When I first got the tool I removed some 11 coats of paint and 3/4 of an inch of grease/grit......so much so that I thought the casting was cracked as large pieces came off with a putty knife.
I had to turn the ram guide plate as the ram was in position #3 and now it is the #1 "usual" orientation as seen in the video. I have no idea why it was turned when I got it.
Since I had to do that I figured I'd have a look at the ram and guides, but I could not get the ram cylinder head off...tried for two days even resorting to a 12 pound sledge when I could think of nothing else.
I called a few folk and it was decided, since I had a job for the hammer, to put it all back together and have run it since with just oil and electricity...about three years.
Guides:
I can wiggle the ram in the down position when its resting on the lower die..about a heavy 1/8" or so (in all directions including twisting the ram). This is most likely the reason for the work going diamond or so I think.
It would appear I need to add shims or new guides at some point..there are two hex bolts protruding through the ram guide plate..I assume these are holding the guides in place.
I removed part #62 the Bypass Chamber and had a look at the marked lines on the plate..they were very close to lining up, but not dead on..I did not change them.
Its hard to change the guides though when the cylinder head will not come off.
#18 the Valve Quadrant Latch (what I would call a pawl) is worn and that is where I added the screw ..not elegant, but it works.
All in all it appears to be a good hammer, but I have done no major work to it. I was told it was rebuilt before I got it, but....I do not think this is so.
In a few months I could try to get the Ram Cylinder head off again...if anyone has suggestions. Perhaps it has loosened with years of vibration and oil and such? That is my hope.
Die key:
It would seem I have too much of a taper, but not by much.
The die is 7.5 inches long and the key is 108 thou on the large side and 95 thou on the small so if I am doing the math correctly I have four thou more than the taper I need.
Odd how I altered the key not much at all and one set of dies fit while the other does not. Other than some add hoc solution like drilling and taping the key end to put pressure on it using bolts and spacers I have few ideas. The dies are flat and parallel with a 5 degree dovetail just like the ones I removed and I have not changed the sow block which has the 5 degree dovetail and secondary taper.
I admit I feel a bit ridiculous not being able to fit a simple key and have it stay.
As things look I may get a larger Nazel for larger work and I'd hate to monkey too much with a 5 or 6 B without an overhead crane or better yet some in-depth know how. Moving something is generally not the main issue...its knowing what to move where.
Ric
The way we remove the ram cylinder head is with an over head crane of some sort. Put a chain in two of the muffler bolt hole and hook the loop. The ram cylinder head has to lift off straight up. I try not to force anything if at a possible. If a ball came out of its cage it could be stuck between the ram cylinder head and ram. Or perhaps you have a broken ram cylinder head ring. You can try loosening the ram guide housing and move it accordingly to try and get the ram cylinder head off.
Just shimming the guide plates isn't enough. You should come off center of the cushion plug and parallel the ram flats to the guide plates and housing. We bench fit everything before puting the parts back in the hammer. If you have 1/8" play with ram at rest that is way too much. That is more than ten times the amount of recommended clearance. I'll bet the cushion bushing it trashed also and the ram cylinder head has moderate to extensive ware. I’d measure everything to get a base line of where to start while you have everything apart.
If the wedge seems like it has too much taper it portably does. The 5 degree angle might be washed out a bit. Whatever the taper and degree the bolster has the wedge has to match. If you do not have the correct taper and degrees you stand a chance of cracking the ram. We do not make wedges for Nazel’s by hand. We have a fixture we use on a milling machine to get the angles, tapers and radiuses right. -
So the top of the ram housing will not be free to remove even if the ram is in the down position? I had the ram down and took off the muffler cone, piece under the cone and all the top nuts and still could not get the top cap free. I used penetrant, hammer blows to the cap, a wedge to the only small gap in the casting I could get and no luck. She is solid in place.
Ric
Sorry for any confusion but we both might not be on the same page? Starting at the top of the front cylinder under the muffler body and muffler cone is the ram cylinder head. If you take out the four (4) bolts that hold both parts of the muffler to the hammer the next item under the muffler and to be removed is the ram cylinder head. The ram cylinder head fits inside the ram and is held to the hammer with six (6) 3/4 - 10 nuts on studs. Is the ram cylinder head what you are calling the ram housing? -
The recommended way to remove the ram guide housing on a B type Nazel Hammer is to remove the head and ram first out from the top of the machine. Before removing the ram first remove the bottom die. All the components within the front cylinder should be parallel and center from the cushion plug in the ram and the cushion bushing in the head out to the ram guide plates and housing. If the guide plates are worn the ram will be off center or cocked and the ram guide housing will be difficult to remove with the ram in the hammer. If there are any bent ram guide housing stubs on the hammer or if the housing is on the hammer off center it will make it even more difficult to remove the housing with the ram in the hammer. You could perhaps sneak the housing off with the ram in the hammer if everything is within tolerance by loosening the head bolts to get some wiggle room. But the factory recommended way to remove the housing is to remove the ram. The ram doesn’t have to be fully removed but it should clear the housing to remove the housing. Either way the head still has to come off. With the head off I’d check the ball valves and cage. The whistling or squeak could be coming from a missing or incorrectly seating ball. If the balls are not seating or one or both are missing altogether it will cause an air leak affecting the cushion between the ram and head no matter if the cushion bushing is within tolerances to the cushion plug.
If the hammer is not forging “square” it is an indication the guide plate could be worn. If the guide plates are worn the amount of wear will translate to the cushion bushing. Assuming the cushion plug is steel and the bushing is brass. We've seen hammers with steel plugs and bushings. If that is the case then both will show signs of ware. The head also helps keep the ram centered in the front cylinder and wear in the guide plates will translate to wear on the head. Using a screw in the latch or “pawl” for adjustment or vise grips on bypass valve stem is an indication of a problem elsewhere that should be addressed. However resourceful any fix of this type might be it should only be for the short term or used as a diagnosis tool to find the cause. There are ways to cheat the system but a better way is to find the source and fix the problem. If left unattended issues tend accumulate causing bigger problems later. -
Ric
Is the squeaking noise coming out of the muffler? Have you done anything to the linkage between the upper and lower valves that might have changed the timing? How long has the hammer been squeaking? It very well could be the timing is off causing the noise. If the timing is not off I'd next check the bypass valve. To check the timing you’ll have to pull the bypass valve chamber off anyhow you might as well check the over all condition of the valve and spring.
You mentioned in your video you have a new larger bottom die. Did you also make a new wedge? The wedge should have a compound taper - 1/8" per foot at 5 degrees. -
It is awfully easy to bash the chinese hammers for the quality of their castings. How many hammer frames have you cast? I would personally rather have a Nazel/Bradley/Beaudry/Chambersburg and in a 300-500# range. We dont always get what we want though. The Kiss 50 is a good hammer and has customer service which is actually such a foreign concept I can only vaugely grasp its meaning. It is in fact very much a one off custom machine. Therefore it will come with all the pitfalls of other one off or discontinued machines. This isn't really a huge problem as lots of old iron is still running and running well(my own hammer is pushing 110 yrs of pounding steel). The Kiss is a well built machine that runs beautifully as lots of skill and engineering went into its design and construction. The Kiss as well as the KA75, and the Phoenix hammers are real, serious, production machines. All are custom built in small shops. There simply is no big factory in this country producing an off the shelf kind of hammer. The Striker and Anyang both impressed me as being far better machines than the fabricated frame variety that dominated the market through the 80s and 90s. The price of the Kuhn was far beyond reasonable and I found it to be somewhat mechanically lacking. I think the entrance of the chinese machines fills a much needed gap in the available machinery. While I am no fan of the chinese government or the fact that they seem to have suplanted ALL manufacturing worldwide, there really is no alternative to theses air hammers. Nazel never built a 33# hammer. They certainly should have but they didn't. Little giants and other old hammers are getting scarce. newcomers to this field need an alternative. I have learned from my students over the years that not everyone has a desire to understand the intricacies of the tools they use. Many simply want it to run. For them a self contained hammer is the only possible machine. Why worry about the availability of factory service? Short of Sid Sudemier is there any factory service still for domesticly produced hammers? Despite this many still pound away.
Perhaps it is that I am used to buying old iron and having to tear down/rebuild everything that the QC on chinese machines doesn't bother me so much.
True, Nazel didn’t make a 33 pound hammer but they got close with a 66 pound light duty 1B. Nazel Hammers could also be considered custom built hammers. If you had enough money when Nazel’s were being produced you could get a hammer configured most anyway within reason if you were willing to pay. Valves for Nazel Hammers were hand lapped and custom fitted to specific hammers to ½ to 1 thousands clearance. Meaning you could not expect to take valves out of a 1B and expect them to fit another 1B. Lot of other parts for Nazel Hammers were also custom fit but not to such tight tolerances.
Contrary to belief there is factory service available for Nazel Hammers but US consumers aren’t always so willing to pay domestic material and labor rates to support American companies. Myself as a consumer and we as a company try our best to buy American made products when at all possible. I’ll admit it isn’t easy and we don’t always have a choice or control over where to product come from that we buy. The part I find annoying is we have no control and we get no choice when buying some things because they are no longer made in America. -
Thank you guys for all your replies! This is excellent information and advice.
Naked anvil, thank you for the explination of the lower balance valve in the rear compression cylinder. This information is not illustrated well enough in the Krause publication. I stand corrected.
My "flap" valve does not flap at all. It is a stationary forged steel disc on a stem that bolts to the exhaust stem. Sounds like I may want to hinge the disc.
The check valve is in perfect working condition. It has a new spring and valve. I cannot hear leakage.
If you have not found a solution to you hammer problem you can contact us directly for assistance if interested. We have some engineering files from the late 1930's or early 40's that address high altitude performance issues with Nazel Hammers. The issue is real enough that pneumatic engineers from Nazel studied the problem and tried to work out a satisfactory solution to it. It has been about 10 years since we've read over the specific files. It could take us a few days to find the documents amongst our records but we might be able to give you a clearer idea of what to expect from your hammer while using it in its current location. -
Don't eat the yellow snow.
Sorry, had too say that.
I'd want to be a dental floss tycoon. -
It seems I am getting sticky spots on the belt and residue left on the pulleys, from oil? I haven't used any belt dressing and have scuffed the belt a couple times to prevent it from chirping, as it warms up it tends to get worse. The guy I bought it from was cleaning it with windex, maybe what has caused the problem. I am getting closer to finishing a jack shaft, and will be raising the whole machine 3", its always something, but it will be worth it!
We’ve had nothing but good luck with using belt dressing in moderation. The brand we use seems to work find and we’ve never had any trouble with chips getting stuck in the belt. On our hammer the belt is high enough on the hammer that any slag or chips fall down an away from the belt. I could see on a Bradley Upright Helve how chips and debris could be a problem but that could be easily addressed with some type of a guard. If oil is causing the problem the guard might help with that issue also. Any advantage of using some type of dressing would outweigh not using anything at all. When my dressing runs out I might give diatomaceous earth a try if it is less expensive and it works just as well for me. I might add if you have an open frame motor the diatomaceous earth might not be a good idea. Either way I’d go with the simple fix first.
If the problem persists a few questions I might ask would be. Is your belt currently leather, canvas or a canvas and rubber blend? Is your motor pulley made of metal or natural materials? Is the motor and stand original to the hammer? If the motor is not original what is the horsepower and RPMs. The problem you’re having could be managed with the right motor, pulley and belt combination. If the previous owner was having the same issue and you set up the hammer the way he had it might be time for a fresh start. If the problem bothers you and you notice the hammer is not performing the way you think it should perhaps and new belt or motor pulley or both will work if the motor is the correct size and RPM. If you use a leather belt you should not use a natural material motor pulley like leather or wood composite. If you use a leather belt with a metal motor pulley make sure leather belt is the correct ply to fit the radius of the motor or final drive pulley size when using a jackshaft. Thicker ply leather belts tend not to like being used on tight radius pulleys. I’ve had good fortune using canvas blend rubber belts with a wood composite motor pulley and belt dressing when needed in moderation. I tend not to like jackshafts because they can only make a slipping problem worse. When using a jackshaft you loss toque by adding more pulleys and added surface area for belts to slip on. It appears you have the right RPMs motor running the hammer without a jackshaft. The only reason I’d see to have to use a jackshaft would to lower a high speed motors RPM to lower or get the correct speed to the final drive pulley. The squeaking from your belt is more than likely from slipping. If you get the slipping under control you’ll really great a chance to see what a better hammer your 500 can be. -
I actually have a couple extra replacement rubbers, not for the video, for the hammer... One is cracked but I don't think it is going to come out, not sure I want to mess with it until I replace the wood beam.
I figure you may be interested in this tread, not sure how to paste it, maybe this will work. I'm still surprise nobody is interested or if its still available.
My thoughts were to use the patterns and parts for sculpture, that would truly be a kinetic sculptors paradise. At least if your talking about sculpture in the 5 to 10 ton range, The 500 Bradley weight is 18000# and sets on ten yards, makes it real quiet.
Don't fix it if it isn't broken. The cracks could only be surface cracks. We have drawings for rubbers that we got from Courtland Machine because they gave up on making rubbers because of the hassle involved. They’re a machine shop not rubber manufactures. We hooked up with a rubber manufacture that has the right rubber formula for Bradley’s. The rubber is the same used on aircraft carrier arresting gear. To have new rubbers made for your 500 it could possibly cost more than you paid for your hammer.
The reason no one is making new mechanical or air hammers in the United States today from old designs is cost. How much do you think it would cost to cast 18,000 pounds of iron to build your hammer without even doing any of the machining involved? When done who could afford to buy it with the low cost of imports coming into the country and the availability of fabricated hammers. There just isn't enough demand to support the manufacturing of hammers in the United States built the old way. We have complete drawings for Nazel, Fairbanks and Beaudry. I'd like nothing more than to build a new 1B or a Fairbanks A or C but the cost would be prohibitive. If I remember correctly before Chambersburg stopped making self contained air hammers the cost for a new 2CH was over $365,000.00 and that price is over 10 years old. No telling what it would cost today.
Sounds like you built the right foundation for your 500. It's easier to do it right the first time instead of having to fix a mistake with a large machine. My theory is set it and forgets it. It’s not like you going to be moving 18,000 pounds around your shop. Figure out where you want the hammer build the correct foundation put it in place and forget about having any trouble. Not only does the right size foundation make your hammer quieter and safer to run it gives is better control. I run a 100 pound Bradley Compact in our shop and I can pick up oil off the bottom die with the top without touching dies. The dies need to be cold but it can be done consistently. For some of the work we do our Bradley is better suited for the job then our Nazel. Control for lighter work down to ¼ the choice is our 100 Bradley. I noticed in your video your belt was squeezing. We use belt dressing when needed but you don’t want to over use it or the belt could squeak even worse. The old timer we bought our Bradley form would pick up a hand full of forging slag and throw it at the pulleys and belt to stop the squeaking. But he used gasoline for paint thinner also. -
Bradley's are great machines and at the top of my list of favorites. If you ever need replacement rubbers we can help.
-
I'm not even going to share my experiences while I worked for the Navy with an Army guy. You thought I was getting a beat down before all this. I know better!
-
There're not all toys some are tools that are used to build toys. Hey, we got to have some fun once and a while.
-
Well to say the least it has been an interesting week if not anything. I don't even want to go there what I learned. One thing for sure there is a lot of inflated egos. If anything I'll keep my pie hole shut and use it for what it was intended. Eat-in humble pie.
-
After this beat down if asked in the future, I’ll just introduce myself as the metal mangle-err-extraordinaire. My thoughts on heat treating will be - heating metal and treating it badly. My treatment of metal to some could even be considered so rude it would border on abuse or cruelty.
-
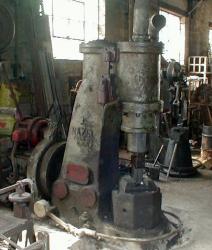
Our Nazel 2B
300 Pound Bradley Upright Helve we sold to a freind
Customers Nazel 3B before rebuild
Nazel 3B after rebuild delivered to customers’ facility
Compressor Piston from a Nazel 3B
Our 100 Pound Bradley Compact
2006 113 Cubic Inch FLHT
1972 Camaro Z28 Dressed in 1937 Chevy Sedan Street Clothes


-
I often describe myself as being a Yankee too. The term Yankee has a meaning more than just in baseball. If I was speaking about baseball I so as heck wouldn’t be using the term Yankee. They beat my Phillies last year in the World Series. Just to set the record straight - My meaning for baseball is Phillies for football it’s Eagles and hockey it’s Flyers. The tread was only an attempt to get an idea of how some of us got our start in blacksmithing. What a tangled web of bull this turned out to be. It just seems I can’t get a word in edge wise. Time to move on and get over it, there was no meaning of disrespect toward anyone who thinks they are better than me. If it makes anyone feel better they can consider themselves better than me and I won’t argue their point. Just call me Igor.
-
It’s been my understanding in colonial terms a master was someone who is in control of their on destine or someone who has stopped his travels to settled down and establish himself in his own shop. There is no pass or fail test for a master other than life itself and if life is the test I don’t want to fail. It’s not to say you are better than anyone else. What I was taught is a journeyman was someone who traveled from shop to shop and who worked for a master. The master being the person who owns the shop and the journeymen is a traveler who is looking to learn as much as he can from a master and then he moves on to another shop if he chooses. The master was the journeymen’s teacher. A person could spend their entire career as a journeyman; his duties would be whatever the master gave him to do. I guess in modern terms the master would be considered a teacher, boss of supervisor. Being a master didn’t mean you were good at what you did. You could be a bad teacher, boss, supervisor or master. I was also taught that a journeyman only became a master when he stopped his travels and he established himself in his own shop. Under the definition a journeyman could easily be better at a specific skill then the master. The term doesn’t only apply to Blacksmiths. It could be a cabinet make the butcher or candle stick maker.
-
The 5B in the back ground to the right in the picture with the Eire is a 5B we sold to our customer with the Eire. The 5B came out of Philadelphia Electric’s maintenance shop before it was closed.
-
Can't offer anything help or advise on these hammers because I haven't studied them. I can just offer the pictures for all to digest. I wanted to take the Beaudry apart but it didn't go over with the owner.


Show me your truck!
in Blacksmithing, General Discussion
Posted