kevin (the professor) Posted January 20, 2009 Share Posted January 20, 2009 OK, here is my second attempt. It is better than the first. I listened to what you guys told me, and put a better polish on my hammer and practiced hammering at correct angle and tuning forge to reduce scale before I started. So, this one is shaped better, the handle is more contoured, and you can actually see the temper line in the steel, even with my poor polish. This time, the main problem occurred when the knife was clean and pretty after rough grinding. (I also practied grinding some before starting, and I am getting a little better at that). However, during the thermal cycling for normalizing (after grinding), there emerged a little wave in the blade. I tried to tap it straight with my smallest (and not recently polished hammer). :mad::confused:This left hammer marks, so that I had to grind the blade thinner than I really wanted. Question: What types of things do you guys recommend for minor straightening once the blade is relatively close to final shape, especially ways that won't cause a newbie to leave hammer marks? Alternatively, should I just leave them thicker until I can not leave hammer marks? (I am hoping there is a way to fix minor bends that will be less likely to leave marks). Any and all input is welcomed and encouraged, Thanks, Kevin Quote Link to comment Share on other sites More sharing options...
lobodag Posted January 20, 2009 Share Posted January 20, 2009 It looks real great for #2 you should have seen mine.now three year and 80-100 knives later they were still the most fun.keep building keep doing things new.I have built my own 2" belt grinder after using a 1" for most or a 6' contact on a arbor.sand sand sand then polish. dave Quote Link to comment Share on other sites More sharing options...
Steve Sells Posted January 20, 2009 Share Posted January 20, 2009 wood mallet, Oh don't have one? make one. a 2x4 works too. Quote Link to comment Share on other sites More sharing options...
kevin (the professor) Posted January 20, 2009 Author Share Posted January 20, 2009 D*** I wish I had thought of the two by four! Quote Link to comment Share on other sites More sharing options...
John Martin Posted January 20, 2009 Share Posted January 20, 2009 1000 thousand times better than the first one. Go buy a hammer handle replace take a chunk of firewood cut out a square, drill a hole in it for the handle, and then make it bigger to fit it. Quote Link to comment Share on other sites More sharing options...
kevin (the professor) Posted January 20, 2009 Author Share Posted January 20, 2009 It was definitely a lot of fun. I actually started a third today. I really enjoy the forging part the most, but grinding is becoming more fun. I need to get better way to hold sandpaper while I polish. I have been cutting strips and wrapping around file, and rotating when each small section fills or won't cut. If there is a more ergonomic way to sand, it would help. Any suggestions? Kevin Quote Link to comment Share on other sites More sharing options...
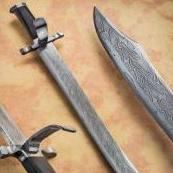
kevin (the professor) Posted January 20, 2009 Author Share Posted January 20, 2009 I have uploaded a picture of the blade after forging and rough grinding. If anyone sees anything that I can change to improve, please mention it to me! I am hooked on this stuff, and I love to see the work those of you do who are professional. I am not deluded to think I will reach that level, but I am enjoying the process. I am getting to the point where it is becoming fun to see what is "the best" I can do. To paraphrase something I read on knife making: it is easier than most think to create a knife, but it is more difficult than most think it should be to continutally produce predictable, top notch results. This captures what I am going through - luckily I can get something fun, but to get something fun and of good quality is a big challenge. It is a wonderful thing that those of you with knowledge and skill are willing to share with us. thanks, Kevin Quote Link to comment Share on other sites More sharing options...
Steve Sells Posted January 20, 2009 Share Posted January 20, 2009 one thing I should point out about fixing a warp, since the blade if finished, there is not a lot of material to move, so I don't have to hit it, I use the 2x4 to press it straight while hot, also reducing the risk if a indentation. Quote Link to comment Share on other sites More sharing options...
Vulpius Posted January 20, 2009 Share Posted January 20, 2009 Steve, How hot do you make the knife for a straightening of a warp with the 2 x 4? I am still a bit warry of dropping a knife back in the forge once the edge has been set. Quote Link to comment Share on other sites More sharing options...
kevin (the professor) Posted January 20, 2009 Author Share Posted January 20, 2009 I see, sort or press with or between 2x4 and anvil. That would have been just right for my last blade. If I ever get the basics and cosmetics right, I will begin with the real issues of things like cutting, hardness, and edge holding. Although, compared to the cheap Gerber knives I have been carrying, even the two I have made are a great improvement in edge geometry, hardness, cutting, and edge holding (as demonstrated by cutting some cardboard). This may not have been a very high bar for testing, but these little successes are what help keep this fun! thanks, Kevin Quote Link to comment Share on other sites More sharing options...
Steve Sells Posted January 20, 2009 Share Posted January 20, 2009 Steve, How hot do you make the knife for a straightening of a warp with the 2 x 4? I am still a bit warry of dropping a knife back in the forge once the edge has been set. I use the 2x4 or other wood, to push it back straight, when still soft. Hit it gently when its hot so soft. When annealing its a matter of one more anneals cycle, when hardening if there is a warp/bend, there is still time to push it flat before the hardening sets in and makes it rigid. read the sticky on knives to get more information about hardening. I strongly advise every metal worker that needs heat treat to read the Vorhoeven paper. It is 205 pages in PDF, and 210 in hardback, but well worth reading. See woody's post for the latest link. Quote Link to comment Share on other sites More sharing options...
kevin (the professor) Posted January 21, 2009 Author Share Posted January 21, 2009 Yes, I had read some of his work a couple of times. I will read this specific paper. I have also followed the heat treat post. I remember that there is a window from around 900 to around 500 degrees F where steel can be moved before it "sets." I actually did that to finish getting the bend out, after creating the unwanted hammer marks. To clarify, they occured just before the final heat and quench. good stuff, and I appreciate these specifics. Kevin Quote Link to comment Share on other sites More sharing options...
kevin (the professor) Posted January 23, 2009 Author Share Posted January 23, 2009 steve thanks a lot for the tips. I hope to use some of them on #3 this weekend. I polished #2 and gave it to my friend the collector. He was very happy to get it, no friend had ever given him a hand-forged knife before and he was touched. for this guy, i think that was the best possible gift, even though i wished i could have done better. those of us who appreciate this art/skill seem to develop a real love of the stuff. there is not much "halfway" about it. kevin Quote Link to comment Share on other sites More sharing options...
Messerist Posted January 28, 2009 Share Posted January 28, 2009 Kevin. Keep up the good work. One thing that is use when I sand is a piece of brass barstock 1/4"X1"X6", wrap sandpaper around it and sand away. it does not have to be 6" long but I keep mine kind of long to keep my fingers away from the edge(slices hurt). Quote Link to comment Share on other sites More sharing options...
Recommended Posts
Join the conversation
You can post now and register later. If you have an account, sign in now to post with your account.