Norrlander Posted June 13, 2021 Share Posted June 13, 2021 Hi everyone! I've had a few brief attempts over the years to get into forge work as a hobby but this time I think it will stick! I put together a simple side-blown 'box of dirt' with air supplied by a small airbed blower, speed controlled via a dimmer switch and mains transformer. Last week I made my first tripod for outdoor cooking, on a tiny anvil and old leg vise. This weekend I acquired a larger anvil which needs to be properly mounted before testing (which of course I'm itching to do); it's a Söderfors 41.5kg, marked 1912. Oh, I live off-grid and make my own charcoal by the 'barrel in a barrel' method. Looking forward to learning from everyone here. Quote Link to comment Share on other sites More sharing options...
Daswulf Posted June 13, 2021 Share Posted June 13, 2021 Welcome aboard. Nice looking anvil. I'm sure it'll be a pleasure to work on compared to a small one. How efficient is your burn for the charcoal? Quote Link to comment Share on other sites More sharing options...
Frosty Posted June 13, 2021 Share Posted June 13, 2021 Welcome aboard Norrlander, glad to have you. NICE anvil! I'm a huge fan of Soderfors anvils, I've never used better. I'm thinking she's perfect for: moderate sized, decorative, hardware, bladesmithing, etc. Prepare to be spoiled for lesser anvils, all she needs is a little wire brushing and some HOT iron hammered on her to put a shine on her face. Be prepared for an extremely LOUD anvil wear good ear protection, mine would make your ears ring through quality muffs and ear plugs. I mounted mine on a steel tripod and it damped the resonance significantly quieting her down to comfortable levels. If you want an example hang a bell on a steel hook or nail, no leather thong. It'll go from RINNNNNNNNG! to clannng. We LOVE pictures, you're off to a great start. Frosty The Lucky. Quote Link to comment Share on other sites More sharing options...
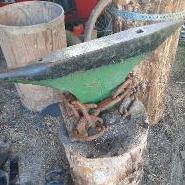
Norrlander Posted June 13, 2021 Author Share Posted June 13, 2021 Thanks for the welcome guys! Daswulf; I'd estimate the efficiency between 30 and 50 percent, depending on factors like moisture content, cut size, amount of attention paid to keeping a HOT fire going while supping beer with friends The upside to the method is that it doesn't take much thinking (no risk of complete burn-out) and it can be fueled with any old flammable scraps. Great way to tidy the workshop! Frosty: Yes, I read a few mentions about the noise of these anvils (it's how I found the forum) and the few light taps I've given her definitely confirmed the rumour! Logs are plentiful here though, so I'll still go that route but add the traditional 'decorative chains'. I always wear ear protection anyway. I'm starting this hobby quite late (I turn 50 in a few weeks) and figure I should preserve what's left of my hearing... As for your assessment of her capabilities, you've pretty much listed my ambitions perfectly. Since you like pictures, I'll add one of the tripod for your critique. Quote Link to comment Share on other sites More sharing options...
Daswulf Posted June 13, 2021 Share Posted June 13, 2021 I keep thinking of making the barrel in a barrel burner for charcoal. No real motivation since coal is available in my area and pretty cheap comparatively. I have a 55 gallon barrel with a 2inch pipe run to about the the middle at the bottom. I load it up, start a fire at the bottom and run a blower to get it going good. Once it's close I plug up the bottom pipe and put a lid on the top to smother it. It isn't very efficient but it gets me some charcoal to use and some charred wood to run in the next one. It does waste alot tho. On the tripod you could turn the ends that point up into hooks to hold something. Quote Link to comment Share on other sites More sharing options...
Norrlander Posted June 13, 2021 Author Share Posted June 13, 2021 I really recommend the two barrel method; I used to make it in a similar way to you, but really found it took a lot of attention to get it right and of course the fuel to run it is sacrificed from the end product. There's not much coal around here (and I'm trying for a carbon- neutral life) but a lot of trees. Interesting idea about extra hooks. Guess I need more practice at drawing out anyway Quote Link to comment Share on other sites More sharing options...
JHCC Posted June 14, 2021 Share Posted June 14, 2021 Welcome to the forum, Norrlander. Glad to have you! I also keep thinking about doing a barrel-in-barrel burner, but haven't had much need since I've been having good success with gas. However, I might have a chance to indulge that particular ambition if my students decide to set a charcoal burning forge for the college smithing club they want to start. Quote Link to comment Share on other sites More sharing options...
Norrlander Posted June 15, 2021 Author Share Posted June 15, 2021 JHCC; thanks, good to be here! I highly recommend the two barrel method, although I've seen some over- complicated versions online, so perhaps I should describe mine in a little more detail. The outer barrel has good sized holes all around, near the base to give plenty of air for the primary burn. The inner barrel has none at all. I start by filling the smaller barrel with sticks/chunks whatever, leaving as little space as possible. Then I place it onto an upturned bucket or smallish log to raise the height. Next, I place the larger barrel upside down, over the filled one. Then the 'tricky' bit: turn the whole arrangement the other way up, keeping the small barrel pressed against the larger one so none of the wood escapes. Finally, light a scrap fire in the space between the barrels and keep it fed and hot for about 2 hours (if the inner wood is fairly dry and around 2 inches thick) The wood gas that comes off will easily find its way out under the lip of the inner barrel and contribute to the burn (lovely big flame at the top) Leave it to cool overnight, tip out and rejoice! It's basically the same way I make charcloth, but bigger Quote Link to comment Share on other sites More sharing options...
pnut Posted June 15, 2021 Share Posted June 15, 2021 I make charcoal in a slightly different manner. I just use smaller barrels. I have a few five gallon buckets with holes in the top. I charge them with wood then build a fire around them. When the buckets stop producing white smoke I cover the holes with dirt and stoke the fire and wait for it to burn down. I've noticed you can actually overcook charcoal believe it or not. If I had the time I'd do some actual testing with a thermometer but it seems to me if the fire gets too hot or burns too long it's detrimental to the quality of the charcoal. Welcome aboard, be safe, and remember it's supposed to be fun. Pnut Quote Link to comment Share on other sites More sharing options...
Frosty Posted June 15, 2021 Share Posted June 15, 2021 Your double barrel method is a classic example of the "Indirect" method of charcoaling. It's more effort and time up front but provides the best return and quality. Once the inner barrel stops smoking it's done continuing to heat it isn't going to do much if any good. When you check the load, any that isn't coaled properly is too large, take note and adjust further loads. I've only made charcoal a couple times to get a friend up to speed. What I'd read said getting the wood uniform in cross section produced more complete coaling. Frosty The Lucky. Quote Link to comment Share on other sites More sharing options...
pnut Posted June 16, 2021 Share Posted June 16, 2021 Uniformity is the key. The first time I tried to make charcoal it was all different lengths and thicknesses. It didn't turn out well. I've since managed to get the process down pretty well. Three layers of wood in each bucket is about all I have patience for cutting. I'd like to try it with even smaller pieces but it gets labor intensive. As it is it's small enough that it all usually pyrolizes I use scrap pallets more often than anything else. I get them for free from the ATV dealership next door to one of the hotels I work at. Pnut Quote Link to comment Share on other sites More sharing options...
Norrlander Posted June 18, 2021 Author Share Posted June 18, 2021 That's very interesting, I'd never heard of charcoal being over cooked. I gravitated to this method partly because it suits my materials (plenty of scraps to feed the fire) but mostly because it's almost impossible to lose the product (unless it's opened too soon... oops.) Of course I try not to burn any longer than necessary, simply because it's wasteful but there's no real way for me to see when it's done. Sometimes there's a few pieces only half-baked (uniformity is key, as you said) or a complet batch will need re-doing (trial and error, experience building makes this a less frequent issue) But if there's issue from over-cooking, perhaps it's almost time for a method review... learning all the time! Quote Link to comment Share on other sites More sharing options...
pnut Posted June 18, 2021 Share Posted June 18, 2021 I don't have any empirical evidence that overheating it is detrimental to the quality but it seems like that's the case. It could have been another variable that I'm not taking into consideration. As I said I haven't done any testing with a timer and thermometer. The couple times it seemed like I overheated it during pyrolization it seemed like it was more brittle, dustier, didn't have the same tink sound when tapped, and didn't burn as well in the forge. Without actual testing I can't swear that getting it too hot was the problem. If you do any testing I'd be interested in your findings. I'm sure there's an optimal temperature to shoot for. Pnut Quote Link to comment Share on other sites More sharing options...
Frosty Posted June 18, 2021 Share Posted June 18, 2021 By their nature, home made charcoal retorts aren't air tight so once pyrolization is complete there isn't positive pressure in the container to prevent oxygen leaking in and burning the carbon. Keeping the retort hot for too long lowers the carbon content you want to keep. Yes? The retort I helped build was an "Indirect" method retort. It was a 55gal. drum with a lid and lock ring. We replaced the rubber gasket with stove rope. We put a street elbow in the bung in the lid and a nipple that reached past the edge of the drum so it protruded a couple inches past the side and put another elbow on the end. We dug a trench to lay the drum in on it's side with a little room on each end, laid it on a couple bricks and covered it with some sheet metal roofing. The pipe was placed on the bottom and aimed back along the drum. Later we discovered the last elbow wasn't necessary. Load the drum with cut wood, clamped the lid on and lay it in the trench with the pipe on the bottom. Stuffed the space around and under the drum with scrap wood and close the front off with more sheet metal, leaving a gap at the bottom. Lit the scrap on fire and sat back to watch. Once the scrap got going good the smoke stopped coming from the back of the trench cover. After a while smoke starts coming out of the pipe and burns under the drum. After a while it's burning like a torch so we stopped feeding it scrap and let the pyrolization gasses cook the wood. It was cooked when the flame went out, we stuffed the end of the pipe with fiberglass insulation and went home to let it cool. I sat through another load with him and a couple other guys but brought snacks and adult beverages because it took hours. We left the last elbow off and the draft carried the flammable gasses and flame under the retort no problem and it was a LOT easier to stuff it with insulation. I don't know what the % charcoal recovery was, they just wanted cheap charcoal so they were happy with happy. I adapted the retort from an article but it worked like a charm, I was "Gandalf." You know the guy who reads more than parties? When the vent hole stops smoking it's about done block it with something that isn't air tight or it'll crush the can as it cools. A little that isn't completely coaled isn't so important if you're getting most. Frosty The Lucky. Quote Link to comment Share on other sites More sharing options...
Norrlander Posted June 21, 2021 Author Share Posted June 21, 2021 Wow, thanks for that detailed account Frosty! I take your point about the over-burn, but wouldn't that still result in the charcoal converting to ash? In which case, as long as what I'm getting looks like charcoal it should still be good..? Whatever the case though, I'm happy with my method for now but might well scale up later; your build is a lot simpler than some I've seen. The hardest part for me wilo be finding a clip-top barrel. I guess I'll know it's time to change when one of those turns up Quote Link to comment Share on other sites More sharing options...
Recommended Posts
Join the conversation
You can post now and register later. If you have an account, sign in now to post with your account.