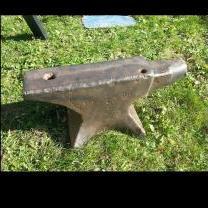
Arthur210 Posted April 4, 2021 Share Posted April 4, 2021 A few weeks ago a nice Champion 400 blower followed me home. It seemed to be in good condition and the price was fairly low at C$150. The handle turned smoothly (if a bit slowly) and the only thing missing was the legs. Put on some legs on it today, as I wanted it upright and stable before I opened anything. The legs are a combination of 1 1/4" black pipe with electrical conduit elbows that I purchased at the hardware store. For now the elbows are just slipped onto the pieces of pipe. I plan on welding them together, after removing the galvanization of the elbows by soaking them in vinegar. Now that it is upright I wanted to check the inside to get an idea of the gears' condition and how much cleaning it would require. The gearcase cover came off with minimal effort. A good surprise, no big mess of grease inside. Just some old oil. Another good surprise. The gears all appear to be in excellent condition. Even what little I can see of the worm gear looks at least good. Also unscrewed the end caps of the shafts. They all came off just by hand. A bit of grease in there, which is normal (from what I have read). That is all I had time to do today. The screws of the fan cover would not budge for now, but instead of applying force I decided to spray them with penetrating oil and leave them alone for now. I will work on cleaning the blower as I get the time in the coming weeks. So far I cannot call this a restoration, because everything looks to be in excellent condition. Quote Link to comment Share on other sites More sharing options...
Stash Posted April 5, 2021 Share Posted April 5, 2021 Good find. Good call, not pushing to get the cover screws off. Just hit them with penetrant- ATF/acetone 50/50 works a treat. Sometimes a little heat will help, but not too hot. The other thing I've done, set a screwdriver in the slot, and give it a light tappy-tap with a light hammer. Lather, rinse and repeat slowly. Good luck. Good proper looking legs too. Steve Quote Link to comment Share on other sites More sharing options...
Arthur210 Posted April 12, 2021 Author Share Posted April 12, 2021 Did some work on the legs, which are now solid and stable. After a good while soaking in penetrating oil, the screws of the fan case came off easily. Once again, everything looks to be in excellent condition, though it will need of a good cleaning! Quote Link to comment Share on other sites More sharing options...
Arthur210 Posted April 13, 2021 Author Share Posted April 13, 2021 Started cleaning the inside of the fan case and tried to untighten the fan screw, but for now it won't come off. I'll let it soak in penetrating oil some more. Meanwhile, I scrubbed the outside fan cover using penetrating oil and steel wool. I then wiped most of the oil off but leaving a little so that the cover won't rust in the time it will take me to clean the rest of the blower. There was some kind of dried whitish coumpound between the cover halves (it can be seen on the previous picture), probably an attempt at reducing air loss from the imperfect joint. Not sure yet if I will replace it -- it remains to be seen how much of a problem that really is. The cover looks much nicer now that it is clean. Found a little bit of red paint on the outside. No way to tell if this was the original color of the blower or if it picked it up later in its life. The handle came off easily from the shaft. Unfortunately, the screw holding the counter weight sheared when I tried removing it. I will have to extract it out and find a proper replacement. The handle's screw also appears to have been riveted in place. It looks like I will have to grind it or file it off (carefully) l to unscrew it and replace the wooden handle. Quote Link to comment Share on other sites More sharing options...
Irondragon Forge ClayWorks Posted April 14, 2021 Share Posted April 14, 2021 I never recommend taking them down any further. I wouldn't remove the fan, the case can be cleaned with it in place with a parts cleaning brush & any solvent like kerosene. The gears take a set through use and it's almost impossible to get them aligned again. To clean inside the gear box, I just soak it with kerosene then wash with a hose. I've even taken them to a car wash and used the pressure hose there to clean the inside. Keep in mind that there are no parts available if/when something breaks. Quote Link to comment Share on other sites More sharing options...
Arthur210 Posted April 14, 2021 Author Share Posted April 14, 2021 Thanks for the advice Irondragon. I have no intention to take apart the gears or the bearings. I know about the set and finicky alignment of the gears, and I do not want to mess that up. Just cleaning everything and apply paint where appropriate. I would just like to take the fan and back fan cover off to make it easier to clean and paint it. I prefer to paint the parts individually whenever possible for a more even coating and to protect the places I do not want painted. Quote Link to comment Share on other sites More sharing options...
pnut Posted April 14, 2021 Share Posted April 14, 2021 11 hours ago, Irondragon ForgeClay Works said: I never recommend taking them down any further. I wouldn't remove the fan, the case can be cleaned with it in place with a parts cleaning brush & any solvent like kerosene. The gears take a set through use and it's almost impossible to get them aligned again. I agree. I don't have much experience except with the one blower I have but I didn't want to take it apart any more than necessary. I opened it up and it didn't look bad so I just shut it back up and added some oil. One thing I do if I'm taking something apart is I take photos and label each piece before I remove it whenever possible. When I want to reassemble it it's usually just a matter of scrolling through the pictures and numbers backwards. Pnut Quote Link to comment Share on other sites More sharing options...
ThomasPowers Posted April 14, 2021 Share Posted April 14, 2021 Recently I was working on the blowers from the hoard and I had a screw on a counter weight rusted in place, it actually had a straight slot for a screw driver. I soaked it with penetrating oil for a couple of weeks with no change so I gently heated the ball on the apron of my forge till the screw would come out easily. No damage to the weight or screw! Quote Link to comment Share on other sites More sharing options...
Arthur210 Posted April 14, 2021 Author Share Posted April 14, 2021 Unfortunately, for the counterweight screw that train has passed. The head sheared off when I tried moving it after letting it soak with penetrating oil. You can see the head on the picture I posted (next to last). Quote Link to comment Share on other sites More sharing options...
ThomasPowers Posted April 14, 2021 Share Posted April 14, 2021 Still will make it easier to back out. Dehydrating the rust makes it less binding. Quote Link to comment Share on other sites More sharing options...
Recommended Posts
Join the conversation
You can post now and register later. If you have an account, sign in now to post with your account.