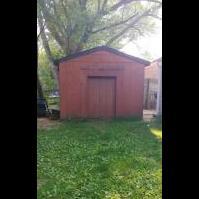
Red Shed Forge Posted June 17, 2020 Share Posted June 17, 2020 For about a year I have been working in my garage with a propane forge I built. It has been perfect for small projects and beginner forging, but I have been wanting to branch out to larger, more ornate projects like gates, barred windows and the like. Of course for this I need more forge space and the ability to spot heat and forge weld. So, I built a coal forge. And because I am not made of money, I did it without breaking the bank. I will provide the pictures and their descriptions in a series of comments so this post is more legible. I do not have the dimensions on hand, but if anyone is interested, I can provide them. Materials: about 5, 2"x4"x8' treated studs. 2, treated 4"x4"x6's. Scrap corrugated steel sheets. Scrap brake rotor. Garbage-picked wheel barrow. Furnace refractory, fire bricks. Angle iron from scrap bed frame. Steel square tube (not sure of proper name). Miscellaneous hardware. I still need a blower. I am going to start with a cheap blow dryer and save up for a hand crank blower so don't have to run electrical out to it all the time. Some of you may be apprehensive about the lumber... but I am confident it will be fine! Fingers crossed, just need that blower to find out. I cut the bowl of the forge from a wheel barrow someone was throwing away and filled it with the refractory, fire bricks and brake rotor. Before setting it in the standing frame, I lined the inside walls and base with the same corrugated steel seen above, sorry I do not have a picture of that. Angle iron was used to protect the top lumber from heat. I forged the air intake manifold into a cone shape from a square steel tube and welded it to the base of the brake rotor. I also fabricated a slide cover (?) don't know proper name) at the base to allow me to release coal ash build up. Link to comment Share on other sites More sharing options...
Frosty Posted June 17, 2020 Share Posted June 17, 2020 That's quite a forge. The only thing I have a question about is how the treated lumber is going to react to the heat. How thick is the clay bed around the fire pot? It's intended for working larger projects than I prefer but it'd be easy to build up around the fire pot with fire brick if you need smaller. I like it, I'd like to take it for a test run and see. Frosty The Lucky. Link to comment Share on other sites More sharing options...
Red Shed Forge Posted June 17, 2020 Author Share Posted June 17, 2020 Thanks Frosty, Yes, I am slightly apprehensive about the lumber too. But I am hoping the protection I gave it will suffice. I will post an update on how it performs once I get the blower attached. The clay bed is a bit thicker than an inch. Link to comment Share on other sites More sharing options...
JHCC Posted June 17, 2020 Share Posted June 17, 2020 40 minutes ago, Red Shed Forge said: I also fabricated a slide cover (?) don't know proper name) at the base to allow me to release coal ash build up. The technical term is "ash dump". Sliding ones can get clogged with ash and clinker, though; you might want to consider a hinged one with a weight to keep it closed. Link to comment Share on other sites More sharing options...
Red Shed Forge Posted June 17, 2020 Author Share Posted June 17, 2020 JHCC, Ok, good to know. I will look into changing it to a hinged one. Link to comment Share on other sites More sharing options...
JHCC Posted June 17, 2020 Share Posted June 17, 2020 Something like this: Notice that the long handle both serves as a weight to keep the flap shut and also is easy to reach, for easy cleaning. Link to comment Share on other sites More sharing options...
Red Shed Forge Posted June 17, 2020 Author Share Posted June 17, 2020 That looks really nice. I will do that for sure, but I'm sorry, how exactly does it stay closed? Link to comment Share on other sites More sharing options...
JHCC Posted June 17, 2020 Share Posted June 17, 2020 Look at the photos in this comment: And in the ones following. Link to comment Share on other sites More sharing options...
Red Shed Forge Posted June 17, 2020 Author Share Posted June 17, 2020 Wow, very important information in that whole post. Thank you for linking that, I will be sure to make the counter weight handled flap... maybe even with something that will hold it open if I need to walk away from it. Link to comment Share on other sites More sharing options...
ThomasPowers Posted June 17, 2020 Share Posted June 17, 2020 For larger items where you may need to heat or reheat the middle of an assembly you will need to pile the fuel high and it will have a tendency to fall out of of the wheelbarrow area and into the air gaps and over the edges and onto the ground. Why having the firepot mounted in a "table"--usually a flat piece of sheetmetal with angle iron fences around the perimeter comes in handy. Link to comment Share on other sites More sharing options...
Red Shed Forge Posted June 17, 2020 Author Share Posted June 17, 2020 Tom, I agree, I am concerned about that too. I guess I have been telling myself that I wont encounter that issue too often due to the depth of the fire pot. If it does become an issue, I will flip the angle iron I have installed to make a raised perimeter. Then cut a dip on one side to keep my steel level with the pile. Link to comment Share on other sites More sharing options...
JHCC Posted June 17, 2020 Share Posted June 17, 2020 Don't call him Tom! Link to comment Share on other sites More sharing options...
Red Shed Forge Posted June 17, 2020 Author Share Posted June 17, 2020 Oops! My apologies ThomasPowers. My dad's name is Thomas and goes by Tom, so I made the assumption. Link to comment Share on other sites More sharing options...
ThomasPowers Posted June 17, 2020 Share Posted June 17, 2020 My Dad's name was Tom and so I go by Thomas---don't want to confuse the revenuers any! Kinfolk sometimes call me Tomboy. Link to comment Share on other sites More sharing options...
Red Shed Forge Posted June 17, 2020 Author Share Posted June 17, 2020 Understood! Link to comment Share on other sites More sharing options...
Frosty Posted June 17, 2020 Share Posted June 17, 2020 Most of my kinfolk call me Jerry, except the nieces who call me Weird Uncle Jerry. Frosty The Lucky. Link to comment Share on other sites More sharing options...
ThomasPowers Posted June 17, 2020 Share Posted June 17, 2020 Short for "Jerrycan" no doubt... Link to comment Share on other sites More sharing options...
Red Shed Forge Posted July 1, 2020 Author Share Posted July 1, 2020 Update: I cut the sides down a bit recently to allow me to fit longer stock in the fire pot. I was unable to make it perfectly level with the fire pot without compromising the structural integrity, but it has been much nicer to work with both ends open. I also have the temporary hair dryer attached and have played around with it for a couple hours. It works just fine, but I still intend to attach a crank blower or who knows... maybe build a bellows. I am going to be attempting my first forge weld soon, as my current project is a (somewhat) ornate hose rack. Ground-staked, not hung. I want it to be all one piece and to incorporate a basket twist. Should be nice and challenging. Link to comment Share on other sites More sharing options...
pnut Posted August 17, 2020 Share Posted August 17, 2020 Looks good. So long as you have at least two inches of clay between the wood and the fire you should be OK. Pnut Link to comment Share on other sites More sharing options...
Red Shed Forge Posted August 17, 2020 Author Share Posted August 17, 2020 Pnut, It is an inch layer of clay, the steel of the old wheelbarrow followed by another layer of sheet metal before the wood. So far no problems in that regard... I STILL need to invest in a better blower and fix that ash dump. I haven't used it much lately as I have been working to fulfill orders that are better completed with the gas forge. Hate to say it, but part of me wants to scrap it and build a smaller one that will fit in the Shed for the winter. I recently found an old abandoned rectangular gas grill as well as a drum brake that was being used as a stand base (in southern KY). Might convert to either of those. Of course, that means installing an exhaust through the roof of the Shed as well. Alex Link to comment Share on other sites More sharing options...
Red Shed Forge Posted August 27, 2020 Author Share Posted August 27, 2020 Yup, I do believe I will be scrapping this forge and building a new one. It was scrap to begin with, right? I recently acquired some 1/8" structural steel tubing that I will cut up and use. Table style. From what I have seen and read on here, 1/8" SEEMS to be thick enough for the table and perimeter walls; anyone caution otherwise? I want to avoid using clay. I will double to 1/4" for the sides of the fire pot and probably to 1/2" for the bottom of the fire pot, same steel. The whole thing will probably be 3.5'x2' or 3' (I like the idea of more space for bigger projects; I have one coming up), with the fire pot around 8"x6"x3.5" deep. Tuyere is TBD but I will probably use that same mild steel tubing pictured above, with a proper ash dump, as well. Also still contemplating buying/building a hand crank blower (would be a fun & challenging build I think). Link to comment Share on other sites More sharing options...
JHCC Posted August 27, 2020 Share Posted August 27, 2020 The box that makes up my current coal forge is made of 1/16" sheet. 1/8" should be fine. Link to comment Share on other sites More sharing options...
Red Shed Forge Posted August 27, 2020 Author Share Posted August 27, 2020 Dangit JHCC, that's cool! Should always spend more time in the galleries lol. But doesn't the sand in yours protect the walls? Mine would just be the table, like the one you showed on this post back in June. Link to comment Share on other sites More sharing options...
Frazer Posted August 27, 2020 Share Posted August 27, 2020 I used 1/8th wall thickness tubing, angle iron and flat stock for my build also. Although JHCC's is bigger. And nicer..... haha Link to comment Share on other sites More sharing options...
Red Shed Forge Posted August 27, 2020 Author Share Posted August 27, 2020 Frazer, Oh yeah I saw yours the other day. Thanks, looks good! I guess I missed that in your specs list, my bad! Link to comment Share on other sites More sharing options...
Recommended Posts
Please sign in to comment
You will be able to leave a comment after signing in
Sign In Now