AngryDaddyBird Posted January 19, 2019 Share Posted January 19, 2019 Mods if I’m posting this in the wrong place please let me know or just delete it and I apologize. I posted it in forges 101 also asmy first build was requested I move it to firges 101. Here’s another pretty simple little forge I made after the Micro forge. It’s been drying for 7 days now. I have to put the burner on it and it’s ready. I attached the Atlas 30k with atlas regulator hose but think I’ll try my modified torch first?? I think its ready anyway??? This Build was made with these items: 1) housing (4” steel square tube”) 14.5” long 1/8” wall thickness 2)Kast-O-Lite 3000 3)Metrikote (this was the final chamber coat) 4)2 steel 3/4 bars 12” long and 1/8” thick bent at the 4.5” mark from each end to make legs 5)nuts12), bolts (4)and lock washers(8) to attach legs 6)burner, I haven’t decided what burner to use? I was planning to use my modified torch head but think I might just use my atlas 30k burner assembly? 7)2.5”-2.75” tube( I used a 2.5 outer diameter pipe for the burn chamber The build was easy enough. First cut the square tube to length. Then locate and mark where your leg bolts will be. Then mark your burner location. Drill all holes. Important to do this next 2 steps! Install the bolts for your legs! Either seal or put a tube into the burner port till it reaches the chamber pipe! Ok now seal one side of the housing (square pipe) with blue tape. Now flip the sealed side down and coat your chamber pipe with oil or pan! Now center your chamber pipe in the housing (square pipe) making sure it’s centered on both ends! The pipe needs to be longer than the square tube housing! Mix up Kast-O-Lite 3000 to texture like mortar and start packing it in around the pipe and ever 2/3” be sure to pack it down nice and good! I tamped it with a wooden dowel every 2-3” until ful to the top and level. Leave it a couple hours to set up firm then you’ll be able to move it to a better place to cure. You might want to remove or at least twist the pipe to get it out easier but I left mine in until the next day. After a day I twisted the pipe and it did. So after a day I decided to take the chamber pipe out. It took some time but it came out without damaging the chamber! I mean it TOOK SOME TIME! But hey it’s only my second attemp at a forge! After the pipe was out I peeled off the blue tape from the opposite end and let it dry another day by the heater. After dry I mixed the Metrikote with water until it was like latex paint and coated the burn chamber and both open ends. I let it sit for DAYS Next to my garage heater and today is Day 7! So I think I can try to fire it up starting at low heat for few seconds or minutes eventually bringing it up to forge temps over a few hours time OR I could just wait another few days or a month to be sure it dries haha! Anyhow I still have enough supplies to make yet a third forge. I’ll really think about it before I do. Now when making this one I didn’t think much about heat reaching the outside housing as you can tell by the thin walls haha. If I had to do this build again I’d use 6” diameter square or round pipe to make sure the outside walls wouldn’t get to hot. I’m sure any forge eventually get veryhot but I think this would have helped. So what size is this thing considered? Micro or mini? How about “Micrini” like Me-cree-Knee haha. What burner will I use? Well I might just use my torch but at use my atlas burner instead! It fits right in there perfectly as seen in a picture. But who knows. All I know is it might be full of flaws but thought you’d all enjoy see my mistakes so you don’t make them same ones. I’ll keep you all updated when I fure it up! Enjoy the pictures! Link to comment Share on other sites More sharing options...
HojPoj Posted January 19, 2019 Share Posted January 19, 2019 Most of the refractory products have a firng schedule to reach max performance. Typically a ramping profile starting at candling flame slowly working up to full blast. Given that this level of flame control is difficult at this scale, it will involve firing it up for a minute, turn off, and turn back on for shorter periods of 'off' time to modulate the heat input. The hobby metal casting guys generally do this over an hour's time if they're impatient. Link to comment Share on other sites More sharing options...
AngryDaddyBird Posted January 20, 2019 Author Share Posted January 20, 2019 16 hours ago, HojPoj said: Most of the refractory products have a firng schedule to reach max performance. Typically a ramping profile starting at candling flame slowly working up to full blast. Given that this level of flame control is difficult at this scale, it will involve firing it up for a minute, turn off, and turn back on for shorter periods of 'off' time to modulate the heat input. The hobby metal casting guys generally do this over an hour's time if they're impatient. I did that with my micro forge and plan to do it with this one. I just hope the Kast-O-Lite stays together and doesn’t crumble into dust when I fireit up. I’ll keep this updated. Link to comment Share on other sites More sharing options...
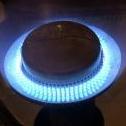
AngryDaddyBird Posted January 21, 2019 Author Share Posted January 21, 2019 Here’s the first fire! Ran it for 1 minute at just barely on, them about 5 minutes at low medium then after an hour to cool repeated and it’s now at full temp! Swirls great! I’ll play with the different burners but plan on using my torch which I tried and worked good in this forge as well! Inthe pictures you see the atlas 30k burner and atlas 20psi hose. So far it’s been an hour no issues. I’m liking the swirl a lot! Link to comment Share on other sites More sharing options...
Mikey98118 Posted January 21, 2019 Share Posted January 21, 2019 It looks like you are getting a reducing flame; I think that is probably do to no room around the burner for any secondary air to enter the forge. Yes, you do have a nice swirl going there. Link to comment Share on other sites More sharing options...
AngryDaddyBird Posted January 22, 2019 Author Share Posted January 22, 2019 18 hours ago, Mikey98118 said: It looks like you are getting a reducing flame; I think that is probably do to no room around the burner for any secondary air to enter the forge. Yes, you do have a nice swirl going there. Yes the flame is you said. I played around a bit with it and got it to burn decent after a good long while. I think I’ll do the 1/2” t burner soon as I find all the parts. Unless... does anyone here have one already built for sale? Link to comment Share on other sites More sharing options...
AngryDaddyBird Posted January 22, 2019 Author Share Posted January 22, 2019 Here’s after playing with the burner depth, air ect! It looks a lot better Link to comment Share on other sites More sharing options...
AngryDaddyBird Posted May 7, 2019 Author Share Posted May 7, 2019 Just an update on my forge build. I made a mount for my burner and played with the air gap from the burner flush with the forge so no air could come in around it and pulled it away up to 2 inches to let in max air mixture. I also played with making different nozzles. I found that a 1/2 to 3/4” gam on MY SETUP works best. I have forgewelded several times already so its hotter than I need it to be. 1 standard BBQ tank Lamar me 12+ hours of forge time making Flint strikers. I have the materials to insulate my forge and will update here when I start the process. If you haven’t seen my forge search MICRINI forge to seethe build. This place has been a wealth of knowledge for me! Link to comment Share on other sites More sharing options...
Iceman35 Posted December 10, 2019 Share Posted December 10, 2019 Oh I so want to make this forge! Any chance you have a total cost of this project? Link to comment Share on other sites More sharing options...
ThomasPowers Posted December 10, 2019 Share Posted December 10, 2019 You should be able to price the parts list. (Quite a bit of which I would get at the scrapyard and buy the refractorie(s) at a refractory dealer). Then I don't know your skill levels/equipment to estimate your time...) Link to comment Share on other sites More sharing options...
Mikey98118 Posted December 10, 2019 Share Posted December 10, 2019 AngryDaddyBird, I'm glad to see this build posted here again, and would like to see the burner discussed in Burners 101, as it is one of the few commercial burners that interests me Link to comment Share on other sites More sharing options...
Iceman35 Posted December 11, 2019 Share Posted December 11, 2019 3 hours ago, ThomasPowers said: You should be able to price the parts list. (Quite a bit of which I would get at the scrapyard and buy the refractorie(s) at a refractory dealer). Then I don't know your skill levels/equipment to estimate your time...) Actually I should be asking how much Kast-O-Lite 3000 it took to fill. I can handle the rest Link to comment Share on other sites More sharing options...
ThomasPowers Posted December 11, 2019 Share Posted December 11, 2019 1) housing (4” steel square tube”) 14.5” long 1/8” wall thickness 7)2.5”-2.75” tube( I used a 2.5 outer diameter pipe for the burn chamber Simple math for volume Link to comment Share on other sites More sharing options...
Iceman35 Posted December 12, 2019 Share Posted December 12, 2019 I thinking 6" x 15" square tube 1/8th" wall volume =453.75" 2.5" od tube volume= 76. net volume 377.15 Kast-O-Lite 3000 19.2 cubic inches per pound 19.643 pound if i did the math right 25lbs just to be safe Link to comment Share on other sites More sharing options...
Recommended Posts
Please sign in to comment
You will be able to leave a comment after signing in
Sign In Now