jlpservicesinc Posted October 3, 2018 Share Posted October 3, 2018 Thanks.. I persevered. but really it was a stupid move and know better, but. If finished before opening the basket it would have been simple and easy.. I just get stubborn.. Quote Link to comment Share on other sites More sharing options...
Steamboat Posted October 3, 2018 Share Posted October 3, 2018 6 hours ago, ausfire said: Jennifer, could you post a link to your 'how to' please? I have made all the usual searches with no success. Ausfire, I see that Jennifer has posted her basket twist video. I had included a link to this video in one of my earlier postings in this thread, but I guess you missed it. It's definitely worth watching. I'm planning to try her mandrel method soon. I've got the steel...just need a bit of free time. Al (Steamboat) Quote Link to comment Share on other sites More sharing options...
Frosty Posted October 4, 2018 Share Posted October 4, 2018 Aus: Do you know what a rope swage or spring tool is? You use them to preform steel stock for a rope/ cable twist before twisting. These are perfect for making basket twists from solid bar. Use them as normal then use a hot cut between the rounded corners to part the "yarns." Another trick a spring rope die is good for is welding the ends of small round stock for a basket twist. Preheat the die to near red and use it to weld the heated bundle for the twist. Flux and set the welds in the spring die easy peasy. Frosty The Lucky. Quote Link to comment Share on other sites More sharing options...
ausfire Posted October 4, 2018 Share Posted October 4, 2018 Al, I saw your post with the pic of your poker, but yes, I did not take notice of the link to Jennifer's video. Frosty, I am not familiar with a rope swage or spring tool. I can understand how the preheated die would help with the forge welding of a bundle. I'll have a look in the tool id section and see if I can spot a picture of one. Quote Link to comment Share on other sites More sharing options...
jlpservicesinc Posted October 4, 2018 Share Posted October 4, 2018 One style of rope swage.. the height of the middle section can be adjusted for how much cut you want.. Remember to allow for extra expansion width wise in the material with this type of swage so it doesn't neck down the rounder metal smaller than desired.. Quote Link to comment Share on other sites More sharing options...
ausfire Posted October 5, 2018 Share Posted October 5, 2018 Thanks for the pic. We have quite a few bottom swages around the place but I can't recall seeing one like that. I'll have a look. Quote Link to comment Share on other sites More sharing options...
jlpservicesinc Posted October 5, 2018 Share Posted October 5, 2018 it's original use was with a top swage with the same profile and is the old way of making things like the startings of Rubix cube type splits in wrought iron gates and such.. Lots of people use this as a base to start the slips in the square bar vs welding on the bars.. It does work though I find it to be a little bit less accurate and needing that extra set of hands.. I didn't preheat the swage in the video and i used a plain old round swage.. When everything is ready in the fire when you wiggle the bar or shaft you will feel it tack weld together.. It will be very obvious. No magic and it's even easier than doing a fold weld like making a fireplace poker because you can acually feel the bars weld.. The largest thing is just to take a really slow heat so everything gets heated together.. Quote Link to comment Share on other sites More sharing options...
JHCC Posted October 5, 2018 Share Posted October 5, 2018 3 hours ago, jlpservicesinc said: I find it to be a little bit less accurate and needing that extra set of hands.. Or a treadle hammer! Quote Link to comment Share on other sites More sharing options...
Jasent Posted October 5, 2018 Author Share Posted October 5, 2018 Wow some great work folks. Keep em coming. Thanks for the video jlp. Ive had very little free time getting the farm winterized. Been frosting for 3 weeks now. 18f this morning. Quote Link to comment Share on other sites More sharing options...
jlpservicesinc Posted October 5, 2018 Share Posted October 5, 2018 Thanks Jasent.. I hope that the information can be useful and applicable for those in need.. Quote Link to comment Share on other sites More sharing options...
Frosty Posted October 5, 2018 Share Posted October 5, 2018 Thanks for the drawing Jennifer, I don't know where my rope swage is or I'd post the pic. Aus: a spring rope swage doesn't have a hardy shank and there two, one top and one bottom connected by a long hair pin flat spring. It doesn't need to be spring steel but wider is helpful to maintain alignment of the dies. An easy way to make rope dies is to weld the die blocks to the spring so they match. Next just bend a length of round stock of the diameter you want to represent the yarns in the cable. I like 1/2" the cable dia but I'm not fussy. I bend the rod flat without deforming it and weld the ends so it won't spread easily. Heat the die blocks to high yellow, place the hairpin between them and hammer them till the die blocks touch. Multiple heats are the norm chill the hairpin. (Master?) Once you have the dies forged break the edges and center ridge so the dies don't cut the work. Unless you're making it to preform basket twists I'd lower the center ridge so it can't part the yarns. I use them by rotating the work 1/4 turn between every blow once I have incision set. Setting the first blow is about as tricky as it gets. . . Not very. Frosty The Lucky. Quote Link to comment Share on other sites More sharing options...
jlpservicesinc Posted October 5, 2018 Share Posted October 5, 2018 Frosty does your dies cut through to the center to split the strands? Or does it just emboss the outside so you are twisting a solid section.. The drawing shown will split the strands out if driven home fully.. Quote Link to comment Share on other sites More sharing options...
Frosty Posted October 6, 2018 Share Posted October 6, 2018 No, I grind the center ridge down so it only incises the center to deliniate the yarns. Yes as drawn the die will part the yarns, I'd use a spring version for a basket twist preform die. When I do a basket twist I use my regular rope die then part the yarns cold with a top cut on a wood block. It doesn't take much and they clean up nicely with emery cloth. Frosty The Lucky. Quote Link to comment Share on other sites More sharing options...
jlpservicesinc Posted October 6, 2018 Share Posted October 6, 2018 what is your starting stock size? Quote Link to comment Share on other sites More sharing options...
Jasent Posted October 6, 2018 Author Share Posted October 6, 2018 I’m interested as well. Avoiding the forge weld would make it cheaper to produce fuel wise I would think. Coal dosent come easy around here and propane heats too much of the stock Quote Link to comment Share on other sites More sharing options...
ausfire Posted October 6, 2018 Share Posted October 6, 2018 11 hours ago, jlpservicesinc said: what is your starting stock size? Yes, I'd like to know too. I would like to use such a thing to make fire pokers with rope twists or basket twists without welding. I guess anything heavier than 12mm starting stock is a bit heavy for a fire poker, so the stock for Frosty's 'hairpin' would have to be 6mm. It would be really nice to see these things used in person, and get some hands-on guidance. Jennifer, when are you going to do a demonstration and teaching tour of Australia? Quote Link to comment Share on other sites More sharing options...
Frosty Posted October 6, 2018 Share Posted October 6, 2018 The one I use most is for 3/8" sq. The yarns are 3/16". A friend Mark, Metalmangler here made up one for 3/4" stock when he let me use his equipment to make a table for my osteo. . .? Bone doctor. Doc made my shattered elbow functional and pain free in only 2 surgeries. Anyway he asked me to make an office side table with a piece of marble another patient gave him. The legs and stretchers are cable twisted 3/4", mortice and tenon joined. DRATS! I can't find the pics of the table base, stupid micro$oft updates, reset to factory default and I have to hunt for everything. . . .GRRRRR! Anyway, I'm using the 3/4" cable twist spring die in the first pic. The second is one of the components. Dr. Dudy liked a more open twist so this is what I made for him. I softened the edges, etc. this is right after twisting. Frosty The Lucky. Quote Link to comment Share on other sites More sharing options...
JHCC Posted October 6, 2018 Share Posted October 6, 2018 Here’s a poker I dashed off when I was still in my teens. It still functions better than just about any I’ve seen. Quote Link to comment Share on other sites More sharing options...
Irondragon Forge ClayWorks Posted October 6, 2018 Share Posted October 6, 2018 That qualifies as an antique then. Quote Link to comment Share on other sites More sharing options...
anvil Posted October 6, 2018 Share Posted October 6, 2018 inspiring stuff! Quote Link to comment Share on other sites More sharing options...
SLAG Posted October 6, 2018 Share Posted October 6, 2018 Mr. Dragon, Then, does JHCC's semi ancient work product qualify as an hysteric piece. I wonder, SLAG. Quote Link to comment Share on other sites More sharing options...
Irondragon Forge ClayWorks Posted October 6, 2018 Share Posted October 6, 2018 Don't know about that. My first fire poker I made when in my 40s was hysterical though. Quote Link to comment Share on other sites More sharing options...
JHCC Posted October 6, 2018 Share Posted October 6, 2018 My mom still has the one I made in my “Introduction to Blacksmithing” class back in 1983. It was my first drop-tong weld, and at my first much-too-hard hammer blow, the upper piece shot across the room and burned a hole in my backpack. Making this one was much less dramatic. Quote Link to comment Share on other sites More sharing options...
jlpservicesinc Posted October 6, 2018 Share Posted October 6, 2018 Frosty nice work. 11 hours ago, ausfire said: Jennifer, when are you going to do a demonstration and teaching tour of Australia? Well, I'd be open to a visit.. 2 weeks they start the site work for the new teaching facility.. If things happen as they are supposed to I'm hoping to offer classes based on the old fashion skill sets.. If there is enough call and things go from there who's to say where I'll end up.. Quote Link to comment Share on other sites More sharing options...
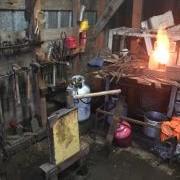
Jasent Posted October 7, 2018 Author Share Posted October 7, 2018 Practicing a little forge welding today Quote Link to comment Share on other sites More sharing options...
Recommended Posts
Join the conversation
You can post now and register later. If you have an account, sign in now to post with your account.