4elements Posted February 4, 2018 Share Posted February 4, 2018 I am building a new solid fuel forge and since it is an variation of the JABOD I am posting pictures of the build. This is built in a bushel size wash tub, rather than a wooden box. The fill is mostly raw clay I dug on my property mixed with sharp silica sand. I did put some plain soil in the bottom under the fire brick so I could conserve the sand clay mix. My tuyere is 1" black pipe which I wrapped in waxed paper to keep the clay from sticking to it. This is to allow the pipe to be pushed into the firepot as the end burns off or to be pulled and trimmed as a consumable. We'll see if and how that works. I followed the suggested dimensions for a JABOD found in this section of the forum. Here is my working sketch. The wash tub with the firebrick for the bottom of the fire pot. The Tuyere wrapped in waxed paper. The mark on the tub is for the hole. The galvanized fitting is to adapt to my bellows. If that end gets hot I'll remove the zinc. I don't know if that will be the case yet. Mixing the sand and clay. I ended up kneading the clay into the sand with my hands. That was the most time consuming part. There probably is a better way. checking to see if I made enough (not quite). soil to make up the difference, going in the bottom. screening out the rocks. soil in the bottom. Next the fire brick. Adding clay sand mix. Drilled the tuyere hole. Approximate location for the tuyere. continuing to fill. nearly there. final shape. Coming soon, a small conflagration. Quote Link to comment Share on other sites More sharing options...
JHCC Posted February 4, 2018 Share Posted February 4, 2018 Not bad. Might want to build a tray (say, 24-30" square) around the rim with a 2" or so layer of dirt on top, to keep excess fuel from spilling over the edges (don't ask me how I know this). Is this staying on the ground, or will you be building a frame to raise it up? Quote Link to comment Share on other sites More sharing options...
Daswulf Posted February 4, 2018 Share Posted February 4, 2018 The style "looks" like it is for use with charcoal. Is that the intended fuel? Quote Link to comment Share on other sites More sharing options...
4elements Posted February 5, 2018 Author Share Posted February 5, 2018 JHCC , yes I will build a frame with a tray. Daswulf, you are right. Charcoal is my preferred fuel. Quote Link to comment Share on other sites More sharing options...
genesaika Posted February 5, 2018 Share Posted February 5, 2018 I took some regular bricks and made a wall around mine. Works double duty blocking some wind and keeping my fuel in place. Quote Link to comment Share on other sites More sharing options...
Jackdawg Posted February 5, 2018 Share Posted February 5, 2018 yeah, just a tub of dirt..... lots of work gone in to that, looks like it will work well. Quote Link to comment Share on other sites More sharing options...
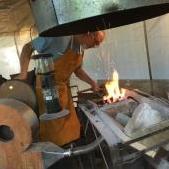
4elements Posted February 5, 2018 Author Share Posted February 5, 2018 Here's a couple of pictures of the first fire. I didn't heat any metal, this was just to see how it burns, and to fire the clay and maybe vitrify the firepot. when I get a stand built I'll do some forging. Quote Link to comment Share on other sites More sharing options...
Glenn Posted February 5, 2018 Share Posted February 5, 2018 How are you going to get the metal into the heart of the fire where things are the hottest? Quote Link to comment Share on other sites More sharing options...
Charles R. Stevens Posted February 5, 2018 Share Posted February 5, 2018 Acualy if the top of the tuyere is 4” or so below the rim the hot spot will be right tat the rim. I find a nerrow bowl, say 4” wide and 8” long and about 6” deal works very well. Mount the pump at an angle to the table or stool you place the tub on Lets see some hot steel! Quote Link to comment Share on other sites More sharing options...
HammerMonkey Posted February 6, 2018 Share Posted February 6, 2018 Nice job Byron! I really like the design. I want to stop by and see it in action when you get it set up and working! Quote Link to comment Share on other sites More sharing options...
ThomasPowers Posted February 6, 2018 Share Posted February 6, 2018 May I commend to your attention the "Tim Lively Washtub forge" designed to use charcoal and there were hundreds built around 15 years ago with the neo-tribal metalsmithing movement. May find some useful tweaks with the extensive use of the various ones built. Quote Link to comment Share on other sites More sharing options...
LeviC Posted February 22, 2018 Share Posted February 22, 2018 Thomas, that's what I was reminded of as well. I built one of Tim's designs years ago as my solid fuel forge. I tried to use bentonite clay and silica sand as my refractory. That bentonite may be great for sealing ponds, but it didn't work for a forge (at least not for me). I ended up cleaning it all out and haven't relined the forge since. Got plenty of red clay around here though. Maybe putting it back in use is my next project after reading all these box-o-dirt/ tub-o-dirt posts. Quote Link to comment Share on other sites More sharing options...
ThomasPowers Posted February 22, 2018 Share Posted February 22, 2018 I've just always used local sourced adobe or creek clay or.... Once I noticed that there were large mud crack plates in a local arroyo so I filled a 55 gallon drum with them as they are the clayey part of the mud puddles out here. Quote Link to comment Share on other sites More sharing options...
Scotty30815 Posted April 23, 2018 Share Posted April 23, 2018 So just to get started safely one could literally just fill a container with dirt...say maybe a nice wooden table with sides a good several inches high...back fill it with dirt...leave an inch rim to keep tools from rolling...and a hole for air flow and charcoal...please correct me if i over simplified that as ive only seen 1 working forge... Quote Link to comment Share on other sites More sharing options...
Frosty Posted April 23, 2018 Share Posted April 23, 2018 Welcome aboard Scotty, glad to have you. If you'll put your general location in the header you might be surprised how many of the gang live within visiting distance. YES, you can just pile a mound of dirt on an old table and make a perfectly serviceable side blast forge. Just make sure there're at least 2"-3" of dirt between the fire and table top. No need for sides or anything complicated like that, JUST DIRT, DAMP dirt compacts though and makes a forge that doesn't want to drift off the table or down wind. Damp dirt and tamp it down some. If you're going to be laying hot steel on the table cover it with a couple inches and tamp it too for a heat shield. Don't worry, you haven't over simplified anything, you need to try harder. We LOVE simple solutions! Frosty The Lucky. Quote Link to comment Share on other sites More sharing options...
Lou L Posted April 23, 2018 Share Posted April 23, 2018 Welcome aboard Scotty. There are a number of easy methods of making a simple forge like this. Before you even start, though, get yourself up to speed on this forum. First, read this thread so you can avoid all the simple issues people have when they join: https://www.iforgeiron.com/topic/53873-read-this-first/ All the sticky threads in the solid fuel forge section will help: https://www.iforgeiron.com/forum/64-solid-fuel-forges/ A video showing how simply this style of forge can be created recently gained some love here on IFI. This is one of the YouTube channels that you should watch to learn about blacksmithing. Quote Link to comment Share on other sites More sharing options...
ThomasPowers Posted April 23, 2018 Share Posted April 23, 2018 Well it does depend on your dirt...if it has a very high vegetable matter content there can be issues. Subsoil should be great most places. Quote Link to comment Share on other sites More sharing options...
Charles R. Stevens Posted April 23, 2018 Share Posted April 23, 2018 You have the gist of it. Even with instruction and illustrated plans most folks tend to complicate things. A forge was (and still is) a hole in the ground with an air source. As Jerry pints out 2-3” of soil or brick to protect flamamble materials. We think in turns of a table with a box at anvil hight (30” for me) but a stack of tires (earth ship) or a wood crib ( compost bin) adobe blocks or cob works. One could dry stack cement block and then lay a top of clay brick as well. Now, again one can mold the hearth and fire bowl directly from cob, build it from adobe brick, clay brick or again, a tire with the sidewalk cut out to contain ash and cinder, meneral soil or cheep clay cat litter (dry) charcoal needs a gental breath of air, and seems happiest with a single 3/4-1” ID (inside diameter) tuyere. 3/4” schedual 40 pipe is pretty close to 7/8” and the hose from a cheep bed inflator pump fits in it. This is consistent with archeological evidence for Viking era forges. This makes a small fire ball about 6” across. As fire spread is an isue with charcoal one needs a fire shied to bank fuel against (Viking style) or a pair of mounds (African/Asian style). Otherwise it’s a fuel hungry hog. For those used to bottom blast coal forges, sideblast charcoal forges are shallower. One may only be 2” above the tuyere to find the hottest part of the fire. A hair dryer is way much air, a manual bed pump or a small computer fan is suffitiant . Quote Link to comment Share on other sites More sharing options...
Recommended Posts
Join the conversation
You can post now and register later. If you have an account, sign in now to post with your account.