AggieBlacksmith Posted February 2, 2018 Share Posted February 2, 2018 Howdy, I have a birthday coming up and am looking to purchase my first set of blacksmithing tools (primarily interested in knife-making at the moment). I'm looking for advice on good, not-too-expensive brands of hammers, wire brushes, coal/coke, etc. I'm in the process of making a railroad-track anvil and a brake-drum forge (just to give you an idea of the tools at my disposal). Also looking for any general advice, recommendations, beginner-type project ideas, tips, etc. Thanks, and Gig'em Link to comment Share on other sites More sharing options...
Steve Sells Posted February 2, 2018 Share Posted February 2, 2018 read the pinned posts in the various sections, these basic questions have been asked and answered there already, Welcome to IFI Link to comment Share on other sites More sharing options...
Michael Cochran Posted February 2, 2018 Share Posted February 2, 2018 Some might disagree with me but the best hammer is the one that’s comfortable in the hand for hours in end. Go to the store and find yourself a small drilling hammer or crosspien hammer to start with. For the wire brush you can use the standard grill cleaning brush to get started but will eventually want to find a butchers block brush with the wide flat bristles. Also please make sure you mount the rail the correct way. Don’t waste time and money trying to make it look like a London pattern anvil. Stand it on end and keep the mass of the rail head under the hammer and you’ll be better off. Next bit of advice is do as steve suggested. Read the pinned posts in the various sections here on IFI and take notes. It’s unlikey you’ll ask a new question for a while so the answers are most likely already posted. Link to comment Share on other sites More sharing options...
Charles R. Stevens Posted February 2, 2018 Share Posted February 2, 2018 A brake drum forge will generaly cost you $50 in pipe fittings plus a blower, and is pretty much limited to coal, a simple sideblast will cost you less than $20 and burns coal or charcoal with equal efficiency. As to the rail anvil, vertical is the way to go, the 1 1/2 x3” end of the rail head is plenty, if you need to straiten a longer piece hang it down parceled to the head and hammer it sideways. As to hammers, start with a 1 1/2- 2# hammer, ball peins are easy to find, one can also spend about $50 at Tractor supply or the like for a farriers rounding hammer. Lump hammmers (short handled double jack hammers that look like Thor’s hammer pendants)are soft faced and two short of handle. They are good for driving top tools how ever (they are for driving stone maysons chisels) it is rather difficult to track down 2# cross peins however. Flea markets are always good places to hunt for hammer heads, a $2 ball pein can easily be forged into a nice cross, strait or diagonal pein. Cheep 2# doublejack hammers from harbor freight can have one face ground into a cross, strait or diagonal pein as well ( I have some that are full semicircle profiles for drawing out). In any event you will need to dress a hammer, the machined face with the sharp 45 d edge will mark your work. Round the edges and sand the face smooth (it shoul still have a slight crown, as a flat face will try to jump in your hand ever time you strike a less than perfect blow). Peins also should be rounded, fat like a finger. Link to comment Share on other sites More sharing options...
ThomasPowers Posted February 2, 2018 Share Posted February 2, 2018 So if we spend a lot of time and effort going over "good, not-too-expensive brands of hammers, wire brushes, coal/coke, etc." that are available only in Australia or South Africa or Chile or the EU this will be a help to you? I would think you would profit from information on stuff LOCAL to yourself; which as you have not told us where you are at, is rather up for grabs as over 150 countries have participated here. (why we suggest editing your profile to give a general location) I personally like fleamarket stuff; but expect to replace handles for almost everything I buy. Sometimes I can find hammers already properly dressed and I find I have less of an internal pushback on modifying items when I buy them used, cheap. It is helpful to know the new prices on tools as some fleamarket dealers will cheerfully try to charge you more than new price for cheap tools! Link to comment Share on other sites More sharing options...
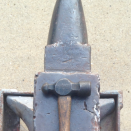
Charles R. Stevens Posted February 2, 2018 Share Posted February 2, 2018 Above are three flea market heads, you can see how much I blunted the cross pein, and the straight is ground from a double jack. The handles are from a rake, as you have to shape them anyway. Harbor freight hammers with the varnish taken off the handles (blisters) I haven’t shaped the handles yet as so far they don’t seem to fatiguing. Please go to the knife section and scroll to the bottom where you will find Steve and Rick’s nice chat and knife class work. Steve has also risen an excellent book as a beginners primer ( we praying to the dark gods for him to write an intermediate and advanced additions). yoy will find that buy reading the pinned posts at the top of each section you will have leaned enough to ask good ignorant questions (as opposed to bad stupid ones). One needs a bit of base knowledge to ask the right questions, all to often we answere the questions you need to ask but are to ignorant to know. as to tongs, I would buy one good flat from a farrier or blacksmith supply and then learn to forge your own (many will tell you to buy them but you need to learn to shape steel and these are excellent intermediate projects. Their exists two “universal tong” styles described here that are exilent, but you have to learn to forge them as Grant has passed. welcome to the insanity Link to comment Share on other sites More sharing options...
JHCC Posted February 2, 2018 Share Posted February 2, 2018 Blacksmithing is the three Hs: Heating, Holding, and Hitting. Heating and Hitting are fairly easy to manage, but Holding is perhaps the most critical. If your red-hot workpiece flies up and hits you because you couldn't hold onto it, you'll remember it. So, go with Cheap and Affordable for your forge, anvil, and hammer (as detailed above), but invest wisely in some good quality tongs. You'll be glad you did -- especially if you first read the threads on tong selection. Link to comment Share on other sites More sharing options...
Tubalcain2 Posted February 2, 2018 Share Posted February 2, 2018 Yup. I have an inch long scar across my nose now from holding steel poorly. SUPER IMPORTANT!!! Link to comment Share on other sites More sharing options...
Charles R. Stevens Posted February 2, 2018 Share Posted February 2, 2018 Nothing like getting lightsabered is there TC? Link to comment Share on other sites More sharing options...
JHCC Posted February 2, 2018 Share Posted February 2, 2018 At least he's still got both hands. Link to comment Share on other sites More sharing options...
ThomasPowers Posted February 2, 2018 Share Posted February 2, 2018 A simple hand forged silver cover can hide that scar and as a bonus you can tell people it was your brother who did it. (See Cat Ballou for details) I myself would tell folks I got so angry I bit my own nose off and if asked how, I would state that I had to stand on a stool to do it... Must be a Friday! Link to comment Share on other sites More sharing options...
AggieBlacksmith Posted February 2, 2018 Author Share Posted February 2, 2018 @Charles R. Stevens Thanks for all the resources. Why turn the anvil on it's side though? If mounted securely, built out of a big enough piece, and adding weight to it (maybe a couple large magnets) why would that not be adequate? Thanks all Link to comment Share on other sites More sharing options...
Tubalcain2 Posted February 2, 2018 Share Posted February 2, 2018 2 hours ago, Charles R. Stevens said: Nothing like getting lightsabered is there TC? No sir. Quite a unique experience. 1 hour ago, JHCC said: At least he's still got both hands. And all 8 fingers! I count 'um every morning to make sure... Link to comment Share on other sites More sharing options...
Michael Cochran Posted February 2, 2018 Share Posted February 2, 2018 Aggie, take the time to read about putting mass underneath your hammer. It’s not just about weight. A 20lb anvil with most of the mass under the hammer will do more than 20lbs spread out over a 12” area. Link to comment Share on other sites More sharing options...
Charles R. Stevens Posted February 2, 2018 Share Posted February 2, 2018 If one uses a piece of rail in the position it sits on the track, the 7/8” wide web will flex minutely absorbing a significant part of the energy in your hammer blow. Buy standing it on end the much stiffer head takes the blow and as it won’t flex under most hammer blows ( maybe a 10# sledge wouldn’t be a great idea) you will forge more effecently. Link to comment Share on other sites More sharing options...
Steve Sells Posted February 2, 2018 Share Posted February 2, 2018 37 minutes ago, AggieBlacksmith said: Why turn the anvil on it's side though? Said end not the side. and you still have not posted location Link to comment Share on other sites More sharing options...
AggieBlacksmith Posted February 2, 2018 Author Share Posted February 2, 2018 16 minutes ago, Steve Sells said: Said end not the side. and you still have not posted location Just added the location. I know what you meant Link to comment Share on other sites More sharing options...
Steve Sells Posted February 2, 2018 Share Posted February 2, 2018 much better Link to comment Share on other sites More sharing options...
Charles R. Stevens Posted February 2, 2018 Share Posted February 2, 2018 See, now the other smiths in Texas know were you are, and can invite you over for some pointers. I know of one young man there who is a fair hand. Did the “why” on the rail make sense? Link to comment Share on other sites More sharing options...
AggieBlacksmith Posted February 2, 2018 Author Share Posted February 2, 2018 Not fully but I definitely appreciate the explanation. I'll be researching it. To be honest, I'm aiming to do only light stuff, and for the time being I'd rather have the benefit of using a larger surface area than the benefit of minimal flexing. I appreciate your insight! Is the young man you know down here a college student? Link to comment Share on other sites More sharing options...
arftist Posted February 5, 2018 Share Posted February 5, 2018 If you insist upon the Traditional look, which is really only good for sheet metal shaping at best, then see if you can find a couple solid hunks which can be welded alongside the web on each side. Be sure to weld them at the top (to the bottom of the rail) and at the bottom to the mounting flange. This will give you an essentially homogeneous mass to work over. This is the only way you will be able to move metal other than the highly recommended vertical mount. Link to comment Share on other sites More sharing options...
Charles R. Stevens Posted February 5, 2018 Share Posted February 5, 2018 High school, I think. Link to comment Share on other sites More sharing options...
JHCC Posted February 5, 2018 Share Posted February 5, 2018 I think he roots for UT, though.... Link to comment Share on other sites More sharing options...
genesaika Posted February 5, 2018 Share Posted February 5, 2018 Ok, so your piece of rail is longer than wide, that's nice for many reasons like stability and being able to tie things down. Keep in mind that you can only move as much metal as the face of your hammer, no matter how big your anvil is. Beyond that your anvil is shaped like an 'H', which is a very strong shape, but it has a lot of open air. So if you hit on one of the wings where it has air under the metal, you are actually hitting on a much smaller amount of weight, just what is directly under your hammer. Now if you turn the rail on end there is no open air under your hammer, just straight anvil mass. As needed you can use saw horses or other supports to help work longer pieces and allow you to tie things down as well. Later today I will post a picture of my 8# sledgehammer anvil with a support block that I added. Link to comment Share on other sites More sharing options...
genesaika Posted February 10, 2018 Share Posted February 10, 2018 Sorry it took me so long, I haven't been getting home until after 8 every night. Here is my anvil with a chain hold down and a support block. Link to comment Share on other sites More sharing options...
Recommended Posts
Please sign in to comment
You will be able to leave a comment after signing in
Sign In Now