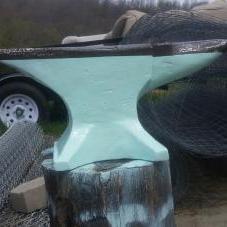
Pr3ssure Posted November 13, 2017 Share Posted November 13, 2017 So I am very new to blacksmithing, in that I haven't really done much of it. Although a few months ago after building a forge I went and purchased an anvil. I didn't know how much it weighed at first, the smith who sold it to me probably told me, but I saw 1 1 2 imprinted on the anvil and assumed that was the weight. Turns out I think it actually says 1 1 21 which may be the date? I'm not sure. Anyway it's a 155 pound pretty positive wrought iron anvil with a steel face. It has a few small pits on the face and one decent chip between the hardy and pritchel, and one side is pretty indented, but for me and what I paid it's more than perfect. I need to get the paint off to try and identify the other imprints on it but I don't know how. Incase anyones wondering I paid $300 which turns out to like $1.93/lb which with the wear on it I think is fair, if anything the smith gave me a first timers deal. At the very least it's market value so he wasn't trying to rip me off like the others. And yes, I'm pretty sure he told me what the maker was but I don't really want to call and bother him for something so menial. Plus I love the input on this site. Quote Link to comment Share on other sites More sharing options...
Pr3ssure Posted November 13, 2017 Author Share Posted November 13, 2017 Thanks to the admin or whoever removed the original post i put in the wrong forum. I was having trouble doing it. No worries, we are here to help Quote Link to comment Share on other sites More sharing options...
beaudry Posted November 13, 2017 Share Posted November 13, 2017 It looks English, maybe a Peter Wright . The numbers is the weight marked in the old hundredweight system ; First 1=112 lbs [ one hundredweight ] second 1= 1/4 hundredweight = 28 lbs last number =21 lbs for a total of 161 lbs , pretty close to your scale weight of 155 lb good anvil in decent shape at a good price Quote Link to comment Share on other sites More sharing options...
Pr3ssure Posted November 13, 2017 Author Share Posted November 13, 2017 44 minutes ago, beaudry said: Thank you, I actually just found a forum about the hundredweight system but it was confusing to me. That is much more simple than what I was reading. Quote Link to comment Share on other sites More sharing options...
Pr3ssure Posted November 13, 2017 Author Share Posted November 13, 2017 After looking up peter wright anvils and comparing the markings to mine I can make out that it does say Peter I cant make out the wright but i can make out Patent under it. I'm not seeing the England stamp on it either so it may be pre 1910-11 from what I've read. This is exciting figuring out my anvils origins. Quote Link to comment Share on other sites More sharing options...
beaudry Posted November 13, 2017 Share Posted November 13, 2017 Don't grind on it, Just strip the paint off if you want and oil it. Using it will smooth it out . You can actually peen that one edge back cold with a hammer . The tip of the horn and any dings can be dressed with a hammer as well The hard face plates on those old english anvils are usually pretty thin [ maybe 3/8'' or so ] Mount it solidly to a base anchored into the floor with the top about wrist height and you are good to go. I like to have a solid timber base slightly smaller that the length of the footprint of the anvil. Orient the grain of the block vertically. This can be one solid piece or built up from smaller timbers. Through bolt two pieces of heavy flat bar [ 1/2' x 6'' maybe ] on each side of the block with the top 1'' of the edge of the flat bar pinching the feet of the anvil. This will hold it really tight to the block and kill the ring at the same time. Loosen the bolts to remove or reorient the anvil on the block. If you are lucky enough to have a dirt floor in your smithy, cut the block long enough to bury it about two feet deep . Pour a couple of inches of concrete in the bottom of the hole , set the block in and fill the hole around the block with more concrete . Bring the last few inches up to finish grade with dirt. If you have a concrete floor, make a base for the block with some angle iron and anchor it into the floor with concrete anchors drilled into the slab. Lead lag shields will enable you to unbolt it and move the block around if you change your mind or need to get it out of the way. With this method you can stand right up next to the anvil in any position for the most effective stance. Having an anvil mounted solidly so that it doesn't move at all will mean that every hammer blow goes into the work instead of pushing the anvil around. Mocking up the location and height and orientation of the anvil will help you get it right the first time. Quote Link to comment Share on other sites More sharing options...
Pr3ssure Posted November 13, 2017 Author Share Posted November 13, 2017 11 minutes ago, beaudry said: Don't grind on it, Just strip the paint off if you want and oil it. Using it will smooth it out . You can actually peen that one edge back cold with a hammer . The tip of the horn and any dings can be dressed with a hammer as well The hard face plates on those old english anvils are usually pretty thin [ maybe 3/8'' or so ] Mount it solidly to a base anchored into the floor with the top about wrist height and you are good to go. I like to have a solid timber base slightly smaller that the length of the footprint of the anvil. Orient the grain of the block vertically. This can be one solid piece or built up from smaller timbers. Through bolt two pieces of heavy flat bar [ 1/2' x 6'' maybe ] on each side of the block with the top 1'' of the edge of the flat bar pinching the feet of the anvil. This will hold it really tight to the block and kill the ring at the same time. Loosen the bolts to remove or reorient the anvil on the block. If you are lucky enough to have a dirt floor in your smithy, cut the block long enough to bury it about two feet deep . Pour a couple of inches of concrete in the bottom of the hole , set the block in and fill the hole around the block with more concrete . Bring the last few inches up to finish grade with dirt. If you have a concrete floor, make a base for the block with some angle iron and anchor it into the floor with concrete anchors drilled into the slab. Lead lag shields will enable you to unbolt it and move the block around if you change your mind or need to get it out of the way. With this method you can stand right up next to the anvil in any position for the most effective stance. Having an anvil mounted solidly so that it doesn't move at all will mean that every hammer blow goes into the work instead of pushing the anvil around. Mocking up the location and height and orientation of the anvil will help you get it right the first time. Thank you very much. How should I go about removing the paint? Would a wire wheel on a drill be good without damaging it? Quote Link to comment Share on other sites More sharing options...
Irondragon Forge ClayWorks Posted November 13, 2017 Share Posted November 13, 2017 Yes a wire wheel will remove the paint without damaging the anvil. A cupped wire brush is best. Quote Link to comment Share on other sites More sharing options...
Pr3ssure Posted November 13, 2017 Author Share Posted November 13, 2017 42 minutes ago, Irondragon Forge & Clay said: Yes a wire wheel will remove the paint without damaging the anvil. A cupped wire brush is best. Awesome, I found a nice pack of them on the Lowes website they have in my area lowes and I'm getting them tomorrow. Now I need to figure out where to get coal/coke so I'm not using wood. Quote Link to comment Share on other sites More sharing options...
ThomasPowers Posted November 13, 2017 Share Posted November 13, 2017 Finding coal in West Virginia should not be difficult. Besides asking around a simple web search on where to buy coal in West Virginia turned up a bunch of hits. Shoot you can probably even buy good smithing coal there! I note that several coalmines were in Blacksville so that must have been a joke... Quote Link to comment Share on other sites More sharing options...
Pr3ssure Posted November 13, 2017 Author Share Posted November 13, 2017 1 hour ago, ThomasPowers said: Finding coal in West Virginia should not be difficult. Besides asking around a simple web search on where to buy coal in West Virginia turned up a bunch of hits. Shoot you can probably even buy good smithing coal there! I note that several coalmines were in Blacksville so that must have been a joke... Yeah, it's a cola mining town. I just didn't know if I could actually go there and buy coal. I really want to find actual smithing coal or coke though. Quote Link to comment Share on other sites More sharing options...
Frosty Posted November 13, 2017 Share Posted November 13, 2017 Nice score and a good price. Before you get carried away and mount it permanently by burying or anchoring it to a concrete slab. Use it on a more mobile stand till you know what you need. Organizing your working tools ad equipment to YOUR needs and preferences doesn't come from a book or experienced smiths. We all have our preferences. If you anchor your anvil down before you have the experience to know what works for you you might find yourself digging the block out of the floor or chipping anchor bolts out of the shop floor. Check the anvil stand sub section on Iforge there are a lot of pictures of stands and discussions of why we like what we use ad what we hate about other stands. No matter how popular there are reasons and occasions that one just sucks big time. I have my anvils on steel tripod stands so I can work close, move them where I need them and quieten the ring. Believe me, they are far from perfect. Frosty The Lucky. Quote Link to comment Share on other sites More sharing options...
JHCC Posted November 13, 2017 Share Posted November 13, 2017 5 hours ago, Pr3ssure said: Yeah, it's a cola mining town. Different kind of Coke. Quote Link to comment Share on other sites More sharing options...
Pr3sure Posted November 13, 2017 Share Posted November 13, 2017 13 minutes ago, JHCC said: Different kind of Coke. Lol Quote Link to comment Share on other sites More sharing options...
ThomasPowers Posted November 13, 2017 Share Posted November 13, 2017 Pocahontas #3 or Sewell seam? In coal mining areas there is usually a way for locals to buy coal for heating their houses. Ask around! Get a 5 gallon bucket and try it; or better have an experience smith try it and rate it for you. You can smith with amazing bad coal; it's just a horrible degrading experience... Quote Link to comment Share on other sites More sharing options...
Pr3ssure Posted November 13, 2017 Author Share Posted November 13, 2017 1 minute ago, ThomasPowers said: Pocahontas #3 or Sewell seam? In coal mining areas there is usually a way for locals to buy coal for heating their houses. Ask around! Get a 5 gallon bucket and try it; or better have an experience smith try it and rate it for you. You can smith with amazing bad coal; it's just a horrible degrading experience... Yeah, I need to look up how coke is made from coal. From what i know so far isn't it just basically baked in an oven to remove impurities almost like making charcoal from wood? or something of the sort. 'Cause I'm sure the coal for heating houses will put off a lot of smoke and I'd rather not have to build a hood/chimney as well. Quote Link to comment Share on other sites More sharing options...
JHCC Posted November 13, 2017 Share Posted November 13, 2017 57 minutes ago, Pr3ssure said: 'Cause I'm sure the coal for heating houses will put off a lot of smoke and I'd rather not have to build a hood/chimney as well. Actually, the coal used for heating houses (usually anthracite, such as the rice coal and nut coal from Tractor Supply Company) actually puts out less smoke than the usual blacksmith's/bituminous coal. It's harder to light, though (especially in colder weather), and it tends to go out if you don't supply it with a steady blast of air. Quote Link to comment Share on other sites More sharing options...
ThomasPowers Posted November 13, 2017 Share Posted November 13, 2017 Local folks, often the miners themselves, tended to use whatever they could get free or very cheap from the local mines. If the local mine was hard coal then they used hard coal, if it was soft coal then they used soft coal. I didn't dig deep into what the mines there produced...But some of the best smithing coal in the world is from that area and it's sure a lot closer to you than folks like me! (its about 200 miles just to get from my southern abode to my northern one and that's in the middle of the state! (418 miles to get from El Paso to Raton---both border towns) Quote Link to comment Share on other sites More sharing options...
Judson Yaggy Posted November 14, 2017 Share Posted November 14, 2017 8 hours ago, Pr3ssure said: I'd rather not have to build a hood/chimney as well. Unless you are only working outside (and perhaps even then) you will need a hood/chimney to work with coal. Coal smoke is bad for you, specifically for your lungs, and bad for your tools as it will make them rust faster than normal. Making a quality tool be it a hood or a hammer is worth the effort in the long run. Do your research, do your best to build it, and be proud. Shortcuts in this trade lead to frustration at best and injuries at worst. Quote Link to comment Share on other sites More sharing options...
Pr3ssure Posted November 14, 2017 Author Share Posted November 14, 2017 On 11/13/2017 at 2:02 PM, ThomasPowers said: Local folks, often the miners themselves, tended to use whatever they could get free or very cheap from the local mines. If the local mine was hard coal then they used hard coal, if it was soft coal then they used soft coal. I didn't dig deep into what the mines there produced...But some of the best smithing coal in the world is from that area and it's sure a lot closer to you than folks like me! (its about 200 miles just to get from my southern abode to my northern one and that's in the middle of the state! (418 miles to get from El Paso to Raton---both border towns) Yeah, I have like 3 mines within 20 minutes of me. Consol #2 is like a mile away, Consol #1 a mile the other way but it blew up in the 90s. Then Peabody isn't far. I'm gonna goto them all and get a few buckets and see what's best for me I guess. Someone just picked me up a bag of coal from Lowes and xxxx was it hard to light, but it made the metal glow the brightest I've ever seen. I just wish the train still went by the tracks beside my house, used to be littered with cole when it did. Now it reroutes through PA up from my house. On 11/13/2017 at 8:56 PM, Judson Yaggy said: Unless you are only working outside (and perhaps even then) you will need a hood/chimney to work with coal. Coal smoke is bad for you, specifically for your lungs, and bad for your tools as it will make them rust faster than normal. Making a quality tool be it a hood or a hammer is worth the effort in the long run. Do your research, do your best to build it, and be proud. Shortcuts in this trade lead to frustration at best and injuries at worst. Yeah, for now i'm just gonna be outside until I acquire enough stuff and knowledge to want to throw down a nice sized slab in my yard and build a shop. By then I hope to just have a welder and make a propane setup. Quote Link to comment Share on other sites More sharing options...
tot Posted November 22, 2020 Share Posted November 22, 2020 hi,just picked up anvil and stand with name john crooks ltd on it,has anybody come across this maker before..regards Quote Link to comment Share on other sites More sharing options...
Irondragon Forge ClayWorks Posted November 22, 2020 Share Posted November 22, 2020 Welcome aboard tot, have you read this yet? READ THIS FIRST Pictures of your anvil and where you are located will help. Are you sure i says Crooks. I have seen John Brooks anvils but never heard of one marked Crooks. Quote Link to comment Share on other sites More sharing options...
ThomasPowers Posted November 23, 2020 Share Posted November 23, 2020 Is the name stamped into the anvil or is it cast proud of the anvil's side? John Brooks is a well known anvil maker in the UK and currently makes cast steel anvils more generally found in the UK and commonwealth. Pictures are quite helpful too! Quote Link to comment Share on other sites More sharing options...
Recommended Posts
Join the conversation
You can post now and register later. If you have an account, sign in now to post with your account.