Jasent Posted June 9, 2017 Author Share Posted June 9, 2017 Thank you Thomas for the clarification. I wasn't sure. He made it before I was born. Prob early to mid 70's. I'm looking forward to putting it back in service Link to comment Share on other sites More sharing options...
Jasent Posted June 19, 2017 Author Share Posted June 19, 2017 Dressed up grandpas handled hot cut and made one more for my striking "anvil" (cast steel tractor weight) from 1 3/16" axel. Did all the work on my vertical rail anvil except upsetting in the modified hardy. Link to comment Share on other sites More sharing options...
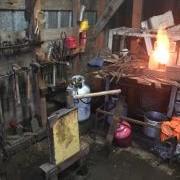
Jasent Posted June 19, 2017 Author Share Posted June 19, 2017 thinking I need to build a wind block for the forge till I can get a shop built. Few bricks helped but not ideal! Link to comment Share on other sites More sharing options...
JHCC Posted June 19, 2017 Share Posted June 19, 2017 On 6/2/2017 at 9:09 PM, ThomasPowers said: I was wondering about starting with a ring of steel. Forge welded or sourced that way. Or flatten the ends a bit and roll into a nice little cylinder on the end. Or trimmed and then ground smooth and rounded. Or... I did one like that once, with one of a bunch of steel rings that a friend picked up somewhere. I wasn't too happy with how it came out, but I really should go back and try again (especially now that I have a proper vise to help with the twisting). I think a round cross-section would look better twisted, too. Link to comment Share on other sites More sharing options...
Jasent Posted June 19, 2017 Author Share Posted June 19, 2017 4 hours ago, JHCC said: I did one like that once, with one of a bunch of steel rings that a friend picked up somewhere. I wasn't too happy with how it came out, but I really should go back and try again (especially now that I have a proper vise to help with the twisting). I think a round cross-section would look better twisted, too. Hmm I may have to try that some time. I have some washers like that Link to comment Share on other sites More sharing options...
Jasent Posted June 24, 2017 Author Share Posted June 24, 2017 Going to my first hammer in today. Hoping to come home with some new knowledge. Link to comment Share on other sites More sharing options...
JHCC Posted June 24, 2017 Share Posted June 24, 2017 21 minutes ago, Jasent said: Going to my first hammer in today. Hoping to come home with some new knowledge. Have fun! Link to comment Share on other sites More sharing options...
Jasent Posted June 25, 2017 Author Share Posted June 25, 2017 Had a blast again at Morgan Jade iron works! (First time was smithing class) also stopped by the recycle yard and found a new "anvil" 3.5"-12"-22" 260 lbs Link to comment Share on other sites More sharing options...
Jasent Posted July 3, 2017 Author Share Posted July 3, 2017 Got a little time yesterday and began cleaning up my block of steel. I don't know what this steel is but it is tough to grind. Going to take a lot more grinding to smooth and flatten the face. Staring with a 36 grit flap disk for almost an hour. Angle grinder started getting hot so I gave it a brake. Still brain storming my stand Link to comment Share on other sites More sharing options...
Exo313 Posted July 3, 2017 Share Posted July 3, 2017 I'd take something more aggressive than a flap disk to it until you get through all the kerf lines from the torch cut. Then move to lighter and lighter abrasives until you're happy with the finish. Go to a pretty aggressive wheel to start, IMO. You'll be at it for ages like that. And unlike an anvil, there's no top plate to worry about damaging. Link to comment Share on other sites More sharing options...
Mark Ling Posted July 4, 2017 Share Posted July 4, 2017 Ooooohhh, if that was mine, it would be a perfect contestant for a Brian Brazeal training anvil! Littleblacksmith Link to comment Share on other sites More sharing options...
Jasent Posted July 4, 2017 Author Share Posted July 4, 2017 That's pretty much my plans lbs. i thought it was mild steel. Figured 36 grit would eat up those torch grooves quick. I was wrong. I'll try the hard stone and see how it goes. Link to comment Share on other sites More sharing options...
Frosty Posted July 4, 2017 Share Posted July 4, 2017 1 hour ago, Jasent said: That's pretty much my plans lbs. i thought it was mild steel. Figured 36 grit would eat up those torch grooves quick. I was wrong. I'll try the hard stone and see how it goes. No flappies, hard disks move a lot more metal, flap disks smooth things without changing shapes or much detail and fit into curved spaces. If you start at one spot, corners are my preference, with the grinding disk level and slowly advance it into the cut marks using the edge to cut it'll go much faster. This is NOT the same as using a grinding disk like a cutting disk or visa versa that is a BAD thing to do, bad can happen. When you look at the results after a few seconds the disk should've cut a flat area behind its edge, literally a step. The flat of the disk should lay on the ground spot behind the cut. Whipping a disk grinder back and forth is a waste of time, energy and QUALITY, they put a motor on the things so you don't have to do that. I don't care what you see them doing on Forged in Fire it's poor grinder technique and the results reflect it. Frosty The Lucky. Link to comment Share on other sites More sharing options...
Jasent Posted July 4, 2017 Author Share Posted July 4, 2017 Thank you. I just love your ways of explaining things. For the record I don't watch fif Link to comment Share on other sites More sharing options...
Jasent Posted July 5, 2017 Author Share Posted July 5, 2017 Well @Frosty 's advice is working much better. 26grit stone. First pic is about 10 min 2nd is about 20 min, that's counting breaks. Grind for a few then let grinder cool for a min then grind. Thanks again Link to comment Share on other sites More sharing options...
Frosty Posted July 5, 2017 Share Posted July 5, 2017 You won't heat the grinder up so fast if you take smaller bites depth wise. Half the blade thickness is about right. It's my pleasure to be of help when I can. Frosty The Lucky. Link to comment Share on other sites More sharing options...
Jasent Posted July 5, 2017 Author Share Posted July 5, 2017 My uncle just stopped by and said he has a 9" grinder I can use. That should help ally! And not burn up my HF 4.5" Link to comment Share on other sites More sharing options...
ThomasPowers Posted July 5, 2017 Share Posted July 5, 2017 9" grinder the thing that gives out will probably be you! Take it easy, it will get done; don't hurt yourself trying to push it! Link to comment Share on other sites More sharing options...
Jasent Posted July 5, 2017 Author Share Posted July 5, 2017 1 hour ago, ThomasPowers said: 9" grinder the thing that gives out will probably be you! Take it easy, it will get done; don't hurt yourself trying to push it! Thank you for bringing that up I've spent a little time with a 9". You know you need to be careful when you kick it on and the torque makes it turn in your hands. I'll be very careful. I'm in no rush as I have an "anvil" like object to use for now. It's not much but it's all I've ever know Link to comment Share on other sites More sharing options...
Frosty Posted July 5, 2017 Share Posted July 5, 2017 You were using a 4.5? No wonder it was getting hot. slow and steady with the 9", they're a brute of a work horse with a serious bite. Frosty The Lucky. Link to comment Share on other sites More sharing options...
Jasent Posted July 5, 2017 Author Share Posted July 5, 2017 Yes a harbor freight 4.5" I had a dewalt 7" but some jerk figured they needed it more than I did. I've been searching threw the forum looking at every stand I can find getting ideas for this block. I'm not sure yet how I'll secure it in the stand. I love the widow stand jlp made with the utility hitches for trays or what not. Link to comment Share on other sites More sharing options...
Frosty Posted July 6, 2017 Share Posted July 6, 2017 Were I making an anvil like this every edge would have it's own shapes. The stand would be a piece of plate with large angle iron welded to it spaced so the anvil was held vertical. A couple set screws in the angle would keep the anvil from bouncing. Frosty The Lucky. Link to comment Share on other sites More sharing options...
Jasent Posted July 6, 2017 Author Share Posted July 6, 2017 I was thinking of that too but just don't know enough to know what other shapes I might need. Got any ideas on shapes I could include? Thought I would do the sides like a swage block with negative curves or dishes. Any and all tips/ advice is appreciated! Link to comment Share on other sites More sharing options...
Frosty Posted July 6, 2017 Share Posted July 6, 2017 There's no hurry is there? Grind the bottom dies as you need them. Make the basic shapes first and do what you discover you need as you go. If you try to anticipate the shapes you'll need in the future all you'll do is make the mistakes permanent. Relying on luck is a bad way to make tools. Sure, once in a while you have to wing it in dark country but that isn't the way to go in every day life. Frosty The Lucky. Link to comment Share on other sites More sharing options...
Jasent Posted July 6, 2017 Author Share Posted July 6, 2017 Correct. There is no hurrie. I some times get ahead of my self. Link to comment Share on other sites More sharing options...
Recommended Posts
Please sign in to comment
You will be able to leave a comment after signing in
Sign In Now