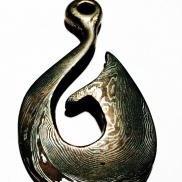
teenylittlemetalguy Posted December 11, 2014 Share Posted December 11, 2014 Just finished this up last night. It is my version of a Maori Hei Matau. Billet was from a $7 stack of quarters. 3" tall. Below is a shot of the billet before I forged the final shape. I am really excited I finally found a way to darken the copper easy and cheap. Getting chemicals up here is really expensive.I had been diluting liver of sulphur but it changes the nickel as well, so not spectacular. I used the ammonia fume process. Just hung it up in a container with some ammonia in the bottom. No liquids on the item. I suppose a shot of the other side is worth posting as well. Quote Link to comment Share on other sites More sharing options...
Chinobi Posted December 11, 2014 Share Posted December 11, 2014 very nice, that came out really well :) Quote Link to comment Share on other sites More sharing options...
njanvilman Posted December 11, 2014 Share Posted December 11, 2014 Could you explain how you do the welding process on the stack of quarters. Quote Link to comment Share on other sites More sharing options...
mitch4ging Posted December 11, 2014 Share Posted December 11, 2014 Form and color came out great! Nice piece. Quote Link to comment Share on other sites More sharing options...
teenylittlemetalguy Posted December 11, 2014 Author Share Posted December 11, 2014 Could you explain how you do the welding process on the stack of quarters. sure it is easy once you get the hang of it. others have different ways so this is my version. i take a couple extra steps to help minimize cracks as they are an issue for quarters. if i am doing a large stack, over say $2 or so i flatten the faces a bit as they cause gaps. gaps are your enemy, the more you avoid them the better. then a quick wash. make a stack. wrap it in masking tape (none on the faces). this is just to keep you from losing your mind while you clamp them. you will need to build a clamp of some type to hold them tight while you heat them, use bolts that can slide through the plates as the stack need to be compresses together. i made mine so i can make the initial weld in a vise. but others use a hammer or a press. the vise is smooth and easy. i get a better result than using a hammer. heat the stack in a forge being careful not to melt the stack. you want to just see it thinking about sweating. fairly yellow color. give it a good hard, heavy and fast squeeze in the vise. that will make the weld. after that you will need to consolidate it. aim for about half the stack height before you do anything else with it. couple last things- never ever hit it while it is cold. no color? then DON'T move the metal. you will only make cracks. take very small hits when you start hammering edgewise on the stack. and only at welding heat. it is solid but it wants to come back apart like any forge weld. get a twist in it soon and it will help a lot. Quote Link to comment Share on other sites More sharing options...
Chinobi Posted December 11, 2014 Share Posted December 11, 2014 a note about twisting: it behaves in the same manner as Damascus, when you draw out your bar prior to the twist, at the very least knock off the corners if not take it all the way to round. that way you reduce the tendency for it to crack along those ridge lines and you wont need to chase the valleys so far if you re-square after the twist. Quote Link to comment Share on other sites More sharing options...
njanvilman Posted December 11, 2014 Share Posted December 11, 2014 Is there any type of flux used, or just getting them clean and clamped? Do you heat in a coal or gas forge? Quote Link to comment Share on other sites More sharing options...
teenylittlemetalguy Posted December 11, 2014 Author Share Posted December 11, 2014 Is there any type of flux used, or just getting them clean and clamped? Do you heat in a coal or gas forge? i have not found flux to be of any use. the oxides that block the weld seem to form before the flux has a chance to melt. best is close the gaps. i use a gas forge. others use electric. not sure if anyone out there uses solid fuel or not. doesn't really need a lot of heat. it can be done with just a torch. Quote Link to comment Share on other sites More sharing options...
Chinobi Posted December 11, 2014 Share Posted December 11, 2014 I don't know of anyone that uses solid, but that's what the Japanese were using when they invented the stuff so it would seeeeem to be doable ;) you can build up a sort of ovenlike enclosure with firebricks or just make a real sturdy beehive/cave with your solid fuel and go from there. My very first attempt was with a MAPP plumbing torch open face on a firebrick with 1/8" torque plates. I have seen videos of it done with a weed burner on larger billets, so it can be done with a great variety of heat sources. Quote Link to comment Share on other sites More sharing options...
mitch4ging Posted December 11, 2014 Share Posted December 11, 2014 Did you put any wax or sealer on it to keep the colors true? Quote Link to comment Share on other sites More sharing options...
Steve Sells Posted December 11, 2014 Share Posted December 11, 2014 I use soft coal in a closed fire. Quote Link to comment Share on other sites More sharing options...
teenylittlemetalguy Posted December 12, 2014 Author Share Posted December 12, 2014 Did you put any wax or sealer on it to keep the colors true? Nope, but wax is common. Other pieces I have done end up with a natural dark patina which I like, but others use all kind so things including car wax. Steve glad to hear you use coal. Have you used gas as well? Wondering which you like best. Quote Link to comment Share on other sites More sharing options...
Frozenforge Posted December 12, 2014 Share Posted December 12, 2014 Very nice indeed! Are you sanding and polishing in the final stages or using a small hammer with light blows to minimize hammer marks? Quote Link to comment Share on other sites More sharing options...
teenylittlemetalguy Posted December 12, 2014 Author Share Posted December 12, 2014 Very nice indeed! Are you sanding and polishing in the final stages or using a small hammer with light blows to minimize hammer marks? Thanks, hammered as fine as I could with a flat face hammer to minimize dents and then 120 grit and up to tripoli before the etch. Sanding on this took me a lot of time. Still not perfect, but I am happy. Probably one of my nicest billets so far and it really paid dividends to forge it into shape instead of just cutting out. Some of the finest layers on the neck are just too small to see. I probably could have etched deeper but this is for a gift and I think they will prefer a smoother finish. Quote Link to comment Share on other sites More sharing options...
Frozenforge Posted December 12, 2014 Share Posted December 12, 2014 Its a catch 22 situation isn't it? You want to keep as much of the billet you worked so hard to achieve but the more you forge it the more you risk debonding or cracking! That will make a wonderful gift. When you flatten the quarters are you doing just the edges and some of the stamping or totally flattening them? Quote Link to comment Share on other sites More sharing options...
Steve Sells Posted December 12, 2014 Share Posted December 12, 2014 my gas forge is not set up for that, its for heat treating. I would assume gas is better, with a thermocouple to control temps better. gotta be easier Quote Link to comment Share on other sites More sharing options...
teenylittlemetalguy Posted December 12, 2014 Author Share Posted December 12, 2014 A thermocouple would be nice, I have to just keep an eye on mine Quote Link to comment Share on other sites More sharing options...
Frosty Posted December 12, 2014 Share Posted December 12, 2014 You know Tristan, I think I'm going to keep my opinion about making Mokume to myself from now on. That's just plain beautiful. Frosty The Lucky. Quote Link to comment Share on other sites More sharing options...
teenylittlemetalguy Posted December 12, 2014 Author Share Posted December 12, 2014 Thanks Jerry, that means a lot. Hopefully I will have time for a few more billets before my new son shows up next month... Quote Link to comment Share on other sites More sharing options...
teenylittlemetalguy Posted December 12, 2014 Author Share Posted December 12, 2014 Its a catch 22 situation isn't it? You want to keep as much of the billet you worked so hard to achieve but the more you forge it the more you risk debonding or cracking! That will make a wonderful gift. When you flatten the quarters are you doing just the edges and some of the stamping or totally flattening them? You could tear it that is true, but the risk goes way down after a good twist , as long as it's all kept hot. Before I even get to a twist I have a pretty good idea if the stack will fail or not. The crucial step is when you start hammering edgewise for the first time and test all the welds, if it fails then you will see it pretty clearly. I baby my stack at that point with way more heats than you would think, I won't hit it edgewise unless it is yellow. And the hits are very light. I don't flatten the edges at all just the faces. And I don't totally flatten them either. Just mainly after mr. Washington's head as it seems to be the proudest part of the metal. If you put two faces together the gap is pretty obnoxious. I have noticed the quarters with the US states on them seem to be a little flatter ( but I have not measured them, I should do that) and do a better job I think. Quote Link to comment Share on other sites More sharing options...
Recommended Posts
Join the conversation
You can post now and register later. If you have an account, sign in now to post with your account.