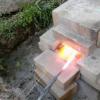
sharxbyte Posted February 26, 2013 Share Posted February 26, 2013 So this is actually from a couple years ago (2010) but having just discovered your wonderful community, I figured it would be a good first post to make. First, about my set up: I designed it to give relatively even air flow, be portable, and have flexibility with the types of air and even fuel sources it could use. As of yet, I have only used low quality barbeque charcoal, but I dislike that due to the firefleas (thanks trying-it for the introduction to the term), sand, and low/uneven heat output. In future I intend to use hardwood lump charcoal. The forge consists of a concrete block I poured that has 25 holes in the center, leading from a chamber designed to equalize the air pressure. The top is flat to allow me to experiment with firebrick arrangements to suit my needs at the time, but I may later decide to mortar them in place if I decide on a more permanent configuration. This block now sits on a second, thinner block of the same width and length to serve as a base. Originally, (and maybe still potetially) I will put these on a utility cart/wagon of some sort to allow me to transport it with relative ease. Prior to the new "foundation", I had it sitting in a sand-filled pit in the backyard. My air source has consisted of first a blow pipe (I had a bad experience involving an ill-timed cough which resulted in some reverse-fire-breathing), then a shop vac, a leaf blower, and now I am in the process of designing/building a bellows. The blade started life as a piece of rebar, and the first handle cracked, so I made one I like better. Is it a masterpiece? no, but I learned a lot doing it and had fun :) So, without further adieu, some pictures!(full gallery, more complete) (best shoes for smithing, I know... Also learned not to wear polypropylene or other "fabrics" that melt with heat.) Fresh from the forge except from some file work on the edge more shaping and some scrubbing mostly shaped, next I heat treated it. rough handle, hand polished with sand paper. Handle that broke much nicer refitted handle Quote Link to comment Share on other sites More sharing options...
Hilt and Hammer Workshop Posted February 26, 2013 Share Posted February 26, 2013 It's a worthy start ! Now that you've gotten a good "feel" for how to shape steel,it would be my humble suggestion to move away from rebar. Quite honestly,it is horrible stuff,full of inclusions and hardly any carbon at all,which is neccesary for a knife blade to truly function as such. If you can pick up some junk springs to work with ,which have a decent carbon content, that can be your next step to making an ideal blade. I admire your perserverence to this point . Whereabouts in California are you? Quote Link to comment Share on other sites More sharing options...
sharxbyte Posted February 26, 2013 Author Share Posted February 26, 2013 Sacramento :) Currently have a railroad spike waiting to be turned into a blade, and I was talking to Loneforge Blades, and BigCotton89, and Lone strongly recommended that I get a better firepot because of the dangers of heating concrete. Steve Sells recommended that I skip my complex 2 stage bellows design (see below) and use a plain single stage bellows. Quote Link to comment Share on other sites More sharing options...
Hilt and Hammer Workshop Posted February 27, 2013 Share Posted February 27, 2013 Funny you should mention the dangers of hot concrete! I tried making an "oven" style forge out of a concrete water meter box when I was even less knowledgeable. Lets just say that flying concrete shards do nothing to contribute to your bodily well being. Moving on.... If you're re-configuring your "backyard" forge set up, clay masonry bricks work very well. They hold the heat,are easy to find and most importantly do not explode :rolleyes: Railroad spikes are a good jump from rebar,for sure . They are quite popular to make knives out of,even though,again,they don't have enough carbon to facilitate a decent edge. Make no mistake,they will sharpen up alright, but the edge will dull quite swiftly with use. Railroad spikes have no more than 0.3% carbon, whereas for a blade,you want at least 0.5- 0.6% carbon content. http://www.bladeforums.com/forums/showthread.php/343476-Head-Markings-and-Carbon-Content-of-Railroad-Spikes It's neat to see you're local. Once I finish my workshop remodel, we should hammer some steel Quote Link to comment Share on other sites More sharing options...
sharxbyte Posted February 27, 2013 Author Share Posted February 27, 2013 Thanks for the input! I have firebricks that I got from a local brick lot, and I think I even have enough to modify the forge. Currently considering modifying a sturdy table into a work bench (sheet metal over the top, pipe air from bellows underneath, and cut out a spot for the bellows on half of the table. Quote Link to comment Share on other sites More sharing options...
rockstar.esq Posted March 1, 2013 Share Posted March 1, 2013 I'll second the recommendation to move away from rebar. I have no experience with RR spikes but I have found that some of the best advice I've received was to start with a piece that's reasonably close to the final intended shape. Time spent upsetting and drawing out an ill matched piece could have been spent on finishing. I've spent considerable time building/rebuilding bellows. I learned a lot but I wish I'd spent that time learning hammer control. I'm using a Japanese style box bellows now. It's more compact than other bellows I've made. Still a hand-crank blower is much smaller and works a treat. Whatever you do read up on it! Better yet, copy a working design. I may be looking at it wrong but your design looks like the intake chamber is smaller than the output chamber. In use, you'd have to pump quite a bit before the airflow started. Reversing that is much better. Also, weights shouldn't be necessary since you're looking for air flow not air pressure. I made all of the valves in my first bellows too small. Several smaller flaps work better than one large one. Once I had larger valves, the bellows cycled without needing any weights. Larger isn't always better. My box bellows puts out too much air for a single tuyere fire pot. I can make my fire levitate by pumping quickly. I'm planning to cut in a waste gate to reduce the piston's resistance. Quote Link to comment Share on other sites More sharing options...
sharxbyte Posted March 11, 2013 Author Share Posted March 11, 2013 Working right now on finishing my great bellows HERE. Thanks for the input :) Quote Link to comment Share on other sites More sharing options...
homeshow Posted March 11, 2013 Share Posted March 11, 2013 Wet bricks of all kinds have the potential to break apart. Possibly explode as well. Do you cover the bricks when it rains? Quote Link to comment Share on other sites More sharing options...
Recommended Posts
Join the conversation
You can post now and register later. If you have an account, sign in now to post with your account.