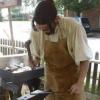
GregDP Posted September 6, 2012 Share Posted September 6, 2012 I'm long winded. I'd rather say too much than too little.. A picture may be worth a thousand words, but the more important things I'll emphasize in boldNothing can replace learning how to manage a coal fire in person from someone of experience. That said some folks may not have that opportunity. When I started using coal in my forge I wasted a lot of time, energy and fuel. I've learned things from trial and error, but even more from places like this. Proper fire management is one of the most basic skills anyone wanting to learn blacksmithing should know. I’ve had to teach myself most of these skills but I’ve by no means done it without the advice of others. It's not terribly complicated, and it may be common sense to many people. I've always been a visual learner and a little dense so I'm doing this the way I'd have liked to have seen it presented to me. I haven't seen a good step-by-step pictorial on such a simple subject so hopefully it'll be helpful. Perhaps it'll serves as a jumping off point for those just beginning and a nudge in the right direction to those struggling. As a point of reference, not a suggestion: my fire pot is about 14"x10" and just over 3" deep. Some ideas for lighting the fire are newspaper, drier lent, dried sticks, chopped kindling, natural charcoal, wood shavings, pine cones, birch bark and dried leaves. (anything flammable and lightweight can be sent aloft while on fire, always be aware) I don't see a need to buy commercial fire-starters, but if you're somewhere urban or in the midst of a winter-wonderland they're an option.. I’ve tried several ways to start a fire. My favorite method is simply a sheet of news paper and charcoal. They produce a clean fire quickly. Building a separate wood fire to steal live coals from before the work day starts isn't a bad idea and the chard wood can be used to start your next fire easily. I don't recommend using accelerants because they're misleading. It's a waste of time to start a fire only to realize that the only thing burning was lighter fluid and it's gone out before anything else was lit.Here you can see a close up of coal, coke, and charcoal (made of bamboo) respectively. Not all coal is the same and I will not go into the different types, but this is a bituminous coal that was bought locally from an unknown vein. It had both large chunks and lots of fines. Large chunks can be placed on or near a fire and they'll break up easily as they heat. Fines can be lightly moistened to form a slurry mixed with slightly coked coal it'll heat up and bond together to form a brittle coke less suited for use at a later time. I prefer to do this at the beginning of a day not the end.When using an electric blower controlling the air flow is helpful. I use a shop vac directed to a T fitting. On the side of the fitting, opposite from the opening directed toward the forge, I’ve fitted a ball valve to allow excess air to be channelled to a side draft style hood/chimney.Additional air can be vented from the ash dump by sliding it open a bit. An open ash dump may also provide enough draft alone to allow a coal fire to coke up.Before a new day’s hearth can be lit: One must sift the ashes, removing occasional bits of clinker. I toss the coke into an empty bucket and more questionable sifted shovels go into a bucket of water. (<-This tip was actualy given by ThomasPowers) The coke floats, and leftover ash, clinker or coal sinks. Use a dust mask if you value your lungs.I first make a ring of coke at the bottom of the firepot. Some charcoal is present.A little more charcoal is added. Charcoal or dried wood tender will ignite much easier than coke/coal. If wood is used do so sparingly. I don’t know that you can’t weld in a fire with burning wood, but I do know it takes up hearth space and doesn’t burn as hot as the coked coal will.A single sheet of newspaper is lit and placed in the center of the hearth. Many people will use several of paper or they ball up coke/coal fines into many sheets of paper. If you've had trouble try it; this is what works for me.Some charcoal is quickly added while the air supply is on very low. Just enough to catch fire before the paper burns out. The kindling or charcoal only needs to burn long enough for the coke to catch. Coal is more difficult to ignite than coke. If building your first fire use more kindling and expect to wait a little while before forging so the coal can coke.The key from here is not suffocating the fire. The blower is still on but you may find too much air causes smouldering kindling that won’t catch. Once again charcoal or even charred wood is much more forgiving. This bamboo charcoal burns hot but quickly. I use it to supplement my coal more than primary forging, so I added more than necessary. I wouldn't use as much wood kindling.Some coked coal is added.When you are sure the coke has caught pile more on. The blower is blowing lightly. If you used kindling you can even carefully pull out any burning wood and seal it in an airtight container, or extinguish it some other way. This will make for an easier fire next time.Remember that floating coke, now is a perfect time to layer it on. This will buy the coal a little time to cook. You may increase the air some, but you don’t need a lot of air yet, but you can increase it enough to keep things going.Pile your wet coal around the center of the hearth/firepot. I snapped this picture right after the wet coke lit, just before cutting the blower off.A handful of mostly uncoked wet coal from the bottom of the water bucket was then placed on top.Then a small scoop of wet coal was added. (This picture didn’t turn out well and I failed to notice at the time.) The coal has heated up around the hearth and begun to melt and stick together as it’s coking. You can make a small entrance with your rake. Within this cave you’ll be able to keep an eye on your steel and see the color of it while still surrounding it with heat from almost every direction. The fire pot is about 3 inches deep and the mound is at least 5-6 inches above the forge table. Note – the fire is about at welding temperature. This is the fire after welding. You can see it’s beginning to burn hollow– there isn’t enough burning coke inside the cave. While enough fuel is present inside this cave to work, use less air and water to allow coking to catch up. A hollow fire is a result of not enough coal coking because you’re keeping it too wet, or too much air being introduced. This will cool your steel and create scale. I use a ladle that’s easily held with my tongs to avoid steam. I can’t tell you when exactly you need to sprinkle the fire and surrounding coal with water, but the idea is to keep the fire from migrating out of the firepot. Or whenever you see large sooty flames from green coal. If the perimeter of the firepot becomes well coked it may need to be watered until it’s time to be slid inwards. Occasionally, after the blower is stopped, the coking coal atop the fire will ignite. Then go out as soon as the blower is cut on again. For this type of fire that is a good sign to add more coal to coke. I assume this happens because the burning coke just below the top of the mound is consuming excess atmosphere from around the fire and the coal on the top of the mound is coked well enough to require lots of oxigen to stay ignited.Heat cokes coal. Coal will burn, and it’ll stay aflame simply from atmospheric air. Coke needs more air introduced or blown towards it to stay lit. I know of no reason to burn coal other than to create a supply of coke and help maintain the shape of certain types of fire. This sort of fire when well maintained can provide an excess of coked coal, which is a good thing as you explore other types of fires.It’s time to sprinkle some water on the fire.After a little water it's time to add more fuel.If heat becomes a problem, then clinker build up could be the source. Clinker can be prevented from blocking the air orifice by firepot design, installed clinker breakers or simply by pulling it all out in one large sticky clump with your fire rake. To the left you can see clinker mixed with flux from lots of welding. The middle and right are two different types of clinker from separate coal sources.This is just one style of fire; I’ve found a cave style fire like this useful to heat several inches of steel. To give you an idea: In this particular fire I forged and welded a small heart shaped hook out of about 6" of half-inch square bar and a 12" knife with a seven-inch blade.If you're just getting into blacksmithing I highly recommend "The Backyard Blacksmith" by Lorelei Sims, that is were I was introduced to this type of fire.I am by no means an expert. I'm presenting this as an educational post. But it's also a chance for me to find out from the rest of you how I may improve, or any misconceptions I may have. Working odd bends and unusual shapes or sizes without destroying a coal fire is still a challenge for me. It’s easier in a well coked open fire. Coke has to be held in place with a rake when steel is inserted or removed. Often it'll still have to be raked back or more added. Then time must be spent waiting for the fire to get back up to temperature if glowing coke is displaced. It's just something you have to get a feel for with experience. These days one may never even use a coal forge. To me it's an intrinsic part of the blacksmith experience worth at least being familiar with and at times even more practical than some modern heat sources. Link to comment Share on other sites More sharing options...
Pulsepushthepopulace Posted September 6, 2012 Share Posted September 6, 2012 This is a great write up. Thanks for sharing Greg! Link to comment Share on other sites More sharing options...
rockstar.esq Posted September 6, 2012 Share Posted September 6, 2012 I second that, thank you for posting. Link to comment Share on other sites More sharing options...
Francis Trez Cole Posted September 6, 2012 Share Posted September 6, 2012 be care full when adding water if you have a cast iron fire pot you are better using a mop you can crack the fire pot. Link to comment Share on other sites More sharing options...
GregDP Posted September 6, 2012 Author Share Posted September 6, 2012 That's a good point I didn't consider. I am unsure how best to use or what would make a good mop. I have an idea, but do you mind elaborating or posting a picture? Link to comment Share on other sites More sharing options...
anvil Posted September 6, 2012 Share Posted September 6, 2012 I use a tin can with a handle I made. Poke a half dozen holes about a third of the way down on both sides. Then you can pour from the top if you need a lot of water, or sprinkle from either side to control your fire as needed. This keeps your hand away from the fire, and each side of the can works best for one or the other side of the fire. Easily replace can once a year or so as needed. The handle is a simple ring at the working end the same size as can you use and the other end becomes the handle of your choice connected by a shaft. The total length is similar to your poker and rake. I used 1/4 x3/4 for parent stock. Link to comment Share on other sites More sharing options...
Frank Turley Posted September 7, 2012 Share Posted September 7, 2012 I told a guy that after a while, mananging a coal fire becomes non cognitive. He responded, "And ya' won't have to think about it much, either?" Link to comment Share on other sites More sharing options...
brian.pierson Posted September 7, 2012 Share Posted September 7, 2012 GregDP, Here is something that Brian Brazeal posted a while back. I hope this helps. http://www.iforgeiro...772#entry150772 Brian Pierson Link to comment Share on other sites More sharing options...
seldom (dick renker) Posted September 7, 2012 Share Posted September 7, 2012 greg, i use a wisk broom for a mop. one of the small ones that generally get used in cars. made of straw. just dip in slack tub and shake where you want it. works pretty good for me. Link to comment Share on other sites More sharing options...
GregDP Posted September 13, 2012 Author Share Posted September 13, 2012 I've got to say. I enjoy the mop. I trimmed down the handle and mop head on an old dollar store contraption after some trial. It can sprinkle a bit more than the old la holey ladle or by letting it drip dry for a moment it's easy to lightly wetten the coal. Great tip. Thank ya'll for the well received encouragement and input. Link to comment Share on other sites More sharing options...
GregDP Posted September 19, 2012 Author Share Posted September 19, 2012 It occurs to me that my wording may have been confusing regarding a hollow fire. "cool your steel" is relative to what the same amount of air with the right amount of fuel would be. I should have said "your steel won't get as hot".. It certainly won't be a very good quench for your steel. :P I'd edit it, but alas... I don't believe I can. Link to comment Share on other sites More sharing options...
Jon Kerr Posted August 17, 2020 Share Posted August 17, 2020 Dear mods- is there any way to rescue the pictures from this post? Seems very informative and Id love to learn from it. Link to comment Share on other sites More sharing options...
JHCC Posted August 17, 2020 Share Posted August 17, 2020 Alas, no. There were a great many pictures lost in a forum software "upgrade" some years back, and despite everyone's best efforts, they appear to be gone for good. Link to comment Share on other sites More sharing options...
Irondragon Forge ClayWorks Posted August 17, 2020 Share Posted August 17, 2020 The only way would be if the OP still had the pictures on a computer and could re-post them but alas in the case of GregDP, he hasn't logged in since March 27, 2016. Don't know if a PM to him would do any good. We had the same situation on another forum about Muzzleloading and I went in and quoted my post's and added the lost pictures. Link to comment Share on other sites More sharing options...
bbmech7 Posted September 16, 2020 Share Posted September 16, 2020 you might try the link below... not sure if it'll work though since the pictures seem to need downloading which you cant do when not logged in. https://web.archive.org/web/20120924000950/https://www.iforgeiron.com/topic/29084-how-i-build-and-manage-a-cave-style-fire-for-welding/ Link to comment Share on other sites More sharing options...
Steve Sells Posted September 16, 2020 Share Posted September 16, 2020 I was going to log in and DL the photos and re load them here, but that wont work since I cant log in, and I am Admin here, Link to comment Share on other sites More sharing options...
Frosty Posted September 16, 2020 Share Posted September 16, 2020 Being moderated Steve? Were you bad. . . AGAIN? Frosty The Lucky. Link to comment Share on other sites More sharing options...
Recommended Posts
Please sign in to comment
You will be able to leave a comment after signing in
Sign In Now