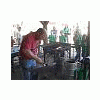
LDW Posted February 23, 2012 Share Posted February 23, 2012 Shawn has been here for a three day class with Brian Brazeal and has done a great job of paying attention to what he is shown. He usually picks right up on the key points and works fluidly at his attempts. He was a little nervous about striking at the beginning but he caught on without any problem. Here are the pics of the days he has been here. Day 1https://picasaweb.google.com/LDWynn/ShawnClassAtBrians?authuser=0&feat=directlink Day 2https://picasaweb.google.com/LDWynn/ShawnsClassDay2?authuser=0&feat=directlink Day 3https://picasaweb.google.com/LDWynn/ShawnsClassDay3?authuser=0&feat=directlink Quote Link to comment Share on other sites More sharing options...
jimbob Posted February 23, 2012 Share Posted February 23, 2012 has Brian changed the way he heat treats his hammers ...from the pictures only the face is hot ; thats a bit different than the way he showed us in the class he did on his odyssey around the country a couple years back. Quote Link to comment Share on other sites More sharing options...
Ted T Posted February 23, 2012 Share Posted February 23, 2012 LDW “THANK YOU” The thing I have learned about when you post is that it means that something good is about to happen and we are all going to learn something of significance. When you (LDW) team up with Brian + one of his students (such as Shawn) + I Forge Iron WE ALL WIN! The two of you (along with both of your unseen family’s personal support) make what you do a “WIN ~ WIN” situation for thousands of people who benefit from your willingness to teach and share here at I Forge Iron. I Forge Iron has provided a near perfect (for our times) vehicle to deliver the fruits of knowledge and expertise of highly skilled teachers and communicators such as yourself and Brian. Right now; these are the good old days if we choose them to be. I must sound like a broken record, but I do understand the value of what Brian and yourself has brought to the table of broadening the base of understanding of the blacksmith craft, worldwide. Thank you bringing us this opportunity to learn something of the blacksmithing kind! Ted Throckmorton Quote Link to comment Share on other sites More sharing options...
Dick L. Posted February 24, 2012 Share Posted February 24, 2012 Great photos Lyle, looks like Shawn had a great time and gained a lot of experience ! Thanks for posting them. Dick Quote Link to comment Share on other sites More sharing options...
LDW Posted February 24, 2012 Author Share Posted February 24, 2012 Jimbob, I am assuming you are talking about the picture I took right as the hammer is being plunged into the water. If it looks like it is only hot on one of the faces that is simply the flash effecting the light. The hammer is a higher than critical temp on the faces and less on the body. We always stand the hammers up in the fire and flip them as they heat up until the shadow is gone in the center of the faces, and the scale is starting to form. This does result in the body being at a lesser temperature. This creates a differential hardening. Only the faces get hard. In the two years and 5 months that I have been working with Brian this has not changed. Thanks for asking though, We like questions. Ted T, It was very refreshing to read your post. We really appreciate your thoughtfulness. I in turn appreciate it when I get to participate with a class when Brian has a student. Shawn was a real treat. He caught on fast and made us want to help even more. Brian can shove as much info into a brain as a person is willing to accept. When the student can demonstrate that "he gets it" or she, he or she can just keep on getting it. It appears that you "get it" Ted T and we really appreciate it. It is my goal that through the pictures people can get an idea of what is going on, and the person that took the class can refer back to the pics to act as the notes they did not take so that when they get home the important thing is that they can remember what to practice that will make them a much better smith. I practice everyday and get better everyday. If a student can leave learning the steps to an element of forging that means they have a life time to perfect it. Efficiency in forging is the goal, elements of forging dictate the efficiency. As Brian says its all about the Heat, hold, and hit. Thanks Dick L Shawns a great guy, we enjoyed working with him. Heres a few more pics,https://picasaweb.google.com/LDWynn/ShawnsLastDay?authuser=0&feat=directlink Quote Link to comment Share on other sites More sharing options...
Borntoolate Posted February 24, 2012 Share Posted February 24, 2012 Thanks, these pics remind me of a few things I "learned" with my two days. I will have to go back and try them. Brian is looking incognito. No plaid shirts and looking a bit hairy. Quote Link to comment Share on other sites More sharing options...
David Gaddis Posted February 24, 2012 Share Posted February 24, 2012 Looks just the same situation as for me a few days earlier..except for it having been rather cold for us some of the time. If anyone has the time they could do them a favor to have some "one on one" instructions from Brian and Lyle. But be preparred" time goes very fast and there is a lot to learn. Carry on Lyle Wynn and Brian Brazeal. Quote Link to comment Share on other sites More sharing options...
jimbob Posted February 24, 2012 Share Posted February 24, 2012 Thanks Lyle for clearing that up Quote Link to comment Share on other sites More sharing options...
Jeff Lodge Posted February 24, 2012 Share Posted February 24, 2012 Ted T said it best in his post, but I also wanted to thank you and Brian for the information you share. This goes for pretty much everyone on this site and I feel fortunate to have found it! Quote Link to comment Share on other sites More sharing options...
McIntyre Knives Posted March 1, 2012 Share Posted March 1, 2012 G’day Everyone Well I have just arrived back to Australia and wanted to get in here and say a few things about my time at Brian’s. If I were to write everything I wanted to about my time there it would be the forge version of War and Peace! (Length wise not subject matter) I am going to split it in two and give a personal view and a professional one. From a personal view my time there was as enjoyable as could be. I have travelled around the joint a few times and met some fantastic people, and I can honestly say Brian, Karen, Paul (Brian’s son for those who don’t know), and not least Lyle are some of the best around. Due to fairly severe jet lag I turned up in pretty rough shape. Everyone was patient, understanding and downright caring as I bumbled my way through things in a bit of a daze. Karen made sure I had everything I needed and made me feel like I was at home. Thanks guys. Righto, the nuts and bolts- my professional view as a full time Bladesmith. You could not make a better investment in your forging career than to spend time with Brian and Lyle. From the moment I walked into the forge I could see I was going to have to put aside what I knew and pay attention to what I was seeing. These guys are metal moving machines, calm, efficient, professional. Every move has a reason; every hammer blow is one step forward towards your goal. Surface area contact, choose the right die, heat hold hit, half hammer face blow, concretes hard, Brian tells you these things over and over until it makes sense and you use them to your advantage. Here is the funny thing, among knifemakers I can honestly say I am considered pretty good with a hammer, well there is a whole other level out there and I am glad I found it. I have always been able to accomplish what I wanted to, now however, I will do it faster, more efficiently, and more accurately. The skills I learned will apply to hand hammer, power hammer, hydraulic press, it is all the same just more horsepower, bigger metal. Bladesmiths are often self-taught or learn from other Bladesmiths, therefore we often don’t see the way other craftsmen have solved problems. Tailgate shear, never heard of it. Well I am building one tomorrow, it is going to save me heaps of time and chop saw grit when I prep Damascus billets. Pine tar for burns? I will have a tin in both shops. I gave up on traditional cut off hardies years ago; I was sick of chewed off cuts. With Brian’s style of hardy I was cutting 15/16” round material in one heat straight to centre, it is like a party trick except anyone can do it if you learn the technique. The list goes on and on. I would like to say a huge thank you to Lyle for all the photos he took. I have looked at heaps of photos on iforgerion and all over the net. I don’t think Lyle realizes just how bloody good his photos are and how much we owe him for putting them out there, cheers mate you are a legend. Finally thanks to the Brian and Lyle for the laughs, the stories, the enthusiasm and the passion for the craft of Blacksmithing it was an absolute pleasure and I look forward to seeing you again soon. Cheers Shawn Quote Link to comment Share on other sites More sharing options...
brianbrazealblacksmith Posted March 1, 2012 Share Posted March 1, 2012 Thank you, Shawn! It was a pleasure working with you! It is very rewarding for me to have someone that grasps the information and is able to execute it so well. We also learned alot from you. Shawn was the first master bladesmith that we have had here. Knowing that he understood and can execute the information gives me confidence that he will share this, and in doing that will learn more and help others. Brian P.S. Shawn, I went ahead and drew a tang and ricosso on that last point you drew out of the 1"x 1/4". We didn't cover it in class, but just like the 2 sided taper with round or square stock or the tongs, you can draw the tang and isolate the ricosso with rectangular stock without having to cut and turn it around. Just remember to get the near side down and control the reverse taper. Karen says thanks, too! Quote Link to comment Share on other sites More sharing options...
McIntyre Knives Posted March 1, 2012 Share Posted March 1, 2012 Hey Brian I may have been the first Bladesmith but I won't be the last, I have been bending peoples ear since I left your place. If Amanda hear's the phrase "surface area contact" one more time she is going to poke me in the eye. She loved the flower bracelet and LDW's leaf fob, she says thanks and has all the stuff in a little display. Your spot on about helping other people and how you learn more, Demonstrating something to someone makes me think about what I am doing in a different light, then the ideas start to bounce back and forth. The first thing i did when i got to my next stop was grab a1.5" round off cut of 52100 and forge my friend Tommy Gann (another ABS Mastersmith) a new hardy. When I cut some bar stock to center he and another Journeyman Smith's face lit up like kid's at Christmas . I needed Lyle there for back up as I didn't think I was getting out of there with my hammers! I went honey badger though and they backed off. I look forward to trying the tang technique you described above, thanks. I am going to knock up a quick vertical configured venturi single burner forge with about a 5" diameter interior with the burner entering from the bottom. That way i can isolate my heat. I have always cut from the bar and turned around after forging the blade to avoid excess grain growth by unneeded reheating of already forged sections. By being able to move past the heat source i will be able to work the tang section as you describe, avoiding tongs and making handling the blade during subsequent normalizing cycles more user friendly, great stuff thanks. I caught your last video on YouTube doing the oval taper, fantastic reminder for me a great demo for someone who hasn't seen you do it in person. I don't think the plywood is sturdy enough though. Say hi to Karen and Lyle for me, I am off to the forge, can't wait. Type soon, cheers, Shawn Quote Link to comment Share on other sites More sharing options...
LDW Posted March 2, 2012 Author Share Posted March 2, 2012 One of my favorite things to do is to see people improve on their striking. When you look at day one pictures I try to get the first time a new person to the shop strikes with a sledge. Whether it is striking, doing the two sided taper, making a leaf, after the first time it only gets better from there. To this day I can see it for myself each time I do these things. Working with you Shawn allows us to see you get better in each element of forging. I said this in my first post " He usually picks right up on the key points and works fluidly at his attempts." and meant what I said. The heat treating details that you shared with us was a learning experience for me and I thank you for sharing. We look forward to seeing you again. Keep your thoughts simple, Lyle Quote Link to comment Share on other sites More sharing options...
Alec.S Posted March 4, 2012 Share Posted March 4, 2012 as usual, Lyle ; great set of pics!!!!! :D Quote Link to comment Share on other sites More sharing options...
Chris_Riffe Posted March 29, 2012 Share Posted March 29, 2012 Lyle and Brian. Once again Daniel and I have remembered things from reading your post that we learned from you but had not given much thought to in a while. We will be polishing off our team skills this coming week to make a hump tool so that we can make top and bottom fullers and humps. Daniel has been showing the new smith at the ranch how to forge hammers and many other techniques but still prefers to spend his "off" day roping and riding. Otherwise he is spending 20+ plus hours a week in his forge and making good money taking orders at the Farmers market. He just completed 100 key fobs and several art pieces (clocks and desk bling) for a corporate party and has an order for a dozen or more decorative truck towing receiver covers. You never know what people will ask you to make for them....! Thank you again for all you have done for my son and the Blacksmithing community in general. Cheers, Chris Quote Link to comment Share on other sites More sharing options...
Recommended Posts
Join the conversation
You can post now and register later. If you have an account, sign in now to post with your account.