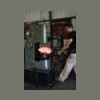
Jamesrjohnson Posted April 3, 2010 Share Posted April 3, 2010 For those that don't know me, I am the USA Anyang dealer. I use to start and end my days behind a power hammer. Unfortunately, I rarely have spare time to forge behind my own power hammers. Next weekend I will be attending the cloud 9 art show/charity. I thought it would be of interest to take a few pictures of me forging a copper bowl for the event. This is also a good example of the controllability of the Anyang 88. I will be hammering on hot 3/16 copper using a double crown (hofi style) die. The die shape is fairly sharp. Without the controllability of my 88, it would be easy to crack/penetrate through the hot copper. –A very expensive… Oh S#$$ Starting with a piece of copper (3/16 thick-14’’x16’’), I begin hammering/texturing the copper, hot. I don’t need the copper to be at a high heat, just a few minutes in the gas forge is more than enough time. Using hammer blows that are consistent in depth and direction the copper bowl starts to form wrinkles or waves. This is from the die spreading the copper side to side and from forging thin or weak sections in the copper. Once the bowl starts to form waves, I start hammering the high and low sections using a soft mallet and a piece of plywood for anvil. This step basically exaggerates the waves that were formed in the power hammer. Once the bowl is textured, and the copper has a rippled shape it’s time to start dishing the bowl and attaching the base. NOTE: In the power hammer pics, if you look closely there is steam around the hammer. The steam is coming from the wet rags that I use with my tongs. Steel tongs will scratch/dig into hot copper. This is avoided by placing a rag between the tongs and the copper. I soak the rags in water, so the rags don’t catch on fire. BE CARFULL OF STEAM, use gloves and common sense. All the texturing/forming/dishing was done hot. The final adjustments are done cold. I could do these steps hot…it would save some time. However, I prefer cold. By hammering on the copper cold the copper will work harden making the bowl very strong and durable. The base of the bowl is made from 3’’ round bar that was cut 1/2’’in length. The edges were hammered/upset using flat dies in my Anyang 88. After forging , I drilled and tapped a 3/8 hole in the center. The rivet that is in the center of the bowl is actually a bolt (a rivet that I tapped threads into it). I could have riveted the bowl, but I prefer a bolt application. When assembling, the bowl could have small high or low spots, which will cause the bowl to lay crooked/ unbalanced. Using a bolt application, I can assemble, and if needed I can disassemble, then adjust/tweak the bowl until everything is balanced. Eventually, I will show more of these techniques with Anyang videos. The process is very simple and easy, but is really hard to describe and explain using a keyboard. Quote Link to comment Share on other sites More sharing options...
clinton Posted April 3, 2010 Share Posted April 3, 2010 one word- Awesome Quote Link to comment Share on other sites More sharing options...
Fe-Wood Posted April 3, 2010 Share Posted April 3, 2010 Outstanding!!! and the pictures, well- were the keys fail the image takes over Nice sequence of shots Thanks :) Quote Link to comment Share on other sites More sharing options...
nonjic Posted April 3, 2010 Share Posted April 3, 2010 Beautiful work james, Really shows the versatility of a good hammer! I hadnt even thought of using a power hammer on copper sheet! could you have annealed the sheet, worked it cold till hard and then re-annealed it? If that would work I might give it a try (more thinking time for me on the workpiece!) The finished bowl reminds me of the big fungi in a forrest ! , very organic Quote Link to comment Share on other sites More sharing options...
monstermetal Posted April 3, 2010 Share Posted April 3, 2010 Outstanding.... I really like it... Would you be offended if I tried my hand a few? Id be happy to call them "Johnson" bowls :) Quote Link to comment Share on other sites More sharing options...
781 Posted April 3, 2010 Share Posted April 3, 2010 I saw you at the BAM conference with one of your 25# hammers. Really loved the textured vase you had there I am sure Iforgers would be very impressed with it also. Any chance to get a look at a pitcure of your die for doing the texture and a brief description on making the die. Quote Link to comment Share on other sites More sharing options...
Bentiron1946 Posted April 3, 2010 Share Posted April 3, 2010 That is a beautiful bowl! Nice sequence of phots too. Thanks for the posting of them. B) Quote Link to comment Share on other sites More sharing options...
David E. Posted April 4, 2010 Share Posted April 4, 2010 Nice bowl, is there any particular reason for using a flat bottom die and not a matched pair of crown dies,or is it just for more stability when texturing? Quote Link to comment Share on other sites More sharing options...
Jamesrjohnson Posted April 6, 2010 Author Share Posted April 6, 2010 Thanks for your compliments, and sorry for the slow response. John N- Your correct, you could work the bowl cold, then anneal, continue to work. Somtimes if the pattern/texture is very complex I will work or at least start the bowl cold. On this paticular bowl, I kept the copper at a low soft heat. There is a few reasons why... I was moving the copper fast under the powerhammer, in minutes of hammering, the bowl will distort and bend in every direction that you don't want it to go. 3/16 copper plate is still stubborn material and can be difficult to straighten out cold -even if it is annealed. Another reason, is that working warm copper under the powerhammer is alot less jarring than cold. Working cold copper(like this) under the powerhammer can really wear me out physically. When working the copper hot everything seems to move like butter, it's fast, fun, and easy. Monstermetal-your more than welcome to take and use any of my bowl designs. You can name the bowl anything you want as long as you tell people that the original was made in an Anyang 88lb powerhammer (I hope I don't sound to much like a die hard salesman) David- The main reason I used a flat die on the bottom, was to maximize the amount of texture and penetration on the top side of the bowl. Also, like you mentioned, I do get more stability having a flat die on the bottom. 781- Tomorrow night I will try to take/post pics with a short (how to) regarding the vase and the dies I used. I had a blast at the BAM show last year. I won't be able to make it this year, due to a schedule conflict with CBA event. I'm planning on attending next year. There is alot of great people in the BAM club. Quote Link to comment Share on other sites More sharing options...
Jamesrjohnson Posted April 7, 2010 Author Share Posted April 7, 2010 781- Here are the pictures/explanation of the dies used for the vase you saw at the BAM show. The dies in the pictures are bolted to a universal die I made years ago for my 50 L.G. I know some smiths that see this will think my ideas/technique are really crude or even crazy, but they did work. These dies were very cheap to make, durable, and made me money. Starting with the bottom die, I would use a 5/32 hard surfacing welding rod and weld a piece of angle iron straight to the die on one side. Then I would break off the piece of angle iron. What was left on the die surface was a small, jagged, completely inconsistent tooth, that ran across the die. I did this over and over again until I had top/bottom dies that resembled a piranha that needed braces. –not pretty On the vase, I started with 3/16 steel plate. At a healthy orange heat, I begin lightly hammering on the steel creating small shallow lines across the vase. I think of this as like I’m salt/peppering the work piece. At first, I use fast, repetitive blows. Once this is done I start really hammering on the power hammer. Suddenly, dies would start cutting deeper and in some places the material would form wrinkles -from where the teeth on the dies wouldn’t line up. The end result was a wood grain like texture. Note: I used mild steel for the base of the dies, but a hard surfacing rod to form the teeth. If you do try this, have an air gun close. In between heats blow out the scale, otherwise it will clog the teeth. The dies in the picture are old, and really worn down. Quote Link to comment Share on other sites More sharing options...
781 Posted April 7, 2010 Share Posted April 7, 2010 Thank you for the pictures and explanation of the dies I was planning to only use a top die but maybe the bottom is needed to create the wrinkles. I was only planning to texture one side of the material. Was surprised how far apart the teeth appear. Again the vase is very very nice. Thanks Quote Link to comment Share on other sites More sharing options...
howardrw Posted April 8, 2010 Share Posted April 8, 2010 781- Here are the pictures/explanation of the dies used for the vase you saw at the BAM show. The dies in the pictures are bolted to a universal die I made years ago for my 50 L.G. I know some smiths that see this will think my ideas/technique are really crude or even crazy, but they did work. These dies were very cheap to make, durable, and made me money. Starting with the bottom die, I would use a 5/32 hard surfacing welding rod and weld a piece of angle iron straight to the die on one side. Then I would break off the piece of angle iron. What was left on the die surface was a small, jagged, completely inconsistent tooth, that ran across the die. I did this over and over again until I had top/bottom dies that resembled a piranha that needed braces. –not pretty On the vase, I started with 3/16 steel plate. At a healthy orange heat, I begin lightly hammering on the steel creating small shallow lines across the vase. I think of this as like I’m salt/peppering the work piece. At first, I use fast, repetitive blows. Once this is done I start really hammering on the power hammer. Suddenly, dies would start cutting deeper and in some places the material would form wrinkles -from where the teeth on the dies wouldn’t line up. The end result was a wood grain like texture. Note: I used mild steel for the base of the dies, but a hard surfacing rod to form the teeth. If you do try this, have an air gun close. In between heats blow out the scale, otherwise it will clog the teeth. The dies in the picture are old, and really worn down. Quote Link to comment Share on other sites More sharing options...
howardrw Posted April 8, 2010 Share Posted April 8, 2010 James, thanks for the pics. If you get time, could you show pictures of the dies you use to get the "pitted" texture you use on the staggered steel and copper candles that are on your website. I made some for my Anyang 33 by making spot welds with a hard surface rod, but it just does'nt look right. It helps some to hammer it hard and then go back over it with a soft touch, but it still does'nt look like real pitting like yours does. Is there a hammering technique that helps? Quote Link to comment Share on other sites More sharing options...
Jamesrjohnson Posted April 9, 2010 Author Share Posted April 9, 2010 James, thanks for the pics. If you get time, could you show pictures of the dies you use to get the "pitted" texture you use on the staggered steel and copper candles that are on your website. I made some for my Anyang 33 by making spot welds with a hard surface rod, but it just does'nt look right. It helps some to hammer it hard and then go back over it with a soft touch, but it still does'nt look like real pitting like yours does. Is there a hammering technique that helps? Howardrw: I have have an art show this Saturday, so I'm a little pressed for time. -I've got alot of work in galleries that I have to pull out and polish for the show. I will be away from the shop for a few days. Either Sunday or Monday I will post pics of the pitting dies. I think I know why your dies aren't creating a the look that you are looking for. It will be alot easier for me to cover all this when I post the die pics. Howardrw: When you get a day off, stop by the shop for a day of forging. Now that you have been using the 33 for awhile, you need to test out my 165. I have some scrap 5" round bar. My shop has changed alot since you picked up your 33. If you need anything feel free to call me 940-627-4529 Quote Link to comment Share on other sites More sharing options...
howardrw Posted April 9, 2010 Share Posted April 9, 2010 Howardrw: I have have an art show this Saturday, so I'm a little pressed for time. -I've got alot of work in galleries that I have to pull out and polish for the show. I will be away from the shop for a few days. Either Sunday or Monday I will post pics of the pitting dies. I think I know why your dies aren't creating a the look that you are looking for. It will be alot easier for me to cover all this when I post the die pics. Howardrw: When you get a day off, stop by the shop for a day of forging. Now that you have been using the 33 for awhile, you need to test out my 165. I have some scrap 5" round bar. My shop has changed alot since you picked up your 33. If you need anything feel free to call me 940-627-4529 Quote Link to comment Share on other sites More sharing options...
howardrw Posted April 9, 2010 Share Posted April 9, 2010 Thanks James, I'm not in any hurry for the pictures. As far as trying out your 165, I'm afraid to. I like my 33 so much that I know if I tried out the 165, I would probably be writing a check I can't afford. :) Quote Link to comment Share on other sites More sharing options...
Recommended Posts
Join the conversation
You can post now and register later. If you have an account, sign in now to post with your account.