Ian Wille
-
Posts
32 -
Joined
-
Last visited
Content Type
Profiles
Forums
Articles
Gallery
Downloads
Events
Everything posted by Ian Wille
-
Funny that you mention graphite crucible formula for the chips, Mike. I rigged up a chip (more like chunk, about like nut size coal) forge using broken up graphite based crucibles from a local foundry several years ago. ( Link to my previous post on this )The burner was a 5" square ribbon burner with about 25 ports, mounted in a firepot about 2" deep. The blower I was using was the 112cfm blower from Kayne and Son. The crucible pieces worked alright, but tended to stick to each other, which made it fun to get work into and out of the chip bed . They also tended to "absorb" scale. Not bad, and has potential, but I ran out of spare time to do more R&D.
-

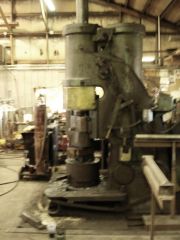
Anybody know what type of hammer this is?
Ian Wille replied to Marc585's topic in Power Hammers, Treadle Hammers, Olivers
Would you mind specifying a little as to where exactly the hammer is in the US? I ask not to buy it, but just help track the origin of this hammer down and try to help you out a bit. I did work for Tom briefly towards the end, and its similar (if not the same) as three that he had brought stateside from Pakistan as a test. If memory serves, they were being made by the same company that made his tongs. Anyway, they're a decent hammer, having ran two smaller sisters to this hammer, can say they are a good machine, and pack quite the hit! -
Anybody know what type of hammer this is?
Ian Wille replied to Marc585's topic in Power Hammers, Treadle Hammers, Olivers
Hi Marc, What part of the world is this hammer located in? The TC is something Tom had put on the tools he sold. This hammer came from Pakistan, but i can't say if it was originally made in Pakistan, or just refurbished there. Ian -
Hi Aaron, I thought I'd chime in on the information about Tom's hammers. I lived about two hours from him, so I made a lot of visits to his shop. Even had the fortunate chance to work for him for a few months before he passed. Tom made all of the forged hammers from 1045. Its dead simple, and forgiving, to work with in the shop, as I'm sure you've discovered. they were quenched in collected rain water, due to the purity. His shop was in a area with HARD water. He most certainly did temper his hammers. There was an old kitchen oven in the shop that he baked them in, somewhere around 475 degrees F. Its hard to beat an old oven for that nice, slow, tempering bake, plus the large volume for multiple hammers all at once. And they come out with such nice colors, too! I've seen how much you like those temper colors! His end goal was between Rockwell 50C - 54C. IIRC, I think he mentioned that he used the 4140 for the cast hammers he did. Seems that what he said in one of our conversations. Though I cannot recall what the heat treat process was on those. And just to add my two cents, everyone else is steering you right. Tempering is a must when making any struck tools. One day it clicked that heat treating is really a balancing act between hardness (brittleness) and toughness. I think it happened as I was looking at a graph on a heat treat spec sheet. It was laid out clearly, and just made it simple to understand. Anyway, when you quench from critical, the carbon and iron atoms are having their crystal structure rearranged, from austenite (crystalline form when steel is at critical) to martensite (the final, hard crystalline form). The thing about the martensite transformation is that there is some volumetric change due to different densities between martensite and austenite. That change, coupled with the naturally high strain the martensite crystal forms are under, creates a lot, and I mean a lot, of stress in the hardened steel. That strain stress is a part of the hardness of a hammer, but like all of us, needs to relax some or it will crack. So tempering helps to relax the crystalline martensite (obviously, the higher the tempering temperature, a higher amount of martensite is relaxed). And that is where the balancing act comes into play: bake at just the right temperature to be hard, but also tough. So there is, I'd say, a good reason we are taught to temper I picked up a lot of this trying to make hammers from 1080. lets just say it was quench crack city for a looong while. Hope this short book helps!
-
Hey Benton, very nice hawks! im curious to know more about that axe class in St. Louis? its about a 20 minute drive from me...
-
Judson, just curious, is that the powdered graphite that is sold for seed flow lubricant for planters?
-
heavy industry forge welding
Ian Wille replied to Joel OF's topic in Blacksmithing, General Discussion
This is not a modern application (unless you consider 1935 modern), but does show forge welding being used in an industrial setting- in this case a linkage for a steam locomotive. I think this should qualify as heavy industrial engineering. -
So maybe we could also actually "sketch" this in iron? It looks like the "3" shape could be bent/lapped over onto itself at the 8mm segemnt, with space left to insert the angled leg. Then the two pieces could either be riveted or forgewelded together. This way the whole part could be made out of the same size stock. Of course this would make the 8mm segment thick, and would also turn this into a 3D piece instead of 2D, and might not be best for a key fob. So hopefully this crude sketch helps explain my take on this... hopefully...
-
Also, as a side note, maybe the key to a NA ribbon burner is a thinner refractory block and larger plenum? Here is a Link to Dudley Giberson's (of Joppa Glassworks) patent: LINKY Notice there is a large plenum, and a thin burner face,as compared to the 2"-3" thick burner faces commonly used of ribbon burners now. Some interesting food for thought. I don't mean to suggest that we run him out of business and steal his ideas, only that we look at and learn from his developments from the NA ribbon burner.
-
Hey Frosty, Have you ever tried one of your T-Burners with a ribbon burner? I've thought about an NA ribbon myself on and off again.
-
To Build on what Horseshoe182 suggested, look for MSC Industrial Supply or Grainger. Both supply houses sell to the manufacturing industry will have those drills, mig tips, and special plumbing supplies in stock. And there will probably be one within a reasonable driving distance.
-
If you have an farm and feed stores near you, you might look look around for graphite seed flow lube. I found some at a local Orscheln's and have had decent results with it plain. I'm next going to try mixing it with some dish soap and water like Hofi's recipe. It's on the list to try out this coming weekend.
-
This is something I've been working on for about one year now. I have actually had some success and have been able to build my own chip bed forge that works reasonably well. In use, the chip bed itself will reach lemon-yellow, and will heat a short section of 1" square to working temperature from cold in a little less than 5 minutes. Some specifics: I made my own ribbon style burner ( Google pine Ridge Burners; these sound similar to what you are talking about). My burner is 5" square tubing with 3" of steel plate built up for the burner face. In that face, I've drilled 25 0.2188" diameter holes for the gas/air mix to exit through. the burner body, or plenum, is 5" x 5" square tubing, 7" long. The gas/air inlet pipe is 2" diameter, and is bottom center on one of the sides of the plenum. Note that when I say bottom, I am referring to the end of the burner opposite of the face. I am using a blower (This one). I use a gate valve between it and the burner to control airflow, as well as the damper on the burner itself. The gas(propane) is admitted just after the the gate valve via a 0.0625" diameter orifice. The hearth is one I made out of 0.750" plate. it is approximately 2" deep, and 12" long by 12" wide. It used to be my coal firepot, until I made one for coke. My ceramic chips are broken up crucible material, which looks to be some sort of graphite. I break it up myself with a hammer and chisel. they do stay put while the burner is running. The burner is mounted as in Angele's, with it shooting straight up into the chip bed. What I've learned: The burner, as it is works quite well for its purpose. The port size I'm using (0.2188") seems to be ideal from what experimenting I've done with the above setup. The steel face of the burner was done for temporary purposes and to allow me to easily experiment with various port sizes. Soon I will either make my own cast refractory head burner or buy one from Pine Ridge. I have found that it needs that 3" thickness. In my early models, I only had 1" plate for the face. In use that plate would get to about 1600 degrees F, at which point the incoming gas and air would ignite and flashback through the system. I added 2" of plate, and have not had that problem since. When I make my own burner, i shall make sure I have at least 3" of refractory between the burner face and the plenum. The graphite crucible material I am using works okay, but could be better. At the temperature the forge runs, the graphite chips do soften and stick together pretty badly, so I end up stirring/breaking up the chip bed every other time I go and take another heat. Of course, the chips scatter around the table top in use, so they have to be raked back into the hearth. The chips do absorb some scale/iron into them, but not too badly. I would like to find some sort of refractory chips that have a softening temperature around 3000 degrees F, maybe 3200 degrees, with some abrasion resistance and ability to withstand thermal shock as well. Mullite seems to fit this bill better than your Aluminum Oxide, though I have only been able to source suppliers of mullite powder here in the U.S. I'm still searching for a company that makes or could economically make mullite chips. I really don't want to start making my own refractories, as I am busy enough making tools, projects, and experimenting, along with school, work, etc... but I digress... Oh, i've also found that around 2" of chips above and below the work piece really cuts down on the heating time. Overall, my model works, but can be improved. It is very home-grown. I've taken care of as many safety issues as I am capable of. In use, it works much like a coal fire, with about the same amount of maintainance and radiant heat. The principles for fire depth/structure are also similar to that of coal, in that there's an oxidizing layer and a neutral layer, and the whole heats much better if there's a thick covering of chips above the work-piece. I get very little scale on the work when heating, which is nice. The fire is also quite clean, with no soot or smoke, which I like. I can also adjust the atmosphere of the chip bed as well to get the neutralizing fire I want. I have found it works for both short and large heats, though heating up large pieces does take quite a bit longer. I present this for learning purposes, both for everyone's and my own. I'm just 21, and have a great deal to learn yet, so anything that anyone sees that I have gotten wrong or understand improperly, by all means, let me know. What I've learned here has been through trial and error and some reading and using good old mental reasoning. I know that what I've made works, and now I'm going to improve upon it. I will be going home this weekend (where I have my forge) and will take picture and get more information while there, maybe even some video too. Ian Wille
-
Here's a link to Brent Bailey's hammer making article: http://www.calsmith.org/techniques/hammers/baileycrosspein.pdf I came across it by happenstance the other day while browsing the CBA's website. I was glad to find it again as I had not been able to located it for some time, and didn't think to print out a copy. Ian Wille
-
I have a question: would not the ribbon burner head itself serve as a plenum with a grate? After all, the burner head consists of 3" square tube, 10 1/2" long capped on each end, with an inlet for the gas/air mix on one long side, and the grate (plate with holes in it) on the opposite side? The tubing would provide space for the air/gas to expand and equalize under the grate/port plate. If that logic is correct, then perhaps the port holes on the burner face are too small to allow the mix to flow freely enough. Or perhaps the plenum needs to be larger. Knowing about the plenum now helps to explain the forge pictured below, which is sold by Johannes Angele in Germany. Here's the link to the webpage with more info: - ANGELE Schmiedetechnik - ANGELE-SHOP Note that the images are from Angele's website. Ian W.
-
Thanks all for the response. A blown burner for this application does make more sense, and I realized that from the start. I chose to go the atmospheric route first out of curiosity after reading what Frosty had said in this thread: http://www.iforgeiron.com/forum/f7/flamefast-ds430-ceramic-chip-forge-10624/. In it, he mentioned a naturally aspirated chip bed forge that Mike Porter and he worked out together. That was the inspiration for me to try the same idea. However, I am no Frosty or Mike Porter, and went wrong/missed something somewhere. All other forges of this type I have seen via the internet use a blower, and as I stated in my first post, I had tried that before with this same burner head, and still ran into flashback problems. The grate idea sounds promising, Sweany, and I think would be in line with what Charlotte said about the behavior of hot gasses. I shall try a blown burner setup again (as I still have that blower and the necessary plumbing), and see if the chip material this time around makes a difference. Last time the brick chips fused together. I'm afraid the graphite chunks may do the same. Ian W.
-
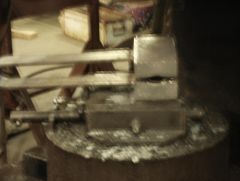
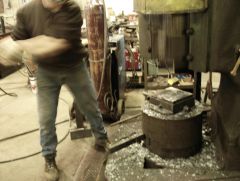
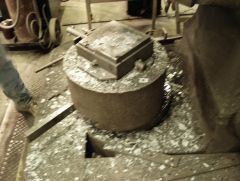
This is an idea I've toyed around with for two years now, and due to losing my coke supplier (yep, I'm a coke addict ) and a recent thread about these forges elsewhere on this site, I've begun pursuing this project in earnest. Note that I have never actually seen one running, and that I have built this prototype going off of pictures with what knowledge I could glean from said images and applying common sense/logic. Naturally, I have run into a few problems. The setup is pretty basic. Its no more that a ribbon burner head mounted to shoot the flame upwards, and is powered by a Rex/Porter style hybrid burner. All of this is built on my coke forge (just made an adapter to fit the firepot hole). I am using firebricks to form the hearth, and broken up graphite (scrap) crucible from a local foundry for the refractory chips. See attached photos. The burner itself has 25 5/16" dia. holes, counterbored to 7/16" by 3/4" depth to create a step to hold the flame. The face of the burner is mild steel, 1 1/2" thick. I did this so I could easily change burner port size. The burner/mixer is based on Rex Price' 1 1/4 foundry burner. I am using a .045 mig tip for the orifice. The main tube is approx. 1 1/4" i.d. The chips are approximately nickel/nut sized. Set up as is, the unit will run for 15 to 20 minutes fine, running the burner full out (i do not have a pressure gauge on my regulator). One oddity that occurs once the burner is burning, is that is "whistles," that is it produces a low frequency, low decible sound not unlike a deep steam whistle. Also, as the chip bed grows hotter, more flame becomes visible/seems to pass through the bed. On ignition, no flame is visible coming from the bed. At the end of 10 minutes, however, there is considerable dragon's breath coming through the bed. However, after this warm up period, the burner likes to flash back and burn in the mixing tube. This also happens when I insert a piece of stock into or take it out of the chips. Or even if the chips are disturbed by moving them with a fire rake. The forge is a very bright orange, near yellow at this point, but not hotter, and I know that the chips are not fusing together to block off the ports. At this temperature, the forge seems to easily flash back, even doing it on its own at times. I've tried lower fuel gas pressures, changing air intake amount/changing mixes, all with the same results (flashback in to the burner/mixer tube). I am at a loss for what's going wrong here. Any thoughts? Ian W. P.S. I tried this setup two years ago, same burner head, and a blown burner body. At that time I used broken up firebrick for the chips. I still ran into the flashback problem, but I believe that was because the firebrick chips were fusing together.
-
Mylore, That might have been the problem. It took me multiple tries before the plugins would work. Terry, I had done all of that when I downloaded the plugins earlier. For some reason though, they didn't work. That was when I was getting the error message. However, I went and redownloaded the plugins, and now everything is working fine. The plugins are wonderful, and are a blast to use! They made a great program even better. I look forward to play around and using them for some projects I have in mind. Ian
-
Mylore, I went and removed the plugins from the application and system, and then re-downloaded them from Terry's website. I followed the installation instructions he gives, reopened Sketchup, and received no error message, and the plugins showed up. All the plugins seem to be working fine.I don't know what changed this time (as I have been removing and reinstalling the plugins all evening trying to get them to work), but something did. Everything seems ok now. Ian
-
Terry, Welcome and thanks for the plugins! I just downloaded Sketchup today, and have been playing around with it, and am looking forward to using the plugins to create nice (and easy to alter) 3D images for projects. I too am having trouble getting the plugins to work. I followed the instructions in the User's Guide, but I get an error message (says Error Loading File...) when I open Sketchup, and they do not show up in the Extensions or plugins sections. I am using Mac OSX version. Again, thanks and welcome to the site! Ian
-
Kuhn Hammer loosing power
Ian Wille replied to eddie's topic in Power Hammers, Treadle Hammers, Olivers
I'm attending SIU in Carbondale, and we have one of the new model 50 Kg Kuhn hammers. It's been out of commission for the past three or four years due to the fact that it was losing power, and the rhythm was slowing down. It was losing power to the point that while running, the ram would just stop cycling and sit on the bottom die. It also knocked loudly while running, something that was not coming from slipping belts. All of these problems got worse as the hammer was used. When I finally looked into it (and I was the 4th guy to do so), I noticed that the rod was loose in its bushings on the compressor cylinder (the source of the knocking). That prompted me to take apart the rear (compressor) cylinder to check on the piston rings. Upon taking the cylinder apart, my first surprise was that everything was bone dry and covered with a black powder mixed with specks of metal. My next (horrible) discovery was that the rings had entirely disintegrated, and that both the piston and cylinder tube had been heavily galled, which was where all those shiny little specks of metal had come from. It looked as though someone had taken a chisel and incised the entire circumference with rather heavy grooves. Now from what I can tell, there was never an oil line that ran to the compressor cylinder. The only oil line on it goes to the ram cylinder. The dealer at Centaur Forge that I've been dealing with says that the rear (compressor) cylinder does not require any oil due to the materials the rings are made of. Note that this cylinder is an aftermarket component that Kuhn buys ready to go from another manufacturer. However, it seems that a lack of lubrication in the cylinder was the source of the failure. Nevertheless, we are awaiting the arrival of a brand new compressor cylinder to get the hammer back up and running. Once its installed, we are thinking about running an oil line to the compressor cylinder to keep this problem from happening again. Your hammer may very well be starting to experience the same symptoms as the one at school. I've heard that other smiths who have these newer models have also experienced similar problems. Check it out ASAP before any major damager gets done! -
Visit To the Bass Pro Fab Shop
Images added to a gallery album owned by Ian Wille in Members Gallery
-
-
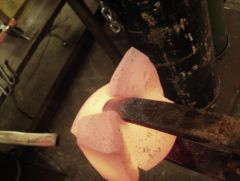
From the album: Visit To the Bass Pro Fab Shop
In the end, the tongs ended up getting broken (by me). They preformed valiantly to the end -
From the album: Visit To the Bass Pro Fab Shop
Another oops.. the tongs became part of the forging -
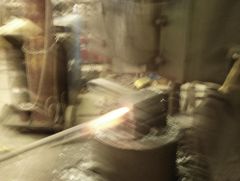
From the album: Visit To the Bass Pro Fab Shop
Forging a spear blade (albeit a blurry shot)