
GuillaumeMarchand
-
Posts
20 -
Joined
-
Last visited
-
 Ok thank you guys again for your help. I'll play with air and injector next time. I'll let you know the results
 -
You know, for a French it's very expensive too. I had the opportunity to gather scrap material over the years in my different jobs, and that's the amazing thing, all that crap append to match perfectly with this project. But yeah, buying all that stainless sheets and tubes would have be too expensive for me too. One of the guys on our french forum told me about that already, and I'm pretty sure he got it from you here. For now it seems to me that my burners swallows to much air because I had to reduce the air entrance as you may see on the pictures. Not knowing what length would fit, I started with the "10 times the diameter in length" ratio. So as the internal diameter of the tube is 15.9mm (5/8") I cut 160mm of tube. Regarding the position of the gas orifice you are correct, it's around 5mm. I've tried 0.4, 0.5, 0.6 mm outside of the forge. In the forge the 0.6 seemed to work the best. Now, the guys here says that if I have to reduce the air intake it's because there is not enough gas and that I should try a larger injector diameter. For example 0.8mm, and open the air, resulting in a more powerfull but more balanced burner. Now you are talking of a 0.3mm injector and I'm lost. Anyway, I've received a bunch of 3D printer nozzle form 0.2 to 1mm if I remember well so it's no harm to try a smaller injector.
-
That's interesting... As said before i'm color blind and don't easily trust what color I see in the forge, but during my second test, while the pyrometer said 1200°C, according to the color chart we all know, I would have said more like 1000°C. It seems that I shouldn't trust it. Thanks
-
Hi guys, A quick update: it's alive! This is the first fire as I just received the 3D printer nozzles. I'll give you some data next week after a few tests. But it works. Here with one burner, 6psi, 0.6mm injector 1/2'' burner and 15 minutes since ignition, it's around 1900°F Thank you all for your help. I'll keep you in touch with the further steps.
-
In fact, I already have the probe. And in the process of making the enclosure of the forge, I'll provide a hole with tee correct diameter. I might not make the hole in the insulation but I'll be ready if needed. The IR thermometer pointing the anvil is a good idea. I'll keep that in mind
-
Well, that's not how color blindness works unfortunately. My eyes are not sensitive enough to the red color to see the difference between two different orange. They might look identical for me and obviously different for you. Even with a color chart.
-
The point is that I'm color blind, so I'm not really confident with my ability to judge temperature from colors. I am sure that the probe will not be installed very often on the forge, but one day i'll need it. For example, during the hammer inn I talked before, under the sun, colors were useless.
-
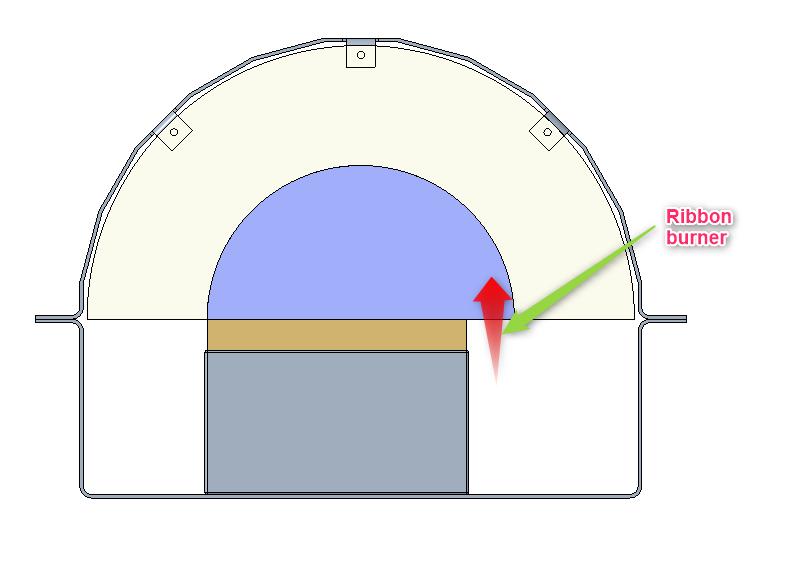
Ok so maybe, for such a small forge my first design would be ok? Maybe I should think about having two holes for two burners and put the thermal probe in the rear wall?
-
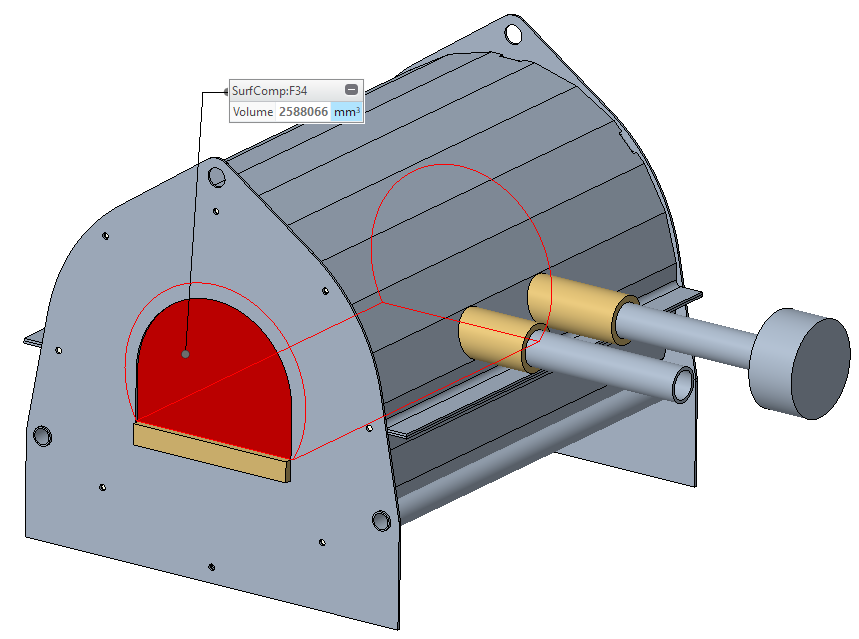
And for the D-shaped forge, after a rapid sketch based on the previous design, the internal volume is of course much smaller : 1.6L / 100 cubic inches It seems really small now. Not sure I'll continue with my round shells but rather build a new enclosure with correct dimensions
-
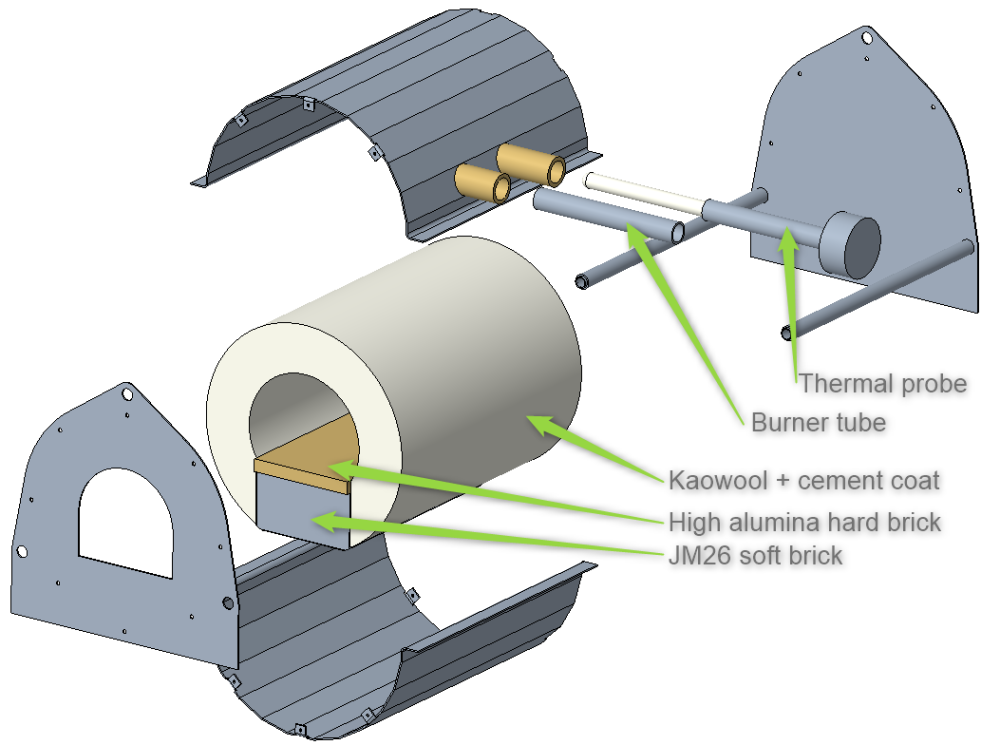
Here are some details about my initial design. The design might seem curious for you but top and bottom shell are already made (saved from scrap). The front and rear plates have to be made. Hopefully no welding needed. The internal insulation is made with kaowool and a JM26 soft-brick at the bottom. The soft-brick is protected by a 13mm (1/2in) thick high alumina hard-brick. The expected internal volume is around 2.6l (160 cubic inches). For more information, see the attached pdf file. That being said, a D-shaped forge could be easily derivate from that, and after that, a ribbon burner. But you might already have some useful advice? Thank you for your time. miniforge_overall.pdf
-
Yeah Ribbon burner. It seems to me to be the obvious way too. I'll add it to my drawings with rule of thumbs dimensions and I'm sure you'll give me good advices. About traveling to France, next year beginning of July (i've just attended this thing. I'm exhausted but it was fun) : https://fb.watch/lINFTJYtbq/ (hope this link will work for everybody) It's a 3 hours road from Paris. And while you'll come with us to discuss ribbon burners, wootz or iron bloom, your wife would enjoy the beautiful countryside of Brittany or spend all your money in Paris.
-
Hi Mickey, My first idea was to build a tunnel forge, but I'm now thinking about building instead a D shaped forge (if I understand well, the straight line of the D is at the bottom) I will try to make a drawing of what I have in mind and show you. For the stainless steel, the point is that I've saved from the scrapyard some stainless steel parts which seemed perfect for a small forge, and it will now be a shame to mix it with iron. I'll have the most shiny forge of the next hammer inn ^^ For now, it's time to prepare the summer vacation (And you how a big deal it is here in France) so the next move might be in august now. Thank you for your time and attention.
-
You know what? Weekends are way too short. My belt grinder needed attention. All the wiring of the inverter to rebuild. I'm currently gathering the components. I have all the stainless sheets for the enclosure. I'll have the mortar for the internal coating of the fiber by the end of the week. Anyway, it might be more a "this summer project" than a "This weekend project"
-
Thank you guys for the good advice and this helpful synthesis. It sounds like a good project for the upcoming weekend.
-
Hi all, First of all, I'm writing from France, I'm not a native English writer, sorry for the errors, I'll do my best to be clear, don't hesitate to ask for explanations. I forge maybe 5 hours a month, mostly knives blades. My propane forge is made with an old propane tank (13kg, very common here). If I remember well, insulation is made with 75mm (around 3 inches ) of kaowool and JM28 bricks plus around 20mm (3/4") layer of hardbrick at the bottom. The burner is a 3/4" pipe with a 1mm mig nozzle. This forge is in a distant workshop witch explains why I can't use it more. Now I'd like to build a smaller portable forge to be able to forge at home and move it easily with my car if needed. I also noticed after a number of sessions of forging that this forge is maybe too large for most of my needs. Let's say 95% of the time. I think it leads to a waste of gas. I have an empty helium tank for inflating balloons (or whatever they put in these tanks). I have a small lathe so I can build a burner. A welder, a small milling machine etc... Here comes the question : I've seen in the Forge 101 topics some discussions about small forges built with these tanks. Most of the time, I understand the initial question but the huge amount of information in this topic, and the language some of you uses in the answers makes it difficult to me to find what I need. To be clearer : Can anybody lead me to a point of the discussion, or a specific topic, where I could find this answer : How do I dimension the burner for a such tank I know it's always difficult to have a simple recipe for that. Hope it's clear enough. Thanks you for your time
