

colorblind72
-
Posts
44 -
Joined
-
Last visited
Content Type
Profiles
Forums
Articles
Gallery
Downloads
Events
Everything posted by colorblind72
-
Sorry I have been away for a while. The skulls don't take long maybe an hour or so once the stock is tapered
-
I've been working on carving the inlets for tangs and making habacki and finally doing some sort of a wrap on the handle. I tend to start with minimal plans and see where the process takes me. This piece I attempted to deferentially heat treat with clay. It through hardened. No hamon but I went on with it anyhow. I hot forged and hand peined the habacki. Then inked it and sanded of the high spots. The wood for the handle is poplar that I wrapped in hemp and then wrapped again with two pieces of paracord with the cores taken out. The knots are terrible. I didn't follow a traditional Tsuka knot because of the inlet I filed in the end of the handle (again, just and experiment.) All feedback is welcome.
-
Thanks guys. I've been out of town for 2 weeks and hadn't had a chance to check the forum. I love the Icepick idea.
-
That's a productive 3 days. Very cool
-
I have posted a tutorial here. http://forums.dfoggknives.com/index.php?showtopic=26388&p=249031
-
Getting there. Got to get back to the horizontal attempt
-
So I finished this one tonight. I have been using a fuller tool under the power hammer to make the cheek to jaw transitions and then developing the eye sockets and cheek bones with the punches.
-
Brilliant!
-
Sounds good
-
That is indeed practical blacksmithing. Way to go.
-
Man, those are nice. Great looking pieces.
-
Some farrier rasp snakes and horseshoe stuff
colorblind72 replied to Teebs's topic in Member Projects
The snakes are great especially that cobra head! -
I'm sure you will get it pretty quick. The photos would help. I appreciate the diagram but school is long behind me and I didn't go very far in it. thanks again. JJ
-
new to forging some of my first projects
colorblind72 replied to loyd's topic in Metal Sculpture & Carvings
Yeah you are rocking it. Keep posting please. -
That book is on my list! Very good. Thanks guys. A lot to take in and try to improve and incorporate.
-
Thanks guys. @Beth, the lack of irregularity is due to me using a one sided fuller under the PH. If I use my cutter under the PH then it makes it more irregular based on my drawing on the hammer. The challenge with these was to get a method for creating the pattern. Once I get that down then I will start playing with spacing, twisting so the skulls face different directions. I want to do a counter twist with the skull in the middle horizontal to the bar or two skulls vertical facing opposite directions etc. I'm going to the scrap yard tomorrow and looking for some bits to make into fullering dies in different shapes and sizes for under the PH. I'm hoping it will improve my control in this project. Thanks again for looking.
-
I will reread this several times in reference with your diagram. Which I really like and am impressed by. It seems to me that operation (F) is where your make or break is so to speak. Because it looks to me that this is where you are creating the elongation of the jaws. The major problem that I have had is creating a cheek bone. Everything else is just using your chisels appropriately. What I did the last time I make these is like your operations (D) and (E) I made an inlet to provide spade for the jaws and eyes. And instead of focusing on narrowing the jaw to create a cheek I did a, pin punch with a punch that was very sharp and had approx. a 45 degree bevel, then I made a deep punch in the eye hole with a long punch that was approx. 80 degree bevel, then I moved the eye sockets out which basically makes a cheek out of the inlet cut from your operation (D) and (E). That punch is long and has a 15-20 degree bevel. That is really the most important punch for creating very big and wide eye sockets and on the opposite a cheek. I then go back and forth with the 80 degree punch and the 15 degree punch. All of these are cheap harbor freight cold chisels/punches. If you could post pics of your operation that would be really helpful. Thanks for the feedback and interest. JJ
-
I will have to see how I can add something like that to my work. If I have the Skills, :rolleyes:
-
So a couple more skull things. A little more refined idea of the spikes. I don't know what they are for other than home defense but they are fun and guys seem to like pointy things. Also a key ring and a bracelet that is too small to wear. Feedback is welcome. thanks for looking.
-
Thanks Phillip. The next one will be better.
-
Very nice tongs!
-
Very cool. Post whatever you end up making. I can post a pic journal of the process. I need to build an anvil stand for my Mousehole so I can make a third hand. Right now I'm working on a post anvil and the workpiece will fall off etc. I like the ideas for production pieces. I could defintely do them bigger and make belt buckles pretty easy.
-
 that is beautiful!!!
 -
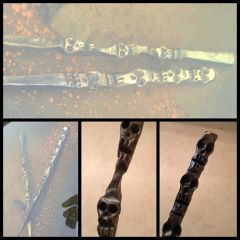 Practicing forging skulls in a row. Next stop, horizontal bar.
 -
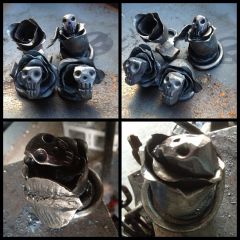 Skull rose combo forged from RR Spike.